Page 73 of 90

PERIODIC MAINTENANCE AND ADJUSTMENT
6-31
6 9. Have a Yamaha dealer adjust the
headlight beam if necessary.
EAU24133
Replacing the tail/brake light
bulb 1. Remove the tail/brake light lens by
removing the screws.
2. Remove the burnt-out bulb by
pushing it in and turning it counter-
clockwise.
3. Insert a new bulb into the socket,
push it in, and then turn it clock-
wise until it stops.
4. Install the lens by installing the
screws. NOTICE: Do not over-
tighten the screws, otherwise
the lens may break.
[ECA10681]EAU24212
Replacing a turn signal light
bulb 1. Remove the turn signal lens by re-
moving the screws.
2. Remove the burnt-out bulb by
pushing it in and turning it counter-
clockwise.
3. Insert a new bulb into the socket,
push it in, and then turn it clock-
wise until it stops.
4. Install the lens by installing the
screws. NOTICE: Do not over-
tighten the screws, otherwise
the lens may break.
[ECA10681]
1. Screw
1. Screw
U11CE4E0.book Page 31 Friday, December 3, 2010 9:12 AM
Page 74 of 90
PERIODIC MAINTENANCE AND ADJUSTMENT
6-32
6
EAU42485
Replacing the license plate
light bulb 1. Remove the license plate light cov-
er by removing the bolts.
2. Pull the license plate light unit up
as shown.3. Remove the license plate light bulb
socket (together with the bulb) by
turning it counterclockwise, and
then pulling it out.
4. Remove the burnt-out bulb by pull-
ing it out from the socket.
5. Insert a new bulb into the socket.6. Install the socket (together with the
bulb) by pushing it in and turning it
clockwise until it stops.
7. Place the license plate light unit in
the original position, and then in-
stall the license plate light cover by
installing the bolts.1. License plate light cover
2. Bolt
1. License plate light unit
1. License plate light bulb socket
1. License plate light bulb
U11CE4E0.book Page 32 Friday, December 3, 2010 9:12 AM
Page 75 of 90

PERIODIC MAINTENANCE AND ADJUSTMENT
6-33
6
EAU42873
Replacing the auxiliary light
bulb If the auxiliary light bulb burns out, re-
place it as follows.
1. Remove the headlight unit. (See
page 6-29.)
2. Remove the auxiliary light bulb
socket (together with the coupler
and bulb) by turning the socket
counterclockwise.
3. Remove the burnt-out bulb by pull-
ing it out.4. Insert a new bulb into the socket.
5. Install the socket (together with the
coupler and bulb) by pushing it in
and turning it clockwise.
6. Install the headlight unit.
EAU24350
Supporting the motorcycle Since this model is not equipped with a
centerstand, follow these precautions
when removing the front and rear
wheel or performing other maintenance
requiring the motorcycle to stand up-
right. Check that the motorcycle is in a
stable and level position before starting
any maintenance. A strong wooden
box can be placed under the engine for
added stability.
To service the front wheel
1. Stabilize the rear of the motorcycle
by using a motorcycle stand or, if
an additional motorcycle stand is
not available, by placing a jack un-
der the frame in front of the rear
wheel.
2. Raise the front wheel off the
ground by using a motorcycle
stand.
To service the rear wheel
Raise the rear wheel off the ground by
using a motorcycle stand or, if a motor-
cycle stand is not available, by placing
1. Auxiliary light bulb socket1
1. Auxiliary light bulb1
U11CE4E0.book Page 33 Friday, December 3, 2010 9:12 AM
Page 78 of 90

PERIODIC MAINTENANCE AND ADJUSTMENT
6-36
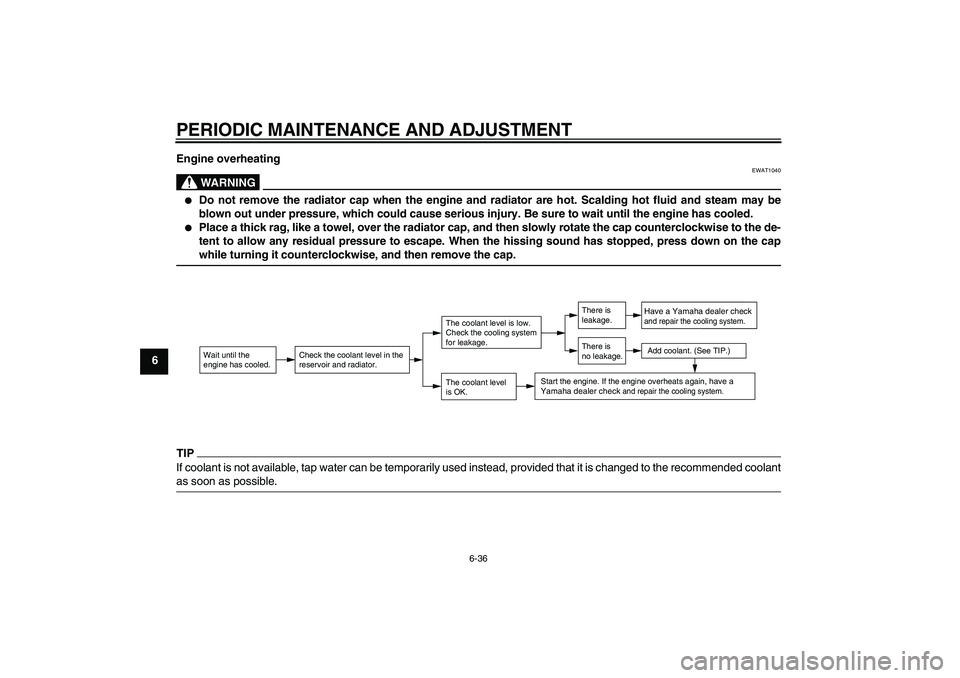
6Engine overheating
WARNING
EWAT1040
�
Do not remove the radiator cap when the engine and radiator are hot. Scalding hot fluid and steam may be
blown out under pressure, which could cause serious injury. Be sure to wait until the engine has cooled.
�
Place a thick rag, like a towel, over the radiator cap, and then slowly rotate the cap counterclockwise to the de-
tent to allow any residual pressure to escape. When the hissing sound has stopped, press down on the cap
while turning it counterclockwise, and then remove the cap.
TIPIf coolant is not available, tap water can be temporarily used instead, provided that it is changed to the recommended coolant
as soon as possible.
Wait until the
engine has cooled.
Check the coolant level in the
reservoir and radiator.
The coolant level
is OK.The coolant level is low.
Check the cooling system
for leakage.
Have a Yamaha dealer checkand repair the cooling system.Add coolant. (See TIP.)
Start the engine. If the engine overheats again,
have a
Yamaha dealer check
and repair the cooling system.
There is
leakage.
There is
no leakage.
U11CE4E0.book Page 36 Friday, December 3, 2010 9:12 AM