Page 47 of 96

PERIODIC MAINTENANCE AND ADJUSTMENT
6-1
6
EAU17243
Periodic inspection, adjustment, and lu-
brication will keep your vehicle in the
safest and most efficient condition pos-
sible. Safety is an obligation of the vehi-
cle owner/operator. The most important
points of vehicle inspection, adjust-
ment, and lubrication are explained on
the following pages.
The intervals given in the periodic
maintenance charts should be simply
considered as a general guide under
normal riding conditions. However, de-
pending on the weather, terrain, geo-
graphical location, and individual use,
the maintenance intervals may need to
be shortened.
WARNING
EWA10321
Failure to properly maintain the ve-
hicle or performing maintenance ac-
tivities incorrectly may increase
your risk of injury or death during
service or while using the vehicle. If
you are not familiar with vehicle ser-
vice, have a Yamaha dealer perform
service.
WARNING
EWA15121
Turn off the engine when performing
maintenance unless otherwise
specified.�
A running engine has moving
parts that can catch on body
parts or clothing and electrical
parts that can cause shocks or
fires.
�
Running the engine while ser-
vicing can lead to eye injury,
burns, fire, or carbon monoxide
poisoning – possibly leading to
death. See page 1-1 for more in-
formation about carbon monox-
ide.WARNING
EWA15460
Brake discs, calipers, drums, and
linings can become very hot during
use. To avoid possible burns, let
brake components cool before
touching them.
EAU17302
Emission controls not only function to
ensure cleaner air, but are also vital to
proper engine operation and maximum
performance. In the following periodic
maintenance charts, the services relat-
ed to emissions control are grouped
separately. These services require
specialized data, knowledge, and
equipment. Maintenance, replacement,
or repair of the emission control devic-
es and systems may be performed by
any repair establishment or individual
that is certified (if applicable). Yamaha
dealers are trained and equipped to
perform these particular services.
U5WME8E0.book Page 1 Monday, August 9, 2010 3:10 PM
Page 50 of 96

PERIODIC MAINTENANCE AND ADJUSTMENT
6-4
6
EAU1770C
General maintenance and lubrication chart NO. ITEM CHECK OR MAINTENANCE JOBODOMETER READING
ANNUAL
CHECK 1000 km
(600 mi)10000 km
(6000 mi)20000 km
(12000 mi)30000 km
(18000 mi)40000 km
(24000 mi)
1 Air filter elementReplace.√
2*ClutchCheck operation, fluid level and
vehicle for fluid leakage.√√√√√
3*Front brakeCheck operation, fluid level and
vehicle for fluid leakage.√√√√√√
Replace brake pads. Whenever worn to the limit
4*Rear brakeCheck operation, fluid level and
vehicle for fluid leakage.√√√√√√
Replace brake pads. Whenever worn to the limit
5*Brake hosesCheck for cracks or damage.√√√√√
Replace. Every 4 years
6*WheelsCheck runout and for damage.√√√√
7*TiresCheck tread depth and for dam-
age.
Replace if necessary.
Check air pressure.
Correct if necessary.√√√√√
8*Wheel bearingsCheck bearing for looseness or
damage.√√√√
9*SwingarmCheck operation and for exces-
sive play.√√√√
Lubricate with lithium-soap-based
grease.Every 50000 km (30000 mi)
U5WME8E0.book Page 4 Monday, August 9, 2010 3:10 PM
Page 51 of 96

PERIODIC MAINTENANCE AND ADJUSTMENT
6-5
6
10 Drive chainCheck chain slack, alignment and
condition.
Adjust and lubricate chain with a
special O-ring chain lubricant
thoroughly.Every 1000 km (600 mi) and after washing the motorcycle, riding in the rain or
riding in wet areas
11*Steering bearingsCheck bearing play and steering
for roughness.√√√√√
Lubricate with lithium-soap-based
grease.Every 20000 km (12000 mi)
12*Chassis fastenersMake sure that all nuts, bolts and
screws are properly tightened.√√√√√
13Brake lever pivot
shaftLubricate with silicone grease.√√√√√
14Brake pedal pivot
shaftLubricate with lithium-soap-based
grease.√√√√√
15Clutch lever pivot
shaftLubricate with silicone grease.√√√√√
16Shift pedal pivot
shaftLubricate with lithium-soap-based
grease.√√√√√
17Sidestand, center-
standCheck operation.
Lubricate with lithium-soap-based
grease.√√√√√
18*Sidestand switchCheck operation.√√√√√√
19*Front forkCheck operation and for oil leak-
age.√√√√
20*Shock absorber as-
sembliesCheck operation and shock ab-
sorbers for oil leakage.√√√√ NO. ITEM CHECK OR MAINTENANCE JOBODOMETER READING
ANNUAL
CHECK 1000 km
(600 mi)10000 km
(6000 mi)20000 km
(12000 mi)30000 km
(18000 mi)40000 km
(24000 mi)
U5WME8E0.book Page 5 Monday, August 9, 2010 3:10 PM
Page 52 of 96
PERIODIC MAINTENANCE AND ADJUSTMENT
6-6
6
EAU36771
TIP�
Air filter
This model’s air filter is equipped with a disposable oil-coated paper element, which must not be cleaned with com-
pressed air to avoid damaging it.
The air filter element needs to be replaced more frequently when riding in unusually wet or dusty areas.
�
Hydraulic brake and clutch service
Regularly check and, if necessary, correct the brake fluid and clutch fluid levels.
Every two years replace the internal components of the brake master cylinders and calipers as well as clutch master
and release cylinders, and change the brake and clutch fluids.
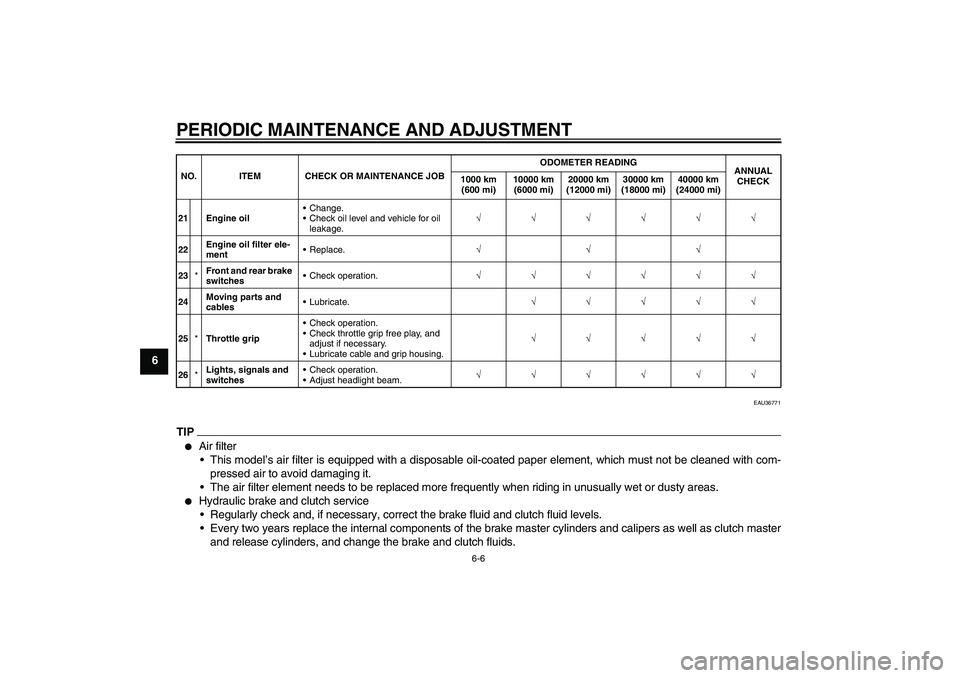
21 Engine oilChange.
Check oil level and vehicle for oil
leakage.√√√√√√
22Engine oil filter ele-
mentReplace.√√√
23*Front and rear brake
switchesCheck operation.√√√√√√
24Moving parts and
cablesLubricate.√√√√√
25*Throttle gripCheck operation.
Check throttle grip free play, and
adjust if necessary.
Lubricate cable and grip housing.√√√√√
26*Lights, signals and
switchesCheck operation.
Adjust headlight beam.√√√√√√ NO. ITEM CHECK OR MAINTENANCE JOBODOMETER READING
ANNUAL
CHECK 1000 km
(600 mi)10000 km
(6000 mi)20000 km
(12000 mi)30000 km
(18000 mi)40000 km
(24000 mi)U5WME8E0.book Page 6 Monday, August 9, 2010 3:10 PM
Page 53 of 96
PERIODIC MAINTENANCE AND ADJUSTMENT
6-7
6 Replace the brake and clutch hoses every four years and if cracked or damaged.
U5WME8E0.book Page 7 Monday, August 9, 2010 3:10 PM
Page 62 of 96

PERIODIC MAINTENANCE AND ADJUSTMENT
6-16
6Tire inspection
The tires must be checked before each
ride. If the center tread depth reaches
the specified limit, if the tire has a nail or
glass fragments in it, or if the sidewall is
cracked, have a Yamaha dealer re-
place the tire immediately.
TIPThe tire tread depth limits may differ
from country to country. Always comply
with the local regulations.
WARNING
EWA10471
�
Have a Yamaha dealer replace
excessively worn tires. Besides
being illegal, operating the vehi-
cle with excessively worn tires
decreases riding stability and
can lead to loss of control.
�
The replacement of all wheel
and brake-related parts, includ-
ing the tires, should be left to a
Yamaha dealer, who has the
necessary professional knowl-
edge and experience to do so.
�
Ride at moderate speeds after
changing a tire since the tire
surface must first be “broken
in” for it to develop its optimal
characteristics.
Tire information
This motorcycle is equipped with cast
wheels and tubeless tires with valves.
WARNING
EWA10481
�
The front and rear tires should
be of the same make and de-
sign, otherwise the handling
characteristics of the motorcy-
cle may be different, which
could lead to an accident.
�
Always make sure that the valve
caps are securely installed to
prevent air pressure leakage.
1. Tire sidewall
2. Tire tread depthMinimum tire tread depth (front and
rear):
1.6 mm (0.06 in)
1. Tire air valve
2. Tire air valve core
3. Tire air valve cap with seal
U5WME8E0.book Page 16 Monday, August 9, 2010 3:10 PM
Page 64 of 96

PERIODIC MAINTENANCE AND ADJUSTMENT
6-18
6
EAU22073
Clutch lever Since this model is equipped with a hy-
draulic clutch, adjusting the clutch lever
free play is not needed. However, it is
necessary to check the clutch fluid level
and check the hydraulic system for
leakage before each ride. (See page
6-20.) If the clutch lever free play does
become excessive, and shifting be-
comes rough or clutch slippage occurs,
causing poor acceleration, there may
be air in the clutch system. If there is air
in the hydraulic system, have a
Yamaha dealer bleed the system be-
fore operating the motorcycle.
EAU37913
Checking the brake lever free
play There should be no free play at the
brake lever end. If there is free play,
have a Yamaha dealer inspect the
brake system.
WARNING
EWA14211
A soft or spongy feeling in the brake
lever can indicate the presence of air
in the hydraulic system. If there is air
in the hydraulic system, have a
Yamaha dealer bleed the system be-
fore operating the vehicle. Air in the
hydraulic system will diminish thebraking performance, which may re-
sult in loss of control and an acci-
dent.1. No brake lever free play
1
U5WME8E0.book Page 18 Monday, August 9, 2010 3:10 PM
Page 65 of 96
PERIODIC MAINTENANCE AND ADJUSTMENT
6-19
6
EAU22293
Brake light switches The brake light, which is activated by
the brake pedal and brake lever, should
come on just before braking takes ef-
fect. If necessary, adjust the rear brake
light switch as follows, but the front
brake light switch should be adjusted
by a Yamaha dealer.
1. Remove panel A. (See page 6-8.)
2. Turn the adjusting nut while hold-
ing the rear brake light switch in
place. To make the brake light
come on earlier, turn the adjusting
nut in direction (a). To make the
brake light come on later, turn the
adjusting nut in direction (b).3. Install the panel.
EAU22321
Checking the front and rear
brake pads Front brake
Rear brake
1. Rear brake light switch
2. Rear brake light switch adjusting nut
1. Brake pad wear indicator groove
1. Brake pad wear indicator groove
U5WME8E0.book Page 19 Monday, August 9, 2010 3:10 PM

