2011 YAMAHA TZR50 tire pressure
[x] Cancel search: tire pressurePage 29 of 88

FOR YOUR SAFETY – PRE-OPERATION CHECKS
4-1
4
EAU15591
The condition of a vehicle is the
owner’s responsibility. Vital compo-
nents can start to deteriorate quickly
and unexpectedly, even if the vehicle
remains unused (for example, as a
result of exposure to the elements).
Any damage, fluid leakage or loss of
tire air pressure could have serious
consequences. Therefore, it is very
important, in addition to a thorough
visual inspection, to check the follo-
wing points before each ride.
TIP
Pre-operation checks should be
made each time the vehicle is used.
Such an inspection can be accom-
plished in a very short time; and the
added safety it assures is more than
worth the time involved.
EWA11150
If any item in the Pre-operation
check list is not working properly,
have it inspected and repaired
before operating the vehicle.
WARNING
5WX-F819D-E3 15/11/08 15:27 Página 29
Page 31 of 88

FOR YOUR SAFETY – PRE-OPERATION CHECKS
4-3
4
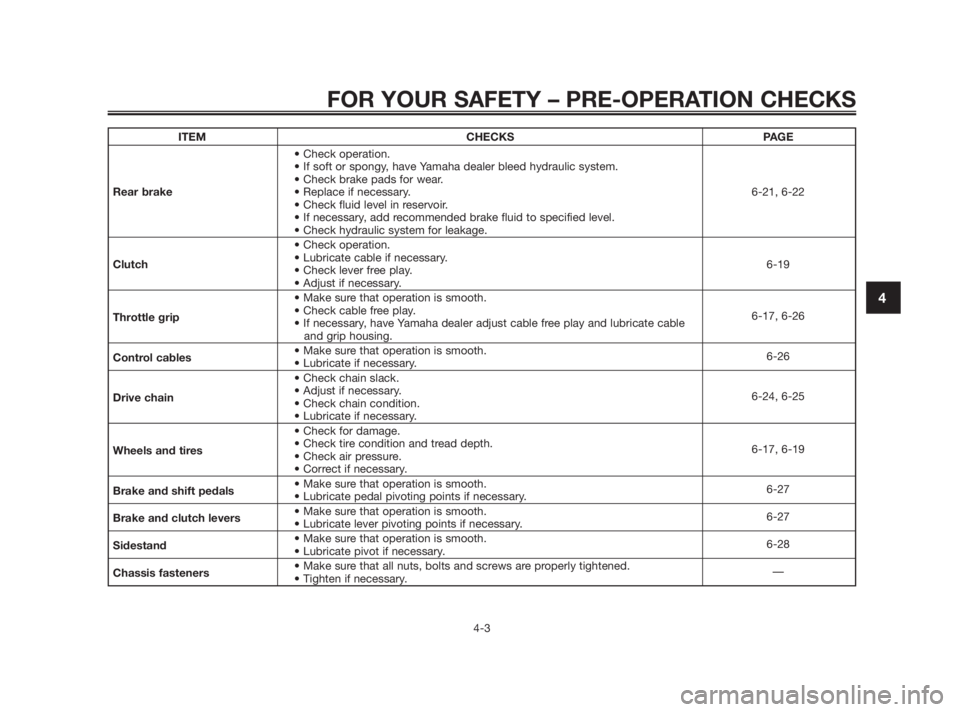
ITEM CHECKS PAGE
• Check operation.
• If soft or spongy, have Yamaha dealer bleed hydraulic system.
• Check brake pads for wear.
Rear brake• Replace if necessary. 6-21, 6-22
• Check fluid level in reservoir.
• If necessary, add recommended brake fluid to specified level.
• Check hydraulic system for leakage.
• Check operation.
Clutch• Lubricate cable if necessary.
6-19
• Check lever free play.
• Adjust if necessary.
• Make sure that operation is smooth.
Throttle grip• Check cable free play.
• If necessary, have Yamaha dealer adjust cable free play and lubricate cable 6-17, 6-26
and grip housing.
Control cables• Make sure that operation is smooth.
• Lubricate if necessary.6-26
• Check chain slack.
Drive chain• Adjust if necessary.
• Check chain condition.6-24, 6-25
• Lubricate if necessary.
• Check for damage.
Wheels and tires• Check tire condition and tread depth.
• Check air pressure.6-17, 6-19
• Correct if necessary.
Brake and shift pedals• Make sure that operation is smooth.
• Lubricate pedal pivoting points if necessary.6-27
Brake and clutch levers• Make sure that operation is smooth.
• Lubricate lever pivoting points if necessary.6-27
Sidestand• Make sure that operation is smooth.
• Lubricate pivot if necessary.6-28
Chassis fasteners• Make sure that all nuts, bolts and screws are properly tightened.
• Tighten if necessary.—
5WX-F819D-E3 15/11/08 15:27 Página 31
Page 40 of 88

EAU17716
General maintenance and lubrication chart
PERIODIC MAINTENANCE AND ADJUSTMENT
6-4
6
ODOMETER READING
CHECK OR ANNUAL
NO. ITEM MAINTENANCE JOB 1000 km 6000 km 12000 km 18000 km 24000 kmCHECK
(600 mi) (3500 mi) (7000 mi) (10500 mi) (14000 mi)
1*
Air filter element • Clean.
√√• Replace. √√
2 Clutch • Check operation.
• Adjust. √√ √ √ √
• Check operation, fluid level and
3* Front brake vehicle for fluid leakage. √√ √ √ √ √
• Replace brake pads.
Whenever worn to the limit
• Check operation, fluid level and
4* Rear brake vehicle for fluid leakage. √√ √ √ √ √
• Replace brake pads.
Whenever worn to the limit
5*Brake hoses • Check for cracks or damage.
√√√ √√• Replace. Every 4 years
6*Wheels • Check runout and for damage. √√√ √
• Check tread depth and for damage.
7* Tires • Replace if necessary. √√√ √√
• Check air pressure.
• Correct if necessary.
8* Wheel bearings • Check bearing for looseness
or damage. √√√ √
5WX-F819D-E3 24/11/08 20:10 Página 40
Page 53 of 88

EAU21370
Adjusting the throttle cable
free play
1. Throttle cable free play
The throttle cable free play should
measure 4.0–6.0 mm (0.16–0.24 in) at
the throttle grip. Periodically check
the throttle cable free play and, if
necessary, adjust it as follows.
TIP
The engine idling speed must be
correctly adjusted before checking
and adjusting the throttle cable free
play.
1. Loosen the locknut.2. To increase the throttle cable free
play, turn the adjusting nut in
direction (a). To decrease the
throttle cable free play, turn the
adjusting nut in direction (b).
1. Locknut
2. Adjusting nut
3. Tighten the locknut.
EAU21562
Tires
To maximize the performance, durabi-
lity, and safe operation of your
motorcycle, note the following points
regarding the specified tires.
Tire air pressure
The tire air pressure should be chec-
ked and, if necessary, adjusted befo-
re each ride.
EWA10501
Operation of this vehicle with
improper tire pressure may cause
severe injury or death from loss of
control.
●The tire air pressure must be
checked and adjusted on cold
tires (i.e., when the temperatu-
re of the tires equals the
ambient temperature).
●The tire air pressure must be
adjusted in accordance with
the riding speed and with the
total weight of rider, passenger,
cargo, and accessories appro-
ved for this model.
WARNING
PERIODIC MAINTENANCE AND ADJUSTMENT
6-17
6
5WX-F819D-E3 15/11/08 15:27 Página 53
Page 54 of 88

EWA10511
Never overload your vehicle. Ope-
ration of an overloaded vehicle
could cause an accident.
Tire inspection
1. Tire tread depth
2. Tire sidewall
The tires must be checked before
each ride. If the center tread depth
reaches the specified limit, if the tire
has a nail or glass fragments in it, or if
the sidewall is cracked, have a Yama-
ha dealer replace the tire immediately.
TIP
The tire tread depth limits may differ
from country to country. Always
comply with the local regulations.
Tire information
This motorcycle is equipped with cast
wheels and tubeless tires.
EWA10461
The front and rear tires should be of
the same make and design, other-
wise the handling characteristics of
the vehicle may be different, which
could lead to an accident.
After extensive tests, only the tires lis-
ted below have been approved for
this model by Yamaha Motor España,
S.A.
Front tire:
Size:
100/80 17 (52H)
Manufacturer/model:
Pirelli / Sport Demon
Continental / Conti-Twist SM
Rear tire:
Size:
130/70 17 (62H)
Manufacturer/model:
Pirelli / Sport Demon
Continental / Conti-Twist SM
WARNING
Minimum tire tread depth (front
and rear):
1.6 mm (0.06 in)
1
2
ZAUM0054
WARNING
Tire air pressure (measured on
cold tires):
0–90 kg (0–198 lb):
Front:
180 kPa (1.80 kgf/cm
2,
26 psi, 1.80 bar)
Rear:
200 kPa (2.00 kgf/cm
2,
29 psi, 2.00 bar)
90–196 kg (198–432 lb):
Front:
190 kPa (1.90 kgf/cm
2,
28 psi, 1.90 bar)
Rear:
230 kPa (2.30 kgf/cm
2,
33 psi, 2.30 bar)
Maximum load*:
196 kg (432 lb)
* Total weight of rider, passenger,
cargo and accessories
PERIODIC MAINTENANCE AND ADJUSTMENT
6-18
6
5WX-F819D-E3 15/11/08 15:27 Página 54
Page 78 of 88

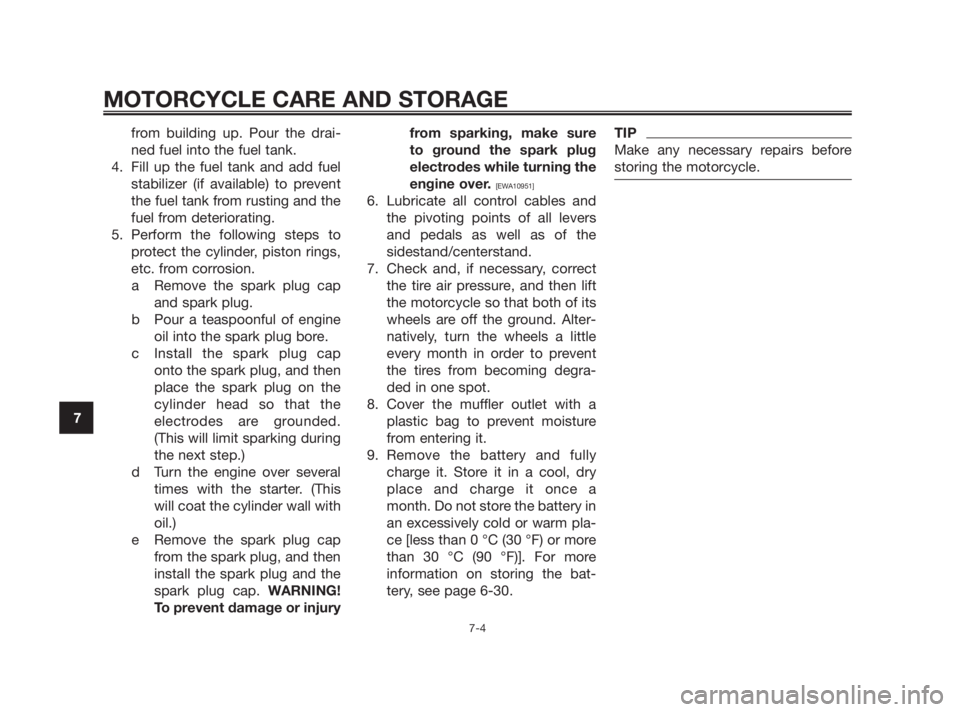
from building up. Pour the drai-
ned fuel into the fuel tank.
4. Fill up the fuel tank and add fuel
stabilizer (if available) to prevent
the fuel tank from rusting and the
fuel from deteriorating.
5. Perform the following steps to
protect the cylinder, piston rings,
etc. from corrosion.
a Remove the spark plug cap
and spark plug.
b Pour a teaspoonful of engine
oil into the spark plug bore.
c Install the spark plug cap
onto the spark plug, and then
place the spark plug on the
cylinder head so that the
electrodes are grounded.
(This will limit sparking during
the next step.)
d Turn the engine over several
times with the starter. (This
will coat the cylinder wall with
oil.)
e Remove the spark plug cap
from the spark plug, and then
install the spark plug and the
spark plug cap. WARNING!
To prevent damage or injuryfrom sparking, make sure
to ground the spark plug
electrodes while turning the
engine over.
[EWA10951]
6. Lubricate all control cables and
the pivoting points of all levers
and pedals as well as of the
sidestand/centerstand.
7. Check and, if necessary, correct
the tire air pressure, and then lift
the motorcycle so that both of its
wheels are off the ground. Alter-
natively, turn the wheels a little
every month in order to prevent
the tires from becoming degra-
ded in one spot.
8. Cover the muffler outlet with a
plastic bag to prevent moisture
from entering it.
9. Remove the battery and fully
charge it. Store it in a cool, dry
place and charge it once a
month. Do not store the battery in
an excessively cold or warm pla-
ce [less than 0 °C (30 °F) or more
than 30 °C (90 °F)]. For more
information on storing the bat-
tery, see page 6-30.
TIP
Make any necessary repairs before
storing the motorcycle.
MOTORCYCLE CARE AND STORAGE
7-4
7
5WX-F819D-E3 15/11/08 15:27 Página 78
Page 80 of 88

Chassis:Frame type:
Double cradle
Caster angle:
25.00 º
Trail:
90.0 mm (3.54 in)
Front tire:Type:
Tubeless
Size:
100/80 17 (52H)
Manufacturer/model:
Pirelli / Sport Demon
Manufacturer/model:
Continental/Conti-Twist SM
Rear tire:Type:
Tubeless
Size:
130/70 17 (62H)
Manufacturer/model:
Pirelli / Sport Demon
Manufacturer/model:
Continental/Conti-Twist SM
Loading:Maximum load:
196 kg (432 lb)
Tire air pressure (measured on cold
tires):
Loading condition:
0–90 kg (0–198 lb)
Front:
180 kPa (1.80 kgf/cm
2, 26 psi, 1.80 bar)Rear:
200 kPa (2.00 kgf/cm
2, 29 psi, 2.00 bar)
Loading condition:
90–196 kg (198–432 lb)
Front:
190 kPa (1.90 kgf/cm
2, 28 psi, 1.90 bar)
Rear:
230 kPa (2.30 kgf/cm
2, 33 psi, 2.30 bar)
Front wheel:Wheel type:
Cast wheel
Rim size:
17 x MT2.75
Rear wheel:Wheel type:
Cast wheel
Rim size:
17 x MT3.50
Front brake:Type:
Single disc brake
Operation:
Right hand operation
Recommended fluid:
DOT 4
Rear brake:Type:
Single disc brake
Operation:
Right foot operation
Recommended fluid:
DOT 4
Front suspension:Type:
Telescopic fork
Spring/shock absorber type:
Coil spring/oil damper
Wheel travel:
108.0 mm (4.25 in)
Rear suspension:Type:
Unit swing
Spring/shock absorber type:
Coil spring/oil damper
Wheel travel:
89.2 mm (3.51 in)
Electrical system:Ignition system:
DC. CDI
Charging system:
AC magneto
Battery:Model:
GT4L-BS
Voltage, capacity:
12 V, 3.0 Ah
Headlight:Bulb type:
Incandescence
Bulb voltage, wattage x quantity:Headlight:
12 V, 25 W/25 W x 2
Tail/brake light:
12 V, 5.0 W/21.0 W x 1
Front turn signal light:
12 V, 16.0 W x 2
SPECIFICATIONS
8-2
8
5WX-F819D-E3 15/11/08 15:27 Página 80