2011 YAMAHA EC-03 charging
[x] Cancel search: chargingPage 43 of 78

CHARGING THE BATTERY
6-9
2
3
4
567
8
9
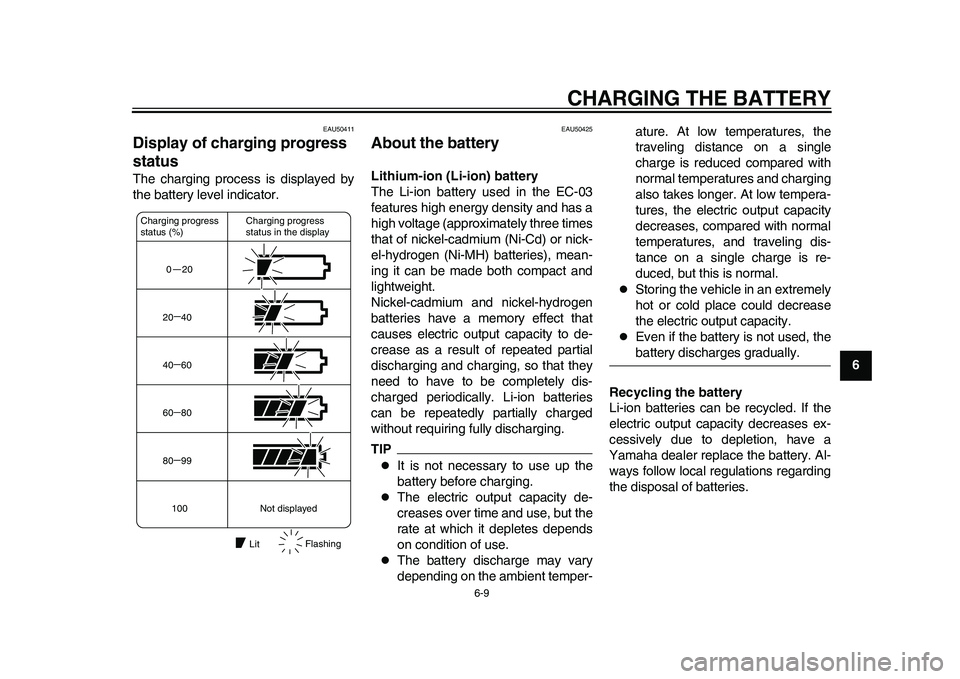
EAU50411
Display of charging progress
status The charging process is displayed by
the battery level indicator.
EAU50425
About the battery Lithium-ion (Li-ion) battery
The Li-ion battery used in the EC-03
features high energy density and has a
high voltage (approximately three times
that of nickel-cadmium (Ni-Cd) or nick-
el-hydrogen (Ni-MH) batteries), mean-
ing it can be made both compact and
lightweight.
Nickel-cadmium and nickel-hydrogen
batteries have a memory effect that
causes electric output capacity to de-
crease as a result of repeated partial
discharging and charging, so that they
need to have to be completely dis-
charged periodically. Li-ion batteries
can be repeatedly partially charged
without requiring fully discharging.TIP
It is not necessary to use up the
battery before charging.
The electric output capacity de-
creases over time and use, but the
rate at which it depletes depends
on condition of use.
The battery discharge may vary
depending on the ambient temper-ature. At low temperatures, the
traveling distance on a single
charge is reduced compared with
normal temperatures and charging
also takes longer. At low tempera-
tures, the electric output capacity
decreases, compared with normal
temperatures, and traveling dis-
tance on a single charge is re-
duced, but this is normal.
Storing the vehicle in an extremely
hot or cold place could decrease
the electric output capacity.
Even if the battery is not used, thebattery discharges gradually.
Recycling the battery
Li-ion batteries can be recycled. If the
electric output capacity decreases ex-
cessively due to depletion, have a
Yamaha dealer replace the battery. Al-
ways follow local regulations regarding
the disposal of batteries.
0 2020 40
40 60
60 80
80 99
100
Charging progress
status in the display Charging progress
status (%)
Not displayed
LitFlashing
1CB-9-E0.book 9 ページ 2010年10月15日 金曜日 午前10時19分
Page 44 of 78

CHARGING THE BATTERY
6-10
1
2
3
4
56
7
8
9Battery depletion
The electric output capacity of the
Li-ion battery used in the EC-03 gradu-
ally decreases in the course of use. Al-
though the extent of depletion varies
based on the conditions of use, electric
output capacity typically decreases to
70% of a new battery when having trav-
eled 8000–10000 km for two years.
This is equivalent to charging about
500 times with the condition of riding
16–20 km on a single charge.
Battery electric output auto-stop-
ping function
The battery is equipped with a function
to prevent further use in case of exces-
sive depletion. When eight years have
passed since initial battery charging orthe accumulated charging amount has
reached 14000 Ah, the battery will no
longer be usable.
TIP
When the battery is replaced with
a new one, fully charge the battery
once before using it. If the battery
is not fully charged, the battery lev-
el indicator does not show the pre-
cise battery level.
At low temperatures such as 0 C,
the electric output capacity de-
creases by approximately 20%
compared with normal tempera-
ture.
If a depleted battery is used at low
temperatures, the electric output
capacity decreases by approxi-
mately 20% compared with normaltemperatures.
1CB-9-E0.book 10 ページ 2010年10月15日 金曜日 午前10時19分
Page 52 of 78

PERIODIC MAINTENANCE AND ADJUSTMENT
8-3
1
2
3
4
5
6
78
9
7*Chassis fasteners• Make sure that all nuts, bolts
and screws are properly
tightened.
8Front brake lever
pivot shaft• Lubricate with
lithium-soap-based grease.
9Rear brake lever
pivot shaft• Lubricate with
lithium-soap-based grease.
10Centerstand• Check operation.
• Lubricate.
11 *Front fork• Check operation and for oil
leakage.
12 *Shock absorber
assembly• Check operation and shock
absorber for oil leakage.
13 *Front and rear
brake switches• Check operation.
14Moving parts and
cables• Lubricate.
15 *Accelerator grip• Check operation.
• Correct if necessary.
16 *Lights, signals and
switches• Check operation.
• Adjust headlight beam.
17 *Motor noise• Check for irregular noise coming
from the motor.
• Correct if necessary.
18 *Charging cord and
plug• Check condition and for
damage.
• Replace if necessary. NO. ITEM CHECK OR MAINTENANCE JOBODOMETER READING
ANNUAL
CHECK
1000 km 6000 km 12000 km 18000 km 24000 km
1CB-9-E0.book 3 ページ 2010年10月15日 金曜日 午前10時19分
Page 63 of 78

PERIODIC MAINTENANCE AND ADJUSTMENT
8-14
2
3
4
5
6
789
EAU50572
Checking the charging cord
and charging plug
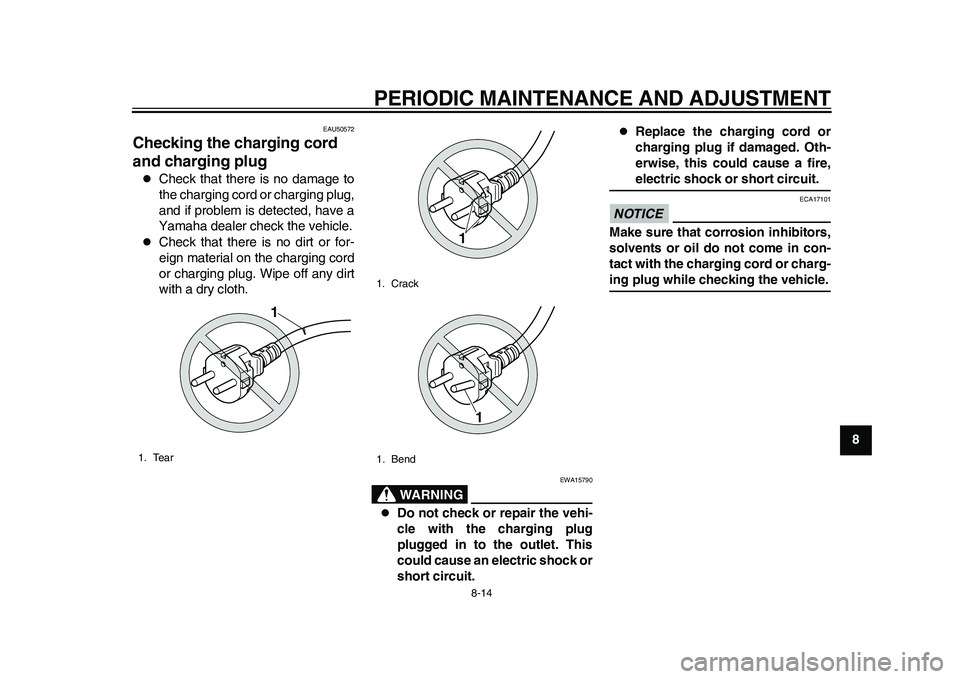
Check that there is no damage to
the charging cord or charging plug,
and if problem is detected, have a
Yamaha dealer check the vehicle.
Check that there is no dirt or for-
eign material on the charging cord
or charging plug. Wipe off any dirt
with a dry cloth.
WARNING
EWA15790
Do not check or repair the vehi-
cle with the charging plug
plugged in to the outlet. This
could cause an electric shock or
short circuit.
Replace the charging cord or
charging plug if damaged. Oth-
erwise, this could cause a fire,electric shock or short circuit.
NOTICE
ECA17101
Make sure that corrosion inhibitors,
solvents or oil do not come in con-
tact with the charging cord or charg-ing plug while checking the vehicle.
1. Tear
1
1. Crack
1. Bend
1
1
1CB-9-E0.book 14 ページ 2010年10月15日 金曜日 午前10時19分
Page 64 of 78

PERIODIC MAINTENANCE AND ADJUSTMENT
8-15
1
2
3
4
5
6
78
9
EAU50182
Troubleshooting If a problem occurs, check the following
before taking the vehicle to a Yamaha
dealer. However, if no electric power is
supplied (nothing appears in the dis-
play), have a Yamaha dealer check the
vehicle.
The vehicle does not enter the
standby mode when the key is
turned to “ON”
Check the following:
1. Is the vehicle currently being
charged?
The vehicle does not enter the
standby mode when the key is
turned to “ON” during charging.
2. Was the key turned to “ON” while
the accelerator grip was being
opened?
If the key is turned to “ON” while
the accelerator grip is opened, the
vehicle does not enter the standby
mode. Close the accelerator grip,
turn the key to “OFF” and then
back to “ON”.
If the vehicle still fails to enter the stand-
by mode, have a Yamaha dealer checkthe vehicle.
The vehicle does not start off
Is the vehicle in the riding mode? (Does
the operating status indicator “RUN”
appear in the display?)
The vehicle cannot be ridden unless it
is in the riding mode.
After checking the above, try starting off
again by following the procedures de-
scribed on page 7-1 “Preparations for
starting off” and page 7-3 “Starting off”
to restart the vehicle.
If the vehicle still does not start off, have
a Yamaha dealer check it.
The warning mark “ ” appears
Turn the key to “OFF” and then back to
“ON”. If the warning mark “ ” still ap-
pears, have a Yamaha dealer check
the vehicle.
TIPAlthough the warning mark appears,
the vehicle can still be ridden if the op-
erating status indicator “RUN” appearsand the vehicle is in the riding mode.A light does not come on
Check the following:
1. Is the vehicle currently being
charged? Lights do not come on if
the vehicle is being charged.
2. Is the key turned to “ON”? (Does
anything appear in the display?)
If nothing appears in the display,
the auto-off function may be acti-
vated. Turn the key to “OFF” and
then back to “ON”.
3. Are all switches working properly?
After checking the above, and a light
does still not come on, proceed with the
following.
If the headlight fails to come on,
the bulb may be burned out. Refer
to page 8-11 for replacement pro-
cedures.
If a tail/brake light or turn signal
light fails to come on, a bulb may
be burned out. Refer to page 8-12
or 8-13 for replacement proce-
dures.
If a light still does not come on, a fuse
may be blown. Have a Yamaha dealer
check the vehicle.
1CB-9-E0.book 15 ページ 2010年10月15日 金曜日 午前10時19分
Page 66 of 78

PERIODIC MAINTENANCE AND ADJUSTMENT
8-17
1
2
3
4
5
6
78
9The warning light comes on, and
“CHG” and the warning mark “ ”
flash during charging
If a problem occurs during charging, the
charging automatically stops. The
warning light comes on and both “CHG”
and the warning mark “ ” flash.
TIPIf this continues for five minutes, the
warning light goes off, along with all in-dicators in the display.
Unplug the charging plug from the out-
let to stop charging, and then start
charging again after waiting a few min-utes. If charging automatically stops
again, there may be a malfunction with
the vehicle. Stop charging and have a
Yamaha dealer check the vehicle.
When the key is turned to “ON”, the
warning light comes on and both
“CHG” and the warning mark “ ”
flash in the display
The battery is not charged properly.
Turn the key “OFF” and then back to
“ON” in order to reset charging. Turn
the key to “OFF” and then charge the
battery again.
After charging, if the above still occurs,there may be a malfunction with the ve-
hicle. Have a Yamaha dealer check the
vehicle.
“– – – – –” flashes in the display
during charging
If the battery voltage is below the spec-
ified level, the display shows this indi-
cator. Continue charging.
If the warning light comes on and both
“CHG” and “ ” flash in the display af-
ter charging for one hour, there may be
a malfunction with the vehicle. Have a
Yamaha dealer check the vehicle.1. Warning light
2. Battery condition indicator “CHG”
3. Warning mark “ ”
3
2
1
1. Warning light
2. Battery condition indicator “CHG”
3. Warning mark “ ”
3
2
1
1. Charging error indicator “– – – – –”
1
1CB-9-E0.book 17 ページ 2010年10月15日 金曜日 午前10時19分
Page 67 of 78

PERIODIC MAINTENANCE AND ADJUSTMENT
8-18
2
3
4
5
6
789 “HEAT” flashes in the display dur-
ing charging
This is not a malfunction.The charging process is in the standby
mode because the battery temperature
is higher than 50 C. Allow the battery
to cool down.
When the battery temperature falls to
the specified temperature, “HEAT”
goes off and charging starts automati-
cally. (See page 6-1 for more informa-
tion about “Battery charging place”.)
“COOL” flashes in the display dur-
ing charging
This is not a malfunction.
The charging process is in the standby
mode because the battery temperature
is lower than –5 C.
If this occurs, start recharging in awarm place.
When the battery temperature reaches
the specified temperature, “COOL”
goes off and charging starts automati-
cally. (See page 6-1 for more informa-
tion about “Battery charging place”.)
When the key is turned to “ON”, the
beeper sounds and the following
occurs
The warning light flashes
The warning mark “ ” comes on
The battery level indicator seg-
ments move from side to side
“PUSH” indicator and “OLD” indi-
cator alternately appear
1. Warning light
2. Battery condition indicator “CHG”
3. Warning mark “ ”
1. Temperature indicator “HEAT”
3
2
1
1
1. Temperature indicator “COOL”
1
1CB-9-E0.book 18 ページ 2010年10月15日 金曜日 午前10時19分
Page 68 of 78

PERIODIC MAINTENANCE AND ADJUSTMENT
8-19
1
2
3
4
5
6
78
9The battery is near the end of its ser-
vice life.
Push one of the control buttons (See
page 4-3.) to cancel the beeper. This
switches the vehicle to the standby
mode.Cancel the standby mode by pushing a
control button again.
Although the vehicle can still be ridden
if the operating status indicator “RUN”
appears, the battery is near the end of
its service life. Consult a Yamaha deal-
er as soon as possible to order a re-
placement battery.
TIPIf a control button is pushed, the beeper
stops and the display changes to the
standby mode. If no control button is
pushed within five minutes, the auto-off
function is activated, and all power iscut to protect the battery.When charging is started, the beep-
er sounds, and the following indi-
cates the battery is at the end of its
service life
The warning light flashes
The warning mark “ ” comes on
The “PUSH” indicator and “OLD”
indicator alternately appear in the
display
The battery has reached the end of its
service life.
Have a Yamaha dealer replace the bat-
tery. Push one of the control buttons
(See page 4-3.) to cancel the beeper.
This display switches to the following
1. Battery level indicator
2. Warning light
3. Battery condition indicator “PUSH”/“OLD”
4. Warning mark “ ”
2
4
3
1
1. Warning light
2. Battery condition indicator “PUSH”/“OLD”
3. Warning mark “ ”
1
3
2
1CB-9-E0.book 19 ページ 2010年10月15日 金曜日 午前10時19分