Page 40 of 148

4-15
1
2
34
5
6
7
8
9
10
11
3. Tighten the locknut to the specified torque.
NOTICE:
Always tighten the locknut
against the adjusting nut, and then tighten
it to the specified torque.
[ECB00081]
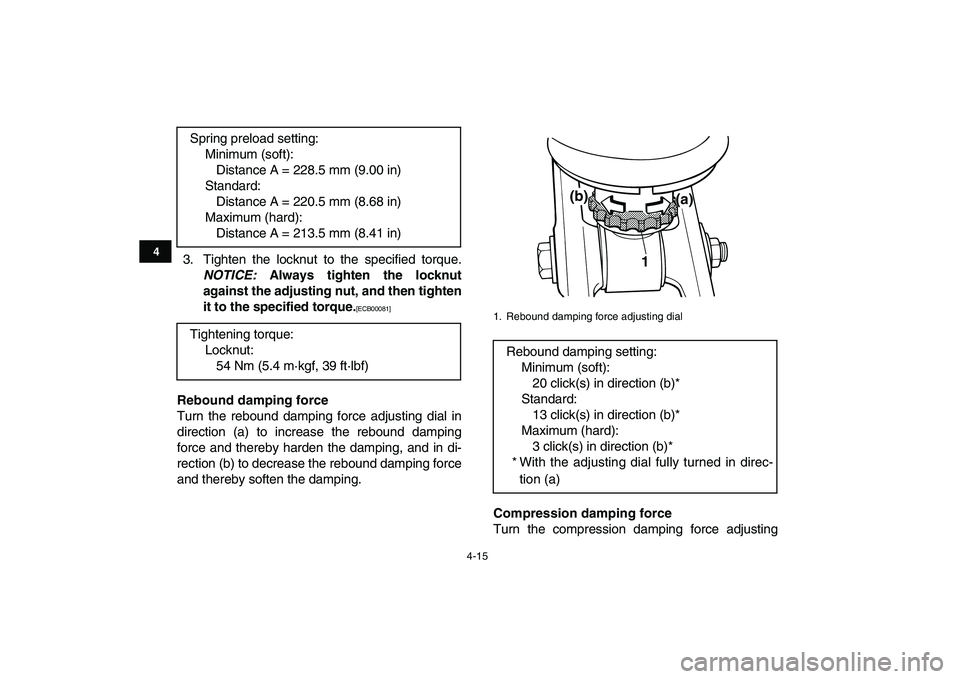
Rebound damping force
Turn the rebound damping force adjusting dial in
direction (a) to increase the rebound damping
force and thereby harden the damping, and in di-
rection (b) to decrease the rebound damping force
and thereby soften the damping.
Compression damping force
Turn the compression damping force adjusting Spring preload setting:
Minimum (soft):
Distance A = 228.5 mm (9.00 in)
Standard:
Distance A = 220.5 mm (8.68 in)
Maximum (hard):
Distance A = 213.5 mm (8.41 in)
Tightening torque:
Locknut:
54 Nm (5.4 m·kgf, 39 ft·lbf)
1. Rebound damping force adjusting dial
Rebound damping setting:
Minimum (soft):
20 click(s) in direction (b)*
Standard:
13 click(s) in direction (b)*
Maximum (hard):
3 click(s) in direction (b)*
* With the adjusting dial fully turned in direc-
tion (a)
1(a) (b)
Page 80 of 148
8-2
1
2
3
4
5
6
78
9
10
11
carry them along with the owner’s tool kit under the
seat.
The service information included in this manual
and the tools provided in the owner’s tool kit are in-
tended to assist you in the performance of preven-
tive maintenance and minor repairs. However,
additional tools such as a torque wrench may be
necessary to perform certain maintenance work
correctly.TIP
If you do not have the tools or experience required
for a particular job, have a Yamaha dealer perform
it for you.
1. Owner’s manual
2. Low-pressure tire gauge
3. Owner’s tool kit
1
23
Page 88 of 148

8-10
1
2
3
4
5
6
78
9
10
11
attempt to diagnose such problems yourself. In-
stead, have a Yamaha dealer check the ATV.
3. Check each spark plug for electrode erosion
and excessive carbon or other deposits, and
replace it if necessary.
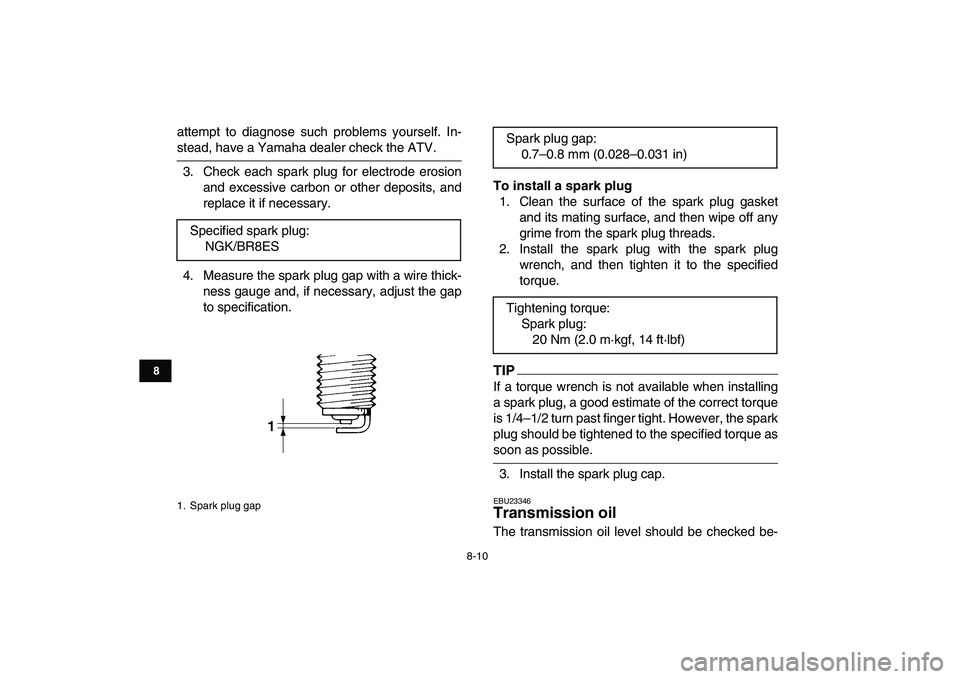
4. Measure the spark plug gap with a wire thick-
ness gauge and, if necessary, adjust the gap
to specification.
To install a spark plug
1. Clean the surface of the spark plug gasket
and its mating surface, and then wipe off any
grime from the spark plug threads.
2. Install the spark plug with the spark plug
wrench, and then tighten it to the specified
torque.TIP
If a torque wrench is not available when installing
a spark plug, a good estimate of the correct torque
is 1/4–1/2 turn past finger tight. However, the spark
plug should be tightened to the specified torque as
soon as possible.
3. Install the spark plug cap.
EBU23346
Transmission oil
The transmission oil level should be checked be- Specified spark plug:
NGK/BR8ES
1. Spark plug gap
Spark plug gap:
0.7–0.8 mm (0.028–0.031 in)
Tightening torque:
Spark plug:
20 Nm (2.0 m·kgf, 14 ft·lbf)
Page 90 of 148

8-12
1
2
3
4
5
6
78
9
10
11
To change the transmission oil
1. Place the ATV on a level surface.
2. Start the engine, warm it up for several min-
utes, and then turn it off.
3. Place an oil pan under the transmission case
to collect the used oil.
4. Remove the oil filler cap, the transmission oil
drain bolt and its gasket to drain the oil from
the transmission case.
5. Install the transmission oil drain bolt and its
new gasket, and then tighten the bolt to the
specified torque.6. Refill with the specified amount of the recom-
mended transmission oil, and then install and
tighten the oil filler cap.TIP
Be sure to wipe off spilled oil on any parts after the
engine and exhaust system have cooled down.NOTICE
ECB00430
�
In order to prevent clutch slippage (since the
transmission oil also lubricates the clutch),
do not mix any chemical additives. Do not
use oils with a diesel specification of “CD” or
oils of a higher quality than specified. In ad-
dition, do not use oils labeled “ENERGY
CONSERVING II” or higher.
�
Make sure that no foreign material enters the
1. Transmission oil drain bolt
2. Gasket
1
12
Tightening torque:
Transmission oil drain bolt:
20 Nm (2.0 m·kgf, 14 ft·lbf)
Recommended transmission oil:
See page 10-1.
Oil quantity:
1.5 L (1.59 US qt, 1.32 Imp.qt)
Page 95 of 148
8-17
1
2
3
4
5
6
78
9
10
11
6. Disconnect the hose on the coolant reservoir
side and drain the coolant from the coolant
reservoir.7. After draining the coolant, thoroughly flush the
cooling system with clean tap water.
8. Install the coolant drain bolts and their new
gasket, and then tighten the bolts to the spec-
ified torque.
9. Connect the coolant reservoir hose.
10. Pour the recommended coolant into the reser-
1. Coolant reservoir cap
1
1. Coolant reservoir hose
2. Coolant reservoir
Tightening torque:
Coolant drain bolt:
14 Nm (1.4 m·kgf, 10 ft·lbf)
1
2
Page 101 of 148

8-23
1
2
3
4
5
6
78
9
10
11
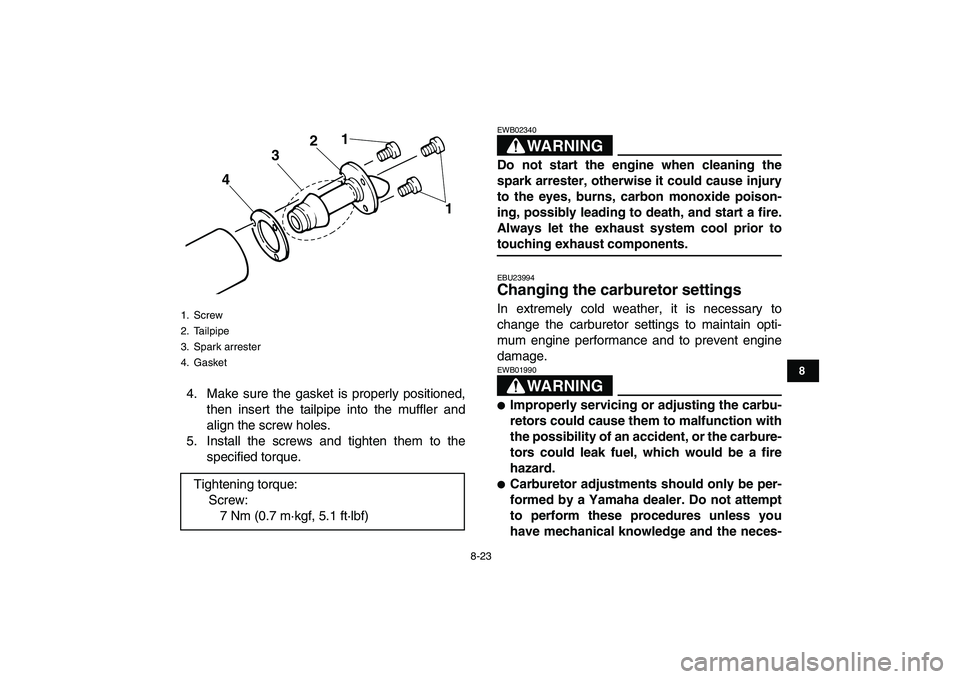
4. Make sure the gasket is properly positioned,
then insert the tailpipe into the muffler and
align the screw holes.
5. Install the screws and tighten them to the
specified torque.
WARNING
EWB02340
Do not start the engine when cleaning the
spark arrester, otherwise it could cause injury
to the eyes, burns, carbon monoxide poison-
ing, possibly leading to death, and start a fire.
Always let the exhaust system cool prior to
touching exhaust components.
EBU23994
Changing the carburetor settings
In extremely cold weather, it is necessary to
change the carburetor settings to maintain opti-
mum engine performance and to prevent engine
damage.WARNING
EWB01990
�
Improperly servicing or adjusting the carbu-
retors could cause them to malfunction with
the possibility of an accident, or the carbure-
tors could leak fuel, which would be a fire
hazard.
�
Carburetor adjustments should only be per-
formed by a Yamaha dealer. Do not attempt
to perform these procedures unless you
have mechanical knowledge and the neces-
1. Screw
2. Tailpipe
3. Spark arrester
4. Gasket
Tightening torque:
Screw:
7 Nm (0.7 m·kgf, 5.1 ft·lbf)
2
3
41
1
Page 108 of 148

8-30
1
2
3
4
5
6
78
9
10
11
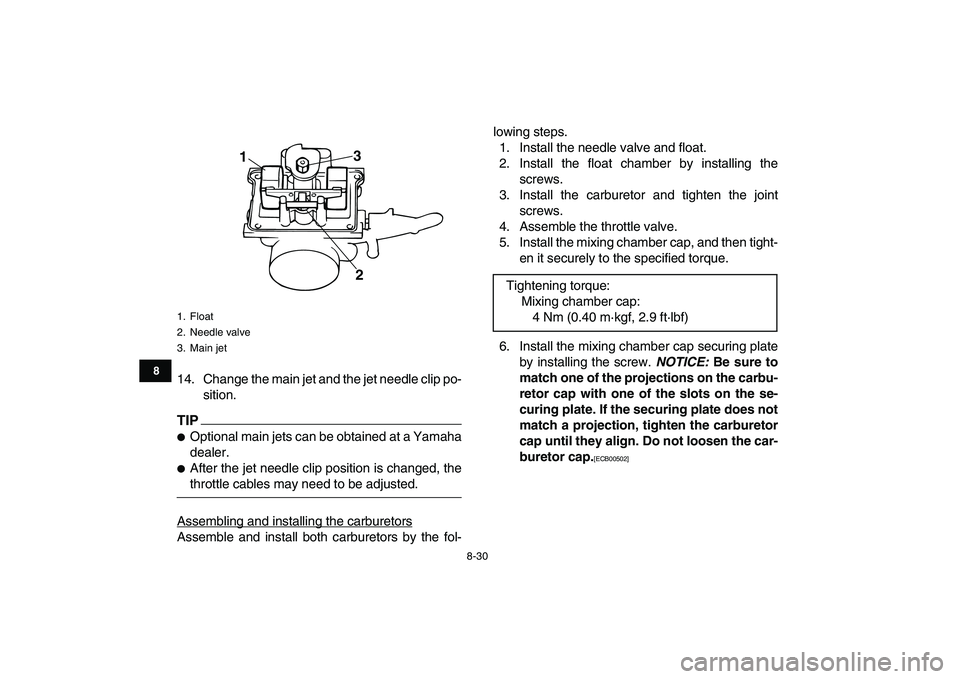
14. Change the main jet and the jet needle clip po-
sition.
TIP
�
Optional main jets can be obtained at a Yamaha
dealer.
�
After the jet needle clip position is changed, the
throttle cables may need to be adjusted.
Assembling and installing the carburetors
Assemble and install both carburetors by the fol-lowing steps.
1. Install the needle valve and float.
2. Install the float chamber by installing the
screws.
3. Install the carburetor and tighten the joint
screws.
4. Assemble the throttle valve.
5. Install the mixing chamber cap, and then tight-
en it securely to the specified torque.
6. Install the mixing chamber cap securing plate
by installing the screw.
NOTICE:
Be sure to
match one of the projections on the carbu-
retor cap with one of the slots on the se-
curing plate. If the securing plate does not
match a projection, tighten the carburetor
cap until they align. Do not loosen the car-
buretor cap.
[ECB00502]
1. Float
2. Needle valve
3. Main jet
1
2 3
Tightening torque:
Mixing chamber cap:
4 Nm (0.40 m·kgf, 2.9 ft·lbf)
Page 109 of 148
8-31
1
2
3
4
5
6
78
9
10
11
7. Tighten the mixing chamber cap securing
plate screw to the specified torque.
8. Tighten the carburetor joint screws.
Adjusting the throttle cables
1. Move the throttle lever a few times.
2. Push the throttle lever forward until it stops
and hold it in this position.
3. Check through each carburetor window to see
if the punch mark on the throttle valve is at the
specified position.
4. If not, loosen the locknut and turn the adjust-
ing nut until the specified position is obtained.
1. Mixing chamber cap securing plate
2. Projection
3. Slot
4. Screw
Tightening torque:
Mixing chamber cap securing plate screw:
3.5 Nm (0.35 m·kgf, 2.5 ft·lbf)
12
3
4
1. Punch mark
2. Specified position: 0–1mm
1
2