Page 102 of 148
8-24
1
2
3
4
5
6
78
9
10
11
sary tools.
�
Do not perform this procedure while the en-
gine is hot. Place a rag under each carbure-
tor to catch any fuel. Wipe up any spilled fuel
completely.
�
After servicing the carburetors, always
check the throttle lever operation before op-
erating the ATV to make sure it is working
correctly.
Standard settings
Main jet #200
Jet needle clip position 3rd groove
Pilot air screw 2.0 turns out
1. Main jet number
1
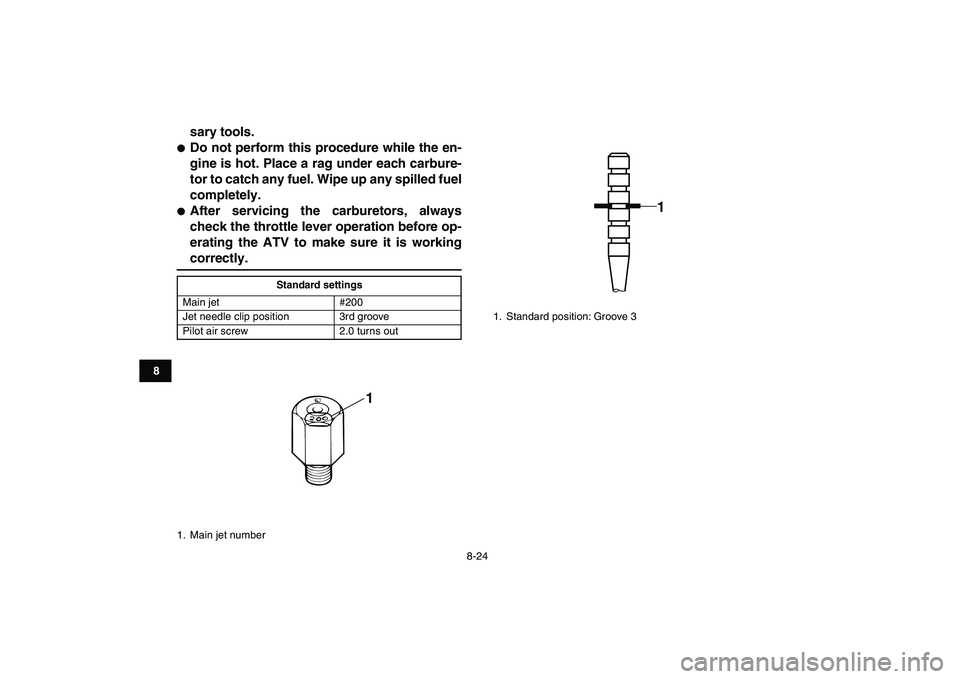
1. Standard position: Groove 3
1
Page 103 of 148
8-25
1
2
3
4
5
6
78
9
10
11
Carburetor setting chart
Changing the settings of the carburetors
To change the settings of the carburetors, you
need to disassemble and remove them. Follow the
procedures for both carburetors.
Disassembling and removing the carburetors
1. Turn the fuel cock to the “OFF” position.
2. Turn out the carburetor drain screw to drain
the fuel.
3. Remove the seat.
4. Remove the radiator cover and side cover by
removing the screws.
5. Remove the fuel hose from the fuel cock.
TemperatureAltitude
0
–1500 m (5000 ft) Above 1500 m (5000 ft)
Main jet Jet needle Pilot air screw Main jet Jet needle Pilot air screw
Above 0 °C (32 °F) #200 3rd groove 2.0 turns out #190 3rd groove 2 1/2 turns out
from +5 °C (41 °F) to
–15 °C (5 °F)#220 3rd groove 1 1/2 turns out #200 3rd groove 2.0 turns out
from –10 °C (14 °F) to
–30 °C (–22 °F)#240 4th groove 1 1/2 turns out #220 3rd groove 1 1/2 turns out
1. Radiator cover
2. Side cover
3. Screw
1
2 3 3
3
3
Page 104 of 148
8-26
1
2
3
4
5
6
78
9
10
11
6. Remove the fuel tank by removing the bolts.
7. Remove the air filter case cover by unhooking
the holders.
1. Fuel hose
1
1. Fuel tank
2. Bolt
1
2
22
2
Page 110 of 148

8-32
1
2
3
4
5
6
78
9
10
11
5. Move the throttle lever a few times and re-
check the position.
6. Install the fuel tank, side cover, radiator cover
and air filter case cover.
7. Connect the fuel hose to the fuel cock.
8. Install the seat.
EBU24020
Adjusting the engine idling speed
The engine idling speed must be checked and, if
necessary, adjusted as follows at the intervals
specified in the periodic maintenance and lubrica-tion chart.
TIP
�
A diagnostic tachometer is needed to make this
adjustment.
�
The carburetor synchronization and the throttle
cable free play must be checked, and adjusted if
necessary, before adjusting the engine idling
speed.
1. Start the engine and warm it up.
TIP
The engine is warm when it quickly responds to the
throttle.
2. Attach the tachometer to the spark plug lead.
3. Turn in both pilot air screws until they lightly
seat.
4. Turn out both pilot air screws to specification.
(See the “Changing the carburetor settings”
section on the page 8-23.)
1. Adjusting nut
2. Locknut
1
2
Page 132 of 148

8-54
1
2
3
4
5
6
78
9
10
11
Rear
3. Elevate the ATV and place a suitable stand
under the frame.
4. Remove the nuts from the wheel.
5. Remove the wheel.
EBU25661
Installing a wheel
1. Place the ATV on a level surface.
2. Install the wheel and the nuts.
3. Lower the ATV to the ground.
4. Tighten the wheel nuts to the specified
torques.
EBU25740
Troubleshooting
Although Yamaha ATVs receive a thorough in-
spection before shipment from the factory, trouble
may occur during operation. Any problem in the fu-
el, compression, or ignition systems, for example,
can cause poor starting and loss of power.
The following troubleshooting charts represent
quick and easy procedures for checking these vital
systems yourself. However, should your ATV re-
quire any repair, take it to a Yamaha dealer, whose
skilled technicians have the necessary tools, expe-
rience, and know-how to service the ATV properly.
Use only genuine Yamaha replacement parts. Im-
itation parts may look like Yamaha parts, but they
are often inferior, have a shorter service life and
can lead to expensive repair bills.WARNING
EWB02280
Do not smoke when checking the fuel system.
1. Wheel nut
1
1
Tightening torques:
Front wheel nut:
45 Nm (4.5 m·kgf, 33 ft·lbf)
Rear wheel nut:
45 Nm (4.5 m·kgf, 33 ft·lbf)
Page 133 of 148
8-55
1
2
3
4
5
6
78
9
10
11
Fuel can ignite or explode, causing severe inju-
ry or property damage. Make sure there are no
open flames or sparks in the area, including pi-
lot lights from water heaters or furnaces.
Page 134 of 148
8-56
1
2
3
4
5
6
78
9
10
11
EBU25841
Troubleshooting charts
Starting problems or poor engine performance
Check the fuel level in
the fuel tank.1. Fuel
There is
enough fuel.
There is
no fuel.
Supply fuel.
Operate the kickstarter.2. Compression
There is compression.
There is
no compression.Check the ignition.
Have a Yamaha dealer
check the ATV.
Remove the spark plugs
and check the electrodes.3. Ignition
Wet
DryWipe off with a dry cloth and correct the
spark plug gaps, or replace the spark plugs.
Have a Yamaha dealer check the ATV.The engine does not start.
Have a Yamaha dealer check the ATV.
Open the throttle halfway and operate
the kickstarter.
Check the compression.
The engine does not start.
Check the compression.
Page 137 of 148

9-2
1
2
3
4
5
6
7
89
10
11
EBU25952
Storage
Short-term
Always store your ATV in a cool, dry place and, if
necessary, protect it against dust with a porous
cover.
NOTICE:
Storing the ATV in a poorly ven-
tilated room or covering it with a tarp while it is
still wet, will allow water and humidity to seep
in and cause rust. To prevent corrosion, avoid
damp cellars, stables (because of the presence
of ammonia) and areas where strong chemi-
cals are stored.
[ECB00721]
Long-term
Before storing your ATV for several months:
1. Follow all the instructions in the “Cleaning”
section of this chapter.
2. Turn the fuel cock lever to “OFF”.
3. Drain the carburetor float chamber by loosen-
ing the drain bolt; this will prevent fuel deposits
from building up. Pour the drained fuel into the
fuel tank.
4. Fill up the fuel tank and add fuel stabilizer (if
available) to prevent the fuel from deteriorat-
ing.5. Perform the following steps to protect the cyl-
inders, piston rings, etc. from corrosion.
a. Remove the spark plug caps and spark
plugs.
b. Pour a teaspoonful of engine oil into each
spark plug bore.
c. Install the spark plug caps onto the spark
plugs, and then place the spark plugs on
the cylinder head so that the electrodes
are grounded. (This will limit sparking dur-
ing the next step.)
d. Turn the engine over several times with
the starter. (This will coat the cylinder walls
with oil.)
e. Remove the spark plug caps from the
spark plugs, and then install the spark
plugs and the spark plug caps.
6. Lubricate all control cables and the pivoting
points of all levers and pedals.
7. Check and, if necessary, correct the tire air
pressure, and then block up the ATV so that
all of its wheels are off the ground. Alternative- Specified amount:
7.5 ml of stabilizer to each liter of fuel (or 1 oz
of stabilizer to each gallon of fuel)