Page 54 of 148
6-5
1
2
3
4
56
7
8
9
10
11
ances. During this period, prolonged full-throttle
operation or any condition that might result in en-
gine overheating must be avoided.
0–160 km (0–100 mi) or 0–10 hours
Avoid prolonged operation above 1/2 throttle. Vary
the speed of the ATV regularly. Do not operate it at
one set throttle position.
160–320 km (100–200 mi) or 10–20 hours
Avoid prolonged operation above 3/4 throttle. Rev
the engine through the gears freely, but do not use
full throttle at any time.
320 km (200 mi) or 20 hours and beyond
The ATV can now be operated normally.
NOTICE
ECB00220
If any engine trouble should occur during the
engine break-in period, immediately have a
Yamaha dealer check the ATV.
EBU20722
Parking
When parking the ATV, shift into first gear, stop the
engine, apply the parking brake, and then turn the
fuel cock to “OFF”.
1. Button
2. Parking brake lock plate
1
2
Page 55 of 148
6-6
1
2
3
4
56
7
8
9
10
11
EBU20865
Parking on a slope
WARNING
EWB00851
Avoid parking on hills or other inclines. Park-
ing on a hill or other incline could cause the
ATV to roll out of control, increasing the
chance of an accident. If you must park on an
incline, place the ATV transversely across the
incline, shift into first gear, stop the engine, ap-
ply the parking brake, and then block the front
and rear wheels with rocks or other objects.
Never park the ATV on hills that are too steep
to walk up easily.
1. Bring the ATV to a stop by applying the front
brake, shift into first gear, and then stop the
engine.
2. With the front and rear brakes applied, apply
the parking brake.
3. Release the front and rear brakes.
4. Turn the fuel cock to “OFF”.
EBU20910
Accessories and loading
EBU20921
Genuine Yamaha Accessories
Choosing accessories for your ATV is an important
decision. Genuine Yamaha Accessories, which
1. Locked position
1
Page 68 of 148
7-11
1
2
3
4
5
67
8
9
10
11
iar with your ATV. Make sure that this area is free
of obstacles and other riders. You should practice
control of the throttle, brakes, shifting procedures,
and turning techniques in this area before trying
more difficult terrain.
Set the parking brake and follow the instruction on
page 6-1 to start the engine. Once it has warmed
up you are ready to begin riding your ATV. As you
get on the ATV, be sure not to accidentally move
the shift pedal. With the engine idling, pull the
clutch lever to disengage the clutch and shift into
1st gear, and then release the parking brake. Open
the throttle gradually, and at the same time, re-
lease the clutch lever slowly. Once the ATV has at-
tained adequate speed, release the throttle lever
and at the same time, quickly pull in the clutch le-
ver and shift into 2nd gear. Open the throttle part
way and gradually release the clutch.
WARNING!
If the throttle is applied too abruptly or if the
throttle is not released during shifting, or if the
shift pedal is not released before applying the
throttle, the front wheels may lift off the
ground, resulting in a loss of directional con-
trol.
[EWB02631]
NOTICE:
Do not shift gears without
releasing the throttle. Damage to the engine or
drive train may occur.
[ECB01071]
Use this same procedure as you move into the
higher gears. Be sure to coordinate the use of the
throttle and shift pedal properly.
Avoid higher speeds until you are thoroughly famil-
iar with the operation of your ATV.
When slowing down or stopping, release the throt-
tle and apply the brakes smoothly and evenly. As
you slow down, shift to a lower gear. Be sure that
the engine has sufficiently slowed before engaging
a lower gear. Improper use of the brakes or shifting
can cause the tires to lose traction, reducing con-
trol and increasing the possibility of an accident.
TURNING YOUR ATVWARNING
EWB01771
Always follow proper procedures for turning
as described in this Owner’s Manual. Practice
turning at low speeds before attempting to turn
at faster speeds. Do not turn at speeds too fast
for your skills or the conditions. ATV could go
out of control, causing a collision or overturn.
To achieve maximum traction on unpaved surfac-
es, the two rear wheels turn together at the same
speed. Therefore, unless the wheel on the inside
of the turn is allowed to slip or lose some traction,
Page 71 of 148
7-14
1
2
3
4
5
67
8
9
10
11
hill. In all cases avoid inclines with slippery or loose
surfaces, or obstacles that might cause you to lose
control.
To climb a hill, you need traction, momentum, and
steady throttle. Travel fast enough to maintain mo-
mentum, but not so fast that you cannot react to
changes in the terrain as you climb.
It is important when climbing a hill to make sure
that your weight is transferred forward on the ATV.
This can be accomplished by leaning forward and,
on steeper inclines, standing on the footrests and
leaning forward over the handlebars. Whenever
possible, ride straight up hills.
Slow down when you reach the crest of the hill if
you cannot see clearly what is on the other side –
there could be another person, an obstacle, or a
sharp drop-off. Use common sense and remember
that some hills are too steep for you to climb or de-
scend.
If you are climbing a hill and you find that you have
not properly judged your ability to make it to the
top, you should turn the ATV around while you still
have forward motion (provided you have the room
to do so) and go down the hill.
If your ATV has stalled or stopped and you believe
you can continue up the hill, restart carefully tomake sure you do not lift the front wheels which
could cause you to lose control. If you are unable
to continue up the hill, dismount the ATV on the up-
hill side. Physically turn the ATV around and then
descend the hill.
If you start to roll backwards, DO NOT apply the
rear brake, and apply the front brake gradually.
The ATV could easily tip over backwards. When
fully stopped, apply the rear brake as well, and
then lock the parking brake. Dismount the ATV im-
mediately on the uphill side or to a side if pointed
straight uphill. Turn the ATV around and remount,
following the procedure described in the Owner’s
Manual.
WARNING! Stalling, rolling backwards
or improperly dismounting while climbing a hill
could result in ATV overturning. If you cannot
control the ATV, dismount immediately on the
uphill side.
[EWB01802]
Page 84 of 148
8-6
1
2
3
4
5
6
78
9
10
11
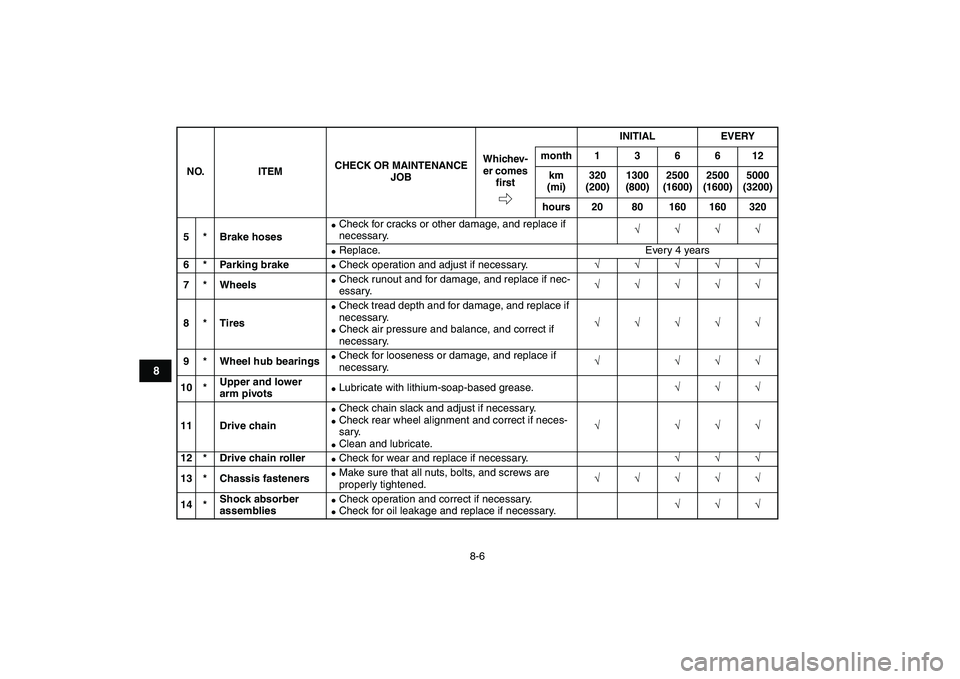
5 * Brake hoses
�
Check for cracks or other damage, and replace if
necessary.
√√√√
�
Replace. Every 4 years
6 * Parking brake
�
Check operation and adjust if necessary.
√√√√√
7 * Wheels
�
Check runout and for damage, and replace if nec-
essary.
√√√√√
8 * Tires
�
Check tread depth and for damage, and replace if
necessary.
�
Check air pressure and balance, and correct if
necessary.
√√√√√
9 * Wheel hub bearings
�
Check for looseness or damage, and replace if
necessary.
√ √√√
10 *Upper and lower
arm pivots
�
Lubricate with lithium-soap-based grease.
√√√
11 Drive chain
�
Check chain slack and adjust if necessary.
�
Check rear wheel alignment and correct if neces-
sary.
�
Clean and lubricate.
√ √√√
12 * Drive chain roller
�
Check for wear and replace if necessary.
√√√
13 * Chassis fasteners
�
Make sure that all nuts, bolts, and screws are
properly tightened.
√√√√√
14 *Shock absorber
assemblies
�
Check operation and correct if necessary.
�
Check for oil leakage and replace if necessary.
√√√
NO. ITEMCHECK OR MAINTENANCE
JOBINITIAL EVERY
Whichev-
er comes
firstmonth 1 3 6 6 12
km
(mi)320
(200)1300
(800)2500
(1600)2500
(1600)5000
(3200)
hours 20 80 160 160 320
Page 116 of 148
8-38
1
2
3
4
5
6
78
9
10
11
EBU24394
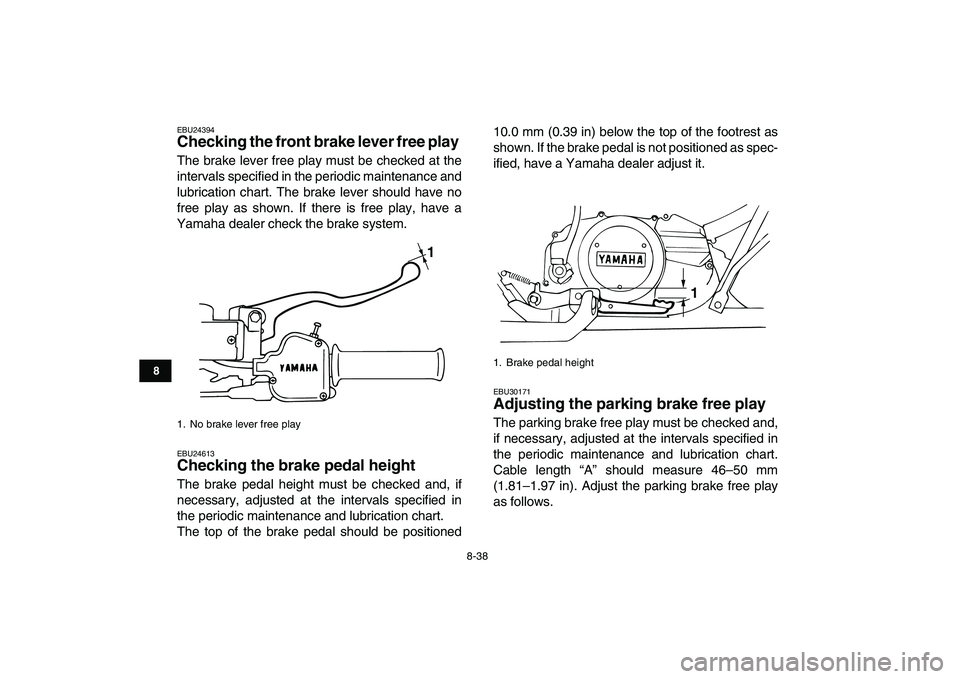
Checking the front brake lever free play
The brake lever free play must be checked at the
intervals specified in the periodic maintenance and
lubrication chart. The brake lever should have no
free play as shown. If there is free play, have a
Yamaha dealer check the brake system.
EBU24613
Checking the brake pedal height
The brake pedal height must be checked and, if
necessary, adjusted at the intervals specified in
the periodic maintenance and lubrication chart.
The top of the brake pedal should be positioned10.0 mm (0.39 in) below the top of the footrest as
shown. If the brake pedal is not positioned as spec-
ified, have a Yamaha dealer adjust it.
EBU30171
Adjusting the parking brake free play
The parking brake free play must be checked and,
if necessary, adjusted at the intervals specified in
the periodic maintenance and lubrication chart.
Cable length “A” should measure 46–50 mm
(1.81–1.97 in). Adjust the parking brake free play
as follows.
1. No brake lever free play
1
1. Brake pedal height
1
Page 117 of 148
8-39
1
2
3
4
5
6
78
9
10
11
1. Release the parking brake.
2. Slide the rubber cover back.3. Fully loosen the locknut and the adjusting bolt
at the clutch lever.
1. Cable length “A”
1
1. Rubber cover
1
Page 119 of 148
8-41
1
2
3
4
5
6
78
9
10
11
1/8 turn and tighten its locknut to the specified
torque.
NOTICE:
When tightening the lock-
nut, hold the adjusting bolt with a wrench
so that it does not turn together with the
locknut.
[ECB00521]
WARNING
EWB02090
Operating with improperly serviced or adjust-
ed brakes could cause the brakes to malfunc-
tion, resulting in reduced braking
performance. This could increase the chance
of a collision or accident. After adjusting the
parking brake free play, block the rear of the
ATV off the ground and spin the rear wheels.
Check to make sure there is no brake drag. If
brake drag is noticed, perform the adjustment
again.
EBU24742
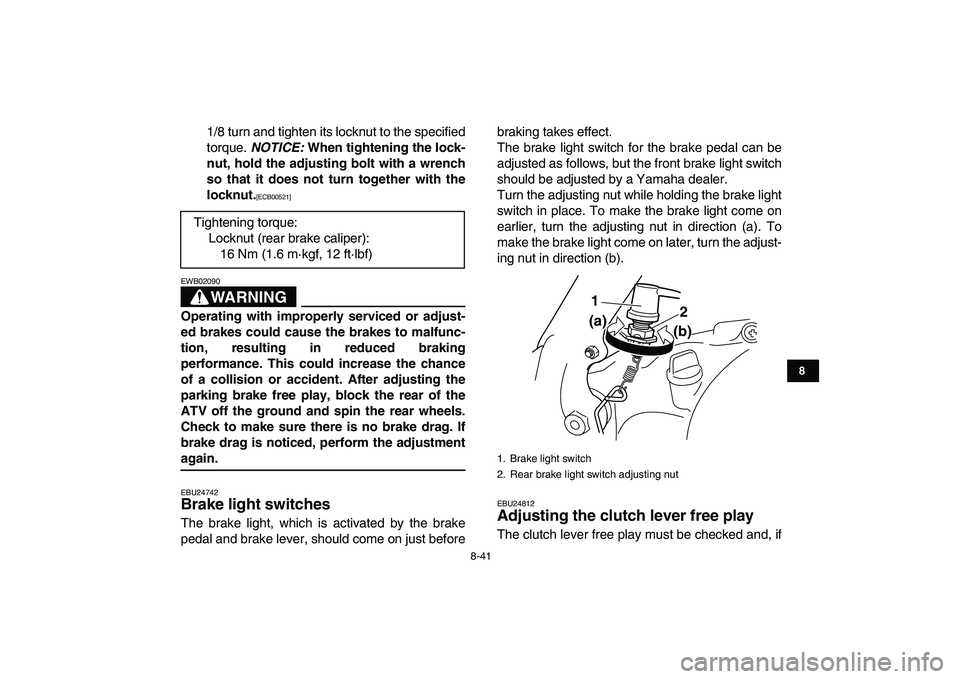
Brake light switches
The brake light, which is activated by the brake
pedal and brake lever, should come on just beforebraking takes effect.
The brake light switch for the brake pedal can be
adjusted as follows, but the front brake light switch
should be adjusted by a Yamaha dealer.
Turn the adjusting nut while holding the brake light
switch in place. To make the brake light come on
earlier, turn the adjusting nut in direction (a). To
make the brake light come on later, turn the adjust-
ing nut in direction (b).
EBU24812
Adjusting the clutch lever free play
The clutch lever free play must be checked and, if Tightening torque:
Locknut (rear brake caliper):
16 Nm (1.6 m·kgf, 12 ft·lbf)
1. Brake light switch
2. Rear brake light switch adjusting nut
1
2
(a)
(b)