Page 53 of 148

6-4
1
2
3
4
56
7
8
9
10
11
the next higher gear.
EBU20650
To decelerate
When slowing down or stopping, release the throt-
tle and apply the brakes smoothly and evenly. As
you slow down, shift to a lower gear. Be sure that
the engine has sufficiently slowed before engaging
a lower gear. Improper use of the brakes or shifting
can cause the tires to lose traction, reducing con-
trol and increasing the possibility of an accident.
WARNING
EWB00710
Make sure the engine has sufficiently slowed
before shifting to a lower gear. Engaging a low-
er gear when the engine speed is too high
could make the wheels stop rotating and lose
traction. This could cause loss of control, an
accident and injury. It could also cause engine
or drive train damage.
NOTICE
ECB00180
�
Even with the transmission in the neutral po-
sition, do not coast for long periods of time
with the engine off, and do not tow the ATV
for long distances. The transmission is prop-erly lubricated only when the engine is run-
ning. Inadequate lubrication may damage
the transmission.
�
Always use the clutch when changing gears.
The engine, transmission and drive train are
not designed to withstand the shock of
forced shifting and can be damaged by shift-
ing without using the clutch.
EBU20672
Engine break-in
TIP
�
For ATVs equipped with an odometer or an hour
meter, follow the figures given in km (mi) or the
figures given in hours.
�
For ATVs not equipped with an odometer or
hour meter, follow the figures given in hours.
There is never a more important period in the life of
your engine than the first 320 km (200 mi) or 20
hours of riding. For this reason, you should read
the following material carefully.
Since the engine is brand new, do not put an ex-
cessive load on it for the first 320 km (200 mi) or 20
hours. The various parts in the engine wear and
polish themselves to the correct operating clear-
Page 68 of 148

7-11
1
2
3
4
5
67
8
9
10
11
iar with your ATV. Make sure that this area is free
of obstacles and other riders. You should practice
control of the throttle, brakes, shifting procedures,
and turning techniques in this area before trying
more difficult terrain.
Set the parking brake and follow the instruction on
page 6-1 to start the engine. Once it has warmed
up you are ready to begin riding your ATV. As you
get on the ATV, be sure not to accidentally move
the shift pedal. With the engine idling, pull the
clutch lever to disengage the clutch and shift into
1st gear, and then release the parking brake. Open
the throttle gradually, and at the same time, re-
lease the clutch lever slowly. Once the ATV has at-
tained adequate speed, release the throttle lever
and at the same time, quickly pull in the clutch le-
ver and shift into 2nd gear. Open the throttle part
way and gradually release the clutch.
WARNING!
If the throttle is applied too abruptly or if the
throttle is not released during shifting, or if the
shift pedal is not released before applying the
throttle, the front wheels may lift off the
ground, resulting in a loss of directional con-
trol.
[EWB02631]
NOTICE:
Do not shift gears without
releasing the throttle. Damage to the engine or
drive train may occur.
[ECB01071]
Use this same procedure as you move into the
higher gears. Be sure to coordinate the use of the
throttle and shift pedal properly.
Avoid higher speeds until you are thoroughly famil-
iar with the operation of your ATV.
When slowing down or stopping, release the throt-
tle and apply the brakes smoothly and evenly. As
you slow down, shift to a lower gear. Be sure that
the engine has sufficiently slowed before engaging
a lower gear. Improper use of the brakes or shifting
can cause the tires to lose traction, reducing con-
trol and increasing the possibility of an accident.
TURNING YOUR ATVWARNING
EWB01771
Always follow proper procedures for turning
as described in this Owner’s Manual. Practice
turning at low speeds before attempting to turn
at faster speeds. Do not turn at speeds too fast
for your skills or the conditions. ATV could go
out of control, causing a collision or overturn.
To achieve maximum traction on unpaved surfac-
es, the two rear wheels turn together at the same
speed. Therefore, unless the wheel on the inside
of the turn is allowed to slip or lose some traction,
Page 83 of 148

8-5
1
2
3
4
5
6
78
9
10
11
EBU21865
General maintenance and lubrication chart
TIP
�
For ATVs not equipped with an odometer or an hour meter, follow the month maintenance intervals.
�
For ATVs equipped with an odometer or an hour meter, follow the km (mi) or hours maintenance inter-
vals. However, keep in mind that if the ATV isn’t used for a long period of time, the month maintenance
intervals should be followed.
�
Items marked with an asterisk should be performed by a Yamaha dealer as they require special tools,
data and technical skills.
NO. ITEMCHECK OR MAINTENANCE
JOBINITIAL EVERY
Whichev-
er comes
firstmonth136612
km
(mi)320
(200)1300
(800)2500
(1600)2500
(1600)5000
(3200)
hours 20 80 160 160 3201 Air filter element
�
Clean and replace if necessary.Every 20–40 hours (more often in wet or
dusty areas)
2 * Clutch
�
Check operation and adjust if necessary.
√ √√√
3 * Front brake
�
Check operation and correct if necessary.
�
Check fluid level and ATV for fluid leakage, and
correct if necessary.
√√√√√
�
Replace brake pads. Whenever worn to the limit
4 * Rear brake
�
Check operation and correct if necessary.
�
Check brake pedal free play and adjust if neces-
sary.
�
Check fluid level and ATV for fluid leakage, and
correct if necessary.
√√√√√
�
Replace brake pads. Whenever worn to the limit
Page 90 of 148

8-12
1
2
3
4
5
6
78
9
10
11
To change the transmission oil
1. Place the ATV on a level surface.
2. Start the engine, warm it up for several min-
utes, and then turn it off.
3. Place an oil pan under the transmission case
to collect the used oil.
4. Remove the oil filler cap, the transmission oil
drain bolt and its gasket to drain the oil from
the transmission case.
5. Install the transmission oil drain bolt and its
new gasket, and then tighten the bolt to the
specified torque.6. Refill with the specified amount of the recom-
mended transmission oil, and then install and
tighten the oil filler cap.TIP
Be sure to wipe off spilled oil on any parts after the
engine and exhaust system have cooled down.NOTICE
ECB00430
�
In order to prevent clutch slippage (since the
transmission oil also lubricates the clutch),
do not mix any chemical additives. Do not
use oils with a diesel specification of “CD” or
oils of a higher quality than specified. In ad-
dition, do not use oils labeled “ENERGY
CONSERVING II” or higher.
�
Make sure that no foreign material enters the
1. Transmission oil drain bolt
2. Gasket
1
12
Tightening torque:
Transmission oil drain bolt:
20 Nm (2.0 m·kgf, 14 ft·lbf)
Recommended transmission oil:
See page 10-1.
Oil quantity:
1.5 L (1.59 US qt, 1.32 Imp.qt)
Page 117 of 148
8-39
1
2
3
4
5
6
78
9
10
11
1. Release the parking brake.
2. Slide the rubber cover back.3. Fully loosen the locknut and the adjusting bolt
at the clutch lever.
1. Cable length “A”
1
1. Rubber cover
1
Page 118 of 148
8-40
1
2
3
4
5
6
78
9
10
11
4. Loosen the locknut and the adjusting bolt at
the rear brake caliper.5. Turn the adjusting bolt at the clutch lever in di-
rection (a) to increase the cable length, and in
direction (b) to decrease it.TIP
If the cable length cannot be adjusted to specifica-
tion, consult a Yamaha dealer.
6. Tighten the locknut at the clutch lever.
7. Slide the rubber cover back to its original po-
sition.
8. Turn in the adjusting bolt at the rear brake cal-
iper by hand until it feels tight, then turn it out
1. Locknut
2. Adjusting bolt
12
(a)
(b)
1. Adjusting bolt
2. Locknut
1
2
Page 119 of 148

8-41
1
2
3
4
5
6
78
9
10
11
1/8 turn and tighten its locknut to the specified
torque.
NOTICE:
When tightening the lock-
nut, hold the adjusting bolt with a wrench
so that it does not turn together with the
locknut.
[ECB00521]
WARNING
EWB02090
Operating with improperly serviced or adjust-
ed brakes could cause the brakes to malfunc-
tion, resulting in reduced braking
performance. This could increase the chance
of a collision or accident. After adjusting the
parking brake free play, block the rear of the
ATV off the ground and spin the rear wheels.
Check to make sure there is no brake drag. If
brake drag is noticed, perform the adjustment
again.
EBU24742
Brake light switches
The brake light, which is activated by the brake
pedal and brake lever, should come on just beforebraking takes effect.
The brake light switch for the brake pedal can be
adjusted as follows, but the front brake light switch
should be adjusted by a Yamaha dealer.
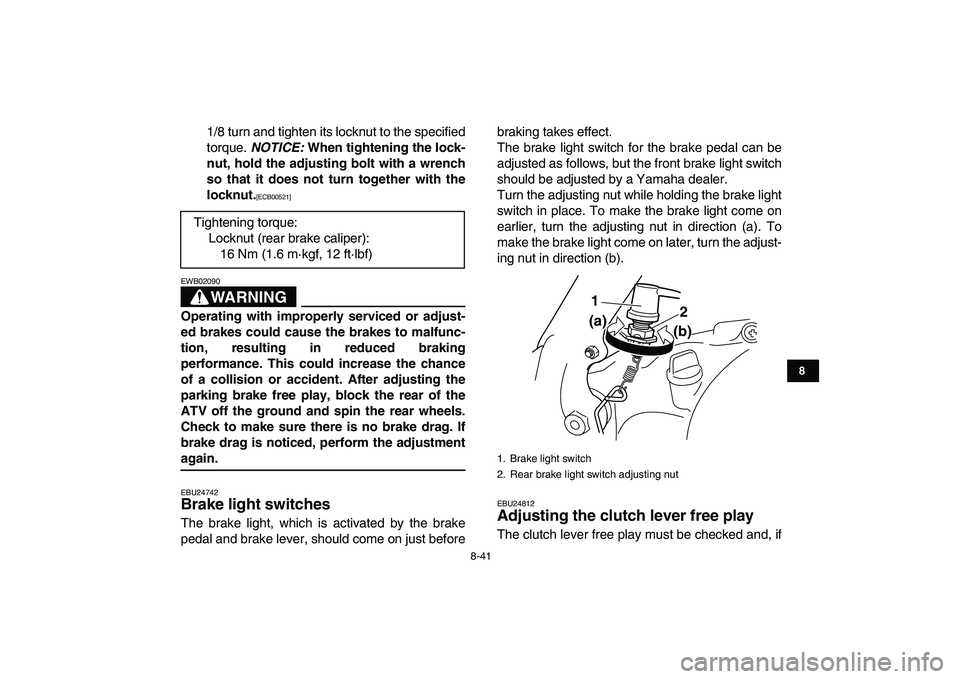
Turn the adjusting nut while holding the brake light
switch in place. To make the brake light come on
earlier, turn the adjusting nut in direction (a). To
make the brake light come on later, turn the adjust-
ing nut in direction (b).
EBU24812
Adjusting the clutch lever free play
The clutch lever free play must be checked and, if Tightening torque:
Locknut (rear brake caliper):
16 Nm (1.6 m·kgf, 12 ft·lbf)
1. Brake light switch
2. Rear brake light switch adjusting nut
1
2
(a)
(b)
Page 120 of 148
8-42
1
2
3
4
5
6
78
9
10
11
necessary, adjusted at the intervals specified in
the periodic maintenance and lubrication chart.
The clutch lever free play should measure
5.0–10.0 mm (0.20–0.39 in) as shown. If the free
play is incorrect, adjust it as follows.
1. Slide the rubber cover back.
2. Loosen the locknut at the clutch lever.
3. To increase the clutch lever free play, turn the
adjusting bolt in direction (a), and to decrease
it, turn the bolt in direction (b).4. Tighten the locknut.
5. Slide the rubber cover back to its original po-
sition.TIP
If the specified free play cannot be obtained as de-
scribed above or if the clutch does not operate cor-
rectly, have a Yamaha dealer check the internal
clutch mechanism.
1. Rubber cover
1
1. Locknut
2. Clutch lever free play adjusting bolt
3. Clutch lever free play
1
2 3
(a)
(b)