Page 260 of 312

07 Maintenance and specifications
Replacing bulbs
07
260* Option/accessory, for more information, see Introduction.
Introduction
All bulb specifications are listed on page 265.
The following bulbs should only be replaced by
a trained and qualified Volvo service techni-
cian:
•Dome lighting
•Reading lights
•Glove compartment lighting
•Footwell lighting
•Turn signals in the door mirrors
•Approach lighting in the door mirrors
•Brake lights
•Active Bending Lights and LED bulbs
NOTE
For information regarding any other bulbs
not mentioned in this section, please con-
tact your Volvo retailer or a trained and
authorized Volvo service technician.
WARNING
•Active Bending Lights* – due to the high
voltage used by these headlights, these
bulbs should only be replaced by a
trained and qualified Volvo service tech-
nician.
•Turn off the lights and remove the
remote key from the ignition before
changing any bulbs.
Headlight housing
G010325
WARNING
•The engine should not be running when
changing bulbs.
•If the engine has been running just prior
to replacing bulbs in the headlight hous-
ing, please keep in mind that compo-
nents in the engine compartment will be
hot.
The entire headlight housing must be lifted out
when replacing all front bulbs.
CAUTION
Never touch the glass of bulbs with your fin-
gers. Grease and oils from your fingers
vaporize in the heat and will leave a deposit
on the reflector, which will damage it.
Page 265 of 312

07 Maintenance and specifications
Replacing bulbs
07
��
265
1. Remove the screws with a screwdriver.
2. Carefully detach the entire bulb housing
and pull it out.
3. Replace the bulb.
4. Reinsert the entire bulb housing and
tighten the screws.
Trunk lighting
G021758
NOTE
Before starting to replace a bulb, see
page 260.
The trunk lighting is located on opposite sides
of the trunk.1. Insert a screwdriver and gently turn so that
the bulb housing comes loose.
2. Replace the bulb.
3. Check that the bulb illuminates and press
it back into the bulb housing.
Vanity mirror lighting
Removing the mirror glass
G021759
1. Insert a screwdriver underneath the lower
edge, in the center, turn and carefully pry
up the lug on the edge.
2. Insert the screwdriver underneath the edge
on the left and right sides (by the black
rubber sections), and pry carefully so that
the glass comes loose in the lower edge.3. Carefully detach and lift aside the entire
mirror glass and cover.
4. Replace the bulb.
Reinstalling the mirror glass1. Press the three lugs at top edge of the mir-
ror glass back into position.
2. Press the three lower lugs back into posi-
tion.
Bulb specifications
Lighting
functionWattageBulb
Active Bend-
ing Lights
(extra high
beam)55H7
Low beam
(halogen)55H7
High beam
(halogen)65H9
Rear fog light21P21W
Brake lights21P21W
Backup lights21P21W
Page 278 of 312
07 Maintenance and specifications
Fuses
07
278* Option/accessory, for more information, see Introduction.
PosFunctionA
-
Airbag system, Occupant
weight system10
Adaptive cruise control
front radar*5
Accelerator pedal, power
door mirrors, Heated rear
seats*7.5
Audio system, CD and
radio15
Brake lights5
Power moonroof*20
Immobilizer5
Page 280 of 312
07 Maintenance and specifications
Fuses
07
280* Option/accessory, for more information, see Introduction.
Cargo area
Located behind the upholstery on the left side of the cargo area
Positions
Rear fuse boxA
Electric parking brake (left
side)30
Electric parking brake (right
side)30
Heated rear window30
Trailer socket 2*15
-
Rear fuse boxA
-
--
--
--
--
Rear fuse boxA
Trailer socket 1*40
--
Page 282 of 312

07 Maintenance and specifications
Vehicle care
07
282
CAUTION
•Avoid waxing or polishing plastic or rub-
ber components
•Polishing chromed strips can wear
away or damage the surface
•Polishes containing abrasive sub-
stances should not be used
Automatic car wash
•We do NOT recommend washing your car
in an automatic wash during the first few
months (because the paint will not have
hardened sufficiently).
•An automatic wash is a simple and quick
way to clean your car, but it is worth
remembering that it may not be as thor-
ough as when you yourself go over the car
with sponge and water. Keeping the under-
body clean is most important, especially in
the winter. Some automatic washers do
not have facilities for washing the under-
body.
CAUTION
•Before driving into an automatic car
wash, turn off the optional rain sensor to
avoid damaging the windshield wipers.
•Make sure that side view mirrors, auxil-
iary lamps, etc, are secure, and that any
antenna(s) are retracted or removed.
Otherwise there is risk of the machine
dislodging them.
•Chromed wheels: Clean chrome-
plated wheels using the same deter-
gents used for the body of the vehicle.
Aggressive wheel-cleaning agents can
permanently stain chrome-plated
wheels.
WARNING
•When the vehicle is driven immediately
after being washed, apply the brakes,
including the parking brake, several
times in order to remove any moisture
from the brake linings.
•Engine cleaning agents should not be
used when the engine is warm. This
constitutes a fire risk.
Exterior lightingCondensation may form temporarily on the
inside of the lenses of exterior lights such as
headlights, fog lights, or taillights. This is nor-mal and the lights are designed to withstand
moisture. Normally, condensation will dissi-
pate after the lights have been on for a short
time.
Polishing and waxing
•Normally, polishing is not required during
the first year after delivery, however, wax-
ing may be beneficial.
•Before applying polish or wax the vehicle
must be washed and dried. Tar spots can
be removed with kerosene or tar remover.
Difficult spots may require a fine rubbing
compound.
•After polishing use liquid or paste wax.
•Several commercially available products
contain both polish and wax.
•Waxing alone does not substitute for pol-
ishing a dull surface.
•A wide range of polymer-based waxes can
be purchased today. These waxes are easy
to use and produce a long-lasting, high-
gloss finish that protects the bodywork
against oxidation, road dirt and fading.
•Do not polish or wax your vehicle in direct
sunlight (the surface of the vehicle should
not be warmer than 113 °F (45 °C).
Page 293 of 312
08 Specifications
Specifications
08
��
293
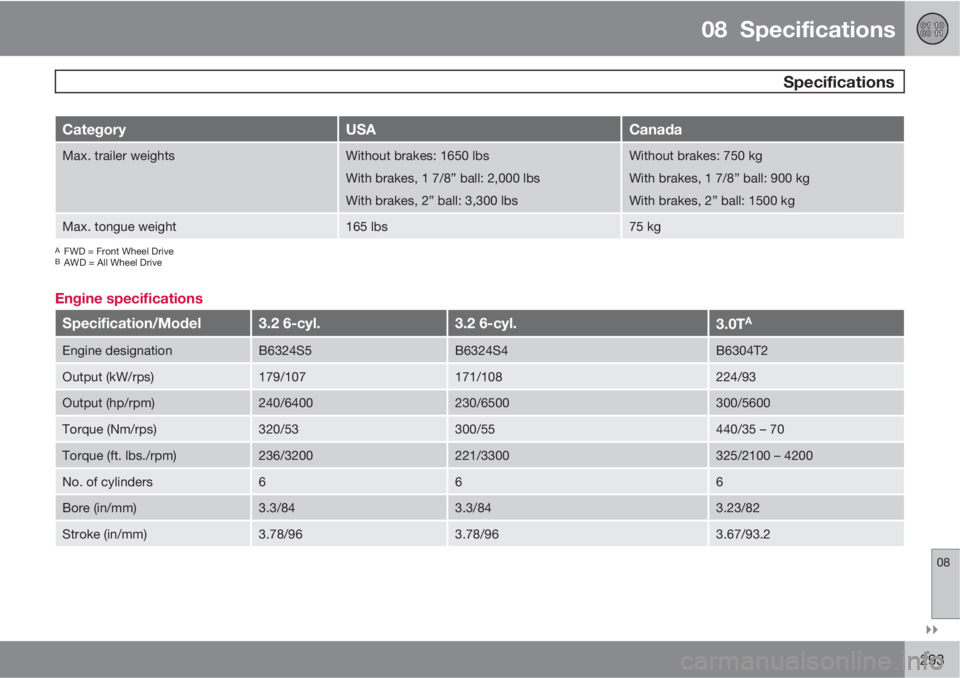
CategoryUSACanada
Max. trailer weightsWithout brakes: 1650 lbs
With brakes, 1 7/8” ball: 2,000 lbs
With brakes, 2” ball: 3,300 lbsWithout brakes: 750 kg
With brakes, 1 7/8” ball: 900 kg
With brakes, 2” ball: 1500 kg
Max. tongue weight165 lbs75 kg
AFWD = Front Wheel DriveBAWD = All Wheel Drive
Engine specifications
Specification/Model3.2 6-cyl.3.2 6-cyl.3.0TA
Engine designationB6324S5B6324S4B6304T2
Output (kW/rps)179/107171/108224/93
Output (hp/rpm)240/6400230/6500300/5600
Torque (Nm/rps)320/53300/55440/35 – 70
Torque (ft. lbs./rpm)236/3200221/3300325/2100 – 4200
No. of cylinders666
Bore (in/mm)3.3/843.3/843.23/82
Stroke (in/mm)3.78/963.78/963.67/93.2
Page 296 of 312
08 Specifications
Specifications
08
296
Oil volume
Engine modelOil volume between MIN and
MAXVolume (incl. filter)
3.2 (6-cyl.)B6324S/S21.27 US qts (1.2 liters)7.18 US qts (6.8 liters)
3.0T (6 cyl.)B6304T21.27 US qts (1.2 liters)7.18 US qts (6.8 liters)
Other fluids and lubricants
FluidSystemVolumeSpecification
Transmission oilAAutomatic (TF-80SC)5.8 US qts (5.5 liters)Transmission fluid BOT 341
Coolant3.2 (6-cyl.)9.4 US qts. (8.9 liters)Coolant with corrosion inhibitor
mixed with water (50/50 mix), see
packaging.
3.0T9.4 US qts. (8.9 liters)
Air conditioningAll models1.7 lbs (770 g)Refrigerant: R134a (HFC134a),
PAG oil
Brake fluid0.63 US qts (0.6 liters)DOT 4+
Power steering1.26 US qts (1.2 liters)Power steering fluid WSS
M2C204-A2 or equivalent product.
Page 298 of 312

08 Specifications
Overview of information and warning symbols
08
298* Option/accessory, for more information, see Introduction.
Introduction
The symbols in the vehicle's various displays
are divided into three main categories:
•Warning symbols
•Indicator symbols
•Information symbols
The following tables list the most common
symbols, their meaning and the pages in this
manual that provide more detailed information.
Warning symbol
The red warning symbol lights up to
indicate a problem related to safety and/or
drivability. A message will also appear in the
main instruments panel's display.
Information symbol
The information symbol lights up and a
text message is displayed to provide the driver
with necessary information about one of the
vehicle's systems.
Symbols in the main instrument panel
Warning symbols
SymbolDescriptionPag
e
Low oil pressure74
A
Parking brake74
SRS airbags74
Seat belt reminder75
Generator not charg-
ing75
A
Fault in the brake
system75
Warning symbol75
ACanadian models
Indicator symbols
SymbolDescriptionPag
e
Fault in the Active
Bending Light
(ABL)*system73
A
Malfunction indicator
light73
A
Anti-lock brake sys-
tem (ABS)73
Rear fog light on73
Stability system
(DSTC)73
Tire pressure monitor-
ing sensor (TPMS)73
Low fuel level73
Information symbol,
see text in information
display73


3.2 (6-cyl.)B6324S/S21.27 US qts (1.2 liters)7.18 US qts (6.8 liters)
3.0T (6 cyl.)")