06 Starting and driving
Brake system
06
��
155 Brake lights
The brake lights come on automatically when
the brakes are applied.
Adaptive brake lightsThe adaptive brake lights activate in the event
of sudden braking or if the ABS system is acti-
vated. This function causes an additional tail-
light on each side of the vehicle to illuminate to
help alert vehicles traveling behind.
The adaptive brake lights activate if:
•The ABS system activates for more than
approximately a half second
•In the event of sudden braking while the
vehicle is moving at speeds above approx-
imately 6 mph (10 km/h)
When the vehicle has come to a stop, the brake
lights and additional taillights remain on for as
long as the brake pedal is depressed or until
braking force on the vehicle is reduced.
Brake circuit malfunction
The brake system is a hydraulic system con-
sisting of two separate brake circuits. If a prob-
lem should occur in one of these circuits, it is
still possible to stop the vehicle with the other
brake circuit.If the brake pedal must be depressed farther
than normal and requires greater foot pressure,
the stopping distance will be longer.
A warning light in the instrument panel will light
up to warn the driver that a fault has occurred.
If this light comes on while driving or braking,
stop immediately and check the brake fluid
level in the reservoir.
NOTE
Press the brake pedal hard and maintain
pressure on the pedal – do not pump the
brakes.
WARNING
If the fluid level is below the MIN mark in the
reservoir or if a brake system message is
shown in the information display, DO NOT
DRIVE. Have the vehicle towed to a Volvo
retailer and have the brake system inspec-
ted.
Power brakes function only when the
engine is running
The power brakes utilize vacuum pressure
which is only created when the engine is run-
ning. Never let the vehicle roll to a stop with the
engine switched off.
If the power brakes are not working, consider-
ably higher pressure will be required on the
brake pedal to compensate for the lack of
power assistance. This can happen for exam-
ple when towing your vehicle or if the engine is
switched off when the vehicle is rolling. The
brake pedal feels harder than usual.
Water on brake discs and brake pads
affects braking
Driving in rain and slush or passing through an
automatic car wash can cause water to collect
on the brake discs and pads. This will cause a
delay in braking effect when the pedal is
depressed. To avoid such a delay when the
brakes are needed, depress the pedal occa-
sionally when driving through rain, slush, etc.
This will remove the water from the brakes.
Check that brake application feels normal. This
should also be done after washing or starting
in very damp or cold weather.
07 Wheels and tires
Tire Sealing System*
07
��
* Option/accessory, for more information, see Introduction.193
upper and lower eyelids. Get medical
attention if symptoms occur.
•Inhalation: Move the person to fresh air.
If irritation persists, get medical atten-
tion.
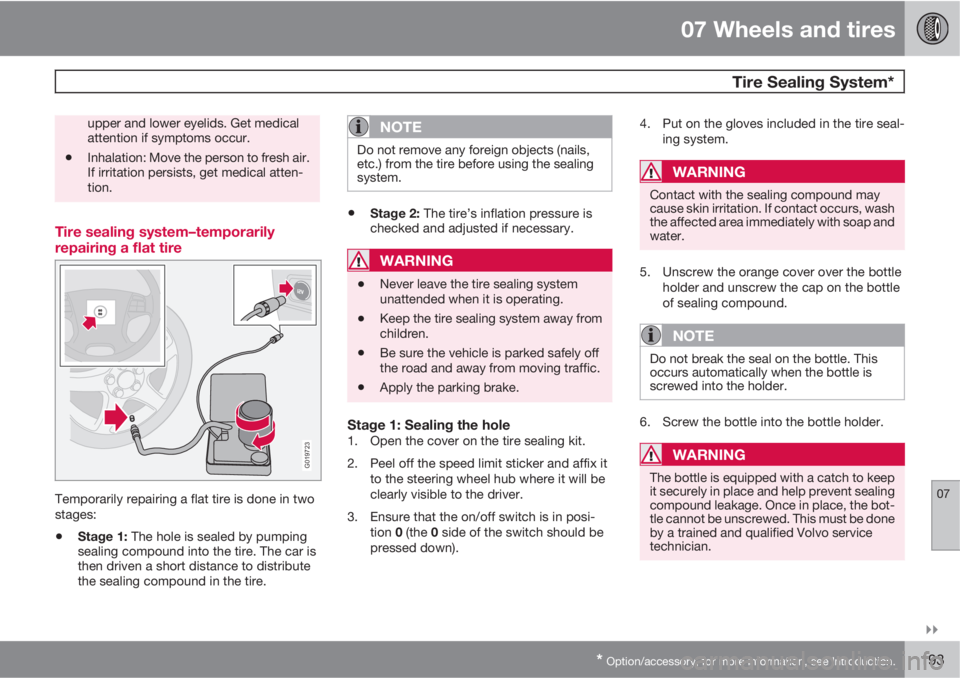
Tire sealing system–temporarily
repairing a flat tire
G019723
Temporarily repairing a flat tire is done in two
stages:
•Stage 1: The hole is sealed by pumping
sealing compound into the tire. The car is
then driven a short distance to distribute
the sealing compound in the tire.
NOTE
Do not remove any foreign objects (nails,
etc.) from the tire before using the sealing
system.
•Stage 2: The tire’s inflation pressure is
checked and adjusted if necessary.
WARNING
•Never leave the tire sealing system
unattended when it is operating.
•Keep the tire sealing system away from
children.
•Be sure the vehicle is parked safely off
the road and away from moving traffic.
•Apply the parking brake.
Stage 1: Sealing the hole1. Open the cover on the tire sealing kit.
2. Peel off the speed limit sticker and affix it
to the steering wheel hub where it will be
clearly visible to the driver.
3. Ensure that the on/off switch is in posi-
tion 0 (the 0 side of the switch should be
pressed down).4. Put on the gloves included in the tire seal-
ing system.
WARNING
Contact with the sealing compound may
cause skin irritation. If contact occurs, wash
the affected area immediately with soap and
water.
5. Unscrew the orange cover over the bottle
holder and unscrew the cap on the bottle
of sealing compound.
NOTE
Do not break the seal on the bottle. This
occurs automatically when the bottle is
screwed into the holder.
6. Screw the bottle into the bottle holder.
WARNING
The bottle is equipped with a catch to keep
it securely in place and help prevent sealing
compound leakage. Once in place, the bot-
tle cannot be unscrewed. This must be done
by a trained and qualified Volvo service
technician.