Page 99 of 290
*
03
��
* Option/accessory, for more information, see Introduction.99
2. Blower speedThe blower speed can be
increased or decreased by
turning the knob. The")
03 Climate
Electronic Climate Control (ECC)*
03
��
* Option/accessory, for more information, see Introduction.99
2. Blower speedThe blower speed can be
increased or decreased by
turning the knob. The blower
speed is regulated automati-
cally if AUTO is selected. The
previously set blower speed is
disconnected.
NOTE
If the knob is turned counterclockwise and
the blower indication in the display goes
out, the blower and the air conditioning are
switched off. The display shows the blower
symbol and
OFF.
3. RecirculationThis function can be used to
shut out exhaust fumes,
smoke, etc from the passen-
ger compartment. The air in
the passenger compartment
is then recirculated, i.e. no air
from outside the car is taken
into the car when this function is activated.
If the air in the car recirculates for too long,
there is a risk of condensation forming on the
insides of the windows, especially in winter.
TimerThe timer function minimizes the risk of fogging
or stale air when the recirculation function is
selected, see page 83 for information on set-
ting the recirculation timer.
NOTE
Recirculation is always disengaged if the
defroster button is engaged to clear ice or
condensation from the side windows.
4. DefrosterDirects airflow to the wind-
shield and side windows and
increases blower speed.
When the defroster is acti-
vated:
•Air flows to the windows at high blower
speed.
•The LED in the defroster button lights up
when this function is activated. The air con-
ditioning system is controlled to provide
maximum air dehumidification.
•The air conditioning is automatically
switched on (can be switched off by press-
ing button 6).
The air is not recirculated.
5. Airflow controlsPress one of the three buttons
in the illustration to activate
the selected airflow. A symbol
in the display above the cli-
mate control panel and a lit
LED in the selected button
indicate that the manual func-
tion has been selected. With manually selected
airflow both warm and cool air can be selected.
See also the table on page 100.
6. Air conditioning On/OffON: The air conditioning sys-
tem is engaged when the ON
light is lit and is controlled
automatically by the system
to maintain the selected tem-
perature.
OFF: The system is disengaged when the
OFF lights up
When OFF is selected and the OFF LED is lit,
the air conditioning system is deactivated.
Other functions are still controlled automati-
cally.
When Defroster (4) is selected, the air condi-
tioning system is activated for maximum dehu-
midifying.
Page 100 of 290
*
03
100* Option/accessory, for more information, see Introduction.
7 and 8. Heated front seats*
Maximum heating:
�
Press the button once – both LEDs ligh")
03 Climate
Electronic Climate Control (ECC)*
03
100* Option/accessory, for more information, see Introduction.
7 and 8. Heated front seats*
Maximum heating:
�
Press the button once – both LEDs light up.
Reduced heating:
�
Press the button a second time – one LED
lights up.
Seat heating off:
�
Press the button a third time – no LEDs are
lit.
9. Rear window and door mirror
defrosters
�
Press to defrost the rear window and door
mirrors.
The rear window and door mirrors are defros-
ted simultaneously if the switch is pressedonce. The defrost function is active if the LED
in the switch is illuminated.
•The function can be switched off manually
by pressing the button.
•The defrost function switches off automat-
ically after 12–20 minutes, depending on
the outside temperature.
NOTE
•On certain markets, the defrost function
may remain on longer than 20 minutes
in cold weather to help keep the rear
window free from ice or condensation.
10. Temperature selectorThe temperatures on the driv-
er's and passenger's sides
can be set separately using
the knob (with the thermome-
ter in it). The temperature can
be set for both sides of the car
when the ignition is switched
on (both LEDs will be on), which means that a
temperature setting will apply to both sides of
the car.
To set the temperature on one side of the car:1. Press the knob once. The LED for one side
of the car will light up. Turn the knob to
adjust the temperature.
2. Press the knob a second time to set the
temperature on the opposite side of the
car.
3. Press the knob a third time to set the tem-
perature on both sides of the car at the
same time.
NOTE
Selecting a temperature that is higher or
lower than necessary will not heat or cool
the passenger compartment faster.
Page 102 of 290
102
Front seats............................................................................................ 104
Interior lighting...................................................................................... 112
Storage compartments......................................................................... 113
Rear seat............................................................................................... 116
Cargo area............................................................................................ 118
Page 105 of 290
04 Interior
Front seats
04
��
105
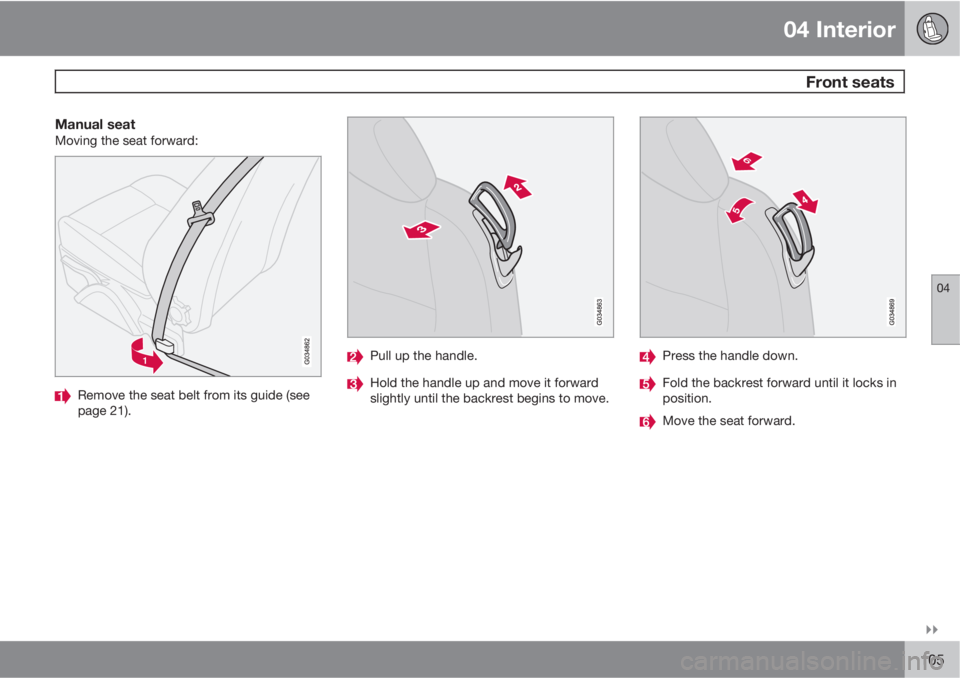
Manual seatMoving the seat forward:
Remove the seat belt from its guide (see
page 21).
Pull up the handle.
Hold the handle up and move it forward
slightly until the backrest begins to move.
Press the handle down.
Fold the backrest forward until it locks in
position.
Move the seat forward.
Page 106 of 290
04 Interior
Front seats
04
106
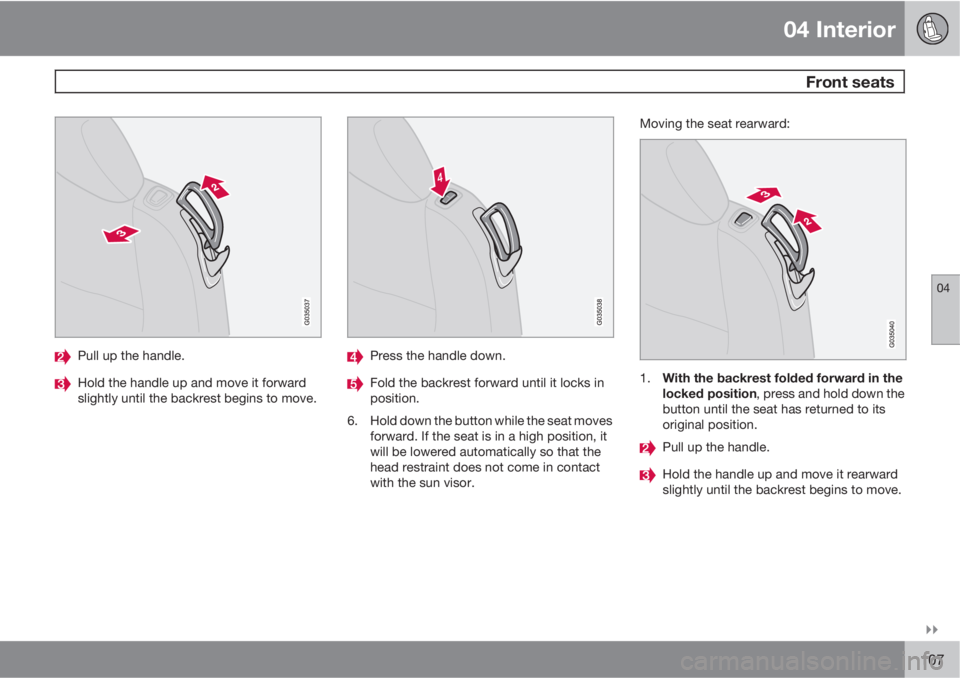
Moving the seat rearward:
With the backrest folded forward in the
locked position, slide the seat rearward
until it stops/locks in its original position.
Pull up the handle.
Hold the handle up and move it rearward
slightly until the backrest begins to move.
Press the handle down.
Fold up the backrest to the upright posi-
tion.
> The seat will return to the position it was
in before it was moved.
6. Return the seat belt to its guide.
Seat positionIf the seat does not return to its original posi-
tion:
1. Sit in the seat.
2. Lift the handle (1) and move the seat as far
rearward as possible.
3. While holding the handle up, move the seat
forward to the desired position.
Power seatMoving the seat forward:
Remove the seat belt from its guide (see
page 21).
Page 107 of 290
04 Interior
Front seats
04
��
107
Pull up the handle.
Hold the handle up and move it forward
slightly until the backrest begins to move.
Press the handle down.
Fold the backrest forward until it locks in
position.
6. Hold down the button while the seat moves
forward. If the seat is in a high position, it
will be lowered automatically so that the
head restraint does not come in contact
with the sun visor.Moving the seat rearward:1.
With the backrest folded forward in the
locked position, press and hold down the
button until the seat has returned to its
original position.
Pull up the handle.
Hold the handle up and move it rearward
slightly until the backrest begins to move.
Page 112 of 290

04 Interior
Interior lighting
04
112
Interior lighting
G020201
Front courtesy lights and reading lights
Front driver's side reading light, on/off
Courtesy lighting
Front passenger's side reading light, on/off
The front seat reading lights can be switched
on and off by pressing buttons (1) or (3) when
the ignition key is position I or II, or when the
engine is running.
The courtesy lighting (2) can be set to three
positions:
�
Press the left side of the button: the interior
courtesy lighting turns on.�
Neutral position: the interior courtesy light-
ing comes on when a door is opened, and
is switched off 10 seconds after the door is
closed.
�
Press the right side of the button: the inte-
rior courtesy lighting stays off.
Courtesy lighting – automatic function
The interior lighting has a built-in automatic
function that switches on the courtesy lighting
for 30 seconds when:
•the car is unlocked from the outside using
the key blade or remote key
•the engine is switched off and the ignition
key is turned to the 0 position.
The courtesy lighting lights up or remains on
for 5 minutes when:
•one of the doors is opened and left open.
•the courtesy lighting has not been
switched off (the right side of button 2
depressed).
The automatic lighting goes out when:
•the engine is started
•the car is locked from the outside using the
key blade or remote key.
If the courtesy lighting is not switched off man-
ually, it will be turned off automatically5 minutes after the engine has been switched
off.
Footwell lightingThe footwell (and courtesy lighting) comes on
or goes off when one of the side doors is
opened or closed.
Vanity mirror
G020210
Raise the cover to switch on the light.
Page 118 of 290

04 Interior
Cargo area
04
118* Option/accessory, for more information, see Introduction.
Load anchoring eyelets
G007602
The eyelets in the cargo area can be used to
fasten accessory load nets and lashing straps,
load nets, and other load anchors.
Hard cargo area cover*
G009475
Installing the cargo area cover1. Before lifting cover into the vehicle, retract
all four lock pins by pulling back the lock
buttons as far as possible. The pins will
remain retracted.
2. Lift the cover into the vehicle at an angle,
turn it back and raise the front edge
slightly.
3. Place the front section of the cover on the
two support pins behind the locking points
(A) on both sides of the vehicle.
G007611
4.
Place one of the rear locks at (B) and slide
the lock pin into position by moving the
lock button forward.
5. Put the other rear lock into position in the
same way and slide the lock pin into posi-
tion by moving the lock button forward.
6. Slide the front lock buttons forward, one at
a time, so that the lock pins move into
position (A).
NOTE
The rear section of the cover can be folded
up when loading items into the cargo area.