Page 99 of 290
*
03
��
* Option/accessory, for more information, see Introduction.99
2. Blower speedThe blower speed can be
increased or decreased by
turning the knob. The")
03 Climate
Electronic Climate Control (ECC)*
03
��
* Option/accessory, for more information, see Introduction.99
2. Blower speedThe blower speed can be
increased or decreased by
turning the knob. The blower
speed is regulated automati-
cally if AUTO is selected. The
previously set blower speed is
disconnected.
NOTE
If the knob is turned counterclockwise and
the blower indication in the display goes
out, the blower and the air conditioning are
switched off. The display shows the blower
symbol and
OFF.
3. RecirculationThis function can be used to
shut out exhaust fumes,
smoke, etc from the passen-
ger compartment. The air in
the passenger compartment
is then recirculated, i.e. no air
from outside the car is taken
into the car when this function is activated.
If the air in the car recirculates for too long,
there is a risk of condensation forming on the
insides of the windows, especially in winter.
TimerThe timer function minimizes the risk of fogging
or stale air when the recirculation function is
selected, see page 83 for information on set-
ting the recirculation timer.
NOTE
Recirculation is always disengaged if the
defroster button is engaged to clear ice or
condensation from the side windows.
4. DefrosterDirects airflow to the wind-
shield and side windows and
increases blower speed.
When the defroster is acti-
vated:
•Air flows to the windows at high blower
speed.
•The LED in the defroster button lights up
when this function is activated. The air con-
ditioning system is controlled to provide
maximum air dehumidification.
•The air conditioning is automatically
switched on (can be switched off by press-
ing button 6).
The air is not recirculated.
5. Airflow controlsPress one of the three buttons
in the illustration to activate
the selected airflow. A symbol
in the display above the cli-
mate control panel and a lit
LED in the selected button
indicate that the manual func-
tion has been selected. With manually selected
airflow both warm and cool air can be selected.
See also the table on page 100.
6. Air conditioning On/OffON: The air conditioning sys-
tem is engaged when the ON
light is lit and is controlled
automatically by the system
to maintain the selected tem-
perature.
OFF: The system is disengaged when the
OFF lights up
When OFF is selected and the OFF LED is lit,
the air conditioning system is deactivated.
Other functions are still controlled automati-
cally.
When Defroster (4) is selected, the air condi-
tioning system is activated for maximum dehu-
midifying.
Page 105 of 290
04 Interior
Front seats
04
��
105
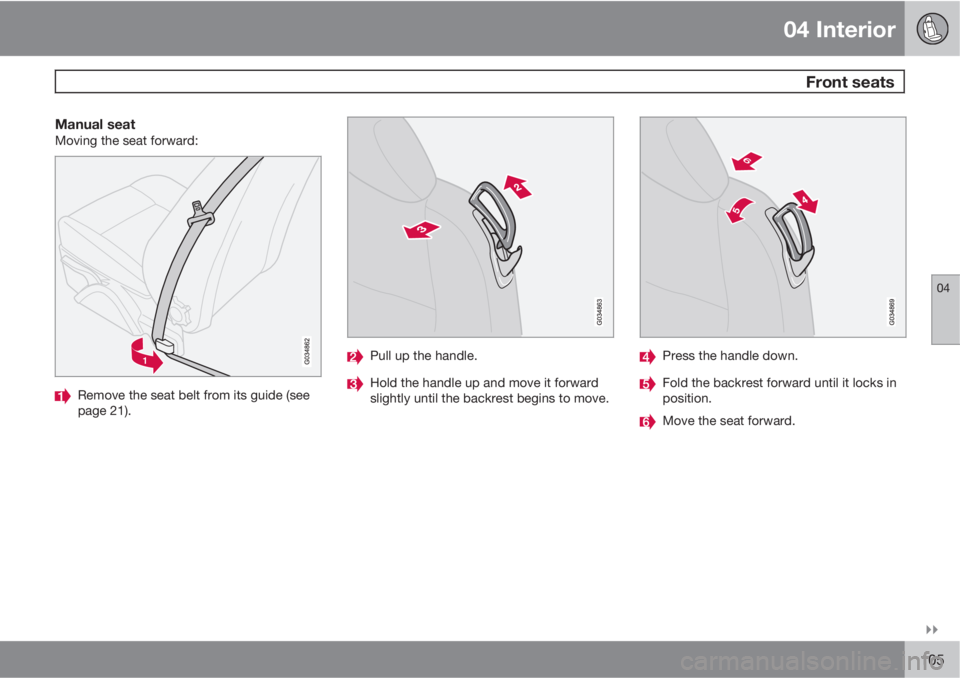
Manual seatMoving the seat forward:
Remove the seat belt from its guide (see
page 21).
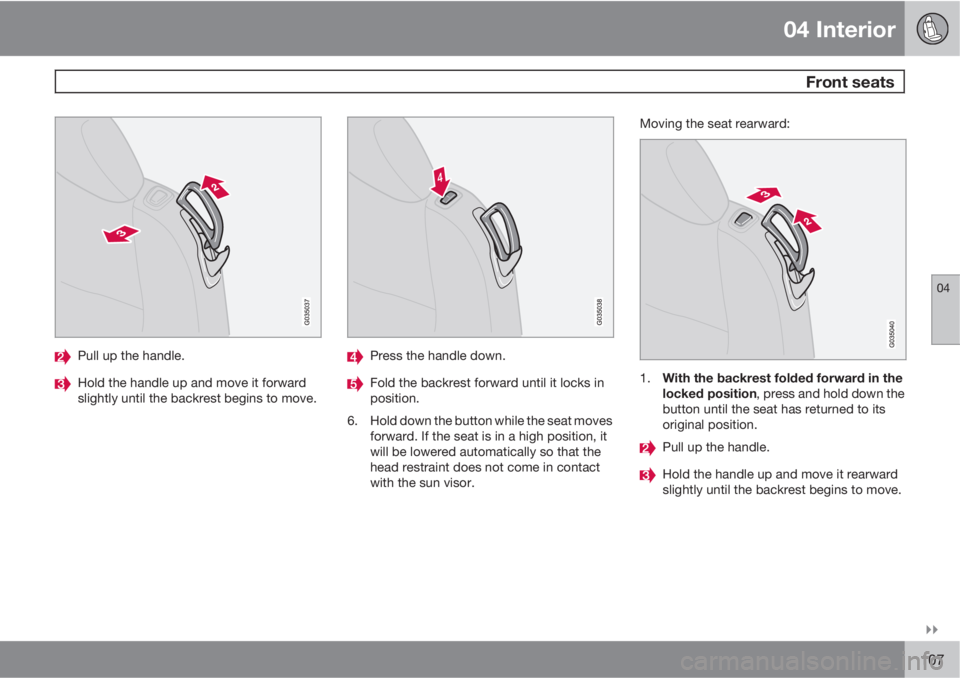
Pull up the handle.
Hold the handle up and move it forward
slightly until the backrest begins to move.
Press the handle down.
Fold the backrest forward until it locks in
position.
Move the seat forward.
Page 106 of 290
04 Interior
Front seats
04
106
Moving the seat rearward:
With the backrest folded forward in the
locked position, slide the seat rearward
until it stops/locks in its original position.
Pull up the handle.
Hold the handle up and move it rearward
slightly until the backrest begins to move.
Press the handle down.
Fold up the backrest to the upright posi-
tion.
> The seat will return to the position it was
in before it was moved.
6. Return the seat belt to its guide.
Seat positionIf the seat does not return to its original posi-
tion:
1. Sit in the seat.
2. Lift the handle (1) and move the seat as far
rearward as possible.
3. While holding the handle up, move the seat
forward to the desired position.
Power seatMoving the seat forward:
Remove the seat belt from its guide (see
page 21).
Page 107 of 290
04 Interior
Front seats
04
��
107
Pull up the handle.
Hold the handle up and move it forward
slightly until the backrest begins to move.
Press the handle down.
Fold the backrest forward until it locks in
position.
6. Hold down the button while the seat moves
forward. If the seat is in a high position, it
will be lowered automatically so that the
head restraint does not come in contact
with the sun visor.Moving the seat rearward:1.
With the backrest folded forward in the
locked position, press and hold down the
button until the seat has returned to its
original position.
Pull up the handle.
Hold the handle up and move it rearward
slightly until the backrest begins to move.
Page 108 of 290

04 Interior
Front seats
04
108* Option/accessory, for more information, see Introduction.
Press the handle down.
Fold up the backrest to the upright posi-
tion.
> The seat will return to its original posi-
tion.
6. Return the seat belt to its guide.
The front passenger's seat belt should be
in its guide while the vehicle is being driven,
even if the seat is not occupied.
WARNING
After the seat has been returned to its orig-
inal position, be sure that the backrest is
securely locked in the upright position.
Power seats*
The power driver's seat can be adjusted:
•If the ignition key is in position I or II.
•During a 10 minute period after the doors
have been unlocked if the door remains
open.
•If the door is closed and the ignition key is
not yet in the ignition, or if the key is in
position 0, the seat can be adjusted or dur-
ing a period of 40 seconds. The power
passenger's seat can only be adjusted if
the ignition key is in position I or II, or if the
engine is running.
Adjusting the seat
G020199
Seat adjustment controls
Seat adjustment controls 1, 2, 3, and 4 on the
side of the seat can be used to move the seat
to the position of your choice.
Move this section of the control up or down
to raise/lower the front section of the seat
cushion.
Move the control forward/rearward to
move the seat forward or rearward.
Move this section of the control up or down
to raise/lower the rear section of the seat
cushion.
Backrest tilt.
NOTE
Both front seats are equipped with head
restraints that can be adjusted vertically to
suit the height of the passenger. The upper
edge of the head restraint should be at least
on a level with the upper-most point of the
seat occupant's ear (see the section
"Adjusting the front seat head restraints" on
page 110).
NOTE
The power seats have an overload protector
that activates if a seat is blocked by any
object. If this occurs, switch off the ignition
(key in position 0) and wait for approxi-
mately 20 seconds before operating the
seat again.
Page 109 of 290

04 Interior
Front seats
04
��
* Option/accessory, for more information, see Introduction.109
Emergency stopIf the seat inadvertently begins to move, press
any of the buttons to stop the seat.
Programming the seat memory, driver's
seat only*
G020200
Power seat memory buttons
Three different seating positions can be stored
in the seat's memory. The memory buttons are
located on the outboard side of the driver's
seat (see the illustration above). The following
example explains how memory button 1 can be
programmed. Buttons 2 and 3 can be pro-
grammed in the same way.
To program (store) a seat position in memory
button 1:1. Adjust the seat to the desired position.
2.
Press and hold down the "M" (Memory)
button.
3.
With the "M" button depressed, press
memory button 1 to store the seat's current
position.
To move the seat to the position that it was in
when memory button 1 was programmed,
press and hold down button 1 until the seat
stops moving.
As a safety precaution, the seat will stop auto-
matically if the button is released before the
seat has reached the preset position.
Central locking system remote key and
driver's seat memory
The remote key transmitter can also be equip-
ped with an optional function that controls the
electrically operated driver's seat in the follow-
ing way:
1. Adjust the seat to the desired position.
2. When you leave the car, lock it using the
remote key.
3. The next time the driver's door is unlocked
with the same remote key and that door is
opened within 2 minutes, the driver's seat
and side door mirrors will automatically
move to the position that they were in whenthe doors were most recently locked with
the same remote key.
NOTE
The memory function in the remote key
operates independently the memory func-
tion in the seat.
WARNING
•Because the driver's seat can be
adjusted with the ignition off, children
should never be left unattended in the
car.
•Movement of the seat can be STOPPED
at any time by pressing any button on
the power seat control panel.
•Do not adjust the seat while driving. The
seat should be adjusted so that the
brake pedal can be depressed fully. In
addition, position the seat as far rear-
ward as comfort and control allow.
•The seat rails on the floor must not be
obstructed in any way when the seat is
in motion.
Page 110 of 290

04 Interior
Front seats
04
110
Adjusting the front seat head restraints
The front seat head restraints are designed so
that they can be adjusted to two different
height positions.
NOTE
•When the vehicle leaves the factory, the
front seat head restraints will be in the
lower position.
•It is advisable to have the front seat
head restraints in the lower position if
you wish to fold down the seat's back-
rest.
The head restraints should be put in the upper
or lower position according to the height of the
occupant of the seat.
The upper edge of the head restraint should be
at least on a level with the upper-most point of
the seat occupant's ear (see illustration).
To raise or lower a head restraint:
Raising or lowering a head restraint1. Release the head restraint by pressing the
button underneath its left side, at the base
of the support (see the illustration).
2. Move the head restraint until it clicks
(locks) into the upper or lower position.
WARNING
After adjusting the head restraint, be sure
that it is securely locked in the new position
by pressing and/or pulling it.
Removing a head restraintThe front seat head restraints can be removed,
for example, when cleaning the upholstery or if
the front passenger's seat backrest is folded
down to accommodate a long load. To do so:
1. Release the head restraint by pressing the
release button underneath its left side, at
the base of the support.
2. While holding in the release button, press
the locking button at the base of the head
restraint's right support with a screw
driver, etc., and lift the head restraint until
it can be removed completely.
Page 111 of 290
04 Interior
Front seats
04
111
WARNING
•If a front seat head restraint has been
removed, it must be put properly back
in place and it must lock (click) into one
of the available adjustment positions
before the seat is occupied.
•The front seat head restraints must be
in position and properly adjusted to the
height of the person sitting in the seat
when the vehicle is driven and when the
front passenger's seat is occupied.

 into one
of the available adjustment position")