2011 VOLKSWAGEN CC alarm
[x] Cancel search: alarmPage 61 of 578

You can obtain additional or duplicate remote control vehicle keys
from authorized Volkswagen dealers, authorized Volkswagen Service
Facilities, and from certain independent repair facilities and lock-
smiths which are qualified to make remote control vehicle keys.
Each vehicle key must be programmed by an authorized Volkswagen
dealer or an authorized Volkswagen Service Facility in order for it to
work with your vehicle.
To find the nearest qualified independent repair facility, locksmith, or
Volkswagen dealer which can cut and code replacement vehicle
keys, call the VW Customer Care Hotline at 1-800-822-8987 or visit
http://www.vw.com and search for “replacement keys.”
Canadian customers can contact an authorized Volkswagen dealer or
Volkswagen Service Facility or call the Volkswagen Canada Custom-
er CARE Center at 1-800-822-8987.
NOTICE
The remote control vehicle keys contain electrical components.
Protect them from damage, moisture and rough handling.
Do not press the buttons on the remote control vehicle key unless
you actually want to use the function in question. Since terrain and
conditions vary, pressing a button on the remote control vehicle key
when it is not necessary may unlock the vehicle or set off the panic
alarm, even if you think you are out of range.
Remote control vehicle key functions can be temporarily disrupt-
ed by interference from transmitters near the vehicle that use the
same frequency range (such as radio equipment or mobile phones).
Things between the remote control vehicle key and vehicle, bad
weather, as well as a weak battery can reduce the operating range.
If the remote control vehicle key buttons ⇒ fig. 20 or the power
locking buttons⇒ Unlocking or locking the vehicle from the inside are
pushed repeatedly in quick succession, the power locking system is
switched off for a brief period to help keep it from being overloaded.
The vehicle is then unlocked for about 30 seconds. Unless a door or
Page 94 of 578

The buttons 1 , 2 , and 3 on the keypad in the sun visor can operate
up to 3 separate devices (for example, a gate and garage door,
house alarm or lighting system).
Please carry out each step only in the order specified:
1. For first time programming only: Press and hold the two
outer HomeLink buttons 1 and 3 at the same time for about 20
seconds, releasing only when the HomeLink indicator light
above button 2 begins to flash.
This step deletes any old settings. Do not perform this step
when programming the additional HomeLink buttons.
2. Position the hand-held transmitter for your remote control de-
vice 1-3 inches (25-75 mm) away from the HomeLink keypad
on the driver side sun visor, keeping the HomeLink indicator
light in view, as shown ⇒ fig. 41.
3. Using both hands, simultaneously press and hold both the
HomeLink button you want to program ( 1 , 2 , or 3 ) and the
hand-held transmitter button, as shown ⇒ fig. 42. Do not re-
lease the buttons until the HomeLink indicator light flash-
es slowly and then rapidly. When the indicator light flashes
rapidly, release both buttons. The rapid flashing indicates suc-
cessful programming.
4.
Press and hold the programmed HomeLink button and watch
the indicator light.
If the indicator light comes on and does not flash, programming
is complete and your garage door opener or other device
should activate when the HomeLink button is pressed and re-
leased.
If the indicator light blinks rapidly for 2 seconds and then stays
on, proceed with the following programming instructions for a
rolling code device. A second person may make the following
steps quicker and easier. Please use a ladder or other device.
Do not stand on your vehicle to perform the next steps ⇒ in
Operating the HomeLink® Universal Transmitter
Page 415 of 578

WARNING
Operating fluids and some materials in the engine compartment
can catch fire easily, causing burns and other serious personal
injuries!
� Never smoke near the engine compartment.
� Never work next to open flames or sparks.
� Never pour or spill operating fluids or other flammable liq-
uids on the engine. These fluids can ignite on hot engine parts
and cause injuries.
� If work on the fuel system or the electrical system is neces-
sary:
– Always disconnect the 12 Volt vehicle battery. Make sure
the vehicle is unlocked when you disconnect the battery, or
the alarm will go off. Never touch the electrical wiring of the
ignition system.
– Never work near heaters, water heaters, or other open
flames.
� Always have a functional, approved fire extinguisher nearby.
NOTICE
When changing or topping off fluids, make sure that you pour
the fluids into the correct reservoirs. Adding the wrong type of
operating fluids will cause serious malfunctions and engine
damage.
Fluid leaks and spills are harmful to the environment. Regularly
check the ground underneath your vehicle for this reason. If you find
spots of oil or other fluids, have your vehicle checked by your author-
ized Volkswagen dealer or authorized Volkswagen Service Facility.
Dispose of leaked operating fluids properly.
Display
�
Page 450 of 578

Only use maintenance-free vehicle batteries meeting standards
TL 825 06 and VW 7 50 73. These standards must date from Au-
gust 2008 or later.
Disconnecting the vehicle battery
If the battery must be disconnected from the vehicle's electrical sys-
tem, note the following:
� Switch off all electrical systems and devices and the ignition.
� Unlock the vehicle before disconnecting the battery; otherwise the
alarm system will go off.
� First disconnect the negative cable (-) and then the positive cable
(+) ⇒ .
Connecting the vehicle battery
� Prior to reconnecting the battery, switch off all electrical systems
and devices and the ignition.
� Connect the positive cable (+) first and then the negative cable (-)
⇒ .
After the battery is connected and the ignition is switched on, different
indicator lights may come on. They should go out after you drive a
short distance at 10–12 mph (15–20 km/h). If the indicator lights do
not go out, contact an authorized Volkswagen dealer or an authorized
Volkswagen Service Facility and have the vehicle checked.
If the battery was disconnected for a long time, the next scheduled
service may not be correctly calculated and displayed ⇒ page 12,
Instrument cluster. The maximum permissible service and mainte-
nance intervals are shown in the ⇒ Booklet Warranty and Mainte-
nance.
Vehicles with Keyless Access
If the ignition will not start after reconnecting the vehicle battery, lock
the vehicle from the outside and unlock it again ⇒ Unlocking or lock-
ing the vehicle with Keyless Access, ⇒ Unlocking or locking the vehi-
cle with Keyless Access. Then try to start the ignition again. If the
ignition cannot be switched on, contact an authorized Volkswagen
dealer, an authorized Volkswagen Service Facility, or another quali-
fied workshop for assistance.
Page 509 of 578

� Switch on the ignition. The electronic immobilizer recognizes a val-
id remote control vehicle key when the ignition is switched on and
deactivates the anti-theft alarm system.
The driver door can be unlocked separately from the inside the
vehicle by pulling the door handle to open the door ⇒ Unlocking or
locking the vehicle from the inside.
The anti-theft alarm system, when installed, is not activated when
the vehicle is locked manually with the emergency key ⇒ page 67,
Power locking and closing system.
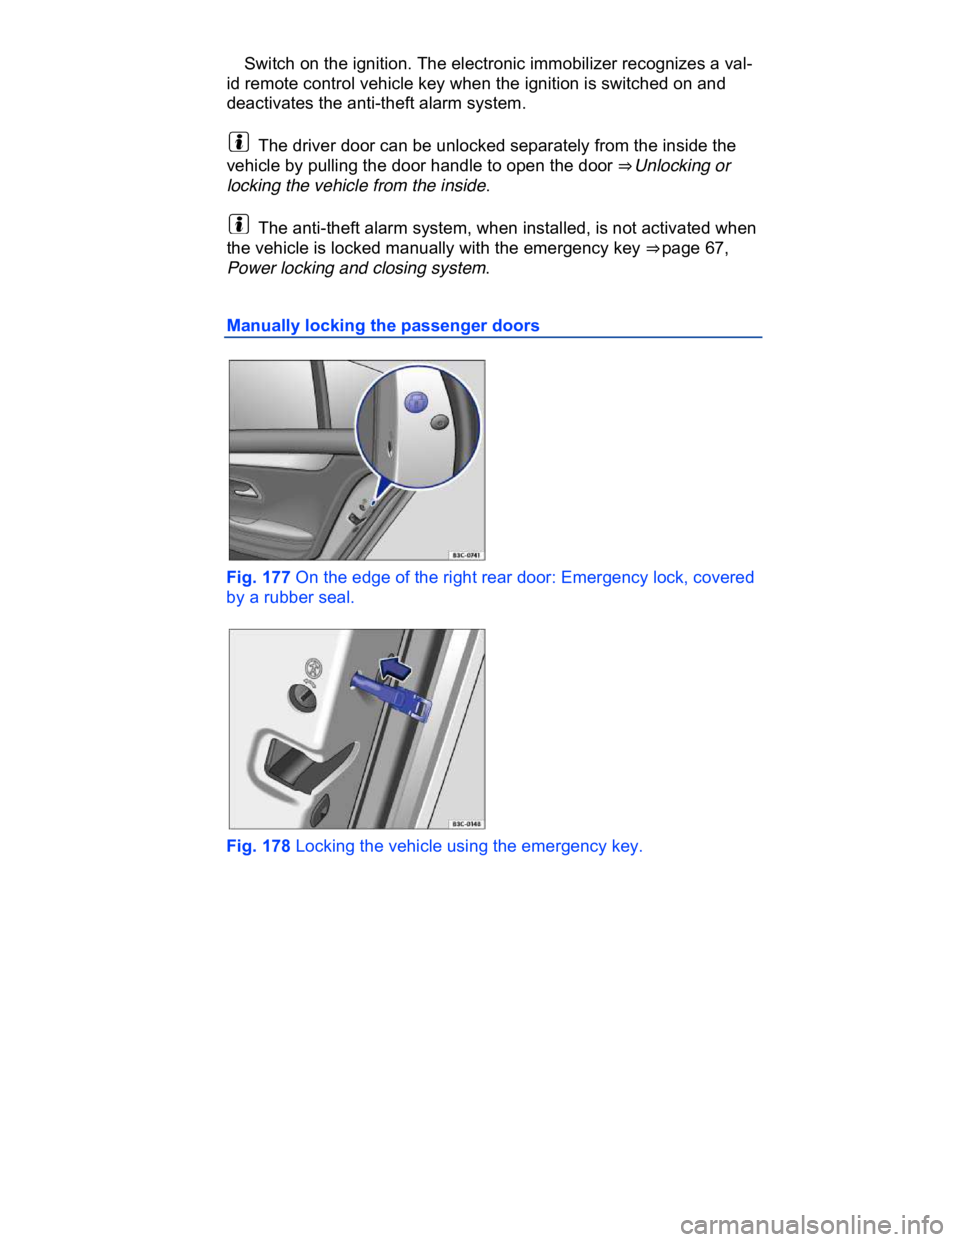
Manually locking the passenger doors
Fig. 177 On the edge of the right rear door: Emergency lock, covered
by a rubber seal.
Fig. 178 Locking the vehicle using the emergency key.
Page 577 of 578

Abbreviations
Abbreviation Meaning
ABS Anti-lock Brake System
AFS Adaptive Front Lighting System
AKI Anti-Knock Index
ANSI American National Standards Institute
ASR Anti-Slip Regulation
ATA Anti-Theft Alarm system
BAS Brake Assist System
ccm Cubic centimeter – metric unit of measure for engine
displacement
CCS Cruise Control System
CID Cubic inch displacement – unit of measure for engine
displacement
cm Centimeter – metric unit of measure for length
CO2 Carbon dioxide
DIN Deutsches Institut für Normung (German Institute for
Standardization)
DRL Daytime Running Lights
DSG® Direct Shift Gearbox automatic transmission
EDL Electronic Differential Lock
EN European Norm
EPC Engine control (Electronic Power Control)
ESC Electronic Stability Control
g/km Generated carbon monoxide amount in grams per
kilometer driven
GAWR Gross Axle Weight Rating
GVWR Gross Vehicle Weight Rating
HID High Intensity Discharge headlights (Xenon)