Page 4 of 416

TABLE OF CONTENTSIndex
4
4-3. Do-it-yourself maintenanceDo-it-yourself service precautions ...................... 250
Hood................................... 253
Positioning a floor jack ....... 254
Engine compartment .......... 256
Tires ................................... 269
Tire inflation pressure......... 275
Wheels ............................... 279
Air conditioning filter ........... 281
Key battery ......................... 284
Checking and replacing fuses ................................ 286
Light bulbs .......................... 297
5-1. Essential information Emergency flashers ........... 308
If your vehicle needs to be towed ............................... 309
If you think something is wrong ............................... 315
Fuel pump shut off system .............................. 316
Event data recorder............ 317 5-2. Steps to take in an emergency
If a warning light turns on or a warning buzzer
sounds... ........................... 319
If you have a flat tire ........... 329
If the engine will not start .... 341
If the shift lever cannot be shifted from P (vehicles
with an automatic
transmission) .................... 343
If you lose your keys ........... 344
If the vehicle battery is discharged ........................ 345
If your vehicle overheats..... 349
If the vehicle becomes stuck ................................. 352
If your vehicle has to be stopped in an
emergency........................ 354
6-1. Specifications Maintenance data (fuel, oil level, etc.) ........... 358
Fuel information .................. 367
Tire information................... 370
6-2. Customization Customizable features ........ 383
Items to initialize ................. 385
5When trouble arises
6Vehicle specifications
Page 136 of 416
136
2-1. Driving procedures
Tur n signal lever
■Turn signals can be operated when
The engine switch is in the ON position.
■ If the indicators flash faster than usual
Check that a light bulb in the front or rear turn signal lights has not burned
out.
Left turn
Right turn
Move and hold the lever
partway to signal a lane
change.
The left hand signal will flash
until you release the lever.
Move and hold the lever
partway to signal a lane
change.
The right hand signal will flash
until you release the lever.
Page 237 of 416
Maintenance and care4
237
4-1. Maintenance and careCleaning and protecting the vehicle exterior......... 238
Cleaning and protecting the vehicle interior.......... 241
4-2. Maintenance Maintenance requirements .................. 244
General maintenance....... 246
Emission inspection and maintenance (I/M)
programs........................ 249 4-3. Do-it-yourself maintenance
Do-it-yourself service precautions .................... 250
Hood ................................ 253
Positioning a floor jack ..... 254
Engine compartment ........ 256
Tires ................................. 269
Tire inflation pressure ...... 275
Wheels ............................. 279
Air conditioning filter......... 281
Key battery ....................... 284
Checking and replacing fuses .............................. 286
Light bulbs........................ 297
Page 251 of 416

251
4-3. Do-it-yourself maintenance
4
Maintenance and care
CAUTION
The engine compartment contains many mechanisms and fluids that may
move suddenly, become hot, or become electrically energized. To avoid death
or serious injury observe the following precautions.
■
When working on the engine compartment
●Keep hands, clothing, and tools away from the moving fan and engine
drive belt.
● Be careful not to touch the engine, radiator, exhaust manifold, etc. right
after driving as they may be hot. Oil and other fluids may also be hot.
● Do not leave anything that may burn easily, such as paper or rags, in the
engine compartment.
● Do not smoke, cause sparks or expose an open flame to fuel or the bat-
tery. Fuel and battery fumes are flammable.
● Be extremely cautious when working on the battery. It contains poisonous
and corrosive sulfuric acid.
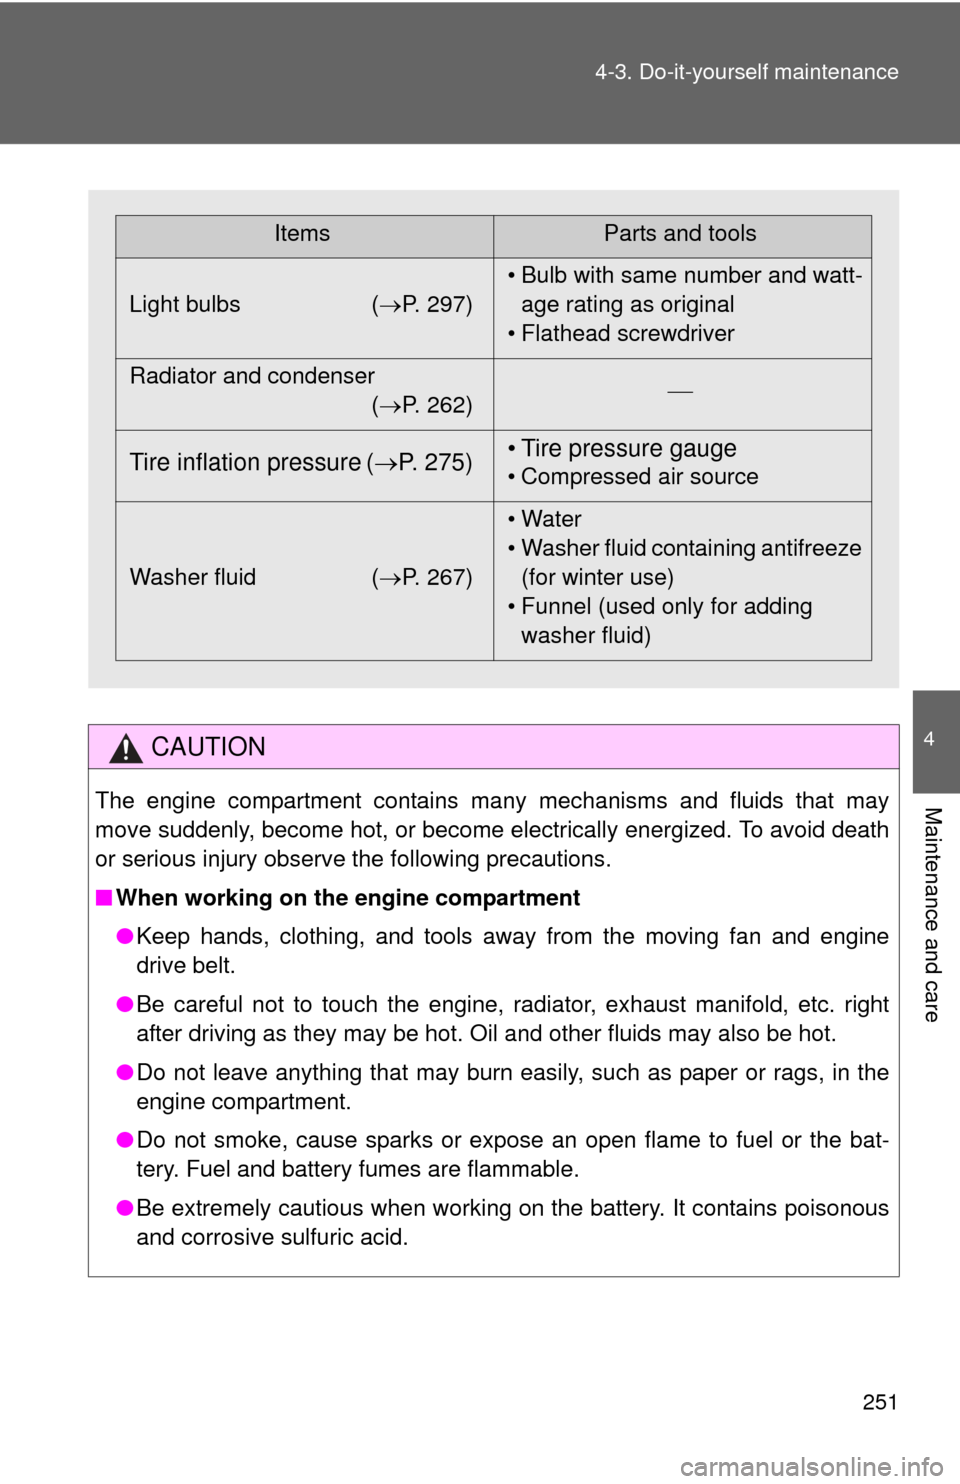
ItemsParts and tools
Light bulbs ( P. 297)• Bulb with same number and watt-
age rating as original
• Flathead screwdriver
Radiator and condenser (P. 262)
Tire inflation pressure (
P. 275) • Tire pressure gauge• Compressed air source
Washer fluid ( P. 267)• Water
• Washer fluid containing antifreeze
(for winter use)
• Funnel (used only for adding washer fluid)
Page 296 of 416

296 4-3. Do-it-yourself maintenance
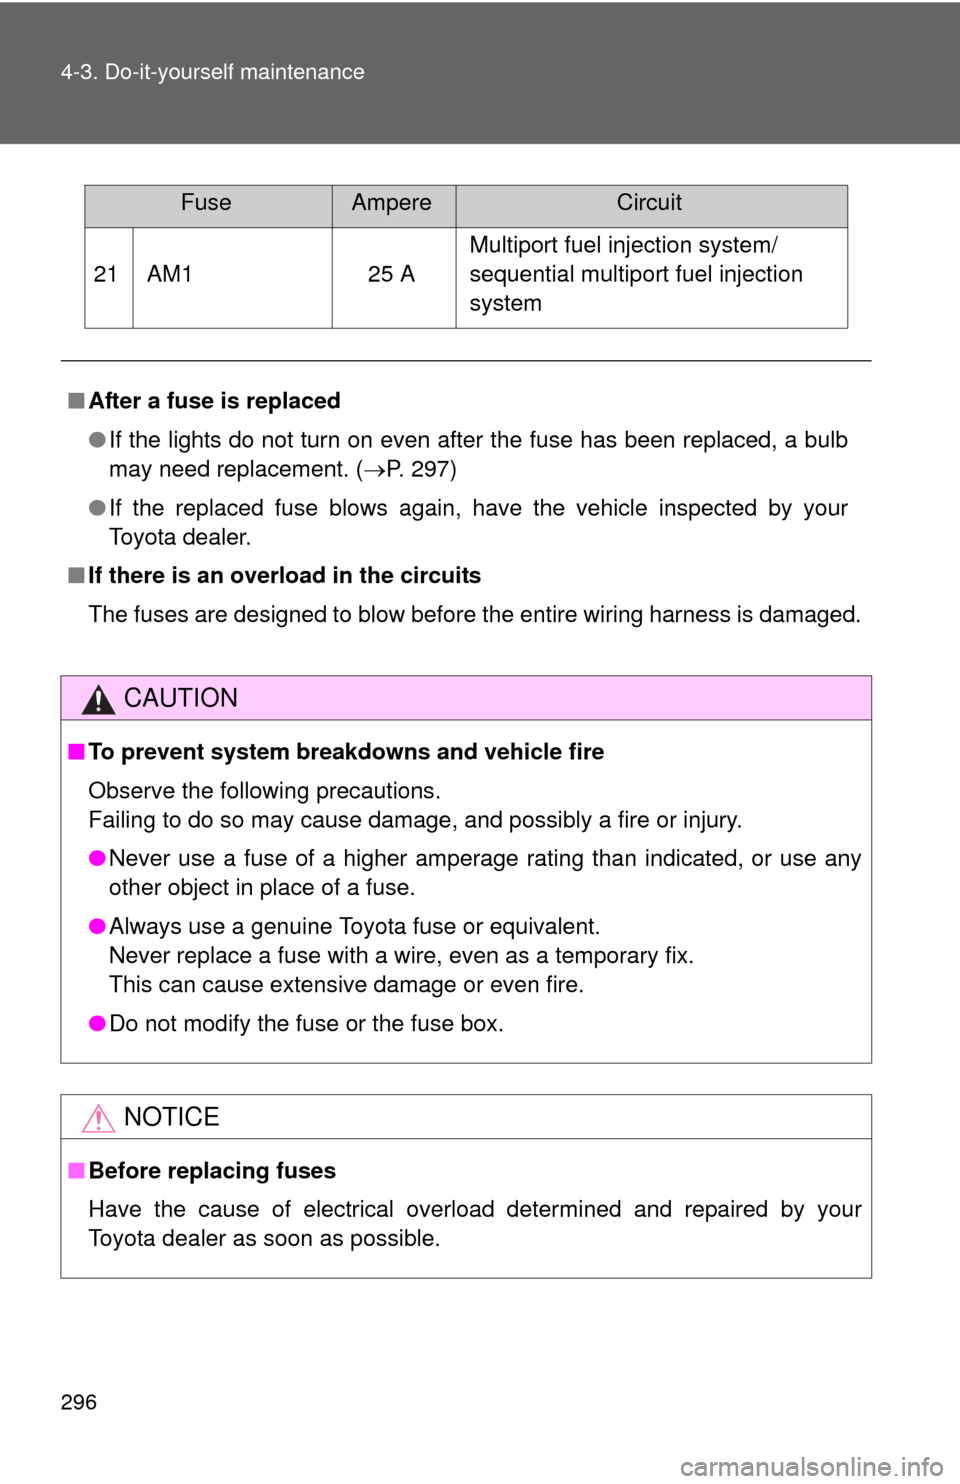
21 AM125 AMultiport fuel injection system/
sequential multiport fuel injection
system
■ After a fuse is replaced
●If the lights do not turn on even after the fuse has been replaced, a bulb
may need replacement. ( P. 297)
● If the replaced fuse blows again, have the vehicle inspected by your
Toyota dealer.
■ If there is an overload in the circuits
The fuses are designed to blow before the entire wiring harness is damaged.
CAUTION
■To prevent system breakdowns and vehicle fire
Observe the following precautions.
Failing to do so may cause damage, and possibly a fire or injury.
●Never use a fuse of a higher amperage rating than indicated, or use any
other object in place of a fuse.
● Always use a genuine Toyota fuse or equivalent.
Never replace a fuse with a wire, even as a temporary fix.
This can cause extensive damage or even fire.
● Do not modify the fuse or the fuse box.
NOTICE
■Before replacing fuses
Have the cause of electrical overload determined and repaired by your
Toyota dealer as soon as possible.
FuseAmpereCircuit
Page 297 of 416
297
4-3. Do-it-yourself maintenance
4
Maintenance and care
Light bulbs
You may replace the following bulbs yourself. The difficulty level of
replacement varies depending on the bulb. If necessary bulb
replacement seems difficult to perfor m, contact your Toyota dealer.
For more information about replacing other light bulbs, contact your
Toyota dealer.
■ Prepare a replacement light bulb.
Check the wattage of the light bulb being replaced. ( P. 366)
■ Front bulb locations
Headlights and
daytime running
lights (if equipped)
Front fog lights
(if equipped)
Front side marker lights
Front turn signal lights
Parking lights
Page 298 of 416
298 4-3. Do-it-yourself maintenance
Replacing light bulbs■ Headlights and daytime running lights (if equipped)
Unplug the connector.
Remove the rubber cover.
■Rear bulb locations
Back-up lights
Rear turn signal lights Stop/tail and rear
side marker lights
License
plate light
Page 299 of 416
299
4-3. Do-it-yourself maintenance
4
Maintenance and care
Release the bulb retaining
spring.
Remove the bulb.
To install a new bulb, align the
tabs of the bulb with the cutouts
of the mounting hole.
■
Front fog lights (if equipped)
Remove the bolts and clips.
Partly remove the fender liner.