Page 233 of 732

233
2-4. Using other
driving systems
2
When driving
■Rear view monitor system camera
■ Smear effect
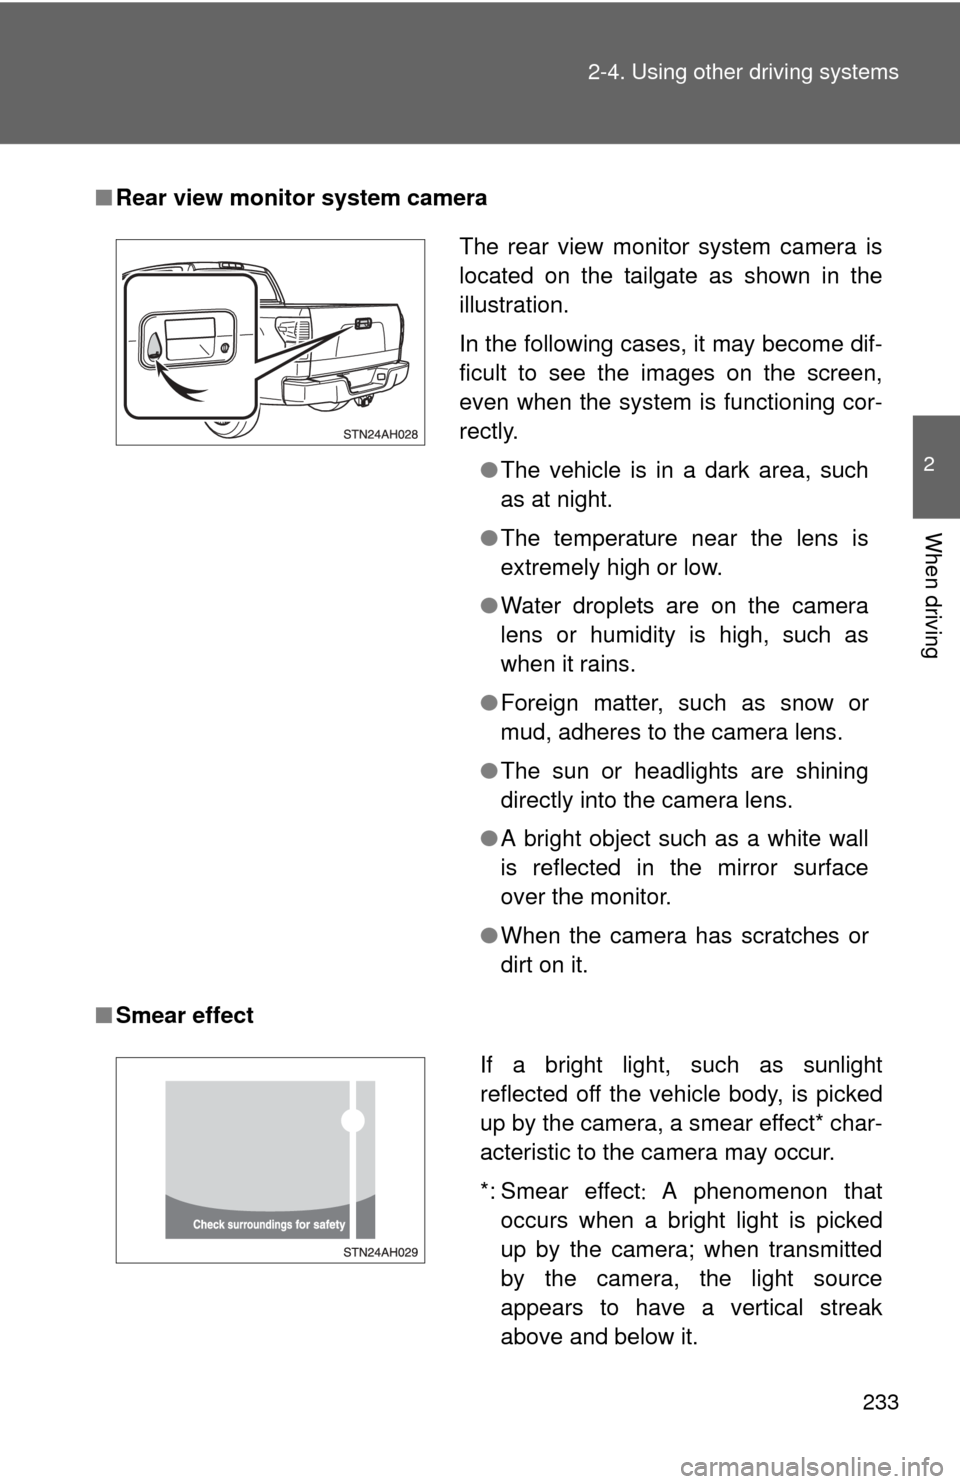
The rear view monitor system camera is
located on the tailgate as shown in the
illustration.
In the following cases, it may become dif-
ficult to see the images on the screen,
even when the system is functioning cor-
rectly.
●The vehicle is in a dark area, such
as at night.
● The temperature near the lens is
extremely high or low.
● Water droplets are on the camera
lens or humidity is high, such as
when it rains.
● Foreign matter, such as snow or
mud, adheres to the camera lens.
● The sun or headlights are shining
directly into the camera lens.
● A bright object such as a white wall
is reflected in the mirror surface
over the monitor.
● When the camera has scratches or
dirt on it.
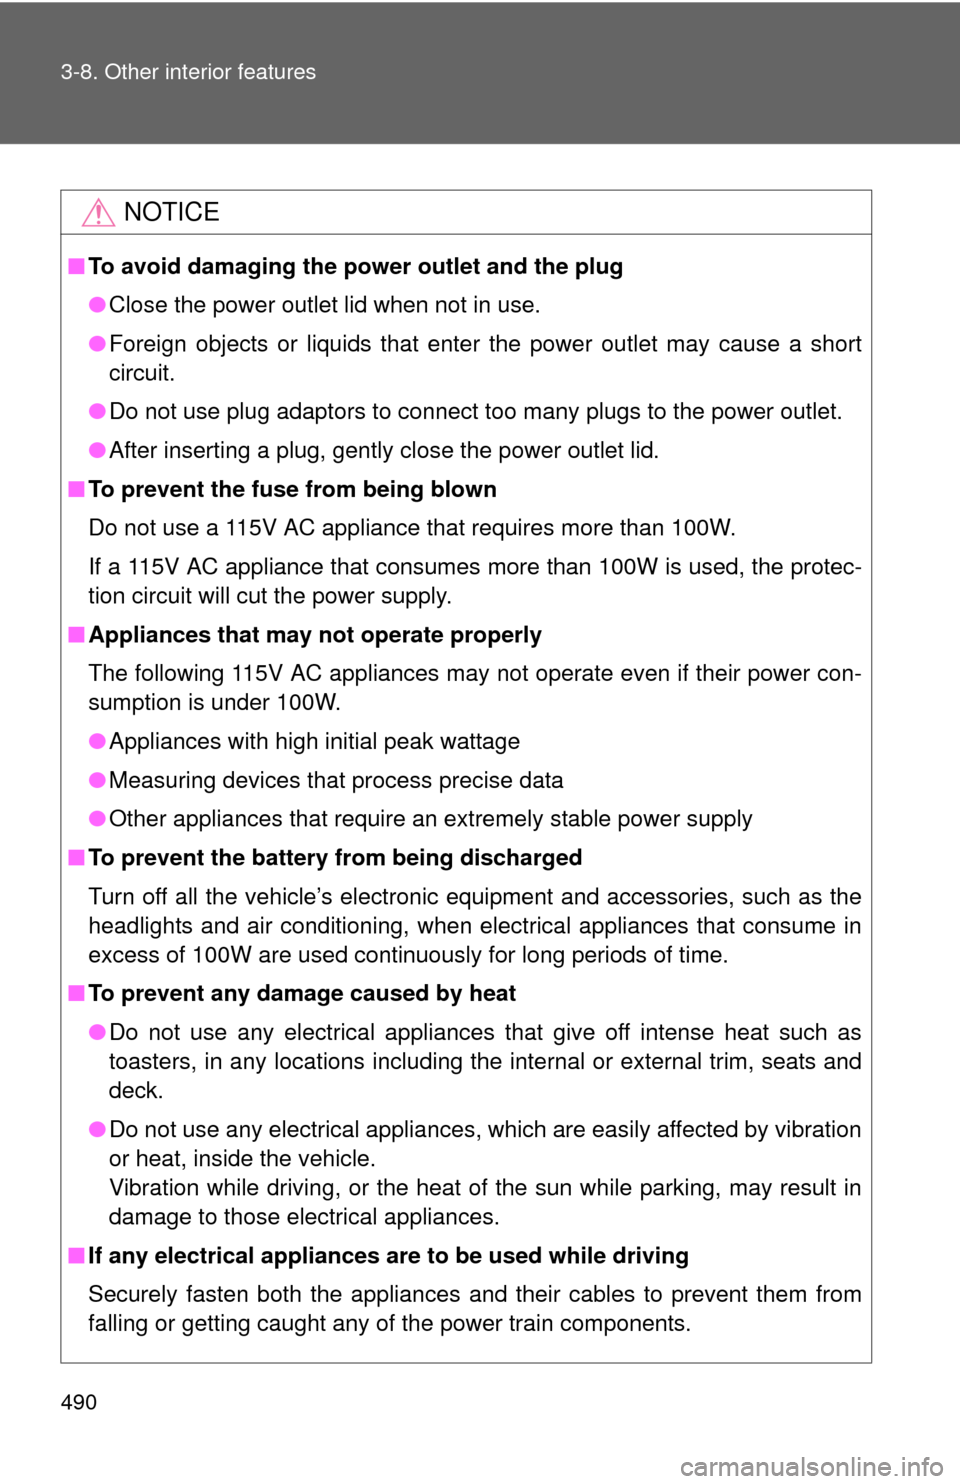
If a bright light, such as sunlight
reflected off the vehicle body, is picked
up by the camera, a smear effect* char-
acteristic to the camera may occur.
*: Smear effect A phenomenon that
occurs when a bright light is picked
up by the camera; when transmitted
by the camera, the light source
appears to have a vertical streak
above and below it.
Page 490 of 732

490 3-8. Other interior features
NOTICE
■To avoid damaging the power outlet and the plug
●Close the power outlet lid when not in use.
● Foreign objects or liquids that enter the power outlet may cause a short
circuit.
● Do not use plug adaptors to connect too many plugs to the power outlet.
● After inserting a plug, gently close the power outlet lid.
■ To prevent the fuse from being blown
Do not use a 115V AC appliance that requires more than 100W.
If a 115V AC appliance that consumes more than 100W is used, the protec-
tion circuit will cut the power supply.
■ Appliances that may not operate properly
The following 115V AC appliances may not operate even if their power con-
sumption is under 100W.
●Appliances with high initial peak wattage
● Measuring devices that process precise data
● Other appliances that require an extremely stable power supply
■ To prevent the battery from being discharged
Turn off all the vehicle’s electronic equipment and accessories, such as the
headlights and air conditioning, when elec trical appliances that consume in
excess of 100W are used continuously for long periods of time.
■ To prevent any damage caused by heat
●Do not use any electrical appliances that give off intense heat such as
toasters, in any locations including the internal or external trim, seats and
deck.
● Do not use any electrical appliances, which are easily affected by vibration
or heat, inside the vehicle.
Vibration while driving, or the heat of the sun while parking, may result in
damage to those electrical appliances.
■ If any electrical appliances are to be used while driving
Securely fasten both the appliances and their cables to prevent them from
falling or getting caught any of the power train components.
Page 525 of 732
525
4-2. Maintenance
4
Maintenance and care
Vehicle interior
ItemsCheck points
Accelerator pedal • Moves smoothly (without uneven
pedal effort or catching)?
Automatic transmission “Park”
mechanism • Can the vehicle be held securely
on an incline with the shift lever in
P?
Brake pedal • Moves smoothly?
• Does it have appropriate clear-
ance and correct amount of free
play?
Brakes • Not pull to one side when
applied?
• Loss of brake effectiveness?
• Spongy feeling brake pedal?
• Pedal almost touches floor?
Head restraints • Move smoothly and lock
securely?
Indicators/buzzers • Function properly?
Lights • Do all the lights come on?
• Headlights aimed correctly?
Parking brake • Moves smoothly?
• Can hold the vehicle securely on
an incline?
Seat belts • Does the seat belt system oper-
ate smoothly?
• Are the belts undamaged?
Seats • Do the seat controls operate
properly?
Steering wheel • Moves smoothly?
• Has correct free play?
• No strange noises?
Page 586 of 732
586 4-3. Do-it-yourself maintenance
CAUTION
■Replacing light bulbs
●Turn off the headlights. Do not attempt to replace the bulb immediately
after turning off the headlights.
The bulbs become very hot and may cause burns.
● Do not touch the glass portion of the light bulb with bare hands. Hold the
bulb by the plastic or metal portion.
If the bulb is scratched or dropped it may blow out or crack.
● Fully install light bulbs and any parts used to secure them. Failing to do so
may result in heat damage, fire, or water entering the headlight unit. This
may damage the headlights or cause condensation to build up on the lens.
■ To prevent damage or fire
Make sure bulbs are fully seated and locked.
Page 628 of 732

628
5-2. Steps to take in an emergency
If the engine will not star t
If the engine still does not start after following the correct starting
procedure ( P. 181) or releasing the steering lock (P. 182), confirm
the following points.
■ The engine will not start even when the starter motor oper-
ates normally.
One of the following may be the cause of the problem.
●There may not be sufficient fuel in the vehicle’s tank.
Refuel the vehicle. (
P. 107)
Flex-fuel vehicles: The type of fuel may be different. When
refueling, add the same type of fuel, if available.
After adding a different type of fuel, the engine may run
roughly and driving performance may be reduced for a while
when the engine is first started. In this case, wait until the
engine runs normally.
● The engine may be flooded.
Try to restart the engine once more following correct starting
procedures.
● There may be a malfunction in the engine immobilizer system.
( P. 1 1 2 )
■ The starter motor turns over slowly, the interior lights and
headlights are dim, or the horn does not sound or sounds at
a low volume.
One of the following may be the cause of the problem.
●The battery may be discharged. ( P. 634)
● The battery terminal connec tions may be loose or corroded.
Page 629 of 732
5
When trouble arises
629
5-2. Steps to take in an emergency
■
The starter motor does not turn over, the interior lights and
headlights do not turn on, or the horn does not sound.
One of the following may be the cause of the problem.
● One or both of the battery terminals may be disconnected.
● The battery may be discharged. ( P. 634)
Contact your Toyota dealer if the problem cannot be repaired, or if
repair procedures are unknown.
Page 635 of 732

5
When trouble arises
635
5-2. Steps to take in an emergency
■
Starting the engine when the battery is discharged
The engine cannot be started by push-starting.
■ Avoiding a discharged battery
●Turn off the headlights and the audio system while the engine is turned
off.
● Turn off any unnecessary electrical components when the vehicle is run-
ning at a low speed for an extended period, such as in heavy traffic, etc.
■ When the battery is removed or discharged
●The moon roof must be initialized. ( P. 104)
● Flex-fuel vehicles: The information recorded in the computer will be
cleared, which may cause the engine to run roughly and reduce driving
performance for a while when the engine is first started. In this case, wait
until the engine runs normally.
If the vehicle is running on E85, the engine may stall.
In this case, restart the engine, repeatedly if necessary.
Positive (+) battery terminal on your vehicle
Positive (+) battery terminal on the second vehicle
Negative (-) battery terminal on the second vehicle
Connect the jumper cable to ground on your vehicle as shown in
the illustration.
Start the engine of the second vehicle. Increase the engine
speed slightly and maintain at that level for approximately 5
minutes to recharge the battery of your vehicle.
Maintain the engine speed of the second vehicle and start
the vehicle’s engine.
Once the vehicle’s engine has started, remove the jumper
cables in the exact reverse order in which they were con-
nected.
Once the engine starts, have the vehicle checked at your Toyota
dealer as soon as possible.
Page 667 of 732
667
6-1. Specifications
6
Vehicle specifications
Light bulbs
*: If equipped
A: HB3 halogen bulbs
B: H11 halogen bulbs
C: H10 halogen bulbs
D: Wedge base bulbs (clear)
E: Wedge base bulbs (amber)
F: Double end bulbs
Light BulbsBulb No.WTy p e
Exterior Headlights
(high beam)
9005 65 A
Headlights
(low beam) H11 55 B
Front fog lights
*9145 45 C
Front side marker lights 168 5 D
Front turn signal/parking
lights/daytime running lights
*4157NAK 28/8 E
Rear turn signal lights 3157A 27/8 E
Stop/tail and rear side
marker lights 3157 27/8 D
Back-up lights 921 18 D
License plate lights 168 4.9 D
High mounted stoplight and
cargo lamp 921 18 D
Outer foot light — 5 D
InteriorVanity lights
7065 1.4 F
Personal/interior lights
Front — 5 D
Rear — 5 D
Foot well lighting — 1.4 D