Page 26 of 360
NAVIGATION SYSTEM: BASIC FUNCTIONS
26
When the “ENGINE START STOP” switch
is in ACCESSORY or IGNITION ON
mode, the initial screen will be displayed
and the system will begin operating.
CAUTION
When the vehicle is stopped with the
engine running, always apply the
parking brake for safety.
After a few seconds, the “CAUTION”
screen will be displayed.
After about 5 seconds, the “CAUTION”
screen automatically switches to the map
screen. When the “MAP/VOICE” button
is also pushed, the map screen is dis-
played.
While the “CAUTION” screen is displayed,
the “DEST” or “SETUP” button cannot be
operated. And if the “Calendar” button on
the “Information” screen is touched, the
screen will change back to the “CAUTION”
screen. In about 5 seconds, or when the
“MAP/VOICE” button is pushed or the
“Show Map” is touched, the “CAUTION”
screen will change to the map screen.
Initial screen
Page 63 of 360

NAVIGATION SYSTEM: DESTINATION SEARCH
63
INFORMATION
�If there is no match for the tele-
phone number inputted, a list of
identical numbers with different
area codes will be displayed.
� To set an address book entry as a
destination using the phone num-
ber, the number must already be
registered. (See page 111.)
1. Push the “DEST” button.
2. Touch “Previous Destinations”
on
the “Destination” screen.
The previous starting point and up to 100
previously set destinations are displayed
on the screen.
3. Touch the button of the desired des-
tination.
“Delete”: To delete the previous destina-
tion. (To delete previous destinations, see
page 117.)
The screen changes and displays the map
location of the selected destination and the
route preference. (See “Starting route
guidance” on page 70.)
INFORMATION
The list of previous destinations can
also be deleted by touching “Delete
Previous Dest.” on the “Navigation
Settings” screen when the vehicle is
stopped. (See “— Deleting previous
destinations” on page 117.)
— Destination search by
“Previous Destinations”
Page 70 of 360
, touch
“Yes”.
If “Yes” is touched, the data cannot be re-
covered.")
NAVIGATION SYSTEM: DESTINATION SEARCH
70
A message appears to confirm the request
to delete.
5. To delete the destination(s), touch
“Yes”.
If “Yes” is touched, the data cannot be re-
covered.
If “No” is touched, the previous screen will
return.
The system searches for the guidance
route again, and displays the entire route.
INFORMATION
Set destinations can also be deleted
by touching “Route”. (See “— Delet-
ing destinations” on page 83.)
After inputting the destination, the screen
changes and displays the map location of
the selected destination and the route pref-
erence.
1. Scroll the map to the desired point.
“Adjust Location”: To adjust the position
in smaller increments.
When an arrow facing the desired point
is touched, the map scrolls in that di-
rection.
Releasing the finger from the arrow will
stop the scrolling.
2. Touch “Go to
”.
The system starts route search and dis-
plays recommended routes.
If there is already a set destination, “Go to
” and “Add to Route” are displayed.
“Go to
”: To delete the existing destina-
tions and set a new one.
“Add to Route”: To add a destination.
“Info.”: If this button is displayed on the
top of the screen, touch it to view items
such as name, address, and phone num-
ber.
Starting route guidance
Page 87 of 360
NAVIGATION SYSTEM: ROUTE GUIDANCE
87
:To indicate the next destination.
:To preview the route to the next
destination.
:To preview the route to the next
destination in fast −forward mode.
: To stop the preview.
:To review the route to the previous
destination or starting point.
: To review the route to the previous
destination or starting point in
fast−forward mode.
: To indicate the previous destina-
tion or starting point.
�To select route type
You can designate the route conditions of
the route to the destination.
1. Touch “Route”.
2. Touch “Preferences”.
3. Touch “Quick”, “Short” or “Alter-
nate” and touch “OK”.
— Route preference
Page 95 of 360
NAVIGATION SYSTEM: ROUTE GUIDANCE
95
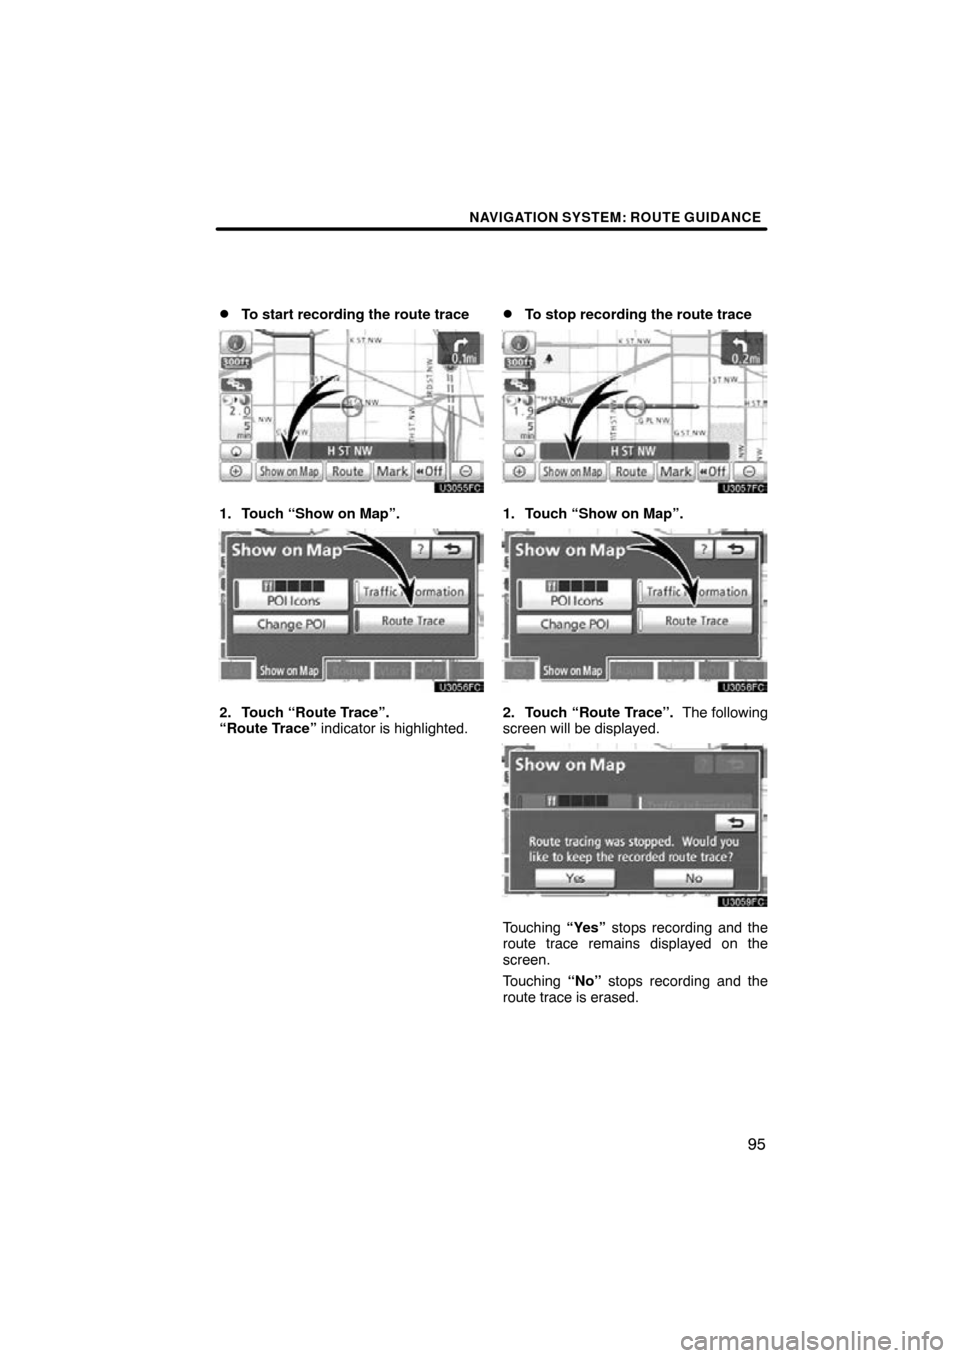
�
To start recording the route trace
1. Touch “Show on Map”.
2. Touch “Route Trace”.
“Route Trace” indicator is highlighted.
�To stop recording the route trace
1. Touch “Show on Map”.
2. Touch “Route Trace”. The following
screen will be displayed.
Touching
“Yes” stops recording and the
route trace remains displayed on the
screen.
Touching “No” stops recording and the
route trace is erased.
Page 126 of 360
TELEPHONE AND INFORMATION
126 �
Connecting a Bluetooth� phone
AUTOMATICALLY
When you register your phone, auto
connection will be turned on. Always
set it to this mode and leave the
Bluetooth � phone in a condition where
connection can be established.
When the “ENGINE START STOP”
switch is in ACCESSORY or IGNITION
ON mode, a nearby cellular phone you
have registered is searched for.
Next, the system automatically con-
nects with the latest of the phones con-
nected to in the past.
Then, the connection result is dis-
played.
This screen appears when the Bluetooth �
phone is first connected after the “ENGINE
START STOP” switch is in ACCESSORY
or IGNITION ON mode.
INFORMATION
It may take time, the phone connec-
tion is carried out during Bluetooth�
audio play.
Page 128 of 360
TELEPHONE AND INFORMATION
128
When you connect the phone while
Bluetooth� audio is playing
This screen is displayed, and the
Bluetooth � audio will stop temporarily.
�Reconnecting the Bluetooth �
phone
If the Bluetooth� phone is
disconnected with a poor reception
from the Bluetooth� network when the
“ENGINE START STOP” switch is in
ACCESSORY or IGNITION ON mode,
the system automatically reconnects
the Bluetooth � phone. In this case, the
connection result is not displayed.
If the Bluetooth� is disconnected on pur-
pose such as you turned your cellular
phone off, this does not happen. Recon-
nect it by the following methods.
�Select the Bluetooth� phone again.
�Enter the Bluetooth� phone.
Page 143 of 360

AUDIO/VIDEO SYSTEM
143
7“CH·DISC” button
Push the “” or “” button to select
a preset station or a selected disc.
For details, see pages 153, 158, 165
and 167.
8Disc slot
Insert discs into the slot after pushing
“LOAD” button. For details, see
pages 163 and 164.
9“SEEK·TRACK” button
Push the “” or “” button to seek
up or down for a station, or to access
a desired track, file or chapter. For
details, see pages 153, 158, 168,
172, 181, 182, 192, 201 and 207.
10“PWR·VOL” knob
Push this knob to turn the audio sys-
tem on and off, and turn it to adjust the
volume. For details, see page 145.
11“” button
Push this button to eject the discs.
12“AM·FM” button
Push this button to choose a radio
station. (AM, FM1, FM2)
For details, see pages 145 and 151.
13“SAT” button
Push this button to choose a SAT sta-
tion. For details, see pages 145 and
156.
14“AUDIO” button
Push this button to display the audio
control screen. For details, see
pages 145 and 167.
15“AM” button
Push this button to choose a radio
station. For details, see pages 145
and 151.
16“FM” button
Push this button to choose a radio
station. (FM1, FM2)
For details, see pages 145 and 151. This section describes some of the basic
features of your audio/video system.
Some information may not pertain to your
system.
Your audio/video system works when the
“ENGINE START STOP” switch is turned
to ACCESSORY or IGNITION ON mode.
FCC ID : AJDK021
This
device complies with Part 15 of the
FCC Rules and RSS −Gen and
RSS−210 of IC Rules. Operation is sub-
ject to the following two conditions : (1)
This device may not cause harmful inter-
ference, and (2) this device must accept
any interference received, including in-
terference that may cause undesired
operation.
CAUTION
FCC WARNING: Changes or modifi-
cations not expressly approved by
the party responsible for compliance
could void the user’s authority to op-
erate the equipment.
CAUTION: Radio Frequency Radi-
ation Exposure
This equipment complies with FCC
radiation exposure limits set forth for
uncontrolled equipment and meets
the FCC radio frequency (RF) Expo-
sure Guidelines in Supplement C to
OET65. This e quipment has very low
levels of RF energy that it deemed to
comply without maximum permis-
sive exposure evaluation (MPE). But
it is desirable that it should be
installed and operated with at least 20
cm and more between the radiator
and person’s body (excluding ex-
tremities: hands, wrists, feet and
ankles).
Using your audio/video
system —
— Some basics