Page 164 of 528
164
2-4. Using other driving systems
Four-wheel drive system (4WD models with an automatic transmission)
Use the front-wheel drive control lever to select the following trans-
fer modes.
The four-wheel drive indicator comes on when the H4, N or L4 mode is
selected.
H2 (high speed position, two-wheel drive)
Use this for normal driving on dry hard-surfaced roads. This position
gives greater economy, quietest ride and least wear.
H4 (high speed position, four-wheel drive)
Use this for driving only on tracks that permit the tires slide, like off-
road, icy or snow-covered roads. This position provides greater traction
than two-wheel drive.
N (neutral position)
No power is delivered to the wheels. The vehicle must be stopped.
L4 (low speed position, four-wheel drive)
Use this for maximum power and traction. Use “L4” for climbing or
descending steep hills, off-road driving, and hard pulling in sand, mud
or deep snow.
Page 167 of 528
167
2-4. Using other driving systems
2
When driving
Active traction control system
When the active traction control system is operatingIf any of the drive wheels spins,
the slip indicator flashes to indi-
cate that the active traction con-
trol system have been engaged.
: If equipped
The active traction control system automatically helps prevent the
spinning of 4 wheels when the vehicle is started or accelerated on
slippery road surfaces.
■ System operation
Vehicles with an automatic transmission:
Stop the vehicle, shift the shift lever to N and shift the front-
wheel drive control lever into L4.
Vehicles with a manual transmission:
Stop the vehicle or reduce your speed to less than 5 mph (8
km/h). Depress the clutch pedal and shift the four-wheel
drive control lever into LL.
Press the A-TRAC switch to
activate the system.
At this time, the active traction
control system indicator will
come on.
To cancel the system, push the
switch again.
Page 171 of 528

171
2-4. Using other driving systems
2
When driving
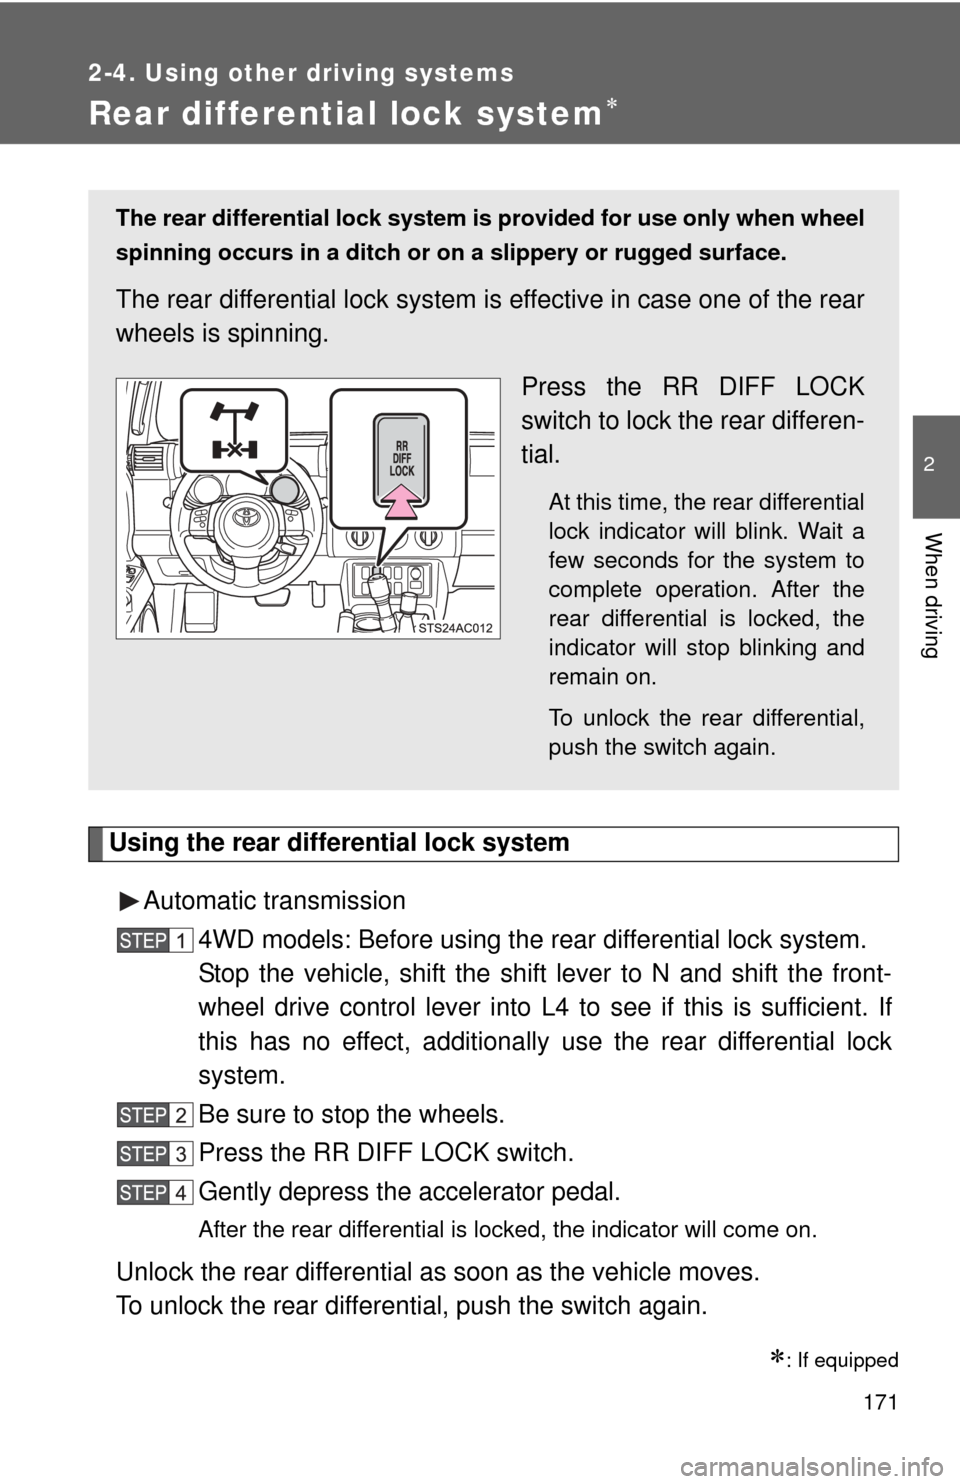
Rear differential lock system
Using the rear differential lock systemAutomatic transmission 4WD models: Before using the rear differential lock system.
Stop the vehicle, shift the shift lever to N and shift the front-
wheel drive control lever into L4 to see if this is sufficient. If
this has no effect, additionally use the rear differential lock
system.
Be sure to stop the wheels.
Press the RR DIFF LOCK switch.
Gently depress the accelerator pedal.
After the rear differential is locked, the indicator will come on.
Unlock the rear differential as soon as the vehicle moves.
To unlock the rear differential, push the switch again.
: If equipped
The rear differential lock system is provided for use only when wheel
spinning occurs in a ditch or on a slippery or rugged surface.
The rear differential lock system is effective in case one of the rear
wheels is spinning.
Press the RR DIFF LOCK
switch to lock the rear differen-
tial.
At this time, the rear differential
lock indicator will blink. Wait a
few seconds for the system to
complete operation. After the
rear differential is locked, the
indicator will stop blinking and
remain on.
To unlock the rear differential,
push the switch again.
Page 172 of 528

172 2-4. Using other driving systems
Manual transmissionBefore using the rear differential lock system.
Stop the vehicle or reduce your speed to less than 5 mph (8
km/h). Depress the clutch pedal and shift the four-wheel drive
control lever into LL to see if this is sufficient. If this has no
effect, additionally use the r ear differential lock system.
Be sure to stop the wheels.
Depress the clutch pedal.
Press the RR DIFF LOCK switch.
Slowly release the clutch pedal.
After the rear differential is locked, the indicator will come on.
Unlock the rear differential as soon as the vehicle moves.
To unlock the rear differential, push the switch again.
■ Locking the rear differential
●When the rear differential is locked, VSC is automatically turned off.
(The rear differential lock and VSC OFF indicators will come on.)
● The following systems do not operate when the rear differential is locked.
It is normal operation for the ABS warning light and VSC OFF indicator to
be on at this time.
•ABS
• Brake assist system
•VSC
• TRAC (TRC)
■ The rear differential lock is disengaged when
●Shift the four-wheel drive control lever to H or HL. (4WD models with a
manual transmission)
● Shift the front-wheel drive control lever to H2 or H4. (4WD models with
an automatic transmission)
Never forget to turn off the switch after using this feature.
■ After unlocking the rear differential
Check that the indicator goes off.
Page 174 of 528
174
2-4. Using other driving systems
Clutch star t cancel switch (vehicles with a manual transmission)
■Clutch start system
The system is designed to keep the starter motor from operating if the clutch
pedal is not depressed all the way down.
The switch allows the vehicle to be driven out of difficult situations
by cranking the engine with the clutch engaged.
Never use the switch for normal engine starting. Be sure to follow the
starting procedure. ( P. 124)
Press the CLUTCH START
CANCEL switch to cancel the
clutch start system with the
engine switch is turned to the
ON position.
The indicator will come on
when the clutch start system is
canceled.
The clutch start cancel switch
is automatically turned off
when the engine switch is
turned off.
Page 177 of 528
177
2-4. Using other
driving systems
2
When driving
To disable TRAC (TRC) and/or VSC (H2 and H4 mode [automatic
transmission] or H and HL mode [m anual transmission] on 4WD models)
If the vehicle gets stuck in fresh snow or mud, TRAC (TRC) and VSC
may reduce power from the engine to the wheels. You may need to
turn the system off to enable you to rock the vehicle in order to free it.
■Turning off TRAC (TRC)
Press the VSC OFF switch to
turn off TRAC (TRC).
The TRAC OFF (TRC OFF) indi-
cator will come on.
Push the switch again to turn the
system back on.
■Turning off TRAC (TRC) and VSC
Press and hold the VSC OFF
switch for more than 3 seconds
while the vehicle is stopped to
turn off both TRAC (TRC) and
VSC.
The VSC OFF and TRAC OFF
(TRC OFF) indicators will come
on.
Push the switch again to turn both
systems back on.
U.S.A. Canada
U.S.A. Canada
Page 184 of 528

184 2-5. Driving information
NOTICE
■To prevent the water damage
●Take all necessary safety measures to ensure that water damage to the
engine or other components does not occur.
● Water entering the engine air intake will cause severe engine damage.
● Water entering the automatic transmission will cause deterioration in shift
quality, locking up of your transmission accompanied by vibration, and ulti-
mately damage.
● Water can wash the grease from wheel bearings, causing rusting and pre-
mature failure, and may also enter the differentials, transmission and
transfer case, reducing the gear oil’s lubricating qualities.
■ When you drive through water
If driving through water, such as when crossing shallow streams, first check
the depth of the water and the bottom of the river bed for firmness. Drive
slowly and avoid deep water.
■ Inspection after off-road driving
●Sand and mud that has accumulate d in brake drums and around brake
discs may affect braking efficiency and may damage brake system compo-
nents.
● Always perform a maintenance inspection after each day of off-road driv-
ing that has taken you through rough terrain, sand, mud, or water. For
scheduled maintenance information, refer to the “Scheduled Maintenance
Guide” or “Owner’s Manual Supplement”.
Page 191 of 528

191
2-5. Driving information
2
When driving
Regulations on the use of snow chains
● Regulations regarding the use of tire chains vary according to loca-
tion and type of road. Always check local regu lations before install-
ing chains.
● Install the chains on the rear tires.
● Retighten the chains after drivi ng 1/4 - 1/2 mile (0.5 - 1.0 km).
■Snow chain installation
Observe the following precautions when installing and removing chains.
●Install and remove tire chains in a safe location.
● Install tire chains on the rear tires only. Do not install tire chains on the
front tires.
● Install tire chains following the instructions provided in the accompanying
instructions.
■ When driving the vehicle
Accelerate the vehicle slowly and drive at a reduced speed suit-
able to road conditions.
■ When parking the vehicle
Park the vehicle and move the shift lever to P (automatic trans-
mission) or to 1 or R (manual transmission) without setting the
parking brake. The parking brak e may freeze up, preventing it
from being released. If necessary , block the wheels to prevent
inadvertent sliding or creeping.