2011 SUBARU TRIBECA deactivate
[x] Cancel search: deactivatePage 46 of 422
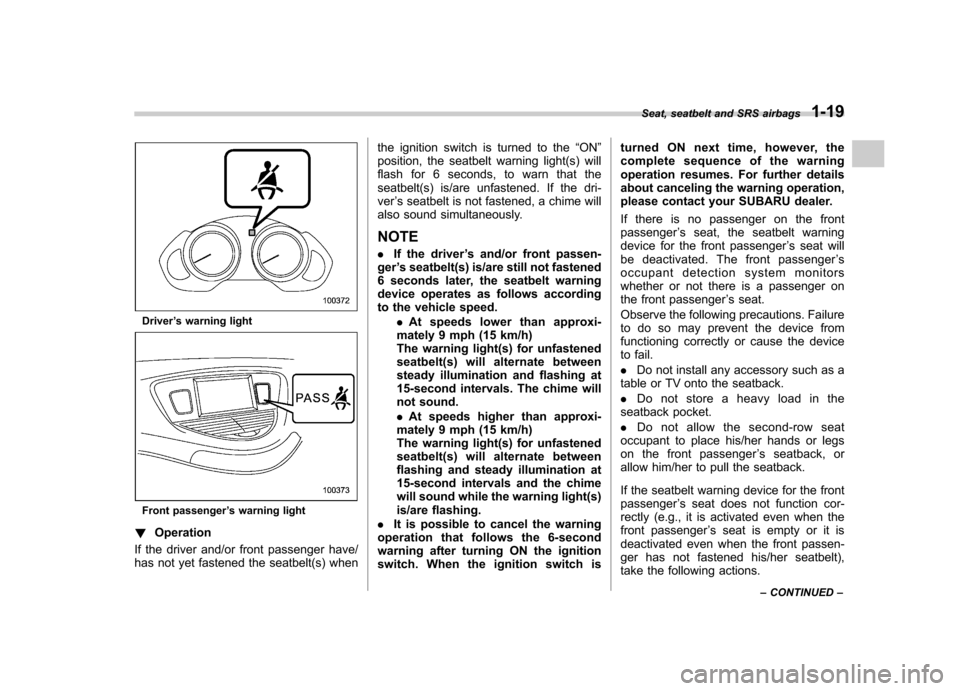
Driver’s warning light
Front passenger ’s warning light
! Operation
If the driver and/or front passenger have/
has not yet fastened the seatbelt(s) when the ignition switch is turned to the
“ON ”
position, the seatbelt warning light(s) will
flash for 6 seconds, to warn that the
seatbelt(s) is/are unfastened. If the dri-ver ’s seatbelt is not fastened, a chime will
also sound simultaneously.
NOTE . If the driver ’s and/or front passen-
ger ’s seatbelt(s) is/are still not fastened
6 seconds later, the seatbelt warning
device operates as follows according
to the vehicle speed.
.At speeds lower than approxi-
mately 9 mph (15 km/h)
The warning light(s) for unfastened
seatbelt(s) will alternate between
steady illumination and flashing at
15-second intervals. The chime will
not sound. . At speeds higher than approxi-
mately 9 mph (15 km/h)
The warning light(s) for unfastened
seatbelt(s) will alternate between
flashing and steady illumination at
15-second intervals and the chime
will sound while the warning light(s)
is/are flashing.
. It is possible to cancel the warning
operation that follows the 6-second
warning after turning ON the ignition
switch. When the ignition switch is turned ON next time, however, the
complete sequence of the warning
operation resumes. For further details
about canceling the warning operation,
please contact your SUBARU dealer.
If there is no passenger on the front passenger
’s seat, the seatbelt warning
device for the front passenger ’s seat will
be deactivated. The front passenger ’s
occupant detection system monitors
whether or not there is a passenger on
the front passenger ’s seat.
Observe the following precautions. Failure
to do so may prevent the device from
functioning correctly or cause the device
to fail. . Do not install any accessory such as a
table or TV onto the seatback.. Do not store a heavy load in the
seatback pocket.. Do not allow the second-row seat
occupant to place his/her hands or legs
on the front passenger ’s seatback, or
allow him/her to pull the seatback.
If the seatbelt warning device for the front passenger ’s seat does not function cor-
rectly (e.g., it is activated even when the
front passenger ’s seat is empty or it is
deactivated even when the front passen-
ger has not fastened his/her seatbelt),
take the following actions. Seat, seatbelt and SRS airbags
1-19
– CONTINUED –
Page 79 of 422

1-52Seat, seatbelt and SRS airbags
. Do not apply any strong impact to the
front passenger ’s seat such as by kicking.
. Do not spill liquid on the front passen-
ger ’s seat. If liquid is spilled, wipe it off
immediately. . Do not remove or disassemble the front
passenger ’s seat.
. Do not install any accessory (such as
an audio amplifier) other than a genuine
SUBARU accessory under the front pas-senger ’s seat.
. Do not place anything (shoes, umbrel-
la, etc.) under the front passenger ’s seat.
. The front passenger ’s seat must not be
used with the head restraint removed. . Do not leave any article including a
child restraint system on the front passen- ger ’s seat or the seatbelt tongue and
buckle engaged when you leave yourvehicle. . Do not place a magnet near the
seatbelt buckle and the seatbelt retractor.
If the seatbelt buckle switch and/or front passenger ’s occupant detection system
have failed, the SRS airbag system
warning light will illuminate. Have the
system inspected by your SUBARU deal-
er immediately if the SRS airbag system
warning light illuminates.
If your vehicle has sustained impact, this
may affect the proper function of the SUBARU advanced frontal airbag system.
Have your vehicle inspected at your
SUBARU dealer.
NOTE
The front passenger ’s SRS side airbag,
SRS curtain airbag and seatbelt pre-
tensioner are not controlled by the
SUBARU advanced frontal airbag sys-tem. ! Passenger ’s frontal airbag ON and
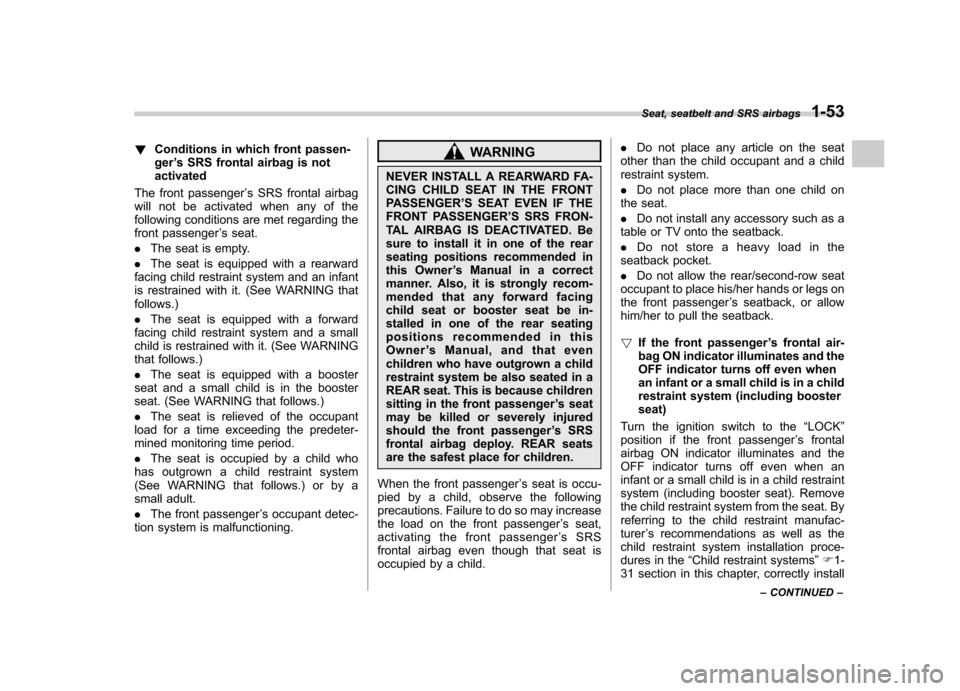
OFF indicators
: Front passenger ’s frontal airbag ON
indicator
: Front passenger ’s frontal airbag OFF
indicator
The front passenger ’s frontal airbag ON
and OFF indicators show you the status of
the front passenger ’s SRS frontal airbag. The indicators are located in the center
portion of the instrument panel.
When the ignition switch is turned to the “
ON ”position, both the ON and OFF
indicators illuminate for 6 seconds during
which time the system is checked. Follow-
ing the system check, both indicators turn
off for 2 seconds. After that, one of the
indicators illuminates depending on the
status of the front passenger ’s SRS frontal
airbag determined by the SUBARU ad-
vanced frontal airbag system monitoring.
If the front passenger ’s SRS frontal airbag
is activated, the passenger ’s frontal airbag
ON indicator will illuminate while the OFF
indicator will remain off.
If the front passenger ’s SRS frontal airbag
is deactivated, the passenger ’s frontal
airbag ON indicator will remain off while
the OFF indicator will illuminate.
With the ignition switch turned to the “ON ”
position, if both the ON and OFF indica-
tors simultaneously remain illuminated or
off even after the system check period, the
system is malfunctioning. Contact your
SUBARU dealer immediately for an in-spection.
Page 80 of 422
!Conditions in which front passen- ger’s SRS frontal airbag is not
activated
The front passenger ’s SRS frontal airbag
will not be activated when any of the
following conditions are met regarding the
front passenger ’s seat.
. The seat is empty.
. The seat is equipped with a rearward
facing child restraint system and an infant
is restrained with it. (See WARNING thatfollows.) . The seat is equipped with a forward
facing child restraint system and a small
child is restrained with it. (See WARNING
that follows.) . The seat is equipped with a booster
seat and a small child is in the booster
seat. (See WARNING that follows.) . The seat is relieved of the occupant
load for a time exceeding the predeter-
mined monitoring time period. . The seat is occupied by a child who
has outgrown a child restraint system
(See WARNING that follows.) or by a
small adult. . The front passenger ’s occupant detec-
tion system is malfunctioning.WARNING
NEVER INSTALL A REARWARD FA-
CING CHILD SEAT IN THE FRONT
PASSENGER ’S SEAT EVEN IF THE
FRONT PASSENGER ’S SRS FRON-
TAL AIRBAG IS DEACTIVATED. Be
sure to install it in one of the rear
seating positions recommended in
this Owner ’s Manual in a correct
manner. Also, it is strongly recom-
mended that any forward facing
child seat or booster seat be in-
stalled in one of the rear seating
positions recommended in this
Owner ’s Manual, and that even
children who have outgrown a child
restraint system be also seated in a
REAR seat. This is because children
sitting in the front passenger ’s seat
may be killed or severely injured
should the front passenger ’s SRS
frontal airbag deploy. REAR seats
are the safest place for children.
When the front passenger ’s seat is occu-
pied by a child, observe the following
precautions. Failure to do so may increase
the load on the front passenger ’s seat,
activating the front passenger ’sSRS
frontal airbag even though that seat is
occupied by a child. .
Do not place any article on the seat
other than the child occupant and a child
restraint system. . Do not place more than one child on
the seat.. Do not install any accessory such as a
table or TV onto the seatback.. Do not store a heavy load in the
seatback pocket.. Do not allow the rear/second-row seat
occupant to place his/her hands or legs on
the front passenger ’s seatback, or allow
him/her to pull the seatback. ! If the front passenger ’s frontal air-
bag ON indicator illuminates and the
OFF indicator turns off even when
an infant or a small child is in a child
restraint system (including boosterseat)
Turn the ignition switch to the “LOCK ”
position if the front passenger ’s frontal
airbag ON indicator illuminates and the
OFF indicator turns off even when an
infant or a small child is in a child restraint
system (including booster seat). Remove
the child restraint system from the seat. By
referring to the child restraint manufac-turer ’s recommendations as well as the
child restraint system installation proce-
dures in the “Child restraint systems ”F 1-
31 section in this chapter, correctly install Seat, seatbelt and SRS airbags
1-53
– CONTINUED –
Page 81 of 422

1-54Seat, seatbelt and SRS airbags
the child restraint system. Turn the ignition
switch to the “ON ”position and make sure
that the front passenger ’s frontal airbag
ON indicator turns off and the OFF
indicator illuminates.
If the ON indicator still remains illuminated
while the OFF indicator turns off, take the
following actions. . Ensure that no article is placed on the
seat other than the child restraint system
and the child occupant. . Ensure that there is no article left in the
seatback pocket.
If the ON indicator still remains illuminated
while the OFF indicator turns off after
taking relevant corre ctive actions de-
scribed above, relocate the child restraint
system to one of the rear seating positions
recommended in this Owner ’s Manual and
immediately contact your SUBARU dealer
for an inspection. NOTE
When a child who has outgrown a child
restraint system or a small adult is
seated in the front passenger ’s seat,
the SUBARU advanced frontal airbag
system may or may not activate the
front passenger ’s SRS frontal airbag
depending on the occupant ’s seating
posture. If the front passenger ’s SRS frontal airbag is activated (the ON
indicator remains illuminated while
the OFF indicator turns off), take the
following actions. .
Ensure that no article is placed on
the seat other than the occupant. . Ensure that there is no article left in
the seatback pocket.
If the ON indicator still remains illumi-
nated while the OFF indicator turns off
despite the fact that the actions noted
above have been taken, seat the child/
small adult in the rear seat and im-
mediately contact your SUBARU dealer
for an inspection. Even if the system
has passed the dealer inspection, it is
recommended that on subsequent trips
the child/small adult always take the
rear seat.
Children who have outgrown a child
restraint system should always wear the
seatbelt irrespective of whether the airbag
is deactivated or activated. ! Conditions in which front passen- ger’s SRS frontal airbag is activated
The front passenger ’s SRS frontal airbag
will be activated for deployment upon
impact when any of the following condi-
tions is met regarding the front passen-ger ’s seat.
. When the seat is occupied by an adult. .
When a heavy article is placed on the
seat.
When the front passenger ’s seat is occu-
pied by an adult, observe the following
precautions. Failure to do so may lessen
the load on the front passenger ’s seat,
deactivating the front passenger ’s SRS
frontal airbag despite the fact that the seat
is occupied by an adult. . Do not allow the rear seat occupant to
lift the front passenger ’s seat cushion
using his/her feet.. Do not place any article under the front
passenger ’s seat, or squeeze any article
from behind and under the seat. This may
lift the seat cushion. . Do not squeeze any article between
the front passenger ’s seat and side trim/
pillar, door or center console box. This
may lift the seat cushion. ! If the passenger ’s frontal airbag OFF
indicator illuminates and the ON
indicator turns off even when the
front passenger ’s seat is occupied
by an adult
This can be caused by the adult incor-
rectly sitting in the front passenger ’s seat.
Turn the ignition switch to the “LOCK ”
position. Ask the front passenger to set
the seatback to the upright position, sit up
Page 112 of 422
&Sounding a panic alarm
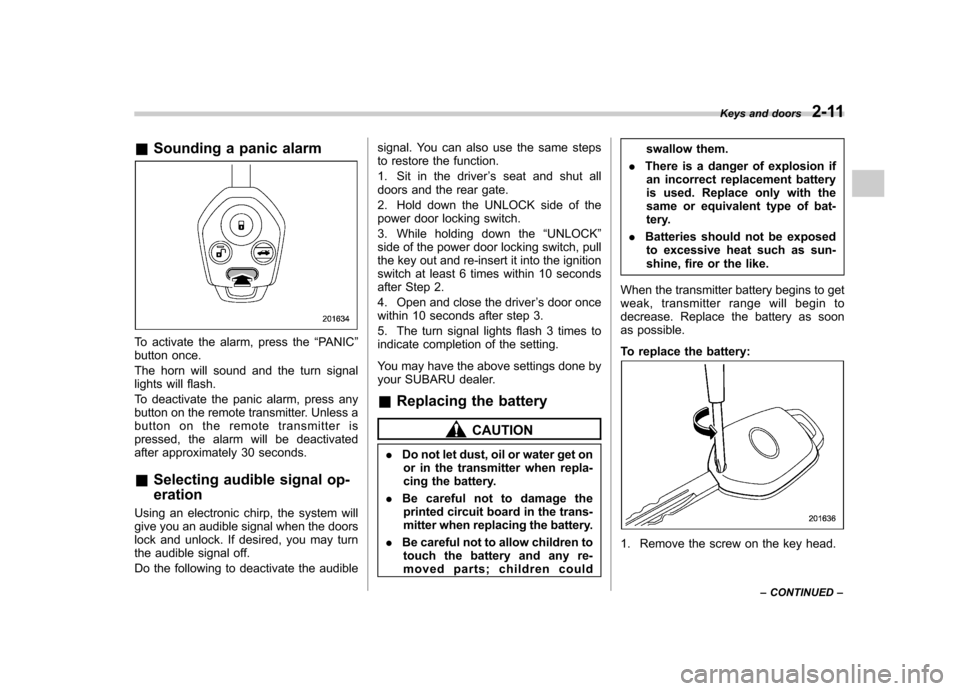
To activate the alarm, press the “PANIC ”
button once.
The horn will sound and the turn signal
lights will flash.
To deactivate the panic alarm, press any
button on the remote transmitter. Unless a
button on the remote transmitter is
pressed, the alarm will be deactivated
after approximately 30 seconds. & Selecting audible signal op- eration
Using an electronic chirp, the system will
give you an audible signal when the doors
lock and unlock. If desired, you may turn
the audible signal off.
Do the following to deactivate the audible signal. You can also use the same steps
to restore the function.
1. Sit in the driver
’s seat and shut all
doors and the rear gate.
2. Hold down the UNLOCK side of the
power door locking switch.
3. While holding down the “UNLOCK ”
side of the power door locking switch, pull
the key out and re-insert it into the ignition
switch at least 6 times within 10 seconds
after Step 2.
4. Open and close the driver ’s door once
within 10 seconds after step 3.
5. The turn signal lights flash 3 times to
indicate completion of the setting.
You may have the above settings done by
your SUBARU dealer.
& Replacing the battery
CAUTION
. Do not let dust, oil or water get on
or in the transmitter when repla-
cing the battery.
. Be careful not to damage the
printed circuit board in the trans-
mitter when replacing the battery.
. Be careful not to allow children to
touch the battery and any re-
moved parts; children could swallow them.
. There is a danger of explosion if
an incorrect replacement battery
is used. Replace only with the
same or equivalent type of bat-
tery.
. Batteries should not be exposed
to excessive heat such as sun-
shine, fire or the like.
When the transmitter battery begins to get
weak, transmitter range will begin to
decrease. Replace the battery as soon
as possible.
To replace the battery:
1. Remove the screw on the key head. Keys and doors
2-11
– CONTINUED –
Page 117 of 422

2-16Keys and doors
Alarm system
The alarm system helps to protect your
vehicle and valuables from theft. The horn
sounds and the turn signal lights flash if
someone attempts to break into yourvehicle.
The system can be armed and disarmed
with the remote transmitter.
The system does not operate when the
key is inserted into the ignition switch.
Your vehicle ’s alarm system has been set
for activation at the time of shipment from
the factory. You can set the system for
deactivation yourself or have it done by
your SUBARU dealer. & System operation
The alarm system will give the following
alarms when triggered. . The vehicle ’s horn will sound for 30
seconds.. The turn signal lights will flash for 30
seconds.
If any of the doors or the rear gate remains
open after the 30-second period, the horn
will continue to sound for a maximum of 3
minutes. If any of the doors or the rear
gate is closed while the horn is sounding,
the horn will stop sounding with a delay of up to 30 seconds.
The alarm is triggered by:.
Opening any of the doors or the rear
gate. Physical impact to the vehicle, such as
forced entry (only vehicles with shock
sensors (dealer option))
NOTE
The alarm system can be set to trigger
the illumination of the following interiorlights. . Dome light (illuminates only when
the dome light switch is in the “DOOR ”
position) . Map lights
The notifications regarding the dome
light and the map lights are deactivated
as the factory setting. A SUBARU
dealer can activate the system. Contact
your SUBARU dealer for details. & Activating and deactivating
the alarm system
To change the setting of your vehicle ’s
alarm system for activation or deactiva-
tion, do the following.
1. Disarm the alarm system. Refer to “ Disarming the system ”F 2-18.
2. Sit in the driver ’s seat and shut all doors and the rear gate.
3. Turn the ignition switch to the
“ON ”
position.
4. Hold down the UNLOCK side of the driver ’s power door locking switch, open
the driver ’s door within the following 1
second, and wait 10 seconds without
releasing the switch. The setting will then
be changed as follows.
If the system was previously activated:
The odometer/trip meter screen displays “ AL oF ”and the horn sounds twice,
indicating that the system is now deacti-vated.
If the system was previously deacti- vated:
The odometer/trip meter screen displays “ AL on ”and the horn sounds once,
indicating that the system is now acti-vated.
NOTE
You may have the above setting
change done by your SUBARU dealer.
Page 134 of 422

Hazard warning flasher
The hazard warning flasher is used to
warn other drivers when you have to park
your vehicle under emergency conditions.
The hazard warning flasher works with the
ignition switch in any position.
To turn on the hazard warning flasher,
push the hazard warning button on the
instrument panel. To turn off the flasher,
push the button again. NOTE
When the hazard warning flasher is on,
the turn signals do not work.Meters and gauges NOTE
Liquid crystal displays are used in
some of the meters and gauges on
the combination meter. You will find
their indications hard to see if you wear
polarized glasses. &
Combination meter illumina- tion
When the ignition switch is turned to the “ ON ”position, the various parts of the
combination meter are illuminated in the
following sequence.
1. Warning lights, indicator lights, meter
rims, meter needles, odometer, trip meter,
and gauge back lights illuminate.
2. Meter needles and gauges each show
MAX reading.
3. Meter needles and gauges each show
MIN reading.
4. Meter and gauge dials illuminate.
5. Regular illumination (for driving) be- gins.
NOTE
The above sequence of operations may
not take place if you quickly turn the ignition switch to start the engine. This
is not a malfunction. &
Canceling the function for
meter needle/gauge move-
ment and combination meter
sequential illumination upon
turning on the ignition switch
It is possible to activate or deactivate the
movement of the meter needles and
gauges and sequential illumination of the
combination meter that takes place when
the ignition switch is turned to the “ON ”
position.
Turn the ignition switch to the “Acc ”
position. With the A trip meter indication
selected, briefly press the trip knob twice.
You can now establish the activated/
deactivated setting for movement of the Instruments and controls
3-5
– CONTINUED –
Page 135 of 422

3-6Instruments and controls
meter needles and gauges when the
ignition switch is turned to the “ON ”
position. To change the current setting,
press the trip knob for at least 2 seconds.
: Activated
: Deactivated
With the function deactivated, the combi-
nation meter illuminates as follows.
1. Warning lights, indicator lights, meter
rims, meter needles, odometer, trip meter,
and gauge back lights illuminate.
2. Meter and gauge dials illuminate.
3. Regular illumination (for driving) be- gins.
Briefly press the trip knob again. You can
now establish the activated/deactivated
setting for sequential illumination of the combination meter when the ignition
switch is turned to the
“ON ”position. To
change the current setting, press the trip
knob for at least 2 seconds.
: Activated
: Deactivated
Briefly press the knob to return to the A trip
meter indication.
If you turn the ignition switch to the “ LOCK ”position, turn the ignition switch
to the “ON ”position, or open and close the
driver ’s door during the setting procedure,
the new setting will be canceled.
Also, if you do not press the trip knob for a
period of 10 seconds, the new setting will
be canceled. NOTE . It is not possible to cancel sequen-
tial illumination of the combination
meter while sequential illumination is
actually taking place. Cancel sequen-
tial illumination when regular illumina-
tion (for driving) has begun.. When you open the driver ’s door
with the ignition switch in the “LOCK ”
position, the meters ’needles and rims
are lit. The illumination stops working
when you shut the driver ’s door or
automatically after 30 seconds. &
Speedometer
The speedometer shows the vehiclespeed. & Odometer
This meter displays the odometer when
the ignition switch is in the “LOCK ”, “Acc ”
or “ON ”position.
The odometer shows the total distance
that the vehicle has been driven.
If you press the trip knob when the ignition
switch is in the “LOCK ”or “Acc ”position,
the odometer/trip meter will light up. If you
do not press the trip knob within 10
seconds of illumination of the odometer/
trip meter, the odometer/trip meter will turnoff.