2011 SUBARU IMPREZA WRX wiring
[x] Cancel search: wiringPage 51 of 458
1-20Seat, seatbelt and SRS airbags
small amount of smoke will be released.
These occurrences are normal and not
harmful. This smoke does not indicate a
fire in the vehicle.
Once the seatbelt pretensioner has been
activated, the seatbelt retractor remains
locked. Consequently, the seatbelt can not
be pulled out and retracted and therefore
must be replaced. NOTE .Seatbelt pretensioners are not de-
signed to activate in minor frontal
impacts, in side or rear impacts or in
roll-over accidents.. The driver ’s seat and passenger ’s
seat pretensioners and frontal SRS
airbag operate simultaneously.. Pretensioners are designed to func-
tion on a one-time-only basis. In the
event that a pretensioner is activated,
both the driver ’s and front passenger ’s
seatbelt retractor assemblies must be
replaced only by an authorized
SUBARU dealer. When replacing seat-
belt retractor assemblies, use only
genuine SUBARU parts.. If either front seatbelt does not
retract or cannot be pulled out due to
a malfunction or activation of the
pretensioner, contact your SUBARU
dealer as soon as possible. .
If the front seatbelt retractor assem-
bly or surrounding area has been
damaged, contact your SUBARU dealer
as soon as possible.. When you sell your vehicle, we urge
you to explain to the buyer that it has
seatbelt pretensioners by alerting the
buyer to the contents of this section.
WARNING
. To obtain maximum protection,
the occupants should sit in an
upright position with their seat-
belts properly fastened. Refer to“ Seatbelts ”F 1-11.
. Do not modify, remove or strike
the front seatbelt retractor as-
semblies or surrounding area.
This could result in accidental
activation of the seatbelt preten-
sioners or could make the sys-
tem inoperative, possibly result-
ing in serious injury. Seatbelt
pretensioners have no user-ser-
viceable parts. For required ser-
vicing of front seatbelt retractors
equipped with seatbelt preten-
sioners, see your nearest
SUBARU dealer.
. When discarding front seatbelt
retractor assemblies or scrap- ping the entire vehicle due to
collision damage or for other
reasons, consult your SUBARU
dealer.
& System monitors
A diagnostic system continually monitors
the readiness of the seatbelt pretensioner
while the vehicle is being driven. The
seatbelt pretensioners share the control
module with the SRS airbag system.
Therefore, if any malfunction occurs in a
seatbelt pretensioner, the SRS airbag
system warning light will illuminate. For
details, refer to “SRS airbag system
monitors ”F 1-55.
& System servicing
WARNING
. When discarding a seatbelt re-
tractor assembly or scrapping
the entire vehicle damaged by a
collision, consult your SUBARU
dealer.
. Tampering with or disconnecting
the system ’s wiring could result
in accidental activation of the
seatbelt pretensioner and/or
SRS airbag or could make the
Page 69 of 458
1-38Seat, seatbelt and SRS airbags
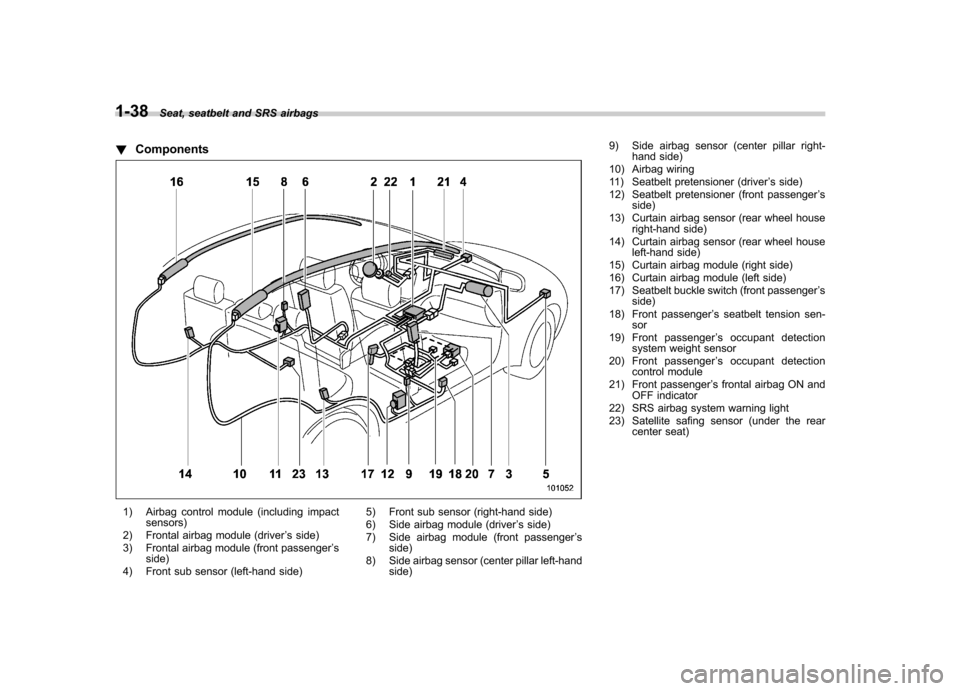
! Components
1) Airbag control module (including impact
sensors)
2) Frontal airbag module (driver ’s side)
3) Frontal airbag module (front passenger ’s
side)
4) Front sub sensor (left-hand side) 5) Front sub sensor (right-hand side)
6) Side airbag module (driver
’s side)
7) Side airbag module (front passenger ’s
side)
8) Side airbag sensor (center pillar left-hand side) 9) Side airbag sensor (center pillar right-
hand side)
10) Airbag wiring
11) Seatbelt pretensioner (driver ’s side)
12) Seatbelt pretensioner (front passenger ’s
side)
13) Curtain airbag sensor (rear wheel house right-hand side)
14) Curtain airbag sensor (rear wheel house left-hand side)
15) Curtain airbag module (right side)
16) Curtain airbag module (left side)
17) Seatbelt buckle switch (front passenger ’s
side)
18) Front passenger ’s seatbelt tension sen-
sor
19) Front passenger ’s occupant detection
system weight sensor
20) Front passenger ’s occupant detection
control module
21) Front passenger ’s frontal airbag ON and
OFF indicator
22) SRS airbag system warning light
23) Satellite safing sensor (under the rear center seat)
Page 87 of 458
1-56Seat, seatbelt and SRS airbags
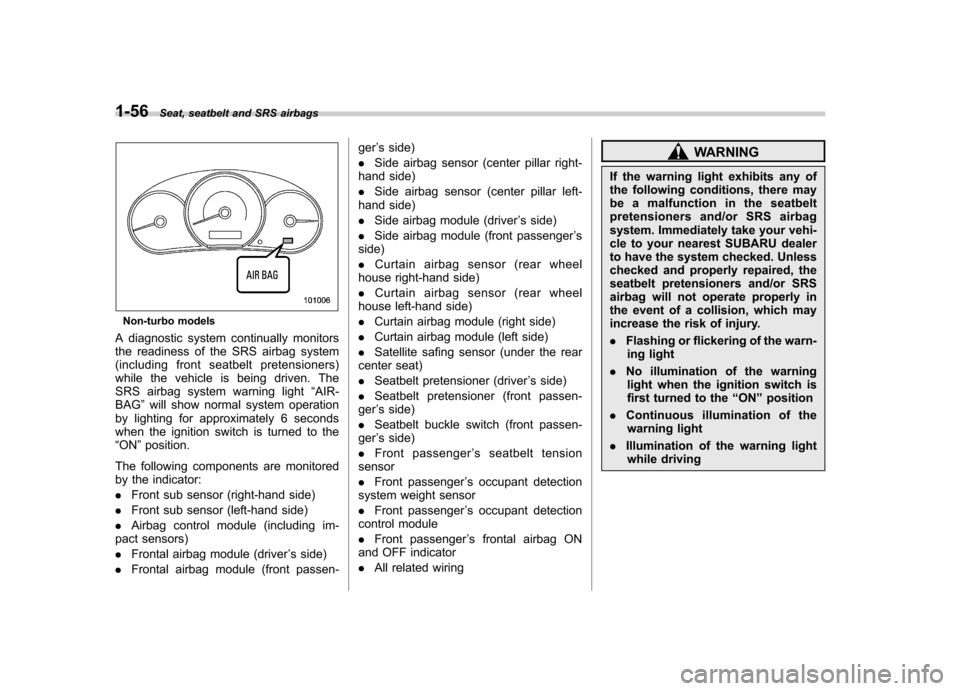
Non-turbo models
A diagnostic system continually monitors
the readiness of the SRS airbag system
(including front seatbelt pretensioners)
while the vehicle is being driven. The
SRS airbag system warning light “AIR-
BAG ”will show normal system operation
by lighting for approximately 6 seconds
when the ignition switch is turned to the“ ON ”position.
The following components are monitored
by the indicator: . Front sub sensor (right-hand side)
. Front sub sensor (left-hand side)
. Airbag control module (including im-
pact sensors). Frontal airbag module (driver ’s side)
. Frontal airbag module (front passen- ger
’s side)
. Side airbag sensor (center pillar right-
hand side). Side airbag sensor (center pillar left-
hand side). Side airbag module (driver ’s side)
. Side airbag module (front passenger ’s
side). Curtain airbag sensor (rear wheel
house right-hand side). Curtain airbag sensor (rear wheel
house left-hand side). Curtain airbag module (right side)
. Curtain airbag module (left side)
. Satellite safing sensor (under the rear
center seat) . Seatbelt pretensioner (driver ’s side)
. Seatbelt pretensioner (front passen-
ger ’s side)
. Seatbelt buckle switch (front passen-
ger ’s side)
. Front passenger ’s seatbelt tension
sensor . Front passenger ’s occupant detection
system weight sensor. Front passenger ’s occupant detection
control module. Front passenger ’s frontal airbag ON
and OFF indicator. All related wiring
WARNING
If the warning light exhibits any of
the following conditions, there may
be a malfunction in the seatbelt
pretensioners and/or SRS airbag
system. Immediately take your vehi-
cle to your nearest SUBARU dealer
to have the system checked. Unless
checked and properly repaired, the
seatbelt pretensioners and/or SRS
airbag will not operate properly in
the event of a collision, which may
increase the risk of injury. . Flashing or flickering of the warn-
ing light
. No illumination of the warning
light when the ignition switch is
first turned to the “ON ”position
. Continuous illumination of the
warning light
. Illumination of the warning light
while driving
Page 88 of 458
&SRS airbag system servicing
WARNING
. When discarding an airbag mod-
ule or scrapping the entire vehi-
cle damaged by a collision, con-
sult your SUBARU dealer.
. The SRS airbag has no user-
serviceable parts. Do not use
electrical test equipment on any
circuit related to the SRS airbag
system. For required servicing of
the SRS airbag, consult your
nearest SUBARU dealer. Tamper-
ing with or disconnecting the system ’s wiring could result in
accidental inflation of the SRS
airbag or could make the system
inoperative, which may result in
serious injury.
CAUTION
If you need service or repair in areas
indicated in the following list, have
the work performed by an author-
ized SUBARU dealer. The SRS air-
bag control module, impact sensors
and airbag modules are stored in
these areas. .
Under the center console
. On both the right and left sides at
the front of the vehicle
. Steering wheel and column and
nearby areas
. Top of the dashboard on front
passenger ’s side and nearby
areas
. Each front seat and nearby area
. Inside each center pillar
. In each roof side (from the front
pillar to a point over the rear seat)
. Between the rear seat cushion
and rear wheel house on eachside
. Under the rear center seat
In the event that the SRS airbag is
deployed, replacement of the system
should be performed only by an author-
ized SUBARU dealer. When the compo-
nents of the SRS airbag system are
replaced, use only genuine SUBARUparts. NOTE
In the following cases, contact your
SUBARU dealer as soon as possible. . The front part of the vehicle was
involved in an accident in which only the driver
’s SRS frontal airbag or both
driver ’s and front passenger ’sSRS
frontal airbags did not deploy. . The pad of the steering wheel, the
cover over the front passenger ’s SRS
frontal airbag, or either roof side (from
the front pillar to a point over the rear
seat) is scratched, cracked, or other-
wise damaged.. Center pillar, rear wheel house or
rear sub frame, or an area near these
parts, was involved in an accident in
which the SRS side airbag and SRS
curtain airbag did not deploy.. The fabric or leather of either front
seatback is cut, frayed, or otherwise damaged. . The rear part of the vehicle was
involved in an accident in which no
SRS airbag was deployed.
& Precautions against vehicle modification
WARNING
To avoid accidental activation of the
system or rendering the system
inoperative, which may result in
serious injury, no modifications
should be made to any components
or wiring of the SRS airbag system. Seat, seatbelt and SRS airbags
1-57
– CONTINUED –
Page 89 of 458
1-58Seat, seatbelt and SRS airbags
This includes following modifica- tions. .Installation of custom steering
wheels
. Attachment of additional trim
materials to the dashboard
. Installation of custom seats
. Replacement of seat fabric or
leather
. Installation of additional fabric or
leather on the front seat
. Attachment of a hands-free mi-
crophone or any other accessory
to a front pillar, a center pillar, a
rear pillar, the windshield, a side
window, an assist grip, or any
other cabin surface that would be
near a deploying SRS curtainairbag.
. Installation of additional electri-
cal/electronic equipment such as
a mobile two-way radio on or
near the SRS airbag system
components and/or wiring is not
advisable. This could interfere
with proper operation of the
SRS airbag system.CAUTION
Do not perform any of the following
modifications. Such modifications
can interfere with proper operation
of the SRS airbag system. . Attachment of any equipment
(bush bar, winches, snow plow,
skid plate, etc.) other than genu-
ine SUBARU accessory parts to
the front end.
. Modification of the suspension
system or front end structure.
. Installation of a tire of different
size and construction from the
tires specified on the vehicle
placard attached to the driver ’s
door pillar or specified for indivi-
dual vehicle models in this Own-er ’s Manual.
. Attachment of any equipment
(side steps or side sill protectors,
etc.) other than genuine SUBARU
accessory parts to the side body.
Always consult your SUBARU dealer if
you want to install any accessory parts on
your vehicle.
Page 357 of 458
11-4Maintenance and service
guard against getting oil or fluids
in your eyes. If something does
get in your eyes, thoroughly
wash them out with clean water.
. Do not tamper with the wiring of
the SRS airbag system or seat-
belt pretensioner system, or at-
tempt to take its connectors
apart, as that may activate the
system or it can render it inop-
erative. NEVER use a circuit
tester for this wiring.
If your SRS airbag or seatbelt
pretensioner needs service, con-
sult your nearest SUBARU deal-
er. &
Before checking or servicing
in the engine compartment
WARNING
. Always stop the engine and set
the parking brake firmly to pre-
vent the vehicle from moving.
. Always let the engine cool down.
Engine parts become very hot
when the engine is running and
remain hot for some time after
the engine is stopped.
. Do not spill engine oil, engine
coolant, brake fluid or any other
fluid on hot engine components.
This may cause a fire.
. Always remove the key from the
ignition switch. When the ignition
switch is in the “ON ”position,
thecoolingfanmayoperate
suddenly even when the engine
is stopped.
. Before performing any servicing
on a vehicle equipped with a
remote engine start system (a
dealer option) temporarily place
that system in the service mode
to prevent it from unexpectedly
starting the engine. &
When checking or servicing
in the engine compartment
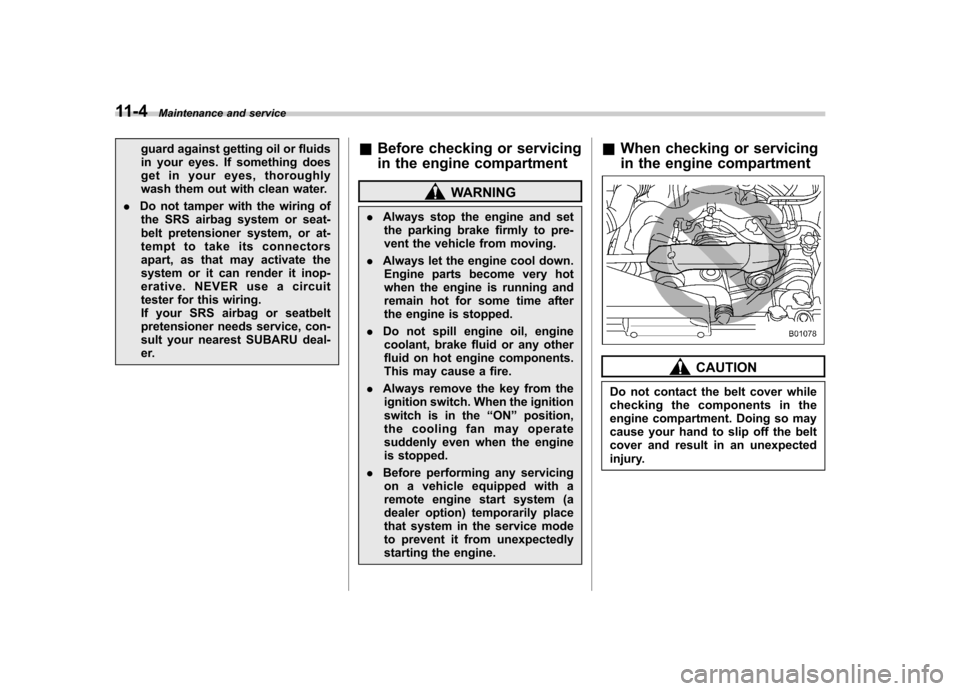
CAUTION
Do not contact the belt cover while
checking the components in the
engine compartment. Doing so may
cause your hand to slip off the belt
cover and result in an unexpected
injury.
Page 398 of 458

Fuses
CAUTION
Never replace a fuse with one hav-
ing a higher rating or with material
other than a fuse because serious
damage or a fire could result.
The fuses are designed to melt during an
overload to prevent damage to the wiring
harness and electrical equipment. The
fuses are located in two fuse boxes.
One is located under the instrument panel
behind the fuse box cover on the driver ’s
seat side. To remove the cover, pull it out.
The other one is housed in the engine compartment.
The spare fuses are stored in the main
fuse box cover in the engine compart-ment.
The fuse puller is stored in the main fuse
box in the engine compartment.
1) Good
2) Blown
If any lights, accessories or other electrical
controls do not operate, inspect the Maintenance and service
11-45
– CONTINUED –
Page 399 of 458

11-46Maintenance and service
corresponding fuse. If a fuse has blown,
replace it.
1. Turn the ignition switch to the “LOCK ”
position and turn off all electrical acces- sories.
2. Remove the cover.
3. Determine which fuse may be blown.
Look at the back side of each fuse box
cover and refer to “Fuses and circuits ”
F 12-12.
4. Pull out the fuse with the fuse puller.
5. Inspect the fuse. If it has blown,
replace it with a spare fuse of the samerating.
6. If the same fuse blows again, this
indicates that its system has a problem.
Contact your SUBARU dealer for repairs. Main fuse
Main fuse box
The main fuses are designed to melt
during an overload to prevent damage to
the wiring harness and electrical equip-
ment. Check the main fuses if any
electrical component fails to operate (ex-
cept the starter motor) and other fuses are
good. A melted main fuse must be
replaced. Use only replacements with the
same specified rating as the melted main
fuse. If a main fuse blows after it is
replaced, have the electrical system
checked by your nearest SUBARU dealer. Installation of accessories
Always consult your SUBARU dealer
before installing fog lights or any other
electrical equipment in your vehicle. Such
accessories may cause the electronic
system to malfunction if they are incor-
rectly installed or if they are not suited for
the vehicle.