2011 SUBARU IMPREZA WRX spare tire
[x] Cancel search: spare tirePage 336 of 458
12. Before putting the spare tire on, clean
the mounting surface of the wheel and hub
with a cloth.
13. Put on the spare tire. Replace the
wheel nuts. Tighten them by hand.
WARNING
Do not use oil or grease on the
wheel studs or nuts when the spare
tire is installed. This could cause the
nuts to become loose and lead to anaccident.
14. Turn the jack handle counterclockwise
to lower the vehicle.
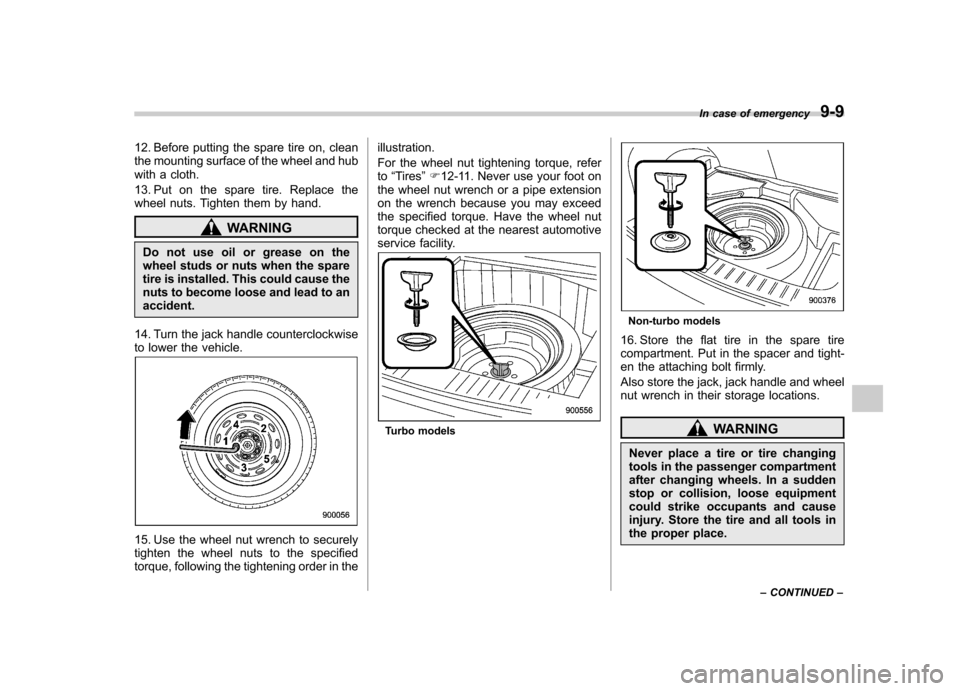
15. Use the wheel nut wrench to securely
tighten the wheel nuts to the specified
torque, following the tightening order in the illustration.
For the wheel nut tightening torque, refer to
“Tires ”F 12-11. Never use your foot on
the wheel nut wrench or a pipe extension
on the wrench because you may exceed
the specified torque. Have the wheel nut
torque checked at the nearest automotive
service facility.
Turbo models
Non-turbo models
16. Store the flat tire in the spare tire
compartment. Put in the spacer and tight-
en the attaching bolt firmly.
Also store the jack, jack handle and wheel
nut wrench in their storage locations.
WARNING
Never place a tire or tire changing
tools in the passenger compartment
after changing wheels. In a sudden
stop or collision, loose equipment
could strike occupants and cause
injury. Store the tire and all tools in
the proper place. In case of emergency
9-9
– CONTINUED –
Page 337 of 458
9-10In case of emergency
&Tire pressure monitoring
system (TPMS) (U.S.-spec. models)
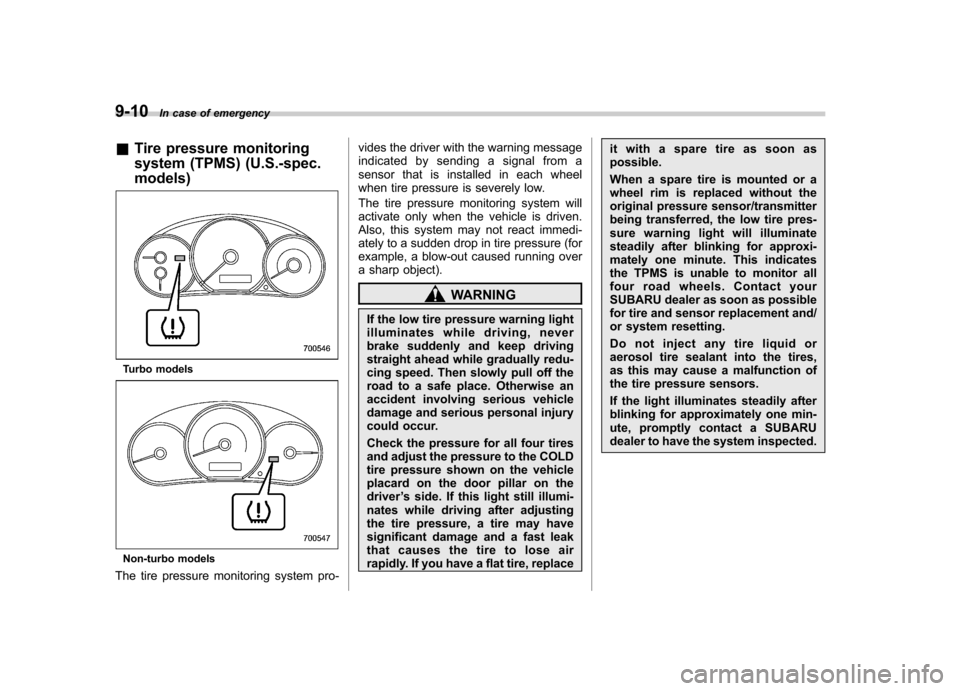
Turbo models
Non-turbo models
The tire pressure monitoring system pro- vides the driver with the warning message
indicated by sending a signal from a
sensor that is installed in each wheel
when tire pressure is severely low.
The tire pressure monitoring system will
activate only when the vehicle is driven.
Also, this system may not react immedi-
ately to a sudden drop in tire pressure (for
example, a blow-out caused running over
a sharp object).
WARNING
If the low tire pressure warning light
illuminates while driving, never
brake suddenly and keep driving
straight ahead while gradually redu-
cing speed. Then slowly pull off the
road to a safe place. Otherwise an
accident involving serious vehicle
damage and serious personal injury
could occur.
Check the pressure for all four tires
and adjust the pressure to the COLD
tire pressure shown on the vehicle
placard on the door pillar on thedriver ’s side. If this light still illumi-
nates while driving after adjusting
the tire pressure, a tire may have
significant damage and a fast leak
that causes the tire to lose air
rapidly. If you have a flat tire, replace it with a spare tire as soon aspossible.
When a spare tire is mounted or a
wheel rim is replaced without the
original pressure sensor/transmitter
being transferred, the low tire pres-
sure warning light will illuminate
steadily after blinking for approxi-
mately one minute. This indicates
the TPMS is unable to monitor all
four road wheels. Contact your
SUBARU dealer as soon as possible
for tire and sensor replacement and/
or system resetting.
Do not inject any tire liquid or
aerosol tire sealant into the tires,
as this may cause a malfunction of
the tire pressure sensors.
If the light illuminates steadily after
blinking for approximately one min-
ute, promptly contact a SUBARU
dealer to have the system inspected.
Page 386 of 458
a flat tire, replace it with a spare tire
as soon as possible.
When a spare tire is mounted or a
wheel rim is replaced without the
original pressure sensor/transmitter
being transferred, the low tire pres-
sure warning light will illuminate
steadily after blinking for approxi-
mately one minute. This indicates
the TPMS is unable to monitor all
four road wheels. Contact your
SUBARU dealer as soon as possible
for tire and sensor replacement and/
or system resetting. If the light
illuminates steadily after blinking
for approximately one minute,
promptly contact a SUBARU dealer
to have the system inspected.
& Tire inspection
Check on a daily basis that the tires are
free from serious damage, nails, and
stones. At the same time, check the tires
for abnormal wear.
Contact your SUBARU dealer immedi-
ately if you find any problem. NOTE . When the wheels and tires strike
curbs or are subjected to harsh treat-
ment as when the vehicle is driven on a rough surface, they can suffer damage
that cannot be seen with the naked eye.
This type of damage does not become
evident until time has passed. Try not
to drive over curbs, potholes or on
other rough surfaces. If doing so is
unavoidable, keep the vehicle
’s speed
down to a walking pace or less, and
approach the curbs as squarely as
possible. Also, make sure the tires are
not pressed against the curb when you
park the vehicle.. If you feel unusual vibration while
driving or find it difficult to steer the
vehicle in a straight line, one of the
tires and/or wheels may be damaged.
Drive slowly to the nearest authorized
SUBARU dealer and have the vehicleinspected.
& Tire pressures and wear
Maintaining the correct tire pressures
helps to maximize the tires ’service lives
and is essential for good running perfor-
mance. Check and, if necessary, adjust
the pressure of each tire (including the
spare) at least once a month (for example,
during a fuel stop) and before any long
journey.
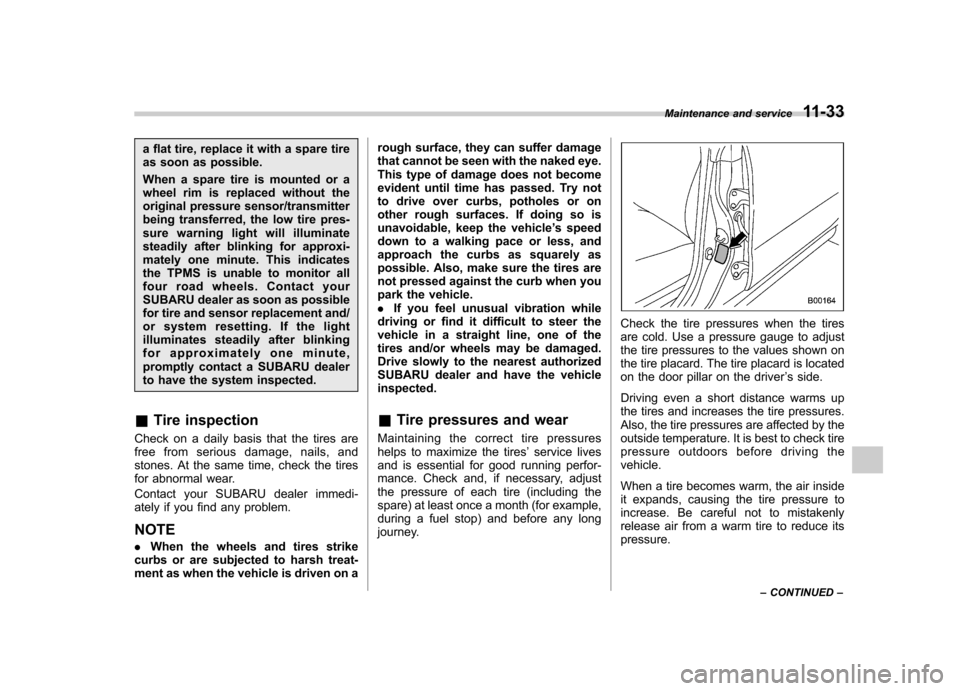
Check the tire pressures when the tires
are cold. Use a pressure gauge to adjust
the tire pressures to the values shown on
the tire placard. The tire placard is located
on the door pillar on the driver ’s side.
Driving even a short distance warms up
the tires and increases the tire pressures.
Also, the tire pressures are affected by the
outside temperature. It is best to check tire
pressure outdoors before driving thevehicle.
When a tire becomes warm, the air inside
it expands, causing the tire pressure to
increase. Be careful not to mistakenly
release air from a warm tire to reduce itspressure. Maintenance and service
11-33
– CONTINUED –
Page 420 of 458

&Tires
Tire size P205/55R16 89V P205/50R17 88V 235/45R17 245/40R18
Wheel size 1666
1/2JJ 17 67JJ 17 68JJ 18 681/2J
Pressure Front 33 psi (230 kPa, 2.3 kgf/cm2)
Rear 32 psi (220 kPa, 2.2 kgf/cm2)
Temporary
spare tire Size T125/70 D17
T135/70 D17
Pressure 60 psi (420 kPa, 4.2 kgf/cm
2)
Wheel nut tightening torque 72 lbf·ft (100 N·m, 10 kgf·m)*
*: This torque is equivalent to applying approximately 88 to 110 lbf (40 to 50 kgf) at the edge of the wheel nut wrench. If you have tightened the wheel
nuts by yourself, have the tightening torque checked at the nearest automotive service facility as soon as possible.
& Wheel alignment
Item 4-door 5-door
Non-turbo models Turbo models Non-turbo models Turbo models
Except STI STI Except
OUTBACK OUTBACK Except STI STI
Toe Front 0+ 0.12 in (0 +3 mm)
Toe angle (sum of both wheels): 0 8+0815 ’
Rear
Camber* Front–0 810 ’+ 0830 ’ –0850 ’+ 0830 ’ –0845 ’+ 0830 ’ –0 810 ’+ 0830 ’ –0805 ’+ 0830 ’ –0805 ’+ 0830 ’ –0 845 ’+ 0830 ’
Rear –1 805 ’+ 0845 ’ –1 835 ’+ 0845 ’ –1830 ’+ 0845 ’ –1805 ’+ 0845 ’ –1835 ’+ 0845 ’ –
1 830 ’+ 0845 ’
*: The differential between right-hand camber and left-hand camber should be within 45 ’or less. Specifications
12-11
Page 434 of 458
crease in temperature could cause
tread separation, and failure of the
tire(s). Possible resulting loss of
vehicle control could lead to anaccident. !Measuring and adjusting air
pressure to achieve proper in-
flation
Check and, if necessary, adjust the
pressure of each tire (including the
spare) at least once a month and
before any long journey. Check the
tire pressures when the tires are
cold. Use a pressure gauge to
adjust the tire pressures to the
specific values. Driving even a
short distance warms up the tires
and increases the tire pressures.
Also, the tire pressures are affected
by the outside temperature. It is
best to check tire pressure out-
doors before driving the vehicle.
When a tire becomes warm, the air
inside it expands, causing the tire
pressure to increase. Be careful not
to mistakenly release air from a
warm tire to reduce its pressure. &
Glossary of tire terminology
. Accessory weight
The combined weight (in excess of
those standard items which may be
replaced) of automatic transmis-
sion, power steering, power brakes,
power windows, power seats, radio,
and heater, to the extent that these
items are available as factory-in-
stalled equipment (whether in-
stalled or not). . Bead
The part of the tire that is made of
steel wires, wrapped or reinforced
by ply cords and that is shaped to fit
the rim.. Bead separation
A breakdown of the bond between
components in the bead.. Bias ply tire
A pneumatic tire in which the ply
cords that extend to the beads are
laid at alternate angles substantially
less than 90 degrees to the center-
line of the tread. . Carcass
The tire structure, except tread and sidewall rubber which, when in-
flated, bears the load. .
Chunking
The breaking away of pieces of the
tread or sidewall.. Cold tire pressure
The pressure in a tire that has been
driven less than 1 mile or has been
standing for three hours or more.. Cord
The strands forming the plies in the tire. . Cord separation
The parting of cords from adjacent
rubber compounds.. Cracking
Any parting within the tread, side-
wall, or inner liner of the tire
extending to cord material. . Curb weight
The weight of a motor vehicle with
standard equipment including the
maximum capacity of fuel, oil and
coolant, and if so equipped, air
conditioning and additional weight
optional engine.
Consumer information and Reporting safety defects
13-5
– CONTINUED –
Page 444 of 458
Uniform tire quality grading standards
This information indicates the rela-
tive performance of passenger car
tires in the area of treadwear,
traction, and temperature resis-
tance. This is to aid the consumer
in making an informed choice in the
purchase of tires.
Quality grades can be found where
applicable on the tire sidewall be-
tween tread shoulder and maxi-
mum section width. For example:
Treadwear 200 Traction AA Tem-
perature A
The quality grades apply to new
pneumatic tires for use on passen-
ger cars. However, they do not
apply to deep tread, winter type
snow tires, space-saver or tempor-
ary use spare tires, tires with
nominal rim diameters of 12 inches
or less, or to some limited produc-
tion tires.
All passenger car tires must con-form to Federal Safety Require-
ments in addition to these grades.
& Treadwear
The treadwear grade is a compara-
tive rating based on the wear rate of
the tire when tested under con-
trolled conditions on a specified
government test course.
For example, a tire graded 150
would wear one and one-half (1-
1/2) times as well on the govern-
ment course as a tire graded 100.
The relative performance of tires
depends upon the actual conditions
of their use, however, and may
depart significantly from the norm
due to variations in driving habits,
service practices and differences in
road characteristics and climate. & Traction AA, A, B, C
The traction grades, from highest to
lowest, are AA, A, B and C. Those
grades represent the tire ’s ability to
stop on wet pavement as measured
under controlled conditions on spe- cified government test surfaces of
asphalt and concrete. A tire marked
C may have poor traction perfor- mance.
WARNING
The traction grade assigned to
this tire is based on straight-
ahead braking traction tests,
and does not include accel-
eration, cornering, hydroplan-
ing, or peak traction charac-teristics.
& Temperature A, B, C
The temperature grades are A (the
highest), B, and C, representing thetire ’s resistance to the generation of
heat and its ability to dissipate heat
when tested under controlled con-
ditions on a specified indoor labora-
tory test wheel. Sustained high
temperature can cause the material
of the tire to degenerate and reduce
tire life, and excessive temperature
can lead to sudden tire failure. The
Consumer information and Reporting safety defects
13-15
– CONTINUED –
Page 455 of 458

14-10Index
Tilt/telescopic ......................................................... 3-50
Stopping the engine ................................................... 7-10
Storage compartment ................................................... 6-4
Sun shade ................................................................ 2-30
Sun visors ................................................................... 6-4
Supplemental Restraint System airbag (SRS) ................ 1-35
Synthetic leather upholstery ........................................ 10-5
T
Tachometer ................................................................. 3-9
Temperature gauge .................................................... 3-11
Temperature warning light AT OIL TEMP ........................................................ 3-18
Coolant ................................................................. 3-17
Rear differential oil ................................................. 3-19
Temporary spare tire .................................................... 9-2
Tether (child restraint system) .............................. 1-29, 1-31
Tie-down hooks ......................................................... 9-14
Tire ............................................................... 11-31, 12-11
Chains .................................................................. 8-11
Inspection ............................................................ 11-33
Pressures and wear .............................................. 11-33
Replacement ........................................................ 11-37
Rotation ............................................................... 11-36
Size and pressure ................................................. 12-11
Types .................................................................. 11-31
Tire pressure monitoring system (TPMS). .... 7-38, 9-10, 11-31
Warning light ......................................................... 3-19
Tires and wheels. ...................................................... 11-31
Tools .......................................................................... 9-4
Top tether anchorages ........................................ 1-29, 1-31 Towing
...................................................................... 9-14
All wheels on the ground ......................................... 9-17
Flat-bed truck ......................................................... 9-17
Hooks ................................................................... 9-14
Trailer Towing .................................................................. 8-15
Trip meter ................................................................... 3-8
Trunk lid .................................................................... 2-25
Release handle ...................................................... 2-25
Trunk light ............................................................... 11-55
Turn signal
Indicator lights ........................................................ 3-26
Lever .................................................................... 3-33
U
Under-floor storage compartment .................................. 6-14
USB storage device operations .................................... 5-37
V
Valet mode ................................................................ 2-19
Vanity mirror ............................................................... 6-4
Vehicle Capacity weight ...................................................... 8-12
Identification ........................................................ 12-19
Symbols .................................................................... 3
Vehicle Dynamics Control
Mode switch .......................................................... 7-36
OFF indicator light .................................................. 3-23
OFF switch ............................................................ 7-37
Operation indicator light ........................................... 3-23
System .................................................................. 7-34