2011 SUBARU IMPREZA headlights
[x] Cancel search: headlightsPage 4 of 458

Warranties &Warranties for U.S.A.
All SUBARU vehicles distributed by
Subaru of America, Inc. and sold at retail
by an authorized SUBARU dealer in the
United States come with the followingwarranties: . SUBARU Limited Warranty
. Emission Control Systems Warranty
. Emissions Performance Warranty
All warranty information, including details
of coverage and exclusions, is in the“ Warranty and Maintenance Booklet ”.
Please read these warranties carefully.
& Warranties for Canada
All SUBARU vehicles distributed by
Subaru Canada, Inc. and sold at retail by
an authorized SUBARU dealer in Canada
come with the following warranties: . SUBARU Limited Warranty
. Anti-Corrosion Warranty
. Emission Control Warranty
All warranty information, including details
of coverage and exclusions, is in the“ Warranty and Service Booklet ”. Please
read these warranties carefully. &
Models with HID headlights
CAUTION
High Intensity Discharge (HID) head-
lights contain mercury. For that
reason, it is necessary to remove
HID headlights before vehicle dis-
posal. Once removed, please reuse,
recycle or dispose of the HID head-
lights as hazardous waste.
& Models without HID head- lights
NOTE
This vehicle does not contain mercury
devices or parts. How to use this Owner
’s
Manual & Using your Owner ’s Manual
Before you operate your vehicle, carefully
read this manual. To protect yourself and
extend the service life of your vehicle,
follow the instructions in this manual.
Failure to observe these instructions may
result in serious injury and damage to yourvehicle.
This manual is composed of fourteen
chapters. Each chapter begins with a brief
table of contents, so you can usually tell at
a glance if that chapter contains the
information you want.
Chapter 1: Seat, seatbelt and SRS airbags
This chapter informs you how to use the
seat and seatbelt and contains precau-
tions for the SRS airbags.
Chapter 2: Keys and doors
This chapter informs you how to operate
the keys, locks and windows.
Chapter 3: Instruments and controls
This chapter informs you about the opera-
tion of instrument panel indicators and
how to use the instruments and otherswitches. 1
– CONTINUED –
Page 7 of 458

4
Mark Name
Front fog lights
Hazard warning flasher
Engine hood
Trunk lid (4-door)
Seat heater
Child restraint top tether an- chorages
Child restraint lower an- chorages
Horn
Wiper intermittent
Windshield washer
Windshield wiper mist (for
single wipe)Mark Name
Rear window wiper
Rear window washer
Lights
Tail lights, license plate light
and instrument panel illumi- nation
Headlights
Turn signal
Illumination brightness
Fan speed
Instrument panel outlets
Instrument panel outlets and
foot outlets
Foot outlets
Mark Name
Windshield defroster and foot outlets
Windshield defroster
Rear window defogger/Out-
side mirror defogger/Wind-
shield wiper deicer
Air recirculation
Engine oil
Washer
Door lock (transmitter)
Door unlock (transmitter)
Trunk lid open (4-door) or rear
gate unlock (5-door) (trans- mitter)
Page 121 of 458

Instruments and controlsCruise control set indicator light ......................... 3-27
Front fog light indicator light (if equipped) .......... 3-27
Headlight indicator light (if equipped) ................. 3-27
Driver ’s control center differential auto indicator
light (STI) ......................................................... 3-27
Driver ’s control center differential indicator and
warning lights (STI) .......................................... 3-27
REV indicator light (STI) ..................................... 3-28
Clock ................................................................... 3-28
Information display ............................................ 3-29
Outside temperature indicator ............................ 3-29
Current fuel consumption (if equipped) ............... 3-30
Average fuel consumption .................................. 3-30
Turn off display of fuel consumption indicator .......................................................... 3-31
Light control switch ........................................... 3-31
Headlights. ......................................................... 3-32
High/low beam change (dimmer) ......................... 3-32
Headlight flasher ................................................ 3-32 Daytime running light system
............................. 3-33
Turn signal lever ................................................ 3-33
Illumination brightness control ......................... 3-33
Headlight beam leveler (if equipped) ............... 3-34
Front fog light switch (if equipped) .................. 3-36
Wiper and washer .............................................. 3-36
Windshield wiper and washer switches .............. 3-38
Rear window wiper and washer switch –
5-door ............................................................. 3-39
Mirrors ................................................................ 3-40
Inside mirror ...................................................... 3-40
Auto-dimming mirror/compass (if equipped) ....... 3-40
Auto-dimming mirror/compass with HomeLink
®(if equipped) .................................................... 3-41
Outside mirrors ................................................. 3-47
Defogger and deicer .......................................... 3-48
Tilt/telescopic steering wheel ........................... 3-50
Horn .................................................................... 3-51
Page 145 of 458

3-26Instruments and controls
& SI-DRIVE indicator light (STI)
1) Intelligent (I) mode
2) Sport (S) mode
3) Sport Sharp (S#) mode
This light indicates the current SI-DRIVE mode.
For details of SI-DRIVE mode, refer to “SI-
DRIVE (STI) ”F 7-28.
& Shift-up indicator light (STI)
While selecting the Intelligent (I) mode of
SI-DRIVE, this indicator light illuminates
and informs the driver about the upshift
timing for fuel-efficient driving. &
Select lever/gear position in-
dicator (AT models)
When the ignition switch is turned to the “ON ”position, all of the select lever/gear
position indicators illuminate for 2 sec-
onds, and then the indicator shows the
position of the select lever.
When the manual mode is selected, the
gear position indicator (which shows the
current gear selection) and the upshift/
downshift indicator light up. Refer to“ Automatic transmission ”F 7-22. &
Turn signal indicator lights
These lights show the operation of the turn
signal or lane change signal.
If the indicator lights do not blink or blink
rapidly, the turn signal bulb may be burned
out. Replace the bulb as soon as possible.
Refer to “Replacing bulbs ”F 11-47.
& High beam indicator light
This light shows that the headlights are in
the high beam mode.
This indicator light also illuminates when
the headlight flasher is operated. &Cruise control indica-
tor light
This light illuminates when the “CRUISE ”
main switch is pressed. NOTE . If you press the “CRUISE ”main
switch button while turning the ignition switch “ON ”, the cruise control func-
tion is deactivated and the cruise
control indicator light flashes. To re-
activate the cruise control function,
turn the ignition switch back to the“ Acc ”or “LOCK ”position, and then
Page 151 of 458

3-32Instruments and controls
discharged.
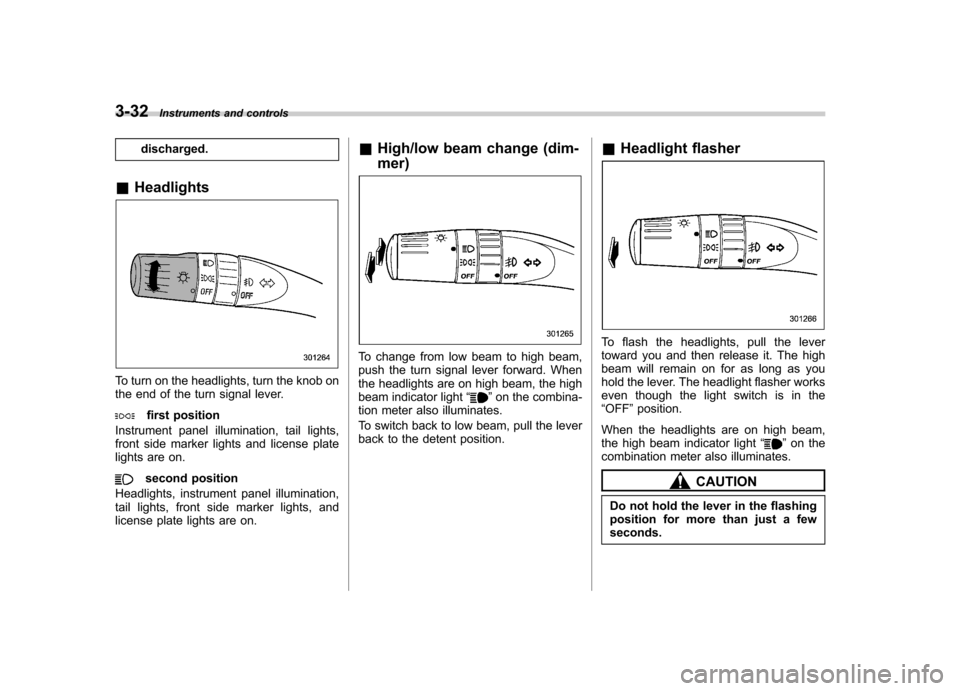
& Headlights
To turn on the headlights, turn the knob on
the end of the turn signal lever.
first position
Instrument panel illumination, tail lights,
front side marker lights and license plate
lights are on.
second position
Headlights, instrument panel illumination,
tail lights, front side marker lights, and
license plate lights are on. &
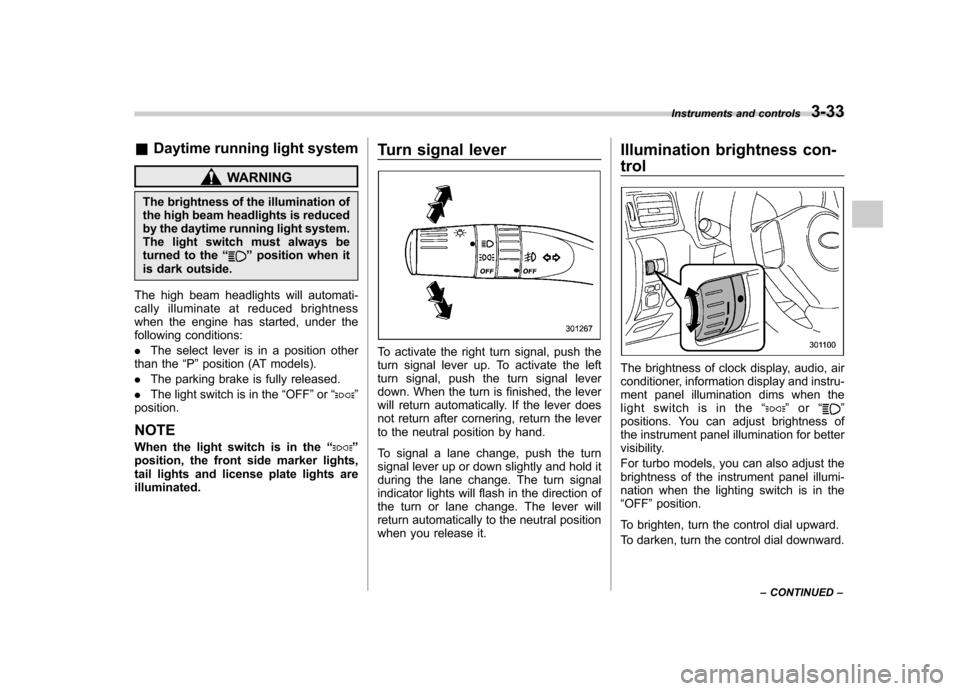
High/low beam change (dim- mer)
To change from low beam to high beam,
push the turn signal lever forward. When
the headlights are on high beam, the high
beam indicator light “
”on the combina-
tion meter also illuminates.
To switch back to low beam, pull the lever
back to the detent position. &
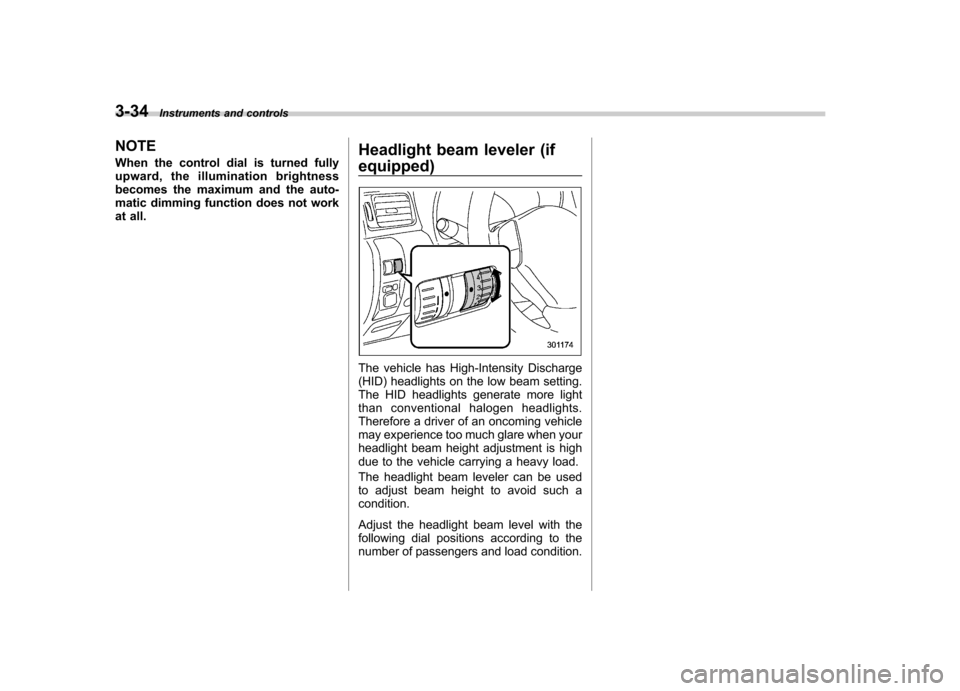
Headlight flasher
To flash the headlights, pull the lever
toward you and then release it. The high
beam will remain on for as long as you
hold the lever. The headlight flasher works
even though the light switch is in the“OFF ”position.
When the headlights are on high beam,
the high beam indicator light “
”on the
combination meter also illuminates.
CAUTION
Do not hold the lever in the flashing
position for more than just a fewseconds.
Page 152 of 458

&Daytime running light system
WARNING
The brightness of the illumination of
the high beam headlights is reduced
by the daytime running light system.
The light switch must always be
turned to the “
”position when it
is dark outside.
The high beam headlights will automati-
cally illuminate at reduced brightness
when the engine has started, under the
following conditions: . The select lever is in a position other
than the “P ”position (AT models).
. The parking brake is fully released.
. The light switch is in the “OFF ”or “
”
position.
NOTE
When the light switch is in the “
”
position, the front side marker lights,
tail lights and license plate lights areilluminated. Turn signal lever
To activate the right turn signal, push the
turn signal lever up. To activate the left
turn signal, push the turn signal lever
down. When the turn is finished, the lever
will return automatically. If the lever does
not return after cornering, return the lever
to the neutral position by hand.
To signal a lane change, push the turn
signal lever up or down slightly and hold it
during the lane change. The turn signal
indicator lights will flash in the direction of
the turn or lane change. The lever will
return automatically to the neutral position
when you release it.Illumination brightness con- trol
The brightness of clock display, audio, air
conditioner, information display and instru-
ment panel illumination dims when the
light switch is in the
“
”or “”
positions. You can adjust brightness of
the instrument panel illumination for better
visibility.
For turbo models, you can also adjust the
brightness of the instrument panel illumi-
nation when the lighting switch is in the“ OFF ”position.
To brighten, turn the control dial upward.
To darken, turn the control dial downward. Instruments and controls
3-33
– CONTINUED –
Page 153 of 458

3-34Instruments and controls
NOTE
When the control dial is turned fully
upward, the illumination brightness
becomes the maximum and the auto-
matic dimming function does not work
at all. Headlight beam leveler (if equipped)
The vehicle has High-Intensity Discharge
(HID) headlights on the low beam setting.
The HID headlights generate more light
than conventional halogen headlights.
Therefore a driver of an oncoming vehicle
may experience too much glare when your
headlight beam height adjustment is high
due to the vehicle carrying a heavy load.
The headlight beam leveler can be used
to adjust beam height to avoid such acondition.
Adjust the headlight beam level with the
following dial positions according to the
number of passengers and load condition.
Page 155 of 458

3-36Instruments and controls
Front fog light switch (if equipped)
The front fog lights operate only when the
light switch is in the “”position.
However, the front fog lights turn off when
the headlights are switched to high beam.
To turn on the front fog lights, turn the front
fog light switch on the turn signal lever
upward to the “
”position. To turn off the
front fog lights, turn the switch back down
to the “OFF ”position.
Turbo models
Non-turbo models
The indicator light on the combination
meter will illuminate when the front fog
lights are illuminated. Wiper and washer
WARNING
In freezing weather, do not use the
windshield washer until the wind-
shield is sufficiently warmed by the
defroster.
Otherwise the washer fluid can
freeze on the windshield, blocking
your view.
CAUTION
. Do not operate the washer con-
tinuously for more than 10 sec-
onds, or when the washer fluid
tank is empty. This may cause
overheating of the washer motor.
Check the washer fluid level
frequently, such as at fuel stops.
. Do not operate the wipers when
the windshield or rear window is
dry. This may scratch the glass,
damage the wiper blades and
cause the wiper motor to burn
out. Before operating the wiper
on a dry windshield or rear
window, always use the wind-
shield washer.