2011 SUBARU IMPREZA filter
[x] Cancel search: filterPage 172 of 458

Ventilator.............................................................. 4-2
Airflow selection ................................................. 4-2
Center and side ventilators .................................. 4-3
Manual climate control system (if equipped) ..................................................... 4-3
Control panel ...................................................... 4-3
Heater operation ................................................. 4-5
Air conditioner operation ..................................... 4-7
Automatic climate control system (if equipped) ..................................................... 4-8
Control panel ...................................................... 4-8
To use as full-automatic climate control system .............................................................. 4-8
To use as semi-automatic climate control system .............................................................. 4-8
Fan speed control dial ......................................... 4-9
Temperature control dial ...................................... 4-9
Airflow control dial .............................................. 4-9
Air inlet selection button .................................... 4-10 Air conditioner button
........................................ 4-11
Temperature sensors ......................................... 4-11
Operating tips for heater and air conditioner ...................................................... 4-12
Cleaning ventilation grille ................................... 4-12
Efficient cooling after parking in direct sunlight ........................................................... 4-12
Lubrication oil circulation in the refrigerant circuit .............................................................. 4-12
Checking air conditioning system before summer season ............................................................ 4-12
Cooling and dehumidifying in high humidity and low temperature weather conditions ................. 4-12
Air conditioner compressor shut-off when engine is heavily loaded .............................................. 4-13
Refrigerant for your climate control system ... ..... 4-13
Air filtration system ........................................... 4-13
Replacing an air filter ......................................... 4-13Climate control
4
Page 184 of 458

system. &Air conditioner compressor
shut-off when engine is
heavily loaded
To improve acceleration and gas mileage,
the air conditioner compressor is designed
to temporarily shut off during air condi-
tioner operation whenever the accelerator
is fully depressed such as during rapid
acceleration or when driving on a steepupgrade. & Refrigerant for your climate
control system
Your air conditioner uses ozone friendly
refrigerant HFC134a. Therefore, the meth-
od of adding, changing or checking the
refrigerant is different from the method for
CFC12 (freon). Consult your SUBARU
dealer for service. Repairs needed as a
result of using the wrong refrigerant are
not covered under warranty. Air filtration system
Replace the filter element according to the
replacement schedule as follows. This
schedule should be followed to maintain
the filter
’s dust collection ability. Under
extremely dusty conditions, the filter
should be replaced more frequently. It is
recommended that you have your filter
checked or replaced by your SUBARU
dealer. For replacement, use only a
genuine SUBARU air filter kit.
Replacement schedule: Every 12 months or 7,500 miles (12,000
km) whichever comes first
CAUTION
Contact your SUBARU dealer if the
following occurs, even if it is not yet
time to change the filter: . Reduction of the airflow through
the vents.
. Windshield gets easily fogged or
misted.
NOTE
The filter can influence the air condi-
tioning, heating and defroster perfor- mance if not properly maintained. &
Replacing an air filter
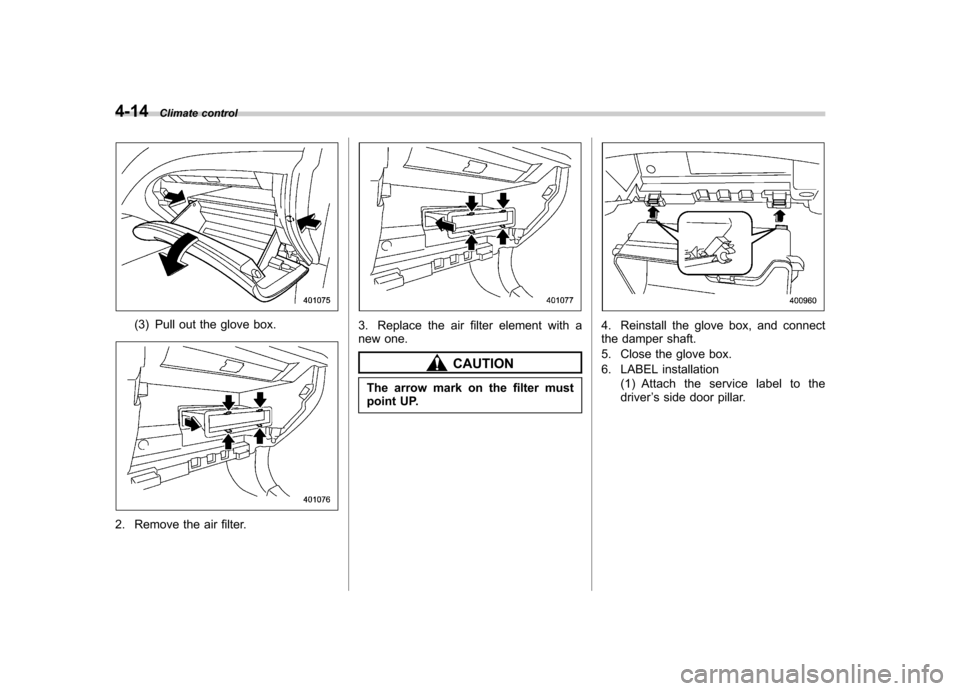
1. Remove the glove box. (1) Open the glove box.(2) Remove the damper shaft from the
glove box. Climate control
4-13
– CONTINUED –
Page 185 of 458

4-14Climate control
(3) Pull out the glove box.
2. Remove the air filter.
3. Replace the air filter element with a
new one.
CAUTION
The arrow mark on the filter must
point UP.
4. Reinstall the glove box, and connect
the damper shaft.
5. Close the glove box.
6. LABEL installation (1) Attach the service label to the driver ’s side door pillar.
Page 186 of 458

1) Caution label(2) Attach the caution label next to the
air filter as shown in the illustration. Climate control
4-15
Page 354 of 458

Maintenance schedule....................................... 11-3
Maintenance precautions ................................... 11-3
Before checking or servicing in the engine compartment .................................................... 11-4
When checking or servicing in the engine compartment .................................................... 11-4
When checking or servicing in the engine compartment while the engine is running .......... 11-5
Engine hood ....................................................... 11-5
Engine compartment overview .......................... 11-7
Non-turbo models .............................................. 11-7
Turbo models except STI .................................... 11-8
STI..................................................................... 11-9
Engine oil .......................................................... 11-10
Checking the oil level ....................................... 11-10
Changing the oil and oil filter ............................ 11-11
Recommended grade and viscosity .................. 11-13
Synthetic oil ..................................................... 11-13
Cooling system ................................................ 11-13
Cooling fan, hose and connections ................... 11-14
Engine coolant ................................................. 11-14
Air cleaner element .......................................... 11-17
Replacing the air cleaner element ..................... 11-17
Spark plugs ...................................................... 11-19
Recommended spark plugs .............................. 11-20
Drive belts ........................................................ 11-20
Manual transmission oil .................................. 11-21
Checking the oil level ....................................... 11-21
Recommended grade and viscosity .................. 11-21Automatic transmission fluid
.......................... 11-22
Checking the fluid level .................................... 11-22
Recommended fluid ......................................... 11-23
Front differential gear oil (AT models) ........... 11-23
Checking the oil level ...................................... 11-23
Recommended grade and viscosity .................. 11-24
Rear differential gear oil .................................. 11-24
Recommended grade and viscosity .................. 11-24
Power steering fluid ........................................ 11-24
Checking the fluid level .................................... 11-24
Recommended fluid ......................................... 11-25
Brake fluid ........................................................ 11-25
Checking the fluid level .................................... 11-25
Recommended brake fluid ............................... 11-26
Clutch fluid (MT models) ................................. 11-26
Checking the fluid level .................................... 11-26
Recommended clutch fluid ............................... 11-27
Brake booster .................................................. 11-27
Brake pedal ...................................................... 11-28
Checking the brake pedal free play .................. 11-28
Checking the brake pedal reserve distance....... 11-28
Clutch pedal (MT models) ............................... 11-29
Checking the clutch function ............................ 11-29
Checking the clutch pedal free play .................. 11-29
Hill start assist system (MT models –if
equipped) ...................................................... 11-29
Replacement of brake pad and lining ............ 11-30
Breaking-in of new brake pads and linings ....... 11-30
Parking brake stroke ....................................... 11-31
Maintenance and service
11
Page 356 of 458

Maintenance schedule
The scheduled maintenance items re-
quired to be serviced at regular intervals
are shown in the“Warranty and Main-
tenance Booklet ”.
For details of your maintenance schedule,
read the separate “Warranty and Main-
tenance Booklet ”. Maintenance precautions
When maintenance and service are re-
quired, it is recommended that all work be
done by an authorized SUBARU dealer.
If you perform maintenance and service
by yourself, you should familiarize yourself
with the information provided in this
section on general maintenance and
service for your SUBARU.
Incorrect or incomplete service could
cause improper or unsafe vehicle opera-
tion. Any problems caused by improper
maintenance and service performed by
you are not eligible for warranty coverage.
WARNING
. Testing of an All-Wheel Drive
model must NEVER be per-
formed on a single two-wheel
dynamometer or similar appara-
tus. Attempting to do so will
result in transmission damage
and in uncontrolled vehicle
movement and may cause an
accident or injuries to persons
nearby.
. Always select a safe area when
performing maintenance on yourvehicle. .
Always be very careful to avoid
injury when working on the vehi-
cle. Remember that some of the
materials in the vehicle may be
hazardous if improperly used or
handled, for example, batteryacid.
. Your vehicle should only be ser-
viced by persons fully competent
to do so. Serious personal injury
may result to persons not experi-
enced in servicing vehicles.
. Always use the proper tools and
make certain that they are wellmaintained.
. Never get under the vehicle sup-
ported only by a jack. Always use
safety stands to support thevehicle.
. Never keep the engine running in
a poorly ventilated area, such as
a garage or other closed areas.
. Do not smoke or allow open
flames around the fuel or battery.
This will cause a fire.
. Because the fuel system is under
pressure, replacement of the fuel
filter should be performed only
by your SUBARU dealer.
. Wear adequate eye protection to Maintenance and service
11-3
– CONTINUED –
Page 364 of 458

pipe, be sure to wipe it off.
. If the level gauge is not pulled out
easily, twist the level gauge right
and left, then pull it out. Other-
wise, you may be injured acci-
dentally straining yourself.
If you check the oil level just after stopping
the engine, wait a few minutes for the oil to
drain back into the oil pan before checking
the level.
Just after driving or while the engine is
warm, the engine oil level reading may be
in a range between the upper level and
the notch mark. This is caused by thermal
expansion of the engine oil.
To prevent overfilling the engine oil, do not
add any additional oil above the upper
level when the engine is cold. & Changing the oil and oil filter
Change the oil and oil filter according to
the maintenance schedule in the “War-
ranty and Maintenance Booklet ”.
The engine oil and oil filter must be
changed more frequently than listed in
the maintenance schedule when driving
on dusty roads, when short trips are
frequently made, or when driving in
extremely cold weather. NOTE
Changing the engine oil and oil filter
should be performed by a properly-
trained expert. It is recommended that
you have this service performed by
your SUBARU dealer.
1. Warm up the engine by letting the
engine idle for approximately 10 minutes
to ease draining the engine oil.
2. Park the vehicle on a level surface and
stop the engine.
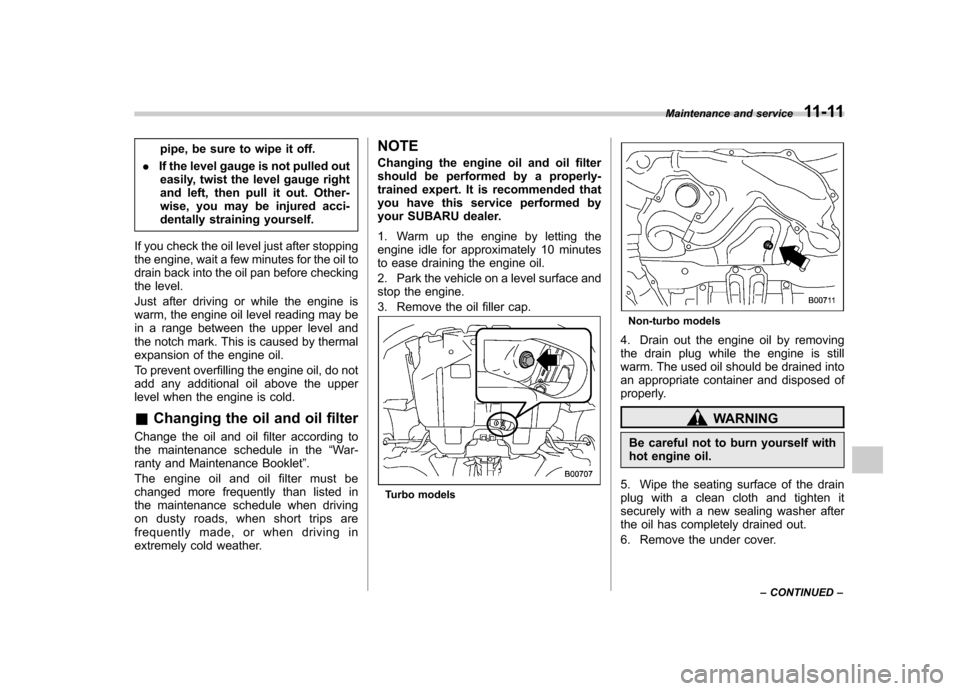
3. Remove the oil filler cap.
Turbo models
Non-turbo models
4. Drain out the engine oil by removing
the drain plug while the engine is still
warm. The used oil should be drained into
an appropriate container and disposed of
properly.
WARNING
Be careful not to burn yourself with
hot engine oil.
5. Wipe the seating surface of the drain
plug with a clean cloth and tighten it
securely with a new sealing washer after
the oil has completely drained out.
6. Remove the under cover. Maintenance and service
11-11
– CONTINUED –
Page 365 of 458

11-12Maintenance and service
Turbo models
Non-turbo models
7. Remove the oil filter with an oil filter wrench.
8. Before installing a new oil filter, apply a
thin coat of engine oil to the seal. 9. Clean the rubber seal seating area of
the bottom of engine and install the oil
filter by hand turning. Be careful not to
twist or damage the seal.
10. Tighten the oil filter by the amount
indicated in the following table after the
seal makes contact with the bottom ofengine.
Oil filter color Part number Amount of
rotation
Black 15208AA100 1 rotation
Blue 15208AA12A 7/8
rotation
CAUTION
. Never over tighten the oil filter
because that can result in an oil leak.
. Thoroughly wipe off any engine
oil that has spilled over the
exhaust pipe and/or under-cover.
If spilled oil is not promptly
wiped up, the oil could cause afire.
11. Reinstall under cover.
12. Pour engine oil through the filler neck.
For the oil capacity (guideline), refer to“ Engine oil ”F 12-5. The oil quantity indicated above is onlyguideline.
The necessary quantity of oil depends on
the quantity of oil that has been drained.
The quantity of drained oil differs slightly
depending on the temperature of the oil
and the time the oil is left flowing out. After
refilling the engine with oil, therefore, you
must use the level gauge to confirm that
the level is correct.
13. Start the engine and make sure that no
oil leaks appear around the filter
’s rubber
seal and drain plug.
14. Run the engine until it reaches the
normal operating temperature. Then stop
the engine and wait a few minutes to allow
the oil drain back. Check the oil level
again and if necessary, add more engineoil.
CAUTION
Be careful not to spill engine oil
when adding it. If oil touches the
exhaust pipe, it may cause a bad
smell, smoke, and/or a fire.