2011 SUBARU IMPREZA Adjust the seats
[x] Cancel search: Adjust the seatsPage 72 of 458

WARNING
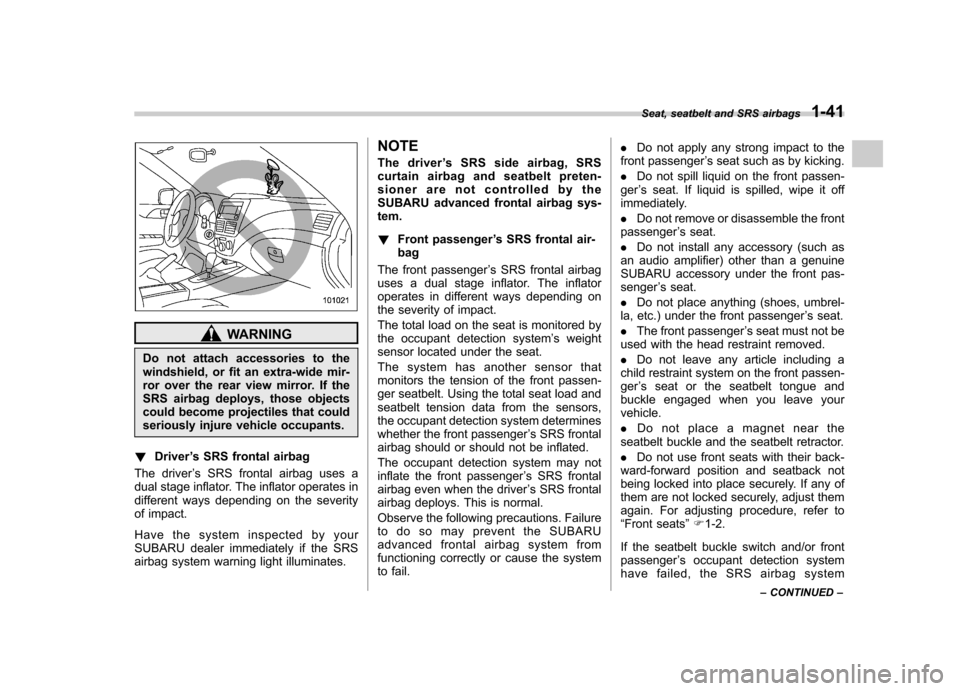
Do not attach accessories to the
windshield, or fit an extra-wide mir-
ror over the rear view mirror. If the
SRS airbag deploys, those objects
could become projectiles that could
seriously injure vehicle occupants.
! Driver ’s SRS frontal airbag
The driver ’s SRS frontal airbag uses a
dual stage inflator. The inflator operates in
different ways depending on the severity
of impact.
Have the system inspected by your
SUBARU dealer immediately if the SRS
airbag system warning light illuminates. NOTE
The driver
’s SRS side airbag, SRS
curtain airbag and seatbelt preten-
sioner are not controlled by the
SUBARU advanced frontal airbag sys-tem. ! Front passenger ’s SRS frontal air-
bag
The front passenger ’s SRS frontal airbag
uses a dual stage inflator. The inflator
operates in different ways depending on
the severity of impact.
The total load on the seat is monitored by
the occupant detection system ’s weight
sensor located under the seat.
The system has another sensor that
monitors the tension of the front passen-
ger seatbelt. Using the total seat load and
seatbelt tension data from the sensors,
the occupant detection system determines
whether the front passenger ’s SRS frontal
airbag should or should not be inflated.
The occupant detection system may not
inflate the front passenger ’s SRS frontal
airbag even when the driver ’s SRS frontal
airbag deploys. This is normal.
Observe the following precautions. Failure
to do so may prevent the SUBARU
advanced frontal airbag system from
functioning correctly or cause the system
to fail. .
Do not apply any strong impact to the
front passenger ’s seat such as by kicking.
. Do not spill liquid on the front passen-
ger ’s seat. If liquid is spilled, wipe it off
immediately. . Do not remove or disassemble the front
passenger ’s seat.
. Do not install any accessory (such as
an audio amplifier) other than a genuine
SUBARU accessory under the front pas-senger ’s seat.
. Do not place anything (shoes, umbrel-
la, etc.) under the front passenger ’s seat.
. The front passenger ’s seat must not be
used with the head restraint removed. . Do not leave any article including a
child restraint system on the front passen- ger ’s seat or the seatbelt tongue and
buckle engaged when you leave yourvehicle. . Do not place a magnet near the
seatbelt buckle and the seatbelt retractor.. Do not use front seats with their back-
ward-forward position and seatback not
being locked into place securely. If any of
them are not locked securely, adjust them
again. For adjusting procedure, refer to“ Front seats ”F 1-2.
If the seatbelt buckle switch and/or frontpassenger ’s occupant detection system
have failed, the SRS airbag system Seat, seatbelt and SRS airbags
1-41
– CONTINUED –
Page 75 of 458

1-44Seat, seatbelt and SRS airbags
lift the front passenger ’s seat cushion
using his/her feet. . Do not place any article under the front
passenger ’s seat, or squeeze any article
from behind and under the seat. This may
lift the seat cushion. . Do not squeeze any article between
the front passenger ’s seat and side trim/
pillar, door or center console box. This
may lift the seat cushion. ! If the passenger ’s frontal airbag OFF
indicator illuminates and the ON
indicator turns off even when the
front passenger ’s seat is occupied
by an adult
This can be caused by the adult incor-
rectly sitting in the front passenger ’s seat.
Turn the ignition switch to the “LOCK ”
position. Ask the front passenger to set
the seatback to the upright position, sit up
straight in the center of the seat cushion,
correctly fasten the seatbelt, position his/
her legs out forward, and adjust the seat to
the rearmost position. Turn the ignition
switch to the “ON ”position. If the OFF
indicator remains illuminated while the ON
indicator remains off, take the followingactions. . Turn the ignition switch to the “LOCK ”
position.. Ensure that there are no articles, books, shoes, or other objects trapped
under the seat, at the rear of the seat, or
on the side of the seat. .
Ensure that the backward-forward po-
sition and seatback of front passenger ’s
seat are locked into place securely by
moving the seat back and forth. . Next, turn the ignition switch to the
“ ON ”position and wait 6 seconds to allow
the system to complete self-checking.
Following the system check, both indica-
tors turn off for 2 seconds. Now, the ON
indicator should illuminate while the OFF
indicator remains off.
If the OFF indicator still remains illumi-
nated while the ON indicator remains off,
ask the occupant to move to the rear seat
and immediately contact your SUBARU
dealer for an inspection. ! Effect vehicle modifications made
for persons with disabilities may
have on SUBARU advanced frontal
airbag system operation (U.S. only)
Changing or moving any parts of the front
seats, rear seat, seatbelts, front bumper,
front side frame, radiator panel, instrument
panel, combination meter, steering wheel,
steering column, tire, suspension or floor
panel can affect the operation of the
SUBARU advanced airbag system. If
you have any questions, you may contact the following SUBARU distributors.
Subaru of America, Inc.
Customer Dealer Services Department
P.O. Box 6000
Cherry Hill, NJ 08034-6000
1-800-SUBARU3 (1-800-782-2783)
Servco Subaru Inc., dba Subaru Hawaii
2850 Pukoloa Street, Suite 202, Honolulu,
HI 96819 808-839-2273
’s Corporation dba Prestige Automo-
bile
491, East Marine Drive, Route 1 Dededo, Guam 671-633-2698
Trebol Motors
P.O. Box 11204, San Juan, Puerto Rico 00910 787-793-2828
There are currently no SUBARU distribu-
tors in any other U.S. territories. If you are
in such an area, please contact the
SUBARU distributor or dealer from which
Page 134 of 458

The warning light(s) for unfastened
seatbelt(s) will alternate between
steady illumination and flashing at
15-second intervals. The chime will
not sound. –At speeds higher than approxi-
mately 9 mph (15 km/h)
The warning light(s) for unfastened
seatbelt(s) will alternate between
flashing and steady illumination at
15-second intervals and the chime
will sound while the warning light(s)
is/are flashing.
. It is possible to cancel the warning
operation that follows the 6-second
warning after turning ON the ignition
switch. When the ignition switch is
turned ON next time, however, the
complete sequence of the warning
operation resumes. For further details
about canceling the warning operation,
please contact your SUBARU dealer.
If there is no passenger on the front passenger ’s seat, the seatbelt warning
device for the front passenger ’s seat will
be deactivated. The front passenger ’s
occupant detection system monitors
whether or not there is a passenger on
the front passenger ’s seat.
Observe the following precautions. Failure
to do so may prevent the device from
functioning correctly or cause the device to fail. .
Do not install any accessory such as a
table or TV onto the seatback.. Do not store a heavy load in the
seatback pocket.. Do not allow the rear seat occupant to
place his/her hands or legs on the front passenger ’s seatback, or allow him/her to
pull the seatback. . Do not use front seats with their back-
ward-forward position and seatback not
being locked into place securely. If any of
them are not locked securely, adjust them
again. For adjusting procedure, refer to“ Front seats ”F 1-2.
If the seatbelt warning device for the front passenger ’s seat does not function cor-
rectly (e.g., it is activated even when the
front passenger ’s seat is empty or it is
deactivated even when the front passen-
ger has not fastened his/her seatbelt),
take the following actions. . Ensure that no article is placed on the
seat other than a child restraint system
and its child occupant, although we
strongly recommend that all children sit
in the rear seat properly restrained. . Ensure that there is no article left in the
seatback pocket.. Ensure that the backward-forward po-
sition and seatback of front passenger ’s seat are locked into place securely by
moving the seat back and forth.
If still the seatbelt warning device for front passenger
’s seat does not function cor-
rectly after taking relevant corrective ac-
tions described above, immediately con-
tact your SUBARU dealer for an inspec-tion.
& SRS airbag system
warning light
WARNING
If the warning light exhibits any of
the following conditions, there may
be a malfunction in the seatbelt
pretensioners and/or SRS airbag
system. Immediately take your vehi-
cle to your nearest SUBARU dealer
to have the system checked. Unless
checked and properly repaired, the
seatbelt pretensioners and/or SRS
airbag will not operate properly in
the event of a collision, which may
increase the risk of injury. . Flashing or flickering of the warn-
ing light
. No illumination of the warning
light when the ignition switch is
first turned to the “ON ”position
Instruments and controls
3-15
– CONTINUED –
Page 169 of 458

3-50Instruments and controls
CAUTION
. To prevent the battery from being
discharged, do not operate the
defogger and deicer system con-
tinuously for any longer than
necessary.
. Do not use sharp instruments or
window cleaner containing abra-
sives to clean the inner surface
of the rear window. They may
damage the conductors printed
on the window.
NOTE . Turn on the defogger and deicer
system if the wipers are frozen to the windshield.. If the windshield is covered with
snow, remove the snow so that the
windshield wiper deicer works effec-
tively.. While the defogger and deicer sys-
tem is in the continuous operation
mode, if the vehicle speed remains at
9 mph (15 km/h) or less for 15 minutes,
the windshield wiper deicer automati-
cally stops operating, though the rear
window defogger and outside mirror
defogger maintain continuous opera-
tion in this condition. Tilt/telescopic steering wheel
WARNING
. Do not adjust the steering wheel
tilt/telescopic position while driv-
ing. This may cause loss of
vehicle control and result in
personal injury.
. If the lever cannot be raised to
the fixed position, adjust the
steering wheel again. It is dan-
gerous to drive without locking
the steering wheel. This may
cause loss of vehicle control
and result in personal injury.
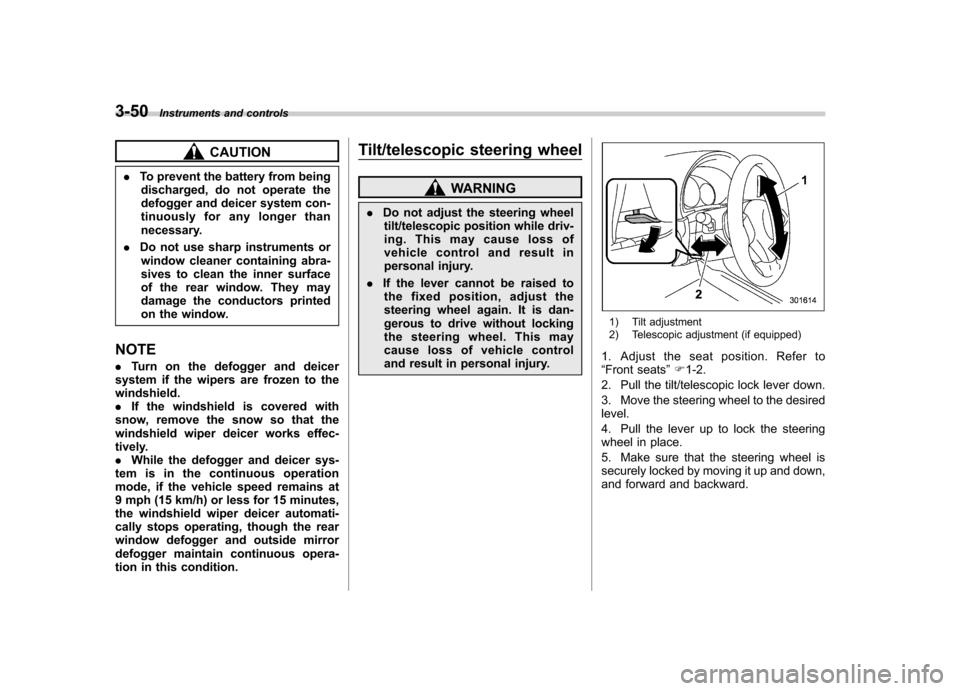
1) Tilt adjustment
2) Telescopic adjustment (if equipped)
1. Adjust the seat position. Refer to “ Front seats ”F 1-2.
2. Pull the tilt/telescopic lock lever down.
3. Move the steering wheel to the desired level.
4. Pull the lever up to lock the steering
wheel in place.
5. Make sure that the steering wheel is
securely locked by moving it up and down,
and forward and backward.
Page 434 of 458

crease in temperature could cause
tread separation, and failure of the
tire(s). Possible resulting loss of
vehicle control could lead to anaccident. !Measuring and adjusting air
pressure to achieve proper in-
flation
Check and, if necessary, adjust the
pressure of each tire (including the
spare) at least once a month and
before any long journey. Check the
tire pressures when the tires are
cold. Use a pressure gauge to
adjust the tire pressures to the
specific values. Driving even a
short distance warms up the tires
and increases the tire pressures.
Also, the tire pressures are affected
by the outside temperature. It is
best to check tire pressure out-
doors before driving the vehicle.
When a tire becomes warm, the air
inside it expands, causing the tire
pressure to increase. Be careful not
to mistakenly release air from a
warm tire to reduce its pressure. &
Glossary of tire terminology
. Accessory weight
The combined weight (in excess of
those standard items which may be
replaced) of automatic transmis-
sion, power steering, power brakes,
power windows, power seats, radio,
and heater, to the extent that these
items are available as factory-in-
stalled equipment (whether in-
stalled or not). . Bead
The part of the tire that is made of
steel wires, wrapped or reinforced
by ply cords and that is shaped to fit
the rim.. Bead separation
A breakdown of the bond between
components in the bead.. Bias ply tire
A pneumatic tire in which the ply
cords that extend to the beads are
laid at alternate angles substantially
less than 90 degrees to the center-
line of the tread. . Carcass
The tire structure, except tread and sidewall rubber which, when in-
flated, bears the load. .
Chunking
The breaking away of pieces of the
tread or sidewall.. Cold tire pressure
The pressure in a tire that has been
driven less than 1 mile or has been
standing for three hours or more.. Cord
The strands forming the plies in the tire. . Cord separation
The parting of cords from adjacent
rubber compounds.. Cracking
Any parting within the tread, side-
wall, or inner liner of the tire
extending to cord material. . Curb weight
The weight of a motor vehicle with
standard equipment including the
maximum capacity of fuel, oil and
coolant, and if so equipped, air
conditioning and additional weight
optional engine.
Consumer information and Reporting safety defects
13-5
– CONTINUED –