2011 SKODA OCTAVIA TOUR child seat
[x] Cancel search: child seatPage 4 of 183

Contents3
Using the system
Safety
Driving Tips
General Maintenance
Breakdown assistance
Technical Data
ContentsLayout of this Owner's Manual
(explanations)
. . . . . . . . . . . . . . . . . . . . . . . . . .
Using the system
. . . . . . . . . . . . . . . . . . . . .
Cockpit
. . . . . . . . . . . . . . . . . . . . . . . . . . . . . . . . . . . . . . . .
Overview . . . . . . . . . . . . . . . . . . . . . . . . . . . . . . . . . . . .
The brief instruction
. . . . . . . . . . . . . . . . . . . . . . . . . .
Basic functions and important information . . . . .
Instruments and Indicator/Warning Lights
. .
Overview of the instrument cluster . . . . . . . . . . . .
Engine revolutions counter . . . . . . . . . . . . . . . . . . . .
Speedometer . . . . . . . . . . . . . . . . . . . . . . . . . . . . . . . . .
Engine coolant temperature Display . . . . . . . . . . .
Fuel gauge . . . . . . . . . . . . . . . . . . . . . . . . . . . . . . . . . . .
Counter for distance driven . . . . . . . . . . . . . . . . . . .
Service Interval Display . . . . . . . . . . . . . . . . . . . . . . .
Digital clock . . . . . . . . . . . . . . . . . . . . . . . . . . . . . . . . . .
Recommended gear* . . . . . . . . . . . . . . . . . . . . . . . . .
Multi-functional indicator (onboard computer)* .
Warning lights . . . . . . . . . . . . . . . . . . . . . . . . . . . . . . . .
Unlocking and locking
. . . . . . . . . . . . . . . . . . . . . . . .
Key . . . . . . . . . . . . . . . . . . . . . . . . . . . . . . . . . . . . . . . . . .
Changing the battery in the remote control key
Electronic immobiliser . . . . . . . . . . . . . . . . . . . . . . . .
Child safety lock . . . . . . . . . . . . . . . . . . . . . . . . . . . . . .
Central locking system . . . . . . . . . . . . . . . . . . . . . . . .
Remote control* . . . . . . . . . . . . . . . . . . . . . . . . . . . . . .
Synchronisation of the remote control . . . . . . . . .
Anti-theft alarm system* . . . . . . . . . . . . . . . . . . . . . .
Power windows* . . . . . . . . . . . . . . . . . . . . . . . . . . . . .
Lights and Visibility
. . . . . . . . . . . . . . . . . . . . . . . . . . .
Lights . . . . . . . . . . . . . . . . . . . . . . . . . . . . . . . . . . . . . . . .
Interior lighting . . . . . . . . . . . . . . . . . . . . . . . . . . . . . . . Visibility . . . . . . . . . . . . . . . . . . . . . . . . . . . . . . . . . . . . .
Windshield wiper and wash system . . . . . . . . . . . .
Rear-view mirror . . . . . . . . . . . . . . . . . . . . . . . . . . . . .
Seats and Stowage
. . . . . . . . . . . . . . . . . . . . . . . . . . .
Front seats . . . . . . . . . . . . . . . . . . . . . . . . . . . . . . . . . .
Head restraints . . . . . . . . . . . . . . . . . . . . . . . . . . . . . . .
Middle rear head restraint* . . . . . . . . . . . . . . . . . . . .
Rear seats . . . . . . . . . . . . . . . . . . . . . . . . . . . . . . . . . . .
Pedals . . . . . . . . . . . . . . . . . . . . . . . . . . . . . . . . . . . . . . .
luggage compartment . . . . . . . . . . . . . . . . . . . . . . . .
Net partition* (Combi) . . . . . . . . . . . . . . . . . . . . . . . .
The roof rack* . . . . . . . . . . . . . . . . . . . . . . . . . . . . . . . .
Cup holder . . . . . . . . . . . . . . . . . . . . . . . . . . . . . . . . . . .
Note holder . . . . . . . . . . . . . . . . . . . . . . . . . . . . . . . . . .
Ashtray* . . . . . . . . . . . . . . . . . . . . . . . . . . . . . . . . . . . . .
Cigarette lighter*, power sockets . . . . . . . . . . . . . .
Storage compartments . . . . . . . . . . . . . . . . . . . . . . .
Overview . . . . . . . . . . . . . . . . . . . . . . . . . . . . . . . . . . . .
Storage compartment on the front passenger side
Storage compartment on the driver's side . . . . . .
Storage compartment on the dash panel . . . . . . .
Storage compartment in front centre console* .
Storage compartment in the front doors . . . . . . .
Front seat armrest with storage compartment*
Rear seat armrest with storage compartment* .
Storage compartment in re ar centre console* . .
Seat backrest with opening for skis* . . . . . . . . . . .
Clothes hooks* . . . . . . . . . . . . . . . . . . . . . . . . . . . . . . .
Heating and air conditioning system
. . . . . . . .
Air outlet vents . . . . . . . . . . . . . . . . . . . . . . . . . . . . . .
Heating . . . . . . . . . . . . . . . . . . . . . . . . . . . . . . . . . . . . . .
Climatic* . . . . . . . . . . . . . . . . . . . . . . . . . . . . . . . . . . . . .
Starting-off and Driving
. . . . . . . . . . . . . . . . . . . . . .
Setting steering wheel position . . . . . . . . . . . . . . .
Ignition lock . . . . . . . . . . . . . . . . . . . . . . . . . . . . . . . . . . Starting the engine . . . . . . . . . . . . . . . . . . . . . . . . . . .
Switching off the engine . . . . . . . . . . . . . . . . . . . . . .
Shifting . . . . . . . . . . . . . . . . . . . . . . . . . . . . . . . . . . . . . .
Handbrake . . . . . . . . . . . . . . . . . . . . . . . . . . . . . . . . . . .
Rear parking aid* . . . . . . . . . . . . . . . . . . . . . . . . . . . . .
Cruise control system (CCS)* . . . . . . . . . . . . . . . . . .
Communication
. . . . . . . . . . . . . . . . . . . . . . . . . . . . . . .
Mobile phones and two-way radio systems . . . .
Safety
. . . . . . . . . . . . . . . . . . . . . . . . . . . . . . . . . . . . . .
Passive Safety
. . . . . . . . . . . . . . . . . . . . . . . . . . . . . . . .
Basic information . . . . . . . . . . . . . . . . . . . . . . . . . . . .
Correct seated position . . . . . . . . . . . . . . . . . . . . . . .
Seat belts
. . . . . . . . . . . . . . . . . . . . . . . . . . . . . . . . . . . . .
Why seat belts? . . . . . . . . . . . . . . . . . . . . . . . . . . . . . .
The physical principle of a frontal collision . . . . .
Important safety information regarding the use of seat
belts . . . . . . . . . . . . . . . . . . . . . . . . . . . . . . . . . . . . . . . .
How are seat belts correctly fastened? . . . . . . . .
Airbag system
. . . . . . . . . . . . . . . . . . . . . . . . . . . . . . . .
Description of the airbag system . . . . . . . . . . . . . .
Front airbags . . . . . . . . . . . . . . . . . . . . . . . . . . . . . . . .
side airbags* . . . . . . . . . . . . . . . . . . . . . . . . . . . . . . . . .
Head airbags* . . . . . . . . . . . . . . . . . . . . . . . . . . . . . . . .
Deactivating an airbag . . . . . . . . . . . . . . . . . . . . . . . .
Transporting children safely
. . . . . . . . . . . . . . . . .
What you should know about transporting children!
Child seat . . . . . . . . . . . . . . . . . . . . . . . . . . . . . . . . . . . .
Attaching a child seat using the “ISOFIX” system
Attaching child seat using the “Top Tether”* system
6799101015151516161616171718182129292930303034353637404043
4445484949505051535357585960606061616262626363636464646566666769737373
7475767677778080818181828585858687898990929495979799102103
s2lk.2.book Page 3 Monday, April 18, 2011 7:41 AM
Page 38 of 183

Unlocking and locking37
Using the system
Safety
Driving Tips
General Maintenance
Breakdown assistance
Technical Data
The interior monitor and the towing protec
tion monitoring are switched on again
automatically the next time the car is locked.
Note
•
You can switch the interior monitor and the towing protection monitoring off if
there is a possibility that movements from (e.g. children or animals) inside the
vehicle interior or if the vehicle must be tr ansported (e.g. by train or ship) or towed,
might trigger the alarm.
•
The opened storage compartment for spectacles reduces the effectiveness of
the interior monitor. In orde r to ensure the function of the interior monitor to be
fully operational, always close the storage compartment for spectacles before
locking the vehicle.
Power windows*Buttons on the driver's doorThe power windows operate only when ignition is switched on.Opening a window – A window is opened by pressing lightly on the respective button in the door. The process stops when one releases the button.
– Additionally you can open the window automatically (fully opened) by pressing the button up to the stop. Renewed pres sing of the button causes the window
to stop immediately.
Closing a window– A window is closed through pulling lightl y on the respective button in the door.
The closing process stops wh en one releases the button.
– Additionally you can close the window automatically (fully closed) by pulling the button up to the stop. Renewed pulling of the button causes the window to stop
immediately.
The buttons for the individual windows are located in the armrest of the driver's
door fig. 32 , front passenger door and in the rear doors* page 38.
Buttons for the power windows in the armrest for the driver Button for the power window in the driver's door
Button for the power window in the front passenger's door
Button for the power window in the rear door on the right*
Button for the power window in the rear door on the left*
Safety pushbutton*
Safety pushbutton*
You can deactivate the buttons for power windows at rear doors by pressing the
safety pushbutton fig. 32 . The buttons for power windows at rear doors are
activated again by pressing the safety pushbutton again.
If the buttons for the rear doors ar e deactivated, the indicator light
in the safety
switch lights up.
WARNING
•
If you lock the vehicle from the outs ide, do not leave any person in the
vehicle since it is no longer possible to open the windows from the inside in an
emergency.
•
The system is fitted with a force limiter page 38. If there is an obstacle,
the closing process is stopped and the window goes down by several centime-
tres. You should then take particular care when closing the windows! You may
otherwise suffer severe injuries as a result of getting an arm, for example,
jammed in the window!
•
It is recommended to deactivate the el ectrically operated power windows in
the rear doors (safety pushbutton) fig. 32 when children are being trans-
ported on the rear seats.
Fig. 32 Buttons on the driver's door
ABCDS
S
S
S
S
s2lk.2.book Page 37 Monday, April 18, 2011 7:41 AM
Page 50 of 183

Seats and Stowage49
Using the system
Safety
Driving Tips
General Maintenance
Breakdown assistance
Technical Data
Seats and StowageFront seatsBasic informationThe front seats have a wide range of differ ent settings and can thus be matched to
the physical characteristics of the driver and front passenger. Correct adjustment of
the seats is particularly important for:•
safely and quickly reaching the controls,
•
a relaxed, fatigue-free body position,
•
achieving the maximum protection offered by the seat belts and the airbag
system.
WARNING
•
Never transport more occupants than the maximum seating in the vehicle.
•
Each occupant must correctly fasten the seat belt belonging to the seat. Chil-
dren must be fastened page 97, “Transporting children safely” with a suitable
restraint system.
•
The front seats and the head restraints must always be adjusted to match
the body size of the seat occupant as well as the seat belts must always be
correctly fastened in order to provide an optimal protection for you and your
occupants.
•
Keep your feet in the footwell at all ti mes while driving. Never place your feet
on the dash panel, out of the window or on the seats. This is particularly impor-
tant for the front seat passenger. You will be exposed to increased risk of injury
if it becomes necessary to apply the brak e or in the event of an accident. If an
airbag is deployed, you may suffer fata l injuries when adopting an incorrect
seated position!
•
It is important for the driver and front passenger to maintain a distance of at
least 25 cm from the steering wheel or dash panel. Not maintaining this
minimum distance will mean that the airbag system will not be able to properly
protect you - hazard! The front seats and the head restraints must always also
be correctly adjusted to match the body size of the occupant.
•
Ensure that there are no objects in the footwell as any objects may get
behind the pedals during a driving or braking manoeuvre. You would then no
longer be able to operate the clutch, to brake or accelerate.
Adjusting the front seatsAdjusting a seat in a forward/back direction–Pull the lever fig. 47 up and push the seat into the desired position.
– Release the lever and push the seat further until the lock is heard to engage.Adjusting height of seat*– Lift the seat if required by pulling or pumping lever upwards.
– Lower the seat if required by pushing or pumping lever downwards.Adjust the angle of the seat backrest– Relieve any pressure on the seat backrest (do not lean on it) and turn the hand-
wheel fig. 47 to adjust the desired angle of the backrest.Adjusting lumbar support*– Turn the wheel until you have set the most comfortable curvature of the seat
upholstery in the area of your spine.
The driver's seat should be adjusted in such a way that the pedals can be fully
pressed to the floor with slightly bent legs.
The seat backrest on the driver's seat sh ould be adjusted in such a way that the
upper point of the steering wheel can be easily reached with slightly bent arms.
Fig. 47 Controls at seat
1
1
2
2
3
4
s2lk.2.book Page 49 Monday, April 18, 2011 7:41 AM
Page 51 of 183
Seats and Stowage
50WARNING
•
Only adjust the driver seat when the vehicle is stationary - risk of injury!
•
Take care when adjusting the seat! Adju sting the seat without care can lead
to bruises or injuries.
•
The seat backrests must not be angled too far back when driving otherwise
this will affect proper operation of the se at belts and of the airbag system - risk
of injury!
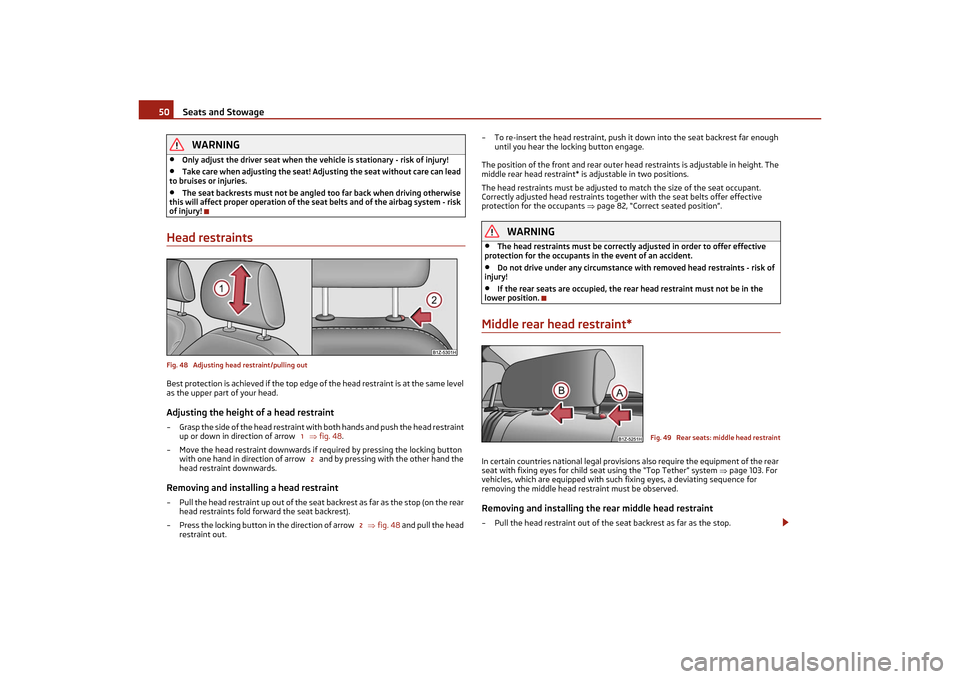
Head restraintsFig. 48 Adjusting head restraint/pulling outBest protection is achieved if the top edge of the head restraint is at the same level
as the upper part of your head.Adjusting the height of a head restraint– Grasp the side of the head restraint with both hands and push the head restraint
up or down in direction of arrow fig. 48 .
– Move the head restraint downwards if required by pressing the locking button with one hand in direction of arrow and by pressing with the other hand the
head restraint downwards.Removing and installing a head restraint– Pull the head restraint up out of the seat backrest as far as the stop (on the rear
head restraints fold forward the seat backrest).
– Press the locking button in the direction of arrow fig. 48 and pull the head
restraint out. – To re-insert the head restraint, push it down into the seat backrest far enough
until you hear the locking button engage.
The position of the front and rear outer head restraints is adjustable in height. The
middle rear head restraint* is adjustable in two positions.
The head restraints must be adjusted to match the size of the seat occupant.
Correctly adjusted head restraints together with the seat belts offer effective
protection for the occupants page 82, “Correct seated position”.
WARNING
•
The head restraints must be correctly adjusted in order to offer effective
protection for the occupants in the event of an accident.
•
Do not drive under any circumstance with removed head restraints - risk of
injury!
•
If the rear seats are occupied, the rear head restraint must not be in the
lower position.
Middle rear head restraint*In certain countries national legal provisions also require the equipment of the rear
seat with fixing eyes for child seat using the “Top Tether” system page 103. For
vehicles, which are equipped with such fixing eyes, a deviating sequence for
removing the middle head restraint must be observed.Removing and installing the rear middle head restraint– Pull the head restraint out of the seat backrest as far as the stop.
12
2
Fig. 49 Rear seats: middle head restraint
s2lk.2.book Page 50 Monday, April 18, 2011 7:41 AM
Page 54 of 183

Seats and Stowage53
Using the system
Safety
Driving Tips
General Maintenance
Breakdown assistance
Technical Data
WARNING
If you or the passenger have a subdued pa in and/or temperature sensitivity, e.g.
through medication, paralysis or because of chronic illness (e.g. diabetes), we
recommend not to use the seat heating at al l. This can lead to burns on the back,
the posterior and the legs which are difficult to heal. If the seat heating is used,
we recommend to make regular breaks in your journey when driving long
distances, so that in specific cases as mentioned above the body can recuperate
from the stress of the journey. Please consult your doctor, who can evaluate
your specific condition.
Caution
•
You should not kneel on the seats or otherwise apply pressure at specific points
in order to avoid damaging the heating elements of the seat heaters.
•
Do not use the seat heating if the seats are not occupied by persons or if objects
are fastened or stored on them, for example a child seat, a bag etc. A fault of the
heating elements in the seat heating can occur.
•
Do not clean the seats moist page 125.Note
•
The seat heating should only be switched on when the engine is running. This
has a significant effect of saving on the battery capacity.
•
If the on-board voltage drops, the seat heating is switched off automatically, in
order to provide sufficient electrical energy for the engine control.
PedalsConcerning a secure depressing of the peda l, you should use only footmats from the
Škoda genuine accessories.
Operation of the pedals must not be hindered!
WARNING
•
Greater pedal distances may be needed when there is a fault in the brake
system.
•
Do not place any footmats or other additional floor coverings in the area of
the pedals in order to ensure that all the pedals can be fully depressed and are
able to return unobstructed to their initial position - risk of accident!
•
There must be no objects on the floor which could roll under the pedals. You
would then no longer be able to apply the brakes, operate the clutch or acceler-
ator - risk of accident!
luggage compartmentLoading the luggage compartmentPlease observe the following in the interest of having good handling characteristics
of your vehicle:
– Distribute the items of luggage as evenly as possible.
– Place heavy objects as far forward as possible.
– Attach the items of luggage to the lashing eyes or the fixing net* page 54.
In the event of an accident, there is such a high kinetic energy which is produced by
small and light objects that they can cause severe injuries. The magnitude of the
kinetic energy depends on the speed at which the vehicle is travelling and on the
weight of the object. The speed at which the vehicle is travelling is in this case the
more significant factor.
Example: In the event of a frontal collis ion at a speed of 50 km/h, an unsecured
object with a weight of 4.5 kg produces an energy, which corresponds to 20 times
its own weight. This means that it results in a weight of approx. 90 kg. You can
imagine the injuries that can occur, if this “bullet” is flying through the interior
compartment and hits an occupant.
WARNING
•
Stow the objects in the luggage compartment and attach them to the lashing
eyes.
•
Loose objects in the passenger compar tment can be thrown forward during
a sudden manoeuvre or in case of an ac cident and can injure the occupants or
other oncoming traffic. This risk is still increased, if the objects which are flying
around are hit by a deployed airbag. In this case, the objects which are thrown
back can injure th e occupants - hazard.
•
Please note that the handling properti es of your vehicle may be affected
when transporting heavy objects as a result of the displacement of the centre of
gravity. The speed and style of driv ing must be adjusted accordingly.WARNING (continued)
s2lk.2.book Page 53 Monday, April 18, 2011 7:41 AM
Page 62 of 183

Seats and Stowage61
Using the system
Safety
Driving Tips
General Maintenance
Breakdown assistance
Technical Data
WARNING
•
Take care when using the cigarette lighter! Not paying proper attention or
incorrect use the cigarette lighter in an uncontrolled manner may result in burns.
•
The cigarette lighter and the power socket also operates when the ignition
is switched off or the ignition key withdrawn. You should therefore never leave
children unattended in the vehicle.Caution
Always use matching plugs to avoid damaging the power socket.
Note
•
Connecting electrical components when the engine is not running will drain
the battery of the vehicle - risk of battery draining!
•
Further information page 146, “Accessories, changing and replacing parts”.
Power socket in the luggage compartment (Combi)– Open the cover of the power socket fig. 70.
– Connect the plug of the electrical appliance to the socket.
You can only use the power socket for the connection of approved electrical acces-
sories with a power uptake up to 120 watts. The vehicle battery will be discharged
in the process if the engine is stationary.
The same remarks apply here as for page 60, “Cigarette lighter*, power sockets”.
Further information page 146, “Accessories, changing and replacing parts”.
Storage compartmentsOverviewYou will find the following storage facilities in your vehicle:
WARNING
•
Please do not place anything on top of the dash panel. Such objects might
slide or fall down when driving (when accelerating or cornering) and may
distract you from concentrating on the traffic situation - risk of accident!
•
Ensure that when driving no objects from the centre console of from other
storage possibilities may get into the footwell of the driver. You would then no
longer be able to apply th e brakes, operate the clutch or accelerator - risk of
accident!
Fig. 70 Luggage compartment: Power
socket
Storage compartment on the front passenger side
page 62
Storage compartment on the driver's side
page 62
Storage compartment on the dash panel
page 62
Storage compartment in front centre console*
page 63
Storage compartment in the front doors
page 63
Front seat armrest with storage compartment*
page 63
Rear armrest with storage compartment*
page 64
Storage compartment in rear centre console*
page 64
Seat backrest with opening for skis*
page 64
Clothes hooks*
page 65
s2lk.2.book Page 61 Monday, April 18, 2011 7:41 AM
Page 82 of 183

Passive Safety81
Using the system
Safety
Driving Tips
General Maintenance
Breakdown assistance
Technical Data
SafetyPassive SafetyBasic informationDriving the safe way
Passive safety measures reduce the risk of injury in accident situa-
tions.In this section you will find important information, tips and notes on the subject of
passive safety in your vehicle. We have combined everything here which you should
be familiar with, for example, regarding seat belts, airbags, child seats and safety of
children. It is therefore important, in particular, to comply with the notes and warn-
ings in this section for your own interest and in the interest of those travelling with
you.
WARNING
•
This chapter contains important information on how to use the vehicle for
the driver and his occupants. You will find further information on safety, which
concerns you and those travelling with yo u, in the following chapters of this
Owner's Manual.
•
The complete on-board literature shou ld always be in the vehicle. This
applies in particular, if you rent out or sell the vehicle.
Safety equipment
The safety equipment is part of th e occupant protection and it can
reduce the risk of injuries in accident situations.“Do not put at risk” your safety and the safe ty of those travelling with you . In the
event of an accident, the safety equipment can reduce the risk of injuries. The
following list contains part of th e safety equipment in your vehicle:•
Three-point seat belts for all the seats,
•
belt force limiter for front seats and outer rear seats*,
•
belt tensioner for front seats,
•
seat belt height adjuster for front seats,
•
front airbag for the driver and the front seat passenger*,
•
side airbags*,
•
head airbags*,
•
anchoring points for child seat using the “ISOFIX” system,
•
anchoring points for child seat using the “Top Tether” system,
•
head restraint adjustable for height,
•
adjustable steering column.
The specified safety equipment works toge ther, in order to optimally protect you
and those travelling with yo u in accident situations. The safety equipment does not
protect you or the people travelling with you, if you or your occupants adopt an
incorrect seated position or the equipment is not correctly adjusted or used.
For this reason you will be provided with information on why this equipment is very
important, how it protects you and the occupants, what should be observed when
using the equipment and how you and the peop le travelling with you can make full
use of the existing safety equipment. This Owner's Manual contains important
warning notes, which you and those travelli ng with you should pay attention to in
order to reduce a risk of injury.
Safety concerns everybody!
Before setting off
The driver is always fully responsible for his occupants and for the
operating safety of the vehicle.For your own safety and the safety of the people travelling with you, please pay
attention to the following points before setting off:•
Ensure that the lighting and the turn signal system are functioning properly.
•
Inspect the tyre inflation pressure.
•
Ensure that all the windows offer a good visibility to the outside.
•
Safely attach the items of luggage page 53, “Loading the luggage compart-
ment”.
•
Ensure that no objects can obstruct the pedal.
•
Adjust the mirror, the front seat and the head restraint to match your body size.
s2lk.2.book Page 81 Monday, April 18, 2011 7:41 AM
Page 83 of 183
Passive Safety
82
•
Point out to your occupants that the head restraints must be adjusted to match
their body size.
•
Protect the children in suit able child seats with correctly fastened seat belts
page 97, “Transporting children safely”.
•
Adopt the correct seated position page 82, “Correct seated position”. Also
inform your occupants to adop t the correct seated position.
•
Fasten the seat belt correctly. Also inform your occupants to properly fasten the
seat belts page 87, “How are seat belts correctly fastened?”.
What influences the driving safety?
The driving safety is primarily determined by the style of driving and
the personal behaviour of all the occupants.The driver is fully responsible for himself and his occupants. If your driving safety is
effected, you place yourself and the oncoming traffic at risk. Please refer to the
following guidelines.•
Do not get distracted from concentrating on the traffic situation, e.g. by your
occupants or mobile phone calls.
•
Never drive when your driving ability is impaired, e.g. through medication,
alcohol, drugs.
•
Keep to the traffic regulations and the permissible speed limit.
•
Adjust the driving speed at all times to th e road condition as well as to the traffic
and weather conditions.
•
Take regular breaks on long journe ys - at the latest every two hours.
Correct seated positionCorrect seated position for the driver
Correct seated position for the driver is important for safe and
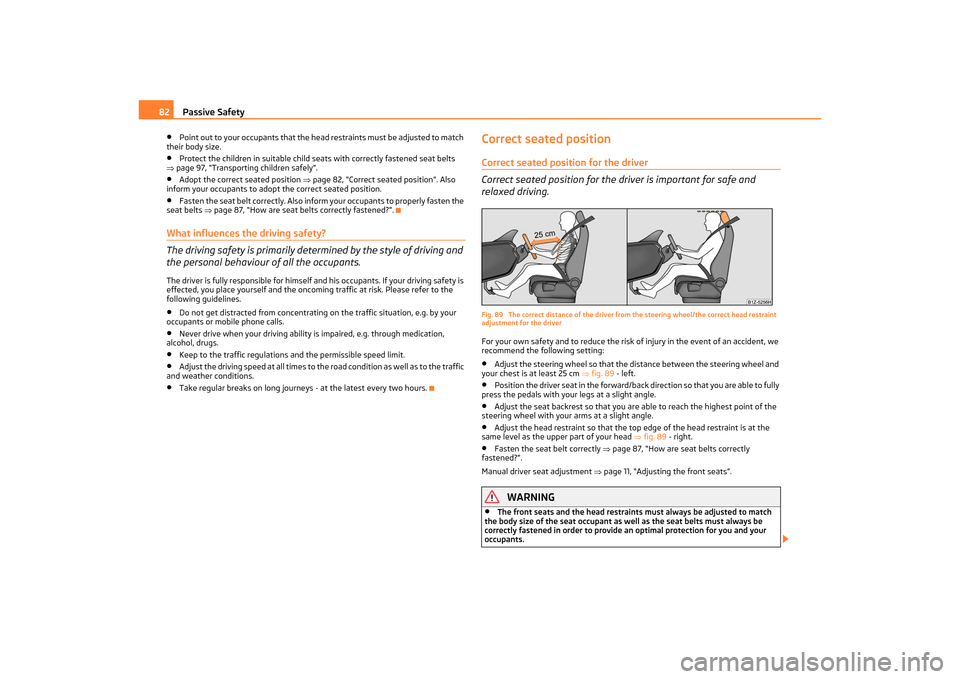
relaxed driving.Fig. 89 The correct distance of the driver fr om the steering wheel/the correct head restraint
adjustment for the driverFor your own safety and to reduce the risk of injury in the event of an accident, we
recommend the following setting:•
Adjust the steering wheel so that the distance between the steering wheel and
your chest is at least 25 cm fig. 89 - left.
•
Position the driver seat in the forward/back direction so that you are able to fully
press the pedals with your legs at a slight angle.
•
Adjust the seat backrest so that you ar e able to reach the highest point of the
steering wheel with your arms at a slight angle.
•
Adjust the head restraint so that the to p edge of the head restraint is at the
same level as the upper part of your head fig. 89 - right.
•
Fasten the seat belt correctly page 87, “How are seat belts correctly
fastened?”.
Manual driver seat adjustment page 11, “Adjusting the front seats”.
WARNING
•
The front seats and the head restraints must always be adjusted to match
the body size of the seat occupant as well as the seat belts must always be
correctly fastened in order to provide an optimal protection for you and your
occupants.
s2lk.2.book Page 82 Monday, April 18, 2011 7:41 AM