2011 Seat Ibiza ST child seat
[x] Cancel search: child seatPage 50 of 280

48Child safety
Securing child seats
Ways to secure a child seat
A child seat can be secured differently on the rear seat and
on the front passenger seat. You can secure a child seat to the rear seat or front passenger seat in the
following ways:
● Child seats in groups 0 to 3 can be secured with a seat belt.
● Child seats for groups 0, 0+ and 1 with the ISOFIX system can be se-
cured, without fastening seat belts, with the ISOFIX securing rings
⇒ page 48.
CategoryWeightSeat locationsFront passen- gerRear outerRear centre
Group 0<10 kgU*UUGroup 0+<13 kgU*UUGroup 19-18 kgU*U/LUGroup 2 / 315-36 kgXUFUF
Suitable for universal approved restraining systems for use in this age
category (universal retention systems are those fitted using the adult
seat belt).
Suitable for universal forward-facing retention systems approved for
use with this age group.
Move the front passenger seat as far back as possible, as high as pos-
sible and always deactivate the airbag.
Suitable for retention systems using the ISOFIX anchors.
Seat position not suitable for children in this age group.
U:
UF
*:
L:
X
WARNING
● When travelling, children must be secured in the vehicle with a re-
straint system suitable for age, weight and size.
● Never install a child seat facing backwards on the front passenger
seat unless the front passenger airbag has been disabled. This could
cause fatal injuries to the child! However, if, in exceptional cases, it is
necessary to transport a child in the front passenger seat, the front pas-
senger airbag ⇒ page 41, Deactivating airbags* must always be disabled
and the seat adjusted to its highest position, where possible.
● Read and always observe information and warnings concerning the
use of child seats ⇒
in Safety notes on using child seats on page 44.
Securing a child seat with the ISOFIX system
Child seats can be secured quickly, easily and safely on the
rear outer seats with the ISOFIX system.
Fig. 26 ISOFIX securing
rings
Page 51 of 280

49
Child safety
When removing or fitting the child seat, please be sure to follow
the manufacturer's instructions.
– Press the child seat onto the ISOFIX retaining rings until the
child seat can be heard to engage securely. If the child seat is
fitted with any other anti-rotation system, follow the manufac-
turer instructions carefully.
– Pull on both sides of the child seat to ensure that it is secure.
Two ISOFIX retaining rings are fitted on each rear seat. In some vehicles, the
rings are secured to the seat frame and, in others, they are secured to the
rear floor. The access to the ISOFIX rings is between the rear seat backrest
and the seat cushioning.
Child seats with ISOFIX mountings are available in your Authorised Service
Centres.
WARNING
● The retaining rings are designed to only be used with ISOFIX child
seats.
● Never secure child seats without the ISOFIX system, retaining belts or
objects to the fastening rings – this can result in potentially fatal injuries
to the child.
● Ensure that the child seat is secured correctly to the ISOFIX anchor
points.
Top Tether retainer straps
Some child restraint seats have a third Top Tether anchoring
point, apart from both ISOFIX anchoring points, which allow
better child retention.
Fig. 27 Position of the
Top Tether rings on the
back of the rear seat
Child seats with the Top Tether system come with a strap for securing the
seat to the vehicle anchor point, located at the back of the rear backrest.
The retainer strap is used to reduce forwards movements of the safety seat
in a crash, helping reduce the risk of injuries to the head from hitting the
inside of the vehicle.
It is foreseen that an EU Directive will introduce requirements related to the
retention of child restraint systems by means of ISOFIX and Top Tether an-
chorages (probably compulsory for new types from 2010), which will entail
improved retention of the child restraint seat and less head movement in
case of frontal collisions.
Safety FirstOperating InstructionsPractical TipsTechnical Specifications
Page 52 of 280

50Child safety
Use of retainer straps on rear-facing seats
At present there are very few rear-facing child safety seats fitted with a re-
tainer strap. Please carefully read and follow the safety seat manufacturer's
instructions for information on how to install the retainer strap properly.
WARNING
An undue installation of the safety seat will increase the risk of injury in
the event of a crash.
● Never tie the retainer strap to a hook in the luggage compartment.
● Never secure or tie luggage or other items to the lower anchorages
(ISOFIX) or the upper ones (Top Tether).
Fitting the Top Tether child restraint to the anchoring point
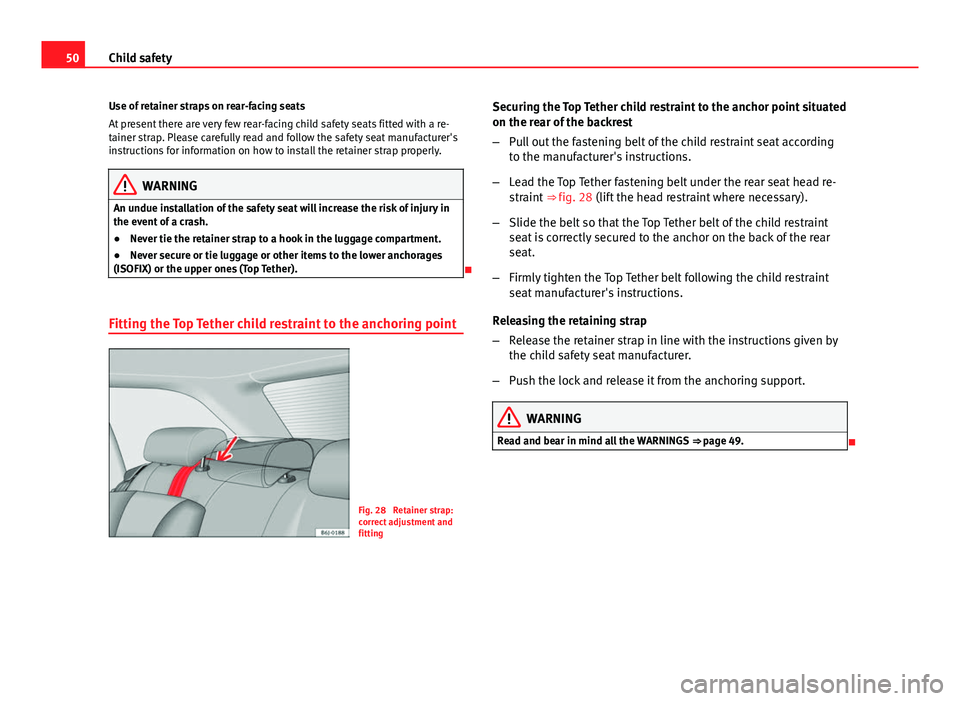
Fig. 28 Retainer strap:
correct adjustment and
fitting Securing the Top Tether child restraint to the anchor point situated
on the rear of the backrest
–
Pull out the fastening belt of the child restraint seat according
to the manufacturer's instructions.
– Lead the Top Tether fastening belt under the rear seat head re-
straint ⇒ fig. 28 (lift the head restraint where necessary).
– Slide the belt so that the Top Tether belt of the child restraint
seat is correctly secured to the anchor on the back of the rear
seat.
– Firmly tighten the Top Tether belt following the child restraint
seat manufacturer's instructions.
Releasing the retaining strap
– Release the retainer strap in line with the instructions given by
the child safety seat manufacturer.
– Push the lock and release it from the anchoring support.
WARNING
Read and bear in mind all the WARNINGS ⇒ page 49.
Page 115 of 280

113
Seats and storage compartments
Seats and storage compartments The importance of correct seat adjustment
Proper seat adjustment optimises the level of protection of-
fered by seat belts and airbags.
Your vehicle has five seats, two in the front and three in the rear. Each seat
is equipped with a three-point seat belt.
The driver seat and the front passenger seat can be adjusted in many ways
to suit the physical requirements of the vehicle occupants. The correct seat
position is very important for:
● a fast and easy operation of all controls on the instrument panel,
● a relaxed posture which does not cause drowsiness,
● a safe driving ⇒ page 7,
● ensuring that the seat belts and airbag system provide maximum pro-
tection ⇒ page 19.
WARNING
● If the driver and passengers assume improper sitting positions, they
may sustain critical injuries.
● More people than available seats must never be transported in your
vehicle.
● Every passenger in the vehicle must properly fasten and wear the
seat belt belonging to his or her seat. Children must be protected with an
appropriate child restraint system ⇒ page 43, Child safety.
● The front seats and all head restraints must always be adjusted to
body size and the seat belt must always be properly adjusted to provide
you and your passengers with optimum protection.
WARNING (Continued)
● Always keep your feet on the footwell when the vehicle is moving;
never rest them on the dash panel, out of the window or on the seat. This
is also applied to passengers. An incorrect sitting position exposes you
to an increased risk of injury in case of a sudden braking or an accident.
If the airbag is triggered, you could sustain severe injuries due to an in-
correct sitting position.
● It is important for the driver and front passenger to keep a distance of
at least 25 cm from the steering wheel and dash panel. Failure to respect
the minimum distance means that the airbag will not protect you. Risk of
fatal injury. The distance between the driver and the steering wheel or
between the front passenger and the dash panel should always be as
great as possible.
● Adjust the driver or front passenger seat only when the vehicle is sta-
tionary. Otherwise, your seat could move unexpectedly while the vehicle
is moving. This could increase the risk of an accident and therefore, in-
jury. In addition, while adjusting your seat, you will assume an incorrect
sitting position. Risk of fatal accidents.
● Special guidelines apply to installing a child seat on the front passen-
ger seat. When installing a child seat, please observe the warnings de-
scribed in ⇒ page 43, Child safety.
Safety FirstOperating InstructionsPractical TipsTechnical Specifications
Page 126 of 280

124Seats and storage compartments
Cigarette lighter*
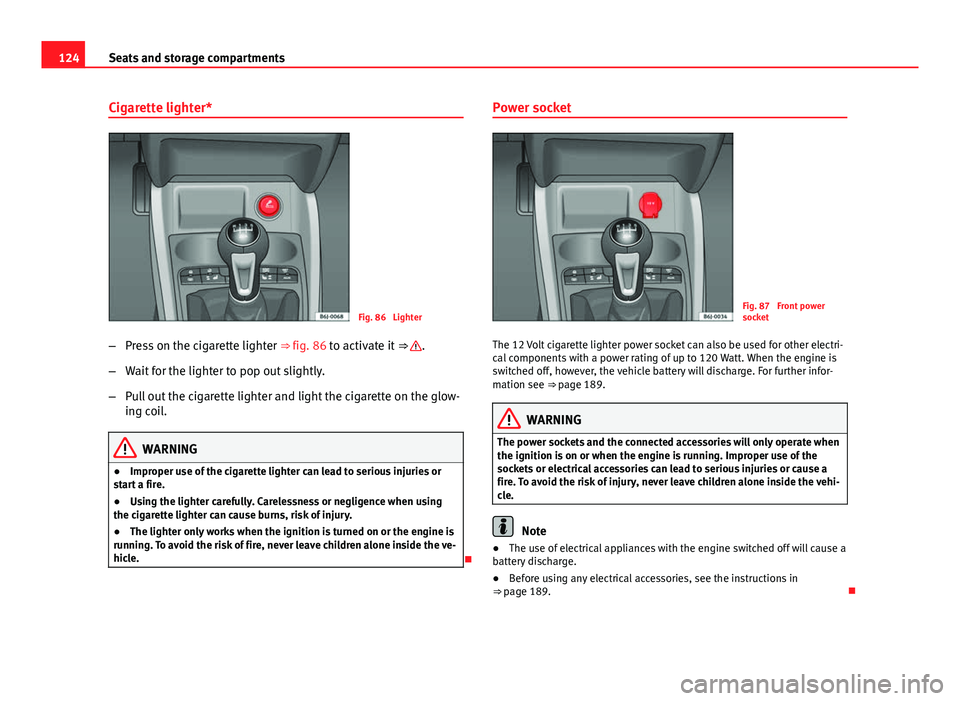
Fig. 86 Lighter
– Press on the cigarette lighter ⇒ fig. 86 to activate it ⇒
.
– Wait for the lighter to pop out slightly.
– Pull out the cigarette lighter and light the cigarette on the glow-
ing coil.
WARNING
● Improper use of the cigarette lighter can lead to serious injuries or
start a fire.
● Using the lighter carefully. Carelessness or negligence when using
the cigarette lighter can cause burns, risk of injury.
● The lighter only works when the ignition is turned on or the engine is
running. To avoid the risk of fire, never leave children alone inside the ve-
hicle.
Power socket
Fig. 87 Front power
socket
The 12 Volt cigarette lighter power socket can also be used for other electri-
cal components with a power rating of up to 120 Watt. When the engine is
switched off, however, the vehicle battery will discharge. For further infor-
mation see ⇒ page 189.
WARNING
The power sockets and the connected accessories will only operate when
the ignition is on or when the engine is running. Improper use of the
sockets or electrical accessories can lead to serious injuries or cause a
fire. To avoid the risk of injury, never leave children alone inside the vehi-
cle.
Note
● The use of electrical appliances with the engine switched off will cause a
battery discharge.
● Before using any electrical accessories, see the instructions in
⇒ page 189.
Page 146 of 280

144Driving
Ignition switched off, steering lock 1
In this position
⇒ fig. 107 the ignition and the engine are OFF and the steer-
ing may get locked.
For the Steering lock to operate without the ignition key, turn the steering
wheel until it locks with an audible sound. You should always lock the steer-
ing wheel when you leave your vehicle. This will help prevent vehicle theft
⇒
.
Switching the ignition or the glow plug system on 2
Turn the ignition key to this position and release it. If the key cannot be
turned or it is difficult to turn from position 1 to position 2, move the
steering wheel from one side to the other until it is released.
Starting 3
The engine is started when the key is in this position. Electrical components
with a high power consumption are switched off temporarily.
Every time the vehicle is started again, the ignition key must be turned to
position 1
. The
repetitive start prevention lock of the ignition prevents
possible damage to the starter motor if the engine is already running.
WARNING
● The ignition key must NOT be removed from the lock until the vehicle
comes to a standstill. Otherwise, the steering could be immediately
blocked- Risk of accident!
● Always remove the key from the ignition when leaving the vehicle,
even for a short period. This is especially important if children or disa-
bled people are left alone in the vehicle. They could accidentally start the
engine or work electrical equipment such as the electric windows, conse-
quently resulting in an accident.
● Unsupervised use of the keys could start the engine or any electrical
system, such as the electric window. This could result in serious injury.
CAUTION
The starter motor will only work when the engine is stopped (ignition key
position 3
).
Electronic immobiliser
The immobiliser prevents unauthorised persons from driv-
ing the vehicle.
Inside the key there is a chip that deactivates the electronic immobiliser au-
tomatically when the key is inserted into the ignition.
The immobiliser will be activated again automatically as soon as you pull
the key out of the ignition lock.
The engine can only be started using a genuine SEAT key with its correct
code.
Note
A perfect operation of the vehicle is ensured if genuine SEAT keys are used.
Page 201 of 280

199
Checking and refilling levels
Winter driving
Diesel can thicken in winter.
Winter-grade diesel
When using “summer-grade diesel fuel”, difficulties may be experienced at
sub-zero temperatures because the fuel thickens due to wax separation. For
this reason, “winter-grade diesel fuel” is available in some countries during
the cold months. It can be used at temperatures as low as -22 °C.
In countries with different climatic conditions the diesel fuel generally sold
has different temperature characteristics. Check with an Authorised Service
Centre or filling stations in the country concerned regarding the type of die-
sel fuels available.
Filter pre-heater
Your vehicle is fitted with a fuel filter glow plug system, making it well
equipped for operation in winter. This ensures that the fuel system remains
operational to approx. -24 °C, provided you use winter-grade diesel that is
safe to -15 °C.
However, if the fuel has waxed to such an extent that the engine will not
start at temperatures of under -24 °C, simply place the vehicle in a warm
place for a while.
CAUTION
Do not mix fuel additives (thinners or similar products) with diesel fuel. Working in the engine compartment
Safety instructions on working in the engine compartment
Any work carried out in the engine compartment or on the
engine must be carried out cautiously.
Before starting any work on the engine or in the engine compart-
ment:
1. Switch off the engine and remove the key from the ignition.
2. Apply the handbrake.
3. Move the gear lever to neutral or the selector lever to position P.
4. Wait for the engine to cool down.
5. Keep children away from the vehicle.
6. Raise the bonnet ⇒ page 201.
You should not do any work in the engine compartment unless you know ex-
actly how to carry out the jobs and have the correct tools! Have the work car-
ried out by a specialised workshop if you are uncertain.
All service fluids and consumables, e.g. coolant, engine oil, spark plugs
and batteries, are under constant development. SEAT provides a constant
flow of information to the Authorised Service Centres concerning modifica-
tions. For this reason, we recommend you to have service fluids and con-
sumables replaced by an Authorised Service Centre. Please observe the rel-
evant instructions ⇒ page 189. The engine compartment of the vehicle is a
hazardous area. ⇒
.
Safety FirstOperating InstructionsPractical TipsTechnical Specifications
Page 214 of 280

212Checking and refilling levels
WARNING
Before opening the bonnet to check the brake fluid level, read and ob-
serve the warnings ⇒ page 199.
Changing the brake fluid
The Maintenance Programme indicates the brake fluid
change intervals. We recommend that you have the brake fluid changed by an Authorised
Service Centre.
Before opening the bonnet, please read and follow the warnings ⇒
in
Safety instructions on working in the engine compartment on page 199 in
section “Safety notes for working in the engine compartment”.
Brake fluid absorbs moisture. In the course of time, it will absorb water from
the ambient air. If the water content in the brake fluid is too high, the brake
system could corrode. This also considerably reduces the boiling point of
the brake fluid. Heavy use of the brakes may then cause a vapour lock
which could impair the braking effect.
It is important that you use only brake fluid compliant with US standard
FMVSS 116 DOT 4. We recommend the use of Genuine SEAT brake fluid.
WARNING
Brake fluid is poisonous. Old brake fluid impairs the braking effect.
● Before opening the bonnet to check the brake fluid level, read and ob-
serve the warnings ⇒ page 199.
WARNING (Continued)
● Brake fluid should be stored in the closed original container in a safe
place out of reach of children. There is a toxic risk.
● Complete the brake fluid change according to the Maintenance Pro-
gramme. Heavy use of the brakes may cause a vapour lock if the brake
fluid is left in the system for too long. This would seriously affect the effi-
ciency of the brakes and the safety of the vehicle. This may cause an ac-
cident.
CAUTION
Brake fluid could damage the paintwork. Wipe off any brake fluid from the
paintwork immediately.
For the sake of the environment
The brake pads and fluid must be collected and disposed of according the
applicable regulations. The SEAT Technical Service network has the neces-
sary equipment and qualified personnel for collecting and disposing of this
waste material.