2011 Seat Ibiza ST window
[x] Cancel search: windowPage 103 of 280

101
Lights and visibility
Home lighting comes on. If the driver door is already open when the lights
are flashed briefly, the Coming Home lighting comes on immediately.
When the last door of the vehicle or the tailgate is closed, the Coming Home
function starts and the switching off the headlights is delayed.
The Coming Home lighting switches off in the following cases:
● On completion of the time period established for the delay in switching
off the lights after all the vehicle doors and the tailgate have been closed.
● If, 30 seconds after being connected, any doors or the tailgate remain
open.
● If the light switch is turned to position .
● If the ignition is switched on.
Leaving home function
The Leaving Home function is activated when the vehicle is unlocked if:
● the light control is in position and
● the photosensor detects “darkness”.
The Leaving Home lighting switches off in the following cases:
● If the time period for the delay in switching off the headlights has ended
● If the vehicle is locked again.
● If the light switch is turned to position .
● If the ignition is switched on.
Note
● To activate the coming/leaving home function, the rotary light switch
must be in position and the light sensor must detect darkness.
● If the ignition key is removed while the lights are on, and the lights are
flashed briefly and the driver door opened, no acoustic signal is heard, as
when the Coming Home function is on, the lights are automatically switched
off after a period of time (except when the light switch is in position or
.
Rear window heating
Fig. 58 Centre console:
heated rear window
switch
The heated rear window only works when the engine is running. When it is
switched on, a lamp lights up on the switch.
After approx. 8 minutes, the heating device of the rear window switches off
automatically.
Safety FirstOperating InstructionsPractical TipsTechnical Specifications
Page 104 of 280

102Lights and visibility
For the sake of the environment
The heated rear window should be disconnected as soon as the glass is
demisted. By saving electrical power you can also save fuel.
Note
To avoid possible damage to the battery, an automatic temporary discon-
nection of this function is possible, coming back on when normal operating
conditions are re-established.
Hazard warning lights
The hazard warning lights are used to draw the attention of
other road users to your vehicle in emergencies.
Fig. 59 Centre console:
switch for hazard warn-
ing lights
If your vehicle breaks down:
1. Park your vehicle at a safe distance from moving traffic. 2. Press the button to switch on the hazard warning lights
⇒
.
3. Switch the engine off.
4. Apply the handbrake.
5. On a manual gearbox engage 1st gear. On an automatic, move the selector lever to P.
6. Use the warning triangle to draw the attention of other road users to your vehicle.
7. Always take the vehicle key with you when you leave the vehi- cle.
Switch on the hazard warning lights to warn other road users, for example
when:
● reaching the tail end of a traffic jam,
● there is an emergency
● your vehicle breaks down due to a technical fault,
● you are towing another vehicle or your vehicle is being towed.
All turn signals flash simultaneously when the hazard warning lights are
switched on. That is that the two turn signal turn signal lamps and the
turn signal lamp in the switch will flash at the same time. The hazard
warning lights also work when the ignition is switched off.
WARNING
● The risk of an accident increases if your vehicle breaks down. Always
use the hazard warning lights and a warning triangle to draw the atten-
tion of other road users to your stationary vehicle.
● Never park where the catalytic converter could come into contact with
inflammable materials under the vehicle, for example dry grass or spilt
petrol. This could start a fire!
Page 110 of 280

108Lights and visibility
Rain sensor*
The rain sensor controls the frequency of the windscreen
wiper intervals, depending on the amount of rain.
Fig. 65 Windscreen wip-
er lever
Switching on the rain sensor
– Move the windscreen wiper lever into position 1
⇒ fig. 65.
– Move the control A
to the left or right to set the sensitivity of
the rain sensor. Control to the right: highly sensitive. Control to
the left: less sensitive.
The rain sensor is part of the interval wipe function. You will have to switch
the rain sensor back on if you switch off the ignition. This is done by switch-
ing the interval wipe function off and back on.
Note
● Do not put stickers on the windscreen in front of the sensor. This may
cause sensor disruption or faults. Rear window wiper
The windscreen wiper lever operates the windscreen wiper
and the wash and wipe system for the rear window.
Fig. 66 Windscreen wip-
er and windscreen wash
lever: rear window wiper
Switching on the interval wipe
– Press the lever forwards to position 6
⇒ fig. 66. The wiper will
wipe the window approximately every 6 seconds.
Switching off the interval wipe function
– Pull the lever back from position 6
towards the steering wheel.
The wiper will continue to function for a short period if you
switch off whilst the wipers are in motion.
Switching on the windscreen wiper and washer system
– Press the lever fully forwards to position 7
⇒ fig. 66. The rear
wiper and washer operate at the same time. The windscreen
wash system will function as long as you hold the lever in this
position.
Page 111 of 280

109
Lights and visibility
– Release the lever. The washer system stops and the wipers con-
tinue until the end of the cycle.
– Move the lever towards the steering wheel to switch off.
WARNING
● A worn or dirty wiper blade will obstruct visibility and reduce safety.
● Always note the corresponding warnings on ⇒ page 209.
CAUTION
In icy conditions, always check that the wiper blade is not frozen to the
glass before using the wiper for the first time. If you switch on the wiper
when the wiper blade is frozen to the glass, this could damage both the
wiper blade and the wiper motor.
Note
● The rear window wiper will only work when the ignition is switched on.
● Depending on the version of the model, when you engage reverse gear
and with the headlight wiper activated, the lamps are wiped.
Headlight washer*
The headlight washers clean the headlight lenses. The headlight washers are activated automatically when the windscreen
washer is used and the windscreen wiper lever is pulled towards the steer-
ing wheel for at least 1.5 seconds – provided the dipped beam headlights
or main beams are switched on. Clean off stubborn dirt (insects, etc.) from
the headlights at regular intervals, for instance when filling the fuel tank.
Note
● To ensure that the headlight washers work properly in winter, keep the
nozzle holders in the bumper free of snow and remove any ice with a de-icer
spray.
● To remove water, the windscreen wipers will be activated from time to
time, the headlight wipers will be activated every three cycles.
Rear view mirrors
Adjusting the rear view mirrors
Before beginning any journey, adjust the rear view mirrors for correct visibil-
ity.
Interior mirror
It is dangerous to drive if you cannot see clearly through the
rear window. Manual anti-dazzle function for interior mirror
In the basic mirror position, the lever at the bottom edge of the mirror
should be at the front. Pull the lever to the back to select the anti-dazzle
function.
Safety FirstOperating InstructionsPractical TipsTechnical Specifications
Page 112 of 280

110Lights and visibility
Automatic anti-dazzle interior mirror*
The automatic anti-dazzle function can be switched on and
off as desired.
Fig. 67 Automatic anti-
dazzle interior mirror.
Switching off the anti-dazzle function
– Press button A
⇒ fig. 67. Indicator lamp B goes off.
Switching on the anti-dazzle function
– Press button A
⇒ fig. 67. Warning lamp is lit.
Anti-dazzle function
The anti-dazzle function is activated every time the ignition is switched on.
The green indicator lamp lights up in the mirror housing.
When the anti-dazzle function is enabled, the interior mirror will darken au-
tomatically according to the amount of light it receives. The anti-dazzle
function is cancelled if reverse gear is engaged.
Note
● The automatic anti-dazzle function will only work properly if the sun
blind* for the rear window is retracted and there are no other objects pre-
venting light from reaching the rear view mirror.
● If you have to stick any type of sticker on the windscreen, do not do so in
front of the sensors. Doing so could prevent the anti-dazzle function from
working well or even from working at all.
Folding in the exterior mirrors
The exterior mirrors of the vehicle may be folded in. For this, press the mir-
ror housing towards the vehicle.
Note
Before washing the vehicle with an automatic car wash, fold in the mirrors
to avoid damage.
Page 115 of 280

113
Seats and storage compartments
Seats and storage compartments The importance of correct seat adjustment
Proper seat adjustment optimises the level of protection of-
fered by seat belts and airbags.
Your vehicle has five seats, two in the front and three in the rear. Each seat
is equipped with a three-point seat belt.
The driver seat and the front passenger seat can be adjusted in many ways
to suit the physical requirements of the vehicle occupants. The correct seat
position is very important for:
● a fast and easy operation of all controls on the instrument panel,
● a relaxed posture which does not cause drowsiness,
● a safe driving ⇒ page 7,
● ensuring that the seat belts and airbag system provide maximum pro-
tection ⇒ page 19.
WARNING
● If the driver and passengers assume improper sitting positions, they
may sustain critical injuries.
● More people than available seats must never be transported in your
vehicle.
● Every passenger in the vehicle must properly fasten and wear the
seat belt belonging to his or her seat. Children must be protected with an
appropriate child restraint system ⇒ page 43, Child safety.
● The front seats and all head restraints must always be adjusted to
body size and the seat belt must always be properly adjusted to provide
you and your passengers with optimum protection.
WARNING (Continued)
● Always keep your feet on the footwell when the vehicle is moving;
never rest them on the dash panel, out of the window or on the seat. This
is also applied to passengers. An incorrect sitting position exposes you
to an increased risk of injury in case of a sudden braking or an accident.
If the airbag is triggered, you could sustain severe injuries due to an in-
correct sitting position.
● It is important for the driver and front passenger to keep a distance of
at least 25 cm from the steering wheel and dash panel. Failure to respect
the minimum distance means that the airbag will not protect you. Risk of
fatal injury. The distance between the driver and the steering wheel or
between the front passenger and the dash panel should always be as
great as possible.
● Adjust the driver or front passenger seat only when the vehicle is sta-
tionary. Otherwise, your seat could move unexpectedly while the vehicle
is moving. This could increase the risk of an accident and therefore, in-
jury. In addition, while adjusting your seat, you will assume an incorrect
sitting position. Risk of fatal accidents.
● Special guidelines apply to installing a child seat on the front passen-
ger seat. When installing a child seat, please observe the warnings de-
scribed in ⇒ page 43, Child safety.
Safety FirstOperating InstructionsPractical TipsTechnical Specifications
Page 130 of 280
128Seats and storage compartments
–Position heavy items as far forward as possible ⇒ fig. 93.
– Secure the load with a luggage net* or with non-elastic straps
secured to the fastening rings ⇒ page 128.
WARNING
● Unsecured objects in the luggage compartment can suddenly shift
and cause changes in the handling of the vehicle.
● In an accident or a sudden manoeuvre, loose objects in the passenger
compartment can be flung forward and might injure vehicle occupants.
● Always keep all objects in the luggage compartment and use appro-
priate grips to secure them, particularly in the case of heavy objects.
● When you transport heavy objects, always bear in mind that a change
of the centre of gravity can also cause changes in vehicle handling.
● Please refer to the notes on ⇒ page 7.
CAUTION
Make sure that no hard objects chafe against the wires of the heating ele-
ment in the rear window and damage them.
Note
The tyre pressure must be adjusted according to the load. When necessary
check the tyre pressures on the label located on the inside fuel tank flap
⇒ page 216. Fastening rings*
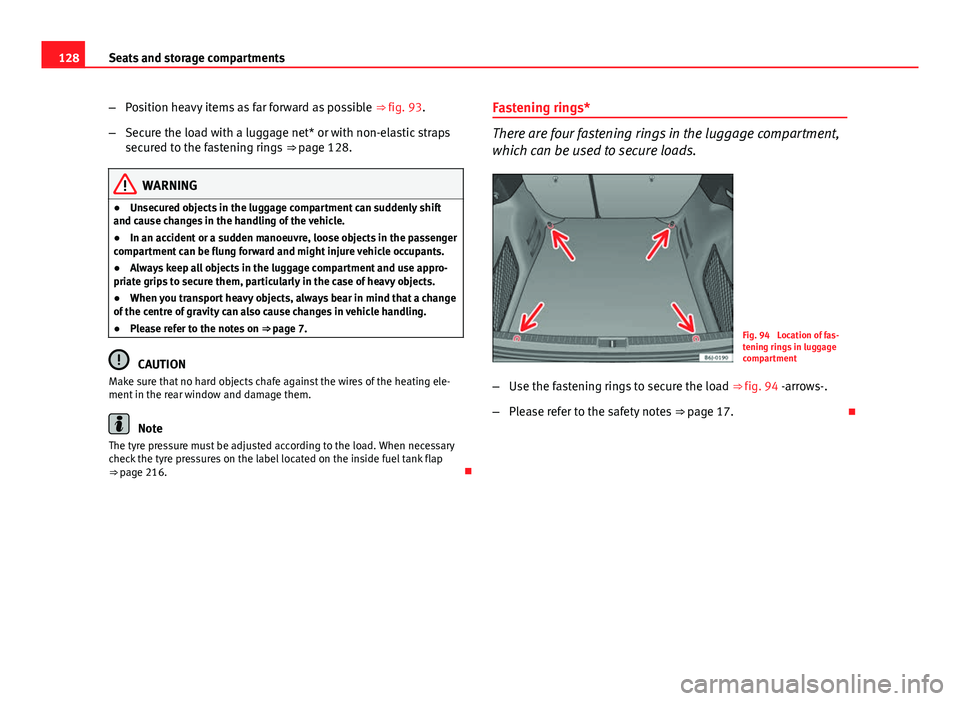
There are four fastening rings in the luggage compartment,
which can be used to secure loads.
Fig. 94 Location of fas-
tening rings in luggage
compartment
– Use the fastening rings to secure the load ⇒ fig. 94 -arrows-.
– Please refer to the safety notes ⇒ page 17.
Page 134 of 280

132Air conditioning
Air conditioning
Heating
Controls
Fig. 99 Heating controls
on the dash panel
– Using the controls A
and C and with the switch B ⇒ fig. 99
you can adjust the temperature, the air distribution and the
blower speed.
– Press the button D
to switch air recirculation mode on or off.
When the function is activated, a warning light on the button is
turned on.
Temperature
Switch A
adjusts temperature. The required temperature inside the vehicle
cannot be lower than the ambient temperature. Maximum heat output, which is needed to defrost the windows quickly, is only available when the
engine has reached its operating temperature.
Blower
The air flow can be set at four speeds with switch
B
. The blower should al-
ways be set at the lowest speed when driving slowly.
Air distribution
Control C
for setting the flow of air in the required direction.
– Air distribution towards the windscreen in order to demist. For safety
reasons, it is not recommended to switch air recirculation on.
– Air distribution to the upper body
– Air distribution to footwell
– Air distribution to the windscreen and the footwell.
Air recirculation mode
Air recirculation mode D
on (a lamp lights up in red) prevents strong
odours from the outside air from entering in the vehicle, for example when
passing through a tunnel or in a traffic jam ⇒
.
When the outside temperature is low, air recirculation mode improves heat-
ing performance by heating air from the interior instead of cold air from the
outside.