2011 Seat Ibiza SC rear light
[x] Cancel search: rear lightPage 174 of 278
172Driving and the environment
The figures for trailer weights and drawbar loads that are given on the data
plate of the towing bracket are for certification purposes only. The correct
figures for your specific model, which may be lower than these figures for
the towing bracket, are given in the vehicle documents or in ⇒ chapter Tech-
nical Data.
Distributing the load
Distribute loads in the trailer so that heavy objects are as near to the axle as
possible. Loads carried in the trailer must be secured to prevent them mov-
ing.
Tyre pressure
Set tyre pressure to the maximum permissible pressure shown on the stick-
er on the inside of the fuel tank flap. Set the tyre pressure of the trailer tyres
in accordance with the trailer manufacturer's recommendations.
Exterior mirrors
Check whether you can see enough of the road behind the trailer with the
standard mirrors. If this is not the case, you should have additional mirrors
fitted. Both exterior mirrors should be mounted on hinged extension brack-
ets. Adjust the mirrors to give sufficient vision to the rear.
WARNING
Never transport people in a trailer. This could result in fatal accidents.
Note
● Towing a trailer places additional demands on the vehicle. We recom-
mend additional services between the normal inspection intervals if the ve-
hicle is used frequently for towing a trailer.
● Find out whether special regulations apply to towing a trailer in your
country. Ball coupling of towing bracket*
The ball coupling is provided with instructions on fitting and removing the
ball coupling of the towing bracket.
WARNING
The towing bracket ball coupling must be stored securely in the luggage
compartment to prevent them being flung through the vehicle and caus-
ing injury.
Note
● By law, the ball coupling must be removed if a trailer is not being towed
and it obscures the number plate.
Driving tips
Driving with a trailer always requires extra care. Weight distribution
The weight distribution of a loaded trailer with an unladen vehicle is very
unfavourable. However, if this cannot be avoided, drive extra slowly to allow
for the unbalanced weight distribution.
Speed
The stability of the vehicle and trailer is reduced with increasing speed. For
this reason, it is advisable not to drive at the maximum permissible speed
in an unfavourable road, weather or wind conditions. This applies especially
when driving downhill.
You should always reduce speed immediately if the trailer shows the slight-
est sign of snaking. Never try to stop the “snaking” by increasing speed.
Page 207 of 278

205
Checking and refilling levels
Removing the wiper blade
– Lift the wiper arm away from the glass ⇒ fig. 130.
– Slide the blade adapter in the direction of the arrow and remove
the blade ⇒ fig. 130.
Fitting the wiper blade
– With one hand, hold the top end of the wiper arm.
– Place the blade as shown in the ⇒ fig. 131 and slide the adapt-
er along until it engages.
Check the condition of the wiper blade regularly. Change as required.
If the windscreen wiper scrapes, it should be replaced if damaged, or
cleaned if soiled.
If this is not sufficient, refer to a specialised workshop.
WARNING
Do not drive unless you have good visibility through all windows!
● Clean the windscreen wiper blades and all windows regularly.
● The wiper blades should be changed once or twice a year.
CAUTION
● A damaged or dirty window wiper could scratch the rear window.
● Never use fuel, nail varnish remover, paint thinner or similar products to
clean the window.
● Never move the windscreen wiper by hand. This could cause damage. Brake fluid
Checking the brake fluid level
The brake fluid is checked at the intervals given in the serv-
ice schedule.
Fig. 132 In the engine
compartment: Brake fluid
reservoir cover
– Read off the fluid level at the transparent brake fluid reservoir. It
should always be between the “MIN” and “MAX” marks.
The position of the brake fluid reservoir is shown in the corresponding en-
gine compartment illustration ⇒ page 250. The brake fluid reservoir has a
black and yellow cap.
The brake fluid level drops slightly when the vehicle is being used as the
brake pads are automatically adjusted as they wear.
However, if the level goes down noticeably in a short time, or drops below
the “MIN” mark, there may be a leak in the brake system. A display on the
instrument panel will warn you if the brake fluid level is too low ⇒ page 61.
Safety FirstOperating InstructionsPractical TipsTechnical Specifications
Page 218 of 278
216If and when
If you have a puncture on one of the front wheels when using snow chains,
fit the compact temporary spare in place of one of the rear wheels. You can
then attach the snow chains to the wheel taken from the rear and use this
wheel to replace the punctured front wheel.
WARNING
● The tyre pressures must be checked and corrected as soon as possi-
ble.
● Do not drive faster than 80 km/h. Higher speeds can cause an acci-
dent.
● Avoid heavy acceleration, hard braking and fast cornering. Risk of ac-
cident.
● Never use two or more compact spare tyres at the same time, risk of
accident.
● No other type of tyre (normal summer or winter tyre) may be fitted on
the compact temporary spare wheel rim.
Tyre repair kit*
The tyre repair kit (for vehicles not including a spare wheel)
is stored under the floor panel in the luggage compartment. In the event of a punctured tyre, your vehicle is equipped with the Tyre Mo-
bility System.
The tyre repair kit consists of a container with sealing compound to repair
the puncture and a compressor to generate the required tyre pressure. The
kit will reliably seal punctures up to a size of about 4 mm caused by the
penetration of a foreign body into the tyre.
Note
● Seek professional assistance if the repair of a tyre puncture is not possi-
ble with the sealing compound.
Wheel change Preparation work
What you must do before changing a wheel.
– If you have a flat tyre or puncture, park the vehicle as far away
from the flow of traffic as possible. Choose a location that is as
level as possible.
– All passengers should leave the vehicle. They should wait in a
safe area (for instance behind the roadside crash barrier).
– Switch the engine off. Switch the hazard warning lights on and
place the warning triangles in position.
– Apply the handbrake firmly.
– Engage the first gear , or put the selector lever to position P for
those vehicles with an automatic gearbox.
– If you are towing a trailer, unhitch it from your vehicle.
– Take the vehicle tools and the spare wheel out of the luggage
compartment.
Page 227 of 278

225
If and when
NumberConsumerAmps36Main beam headlight, right10, 15 c)37Main beam headlight, left10, 15c)38Engine heater3039Vacant 4012 Volt Input/Cigarette lighter1541Heated seats control unit / Cup Holder2542Horn2043Panorama sunroof3044Windscreen wipers2045Heated rear window30
46Radio / Bluetooth / USB + AUX-In / DC-DC con-
verter for Start-Stop20
47Climatronic / autoclima / Gateway / Diagnosis /
Automatic gearbox (ZSS lock)5
48Locking unit2549Electric windows (front)2550Rear electric windows3051Automatic gearbox control unit2552Alarm15
53Electro-kinetic pump relay/bi-turbo fuel control
unit15
54Reverse light for automatic gearbox/ Fog light /
Cornering light15
55Transformer on15, 20b)56Rear window wiper1057Dipped beam headlights (right side) / Daylight1558Dipped beam headlights (to the left) / Daylight15a)
If it is LPG.
b) Ampere rating according to motorisation.
c) If it has Start-Stop or not. Fuses below steering wheel in relay holder
PTC fuses
NumberConsumerAmps1Supplementary electrical heating using air402Supplementary electrical heating using air403Supplementary electrical heating using air40
AUX 1 Fuses
NumberConsumerAmps
1Left daytime light AFS lamp15, 20
a)Navigator, Bluetooth, MDI, radio control lever20
2Right daytime light AFS lamp15, 20a)Instrument panel / ESP relay53Headlight washer pump20a)
If it has Start-Stop or not.
AUX 3 Fuses
NumberConsumerAmps1Trailer control unit152Trailer control unit203Trailer control unit20
Safety FirstOperating InstructionsPractical TipsTechnical Specifications
Page 239 of 278
237
If and when
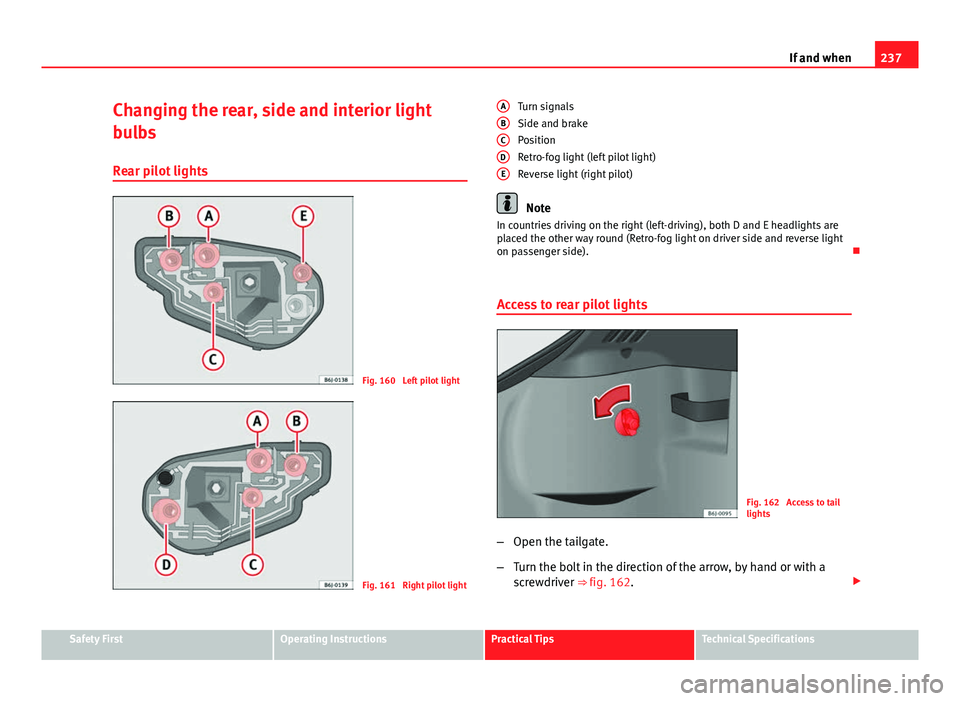
Changing the rear, side and interior light
bulbs
Rear pilot lights
Fig. 160 Left pilot light
Fig. 161 Right pilot light Turn signals
Side and brake
Position
Retro-fog light (left pilot light)
Reverse light (right pilot)
Note
In countries driving on the right (left-driving), both D and E headlights are
placed the other way round (Retro-fog light on driver side and reverse light
on passenger side).
Access to rear pilot lights
Fig. 162 Access to tail
lights
– Open the tailgate.
– Turn the bolt in the direction of the arrow, by hand or with a
screwdriver ⇒ fig. 162.
A
BCDE
Safety FirstOperating InstructionsPractical TipsTechnical Specifications
Page 244 of 278
242If and when
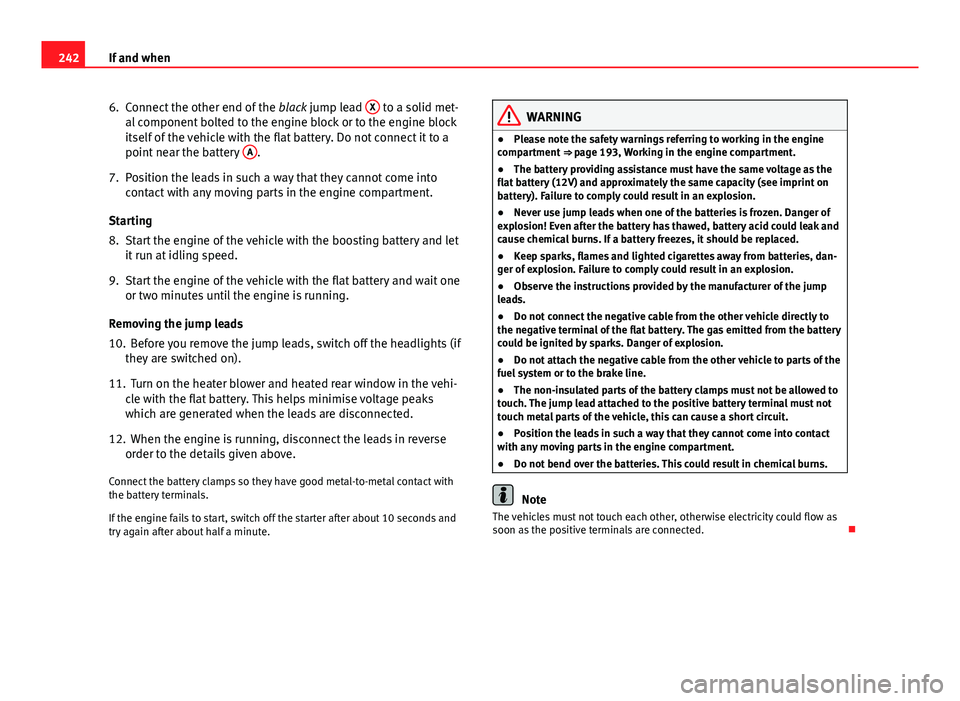
6. Connect the other end of the black jump lead X
to a solid met-
al component bolted to the engine block or to the engine block
itself of the vehicle with the flat battery. Do not connect it to a
point near the battery A
.
7. Position the leads in such a way that they cannot come into contact with any moving parts in the engine compartment.
Starting
8. Start the engine of the vehicle with the boosting battery and let it run at idling speed.
9. Start the engine of the vehicle with the flat battery and wait one or two minutes until the engine is running.
Removing the jump leads
10. Before you remove the jump leads, switch off the headlights (if they are switched on).
11. Turn on the heater blower and heated rear window in the vehi- cle with the flat battery. This helps minimise voltage peaks
which are generated when the leads are disconnected.
12. When the engine is running, disconnect the leads in reverse order to the details given above.
Connect the battery clamps so they have good metal-to-metal contact with
the battery terminals.
If the engine fails to start, switch off the starter after about 10 seconds and
try again after about half a minute.
WARNING
● Please note the safety warnings referring to working in the engine
compartment ⇒ page 193, Working in the engine compartment.
● The battery providing assistance must have the same voltage as the
flat battery (12V) and approximately the same capacity (see imprint on
battery). Failure to comply could result in an explosion.
● Never use jump leads when one of the batteries is frozen. Danger of
explosion! Even after the battery has thawed, battery acid could leak and
cause chemical burns. If a battery freezes, it should be replaced.
● Keep sparks, flames and lighted cigarettes away from batteries, dan-
ger of explosion. Failure to comply could result in an explosion.
● Observe the instructions provided by the manufacturer of the jump
leads.
● Do not connect the negative cable from the other vehicle directly to
the negative terminal of the flat battery. The gas emitted from the battery
could be ignited by sparks. Danger of explosion.
● Do not attach the negative cable from the other vehicle to parts of the
fuel system or to the brake line.
● The non-insulated parts of the battery clamps must not be allowed to
touch. The jump lead attached to the positive battery terminal must not
touch metal parts of the vehicle, this can cause a short circuit.
● Position the leads in such a way that they cannot come into contact
with any moving parts in the engine compartment.
● Do not bend over the batteries. This could result in chemical burns.
Note
The vehicles must not touch each other, otherwise electricity could flow as
soon as the positive terminals are connected.
Page 246 of 278
244If and when
Do not pull too hard with the towing vehicle and take care to avoid jerking
the tow-rope. When towing on an unpaved road, there is always a risk of
overloading and damaging the anchorage points.
The ignition of the vehicle being towed must be switched on to prevent the
steering wheel from locking and also to allow the use of the turn signals,
horn, windscreen wipers and washers.
As the brake servo does not work if the engine is not running, you must ap-
ply considerably more pressure to the brake pedal than you normally would.
As the power assisted steering does not work if the engine is not running,
you will need more strength to steer than you normally would.
Towing vehicles with an automatic gearbox
● Put the selector lever into position “N”.
● Do not drive faster than 50 km/h.
● Do not tow further than 50 km.
● If a breakdown vehicle is used, the vehicle must be towed with the front
wheels raised.
Note
● Observe legal requirements when towing or tow-starting.
● Switch on the hazard warning lights of both vehicles. However, observe
any regulations to the contrary.
● For technical reasons, vehicles with an automatic gearbox must not be
tow-started.
● If damage to your vehicle means that there is no lubricant in the gear-
box, you must raise the drive wheels while the vehicle is being towed.
● If the vehicle has to be towed more than 50 km, the front wheels should
be raised during towing, and towing should be carried out by a qualified
person. ●
The steering wheel is locked when the vehicle has no electrical power.
The vehicle must then be towed with the front wheels raised. Towing should
be carried out by a qualified person.
● The towing eye should always be kept in the vehicle.
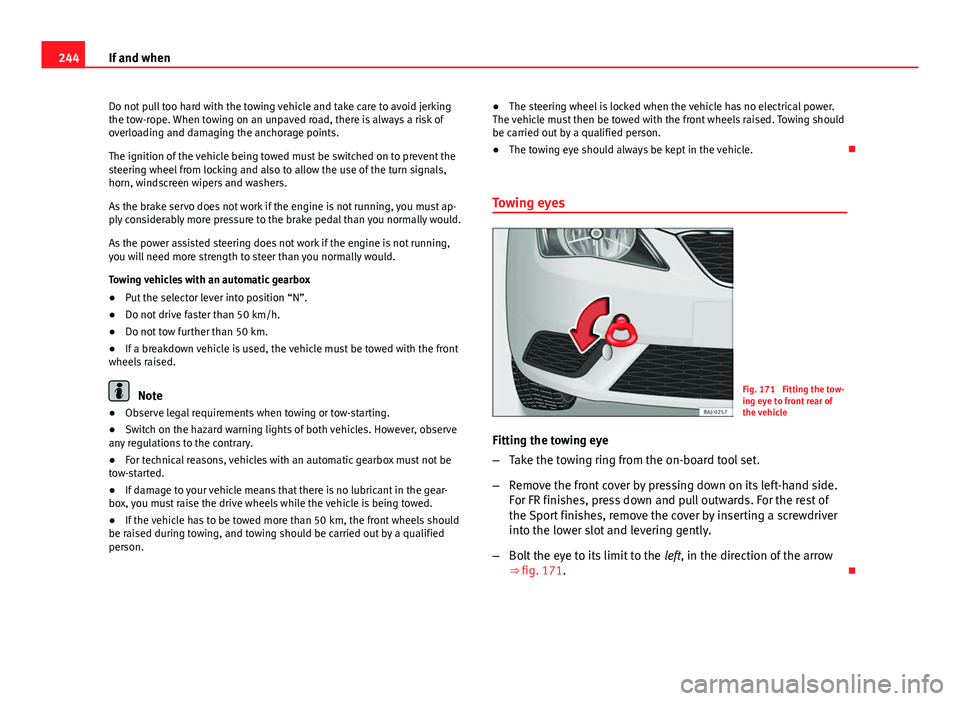
Towing eyesFig. 171 Fitting the tow-
ing eye to front rear of
the vehicle
Fitting the towing eye
– Take the towing ring from the on-board tool set.
– Remove the front cover by pressing down on its left-hand side.
For FR finishes, press down and pull outwards. For the rest of
the Sport finishes, remove the cover by inserting a screwdriver
into the lower slot and levering gently.
– Bolt the eye to its limit to the left, in the direction of the arrow
⇒ fig. 171.
Page 253 of 278

251
Technical specifications
Petrol engine 1.2 44 kW (60 PS)
Engine specifications Power output in kW (PS) rpm 44 (60)/ 5200
Maximum torque in Nm at rpm 108/ 3000
No. of cylinders/capacity in cm3
3/ 1198
Fuel Super 95 RON a)
/Normal 91 RON b)
a)
Research Octane Number = Anti-detonation rating of the petrol.
b) Slight power loss.
Performance Maximum speed in km/h 155
Acceleration from 0-80 km/h in sec. 10,3
Acceleration from 0-100 km/h in sec. 15,9
Weights
Gross vehicle weight in kg 1500
Weight in running order (with driver) in kg 1049
Gross front axle weight in kg 810
Gross rear axle weight in kg 780
Permitted roof load in kg 75
Trailer weight
Trailer without brakes 520
Trailer with brakes, gradients up to 8% 1000
Trailer with brakes, gradients up to 12% 800
Engine oil capacity
Approximate engine oil capacity with oil filter change 2.75 litres
Safety FirstOperating InstructionsPractical TipsTechnical Specifications