2011 Seat Ibiza SC warning
[x] Cancel search: warningPage 221 of 278

219
If and when
WARNING
Loosen the wheel bolts only about one turn before raising the vehicle
with the jack, otherwise there is a risk of accident.
Note
● If the wheel bolt is very tight, you may be able to loosen it by pushing
down the end of the spanner carefully with your foot. Hold on to the vehicle
for support and take care not to slip.
Raising the vehicle
In order to remove the wheel, the vehicle must be raised
with a jack.
Fig. 137 Jack position
points
Fig. 138 Fitting the jack
– Locate the jacking point under the door sill closest to the wheel
to be changed ⇒ fig. 137.
– Place the jack under the jacking point and turn the crank until
the arm of the jack is directly below the vertical rib under the
door sill.
– Align the jack so that the arm of the jack fits around the rib un-
der the door sill and the movable base plate of the jack is flat
on the ground ⇒ fig. 138.
– Raise the jack until the defective wheel is just clear of the
ground.
Recesses at the front and rear of the door sills mark the jacking points
⇒ fig. 137. There is only one jacking point for each wheel. Do not fit the jack anywhere else.
Safety FirstOperating InstructionsPractical TipsTechnical Specifications
Page 222 of 278

220If and when
An unstable surface under the jack may cause the vehicle to slip off the
jack. Therefore, the jack must be fitted on solid ground offering good sup-
port. Use a large and stable base, if necessary. On a hard, slippery surface
(such as tiles) use a rubber mat or similar to prevent the jack from slipping.
WARNING
● Take all precautions so that the base of the jack does not slip. Failure
to do so could result in an accident.
● The vehicle can be damaged if the jack is not applied at the correct
jacking points. There is also a risk of injury since the jack can slip off
suddenly if it is not properly engaged.
Removing and fitting the wheel
For removal and fitting the wheel, the following tasks must
be completed.
After loosening the wheel bolts and raising the vehicle with the
jack, change the wheel as described below:
Removing a wheel
– Unscrew the wheel bolts using the box spanner and place them
on a clean surface.
Fitting a wheel
– Screw on the wheel bolts in position and tighten them loosely
with a box spanner.
The wheel bolts should be clean and easily screwed. Before fitting the spare
wheel, inspect the wheel condition and hub mounting surfaces. These sur-
faces must be clean before fitting the wheel. If tyres with a specific direction of rotation are fitted, note the direction of
rotation.
Anti-theft wheel bolts*
A special adapter is required to turn the anti-theft wheel
bolts. This is found in the tool box.
Fig. 139 Anti-theft
wheel bolt
– Insert the adapter onto the wheel bolt and push it on as far as it
will go ⇒ fig. 139.
– Fit the box spanner as far as it will go over the adapter.
– Loosen or tighten the wheel bolt as appropriate.
Code
The code number of the anti-theft wheel bolt is stamped onto the front part
of the adaptor.
Page 223 of 278

221
If and when
The code number should be noted and kept in a safe place, as it is only by
using the code number that a duplicate adaptor can be obtained from an
Authorised Service Centre.
Tyres with directional tread pattern
Tyres with directional tread pattern must be fitted so that
they rotate in the correct direction. A directional tread pattern can be identified by arrows on the sidewall that
point in the direction of rotation. Always note the direction of rotation indi-
cated when fitting the wheel. This is important so that these tyres can give
maximum grip and avoid excessive noise, tread wear and aquaplaning.
If, in an emergency, you have to fit the spare wheel so it rotates in the wrong
direction, you must drive extremely carefully. The tyre will not give optimum
performance. This is particularly important when driving on wet roads.
To benefit from the advantages of tyres with this type of tread pattern, the
defective tyre should be replaced as soon as possible so that all tyres again
rotate in the correct direction.
Tyre repair kit (Tyre-Mobility-System)*
General information and safety notes
Your vehicle is equipped with a tyre repair kit: the Tyre Mobility System.
In the event of a tyre puncture, a sealing compound and an air compressor
are located in the luggage compartment under the floor panel. The Tyre Mobility System will reliably seal punctures caused by the penetra-
tion of a foreign body of up to about 4 mm in diameter.
It is not necessary to remove the foreign body from the tyre.
Instructions for the sealing compound are located on the sealing compound
container.
It also contains the instructions for using the compressor.
WARNING
● Do not attempt to repair a puncture with the sealing compound if the
tyre has been damaged by driving the vehicle after the tyre has lost its
air.
● Always observe warnings and follow safety instructions concerning
compressor and sealing compound carefully.
● Do not drive faster than 80 km/h, avoid heavy acceleration, hard
braking and fast cornering.
● Tyres which have been repaired with sealing compound are only suit-
able for temporary use over a short period. Therefore, please drive care-
fully to the next available specialised workshop.
For the sake of the environment
If you have to dispose of a sealant can, go to a specialised waste service or
to a SEAT Technical Service, where the product can be recycled in an appro-
priate waste container.
Safety FirstOperating InstructionsPractical TipsTechnical Specifications
Page 224 of 278

222If and when
Note
● If sealant should leak out, leave it to dry. This way you can pull it off like
a piece of foil.
● Observe the expiry date stated on the sealing compound can. Have the
sealing compound exchanged by a specialised workshop.
● Seek professional assistance if the repair of a tyre puncture is not possi-
ble with the sealing compound.
What to do first
Certain steps must be taken before repairing a tyre.
– If you have a flat tyre or puncture, park the vehicle as far away
from the flow of traffic as possible.
– Apply the handbrake firmly.
– Engage first gear , or put the selector lever to position P.
– All passengers should leave the vehicle. They should wait in a
safe area (for instance behind the roadside crash barrier).
– Check whether a repair is possible using the Tyre Mobility Sys-
tem “General information and safety notes.”
– Unscrew inflation cap from the affected wheel.
– Take the tyre repair kit out of the luggage compartment.
WARNING
Switch on the hazard warning lights and place the warning triangles in
position. This is for your own safety and also warns other road users.
CAUTION
Take special care if you have to repair a tyre on a slope.
Note
● Please observe legal requirements when doing so.
● Remember to replace the sealing compound as soon as possible.
Tyre repair
The following sections describe the procedures for repairing
a tyre.
Using the sealing compound
– The instructions on the container give detailed information on
how to use the sealing compound.
Inflating the tyre.
– Remove the air compressor and hose from the container.
– Screw the retaining nut onto the valve.
– Plug the compressor cable into a 12 volt power point.
– Turn on compressor and monitor the pressure shown on the
pressure gauge.
Completing the repair
– Remove the compressor hose from the valve.
– Fit the valve cap.
Page 225 of 278

223
If and when
– Unplug the compressor from the socket.
– Return all tools to their proper storing location.
Note
The compressor should never be allowed to run for longer than 6 minutes.
Fuses Changing a fuse
Blown fuses must be replaced
Fig. 140 Fuses in the
dash panel
Fuse cover
– Switch off the ignition and its failed electrical component. –
Identify the fuse corresponding to the damaged electric con-
sumer ⇒ page 224.
– Take the plastic clip from inside the fuse cover, fit it onto the
blown fuse and pull the fuse out.
– Replace the blown fuse (which will have a melted metal strip)
with a new fuse of the same ampere rating.
The individual electrical circuits are protected by fuses. The fuses are loca-
ted behind a cover at the left-hand end of the dash panel. When the steer-
ing wheel is on the right, the fuses are on the right-hand side of the dash
panel, behind a cover.
Fuses colour code
ColourAmpsgrey2Beige5Brown7,5Red10Blue15Yellow20Natural (white)25Green30orange40
WARNING
Never “repair” damaged fuses and never replace them with fuses with a
higher rating. Failure to comply could result in fire. This could also cause
damage to other parts of the electrical system.
Safety FirstOperating InstructionsPractical TipsTechnical Specifications
Page 229 of 278

227
If and when
Xenon 1)
/adaptive headlights*
- D1S2)
- LED 3)
- LED 3)
- PY 21W
Fog lights - H11
WARNING
● Take particular care when working on components in the engine com-
partment if the engine is warm - risk of burns!
● Bulbs are highly sensitive to pressure. The glass can break when you
touch the bulb, causing injury.
● The high voltage element of gas discharge bulbs* (xenon light) must
be handled correctly. Otherwise, there is a risk of death.
● When changing bulbs, please take care not to injure yourself on sharp
parts in the headlight housing.
CAUTION
● Remove the ignition key before working on the electric system. If not, a
short circuit could occur.
● Switch off the lights or parking lights before you change a bulb.
Dipped and full beam
Position
DRL (day light)
Turn signals
Fog light/cornering
For the sake of the environment
Please ask your specialist retailer how to dispose of used bulbs in the prop-
er manner.
Note
● Depending on weather conditions (cold or wet), the front lights, the fog
lights, the tail lights and the turn signals may be temporarily misted. This
has no influence on the useful life of the lighting system. By switching on
the lights, the area through which the beam of light is projected will quickly
be demisted. However, the edges may continue to be misted.
● Please check at regular intervals that all lighting (especially the exterior
lighting) on your vehicle is functioning properly. This is not only in the inter-
est of your own safety, but also that of all other road users.
● Before changing a bulb, make sure you have the correct new bulb.
● Do not touch the glass part of the bulb with your bare hands, use a cloth
or paper towel instead. Otherwise, the fingerprints left on the glass will va-
porise as a result of the heat generated by the bulb, they will be deposited
on the reflector and will impair its surface.
1)
With these types of headlights, the user can replace the indicator bulb. Replacement of the
dipped/main beam bulb must be done by a Technical Service, given that complex elements
must be removed from the vehicle and the automatic control system that incorporates it
must be reset.
2) The Xenon bulbs discharge 2.5 times the light flux and have an average lifespan of 5 times
more than that of halogen bulbs, this means that, except due to unusual circumstances,
there is no need to change the bulbs for the whole life of the vehicle.
3) In the event that there is a fault in the LEDs, the complete headlight must be replaced.
Safety FirstOperating InstructionsPractical TipsTechnical Specifications
Page 236 of 278

234If and when
Changing the bulbs of AFS headlights
AFS headlight bulbs
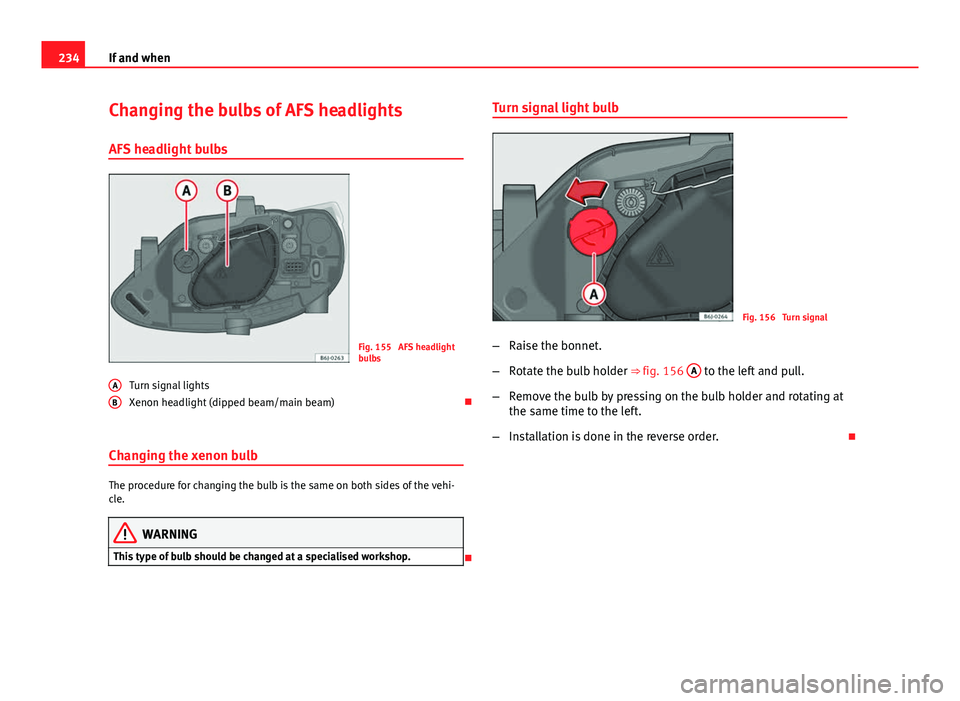
Fig. 155 AFS headlight
bulbs
Turn signal lights
Xenon headlight (dipped beam/main beam)
Changing the xenon bulb
The procedure for changing the bulb is the same on both sides of the vehi-
cle.
WARNING
This type of bulb should be changed at a specialised workshop.
A
B
Turn signal light bulb
Fig. 156 Turn signal
– Raise the bonnet.
– Rotate the bulb holder ⇒ fig. 156 A
to the left and pull.
– Remove the bulb by pressing on the bulb holder and rotating at
the same time to the left.
– Installation is done in the reverse order.
Page 244 of 278

242If and when
6. Connect the other end of the black jump lead X
to a solid met-
al component bolted to the engine block or to the engine block
itself of the vehicle with the flat battery. Do not connect it to a
point near the battery A
.
7. Position the leads in such a way that they cannot come into contact with any moving parts in the engine compartment.
Starting
8. Start the engine of the vehicle with the boosting battery and let it run at idling speed.
9. Start the engine of the vehicle with the flat battery and wait one or two minutes until the engine is running.
Removing the jump leads
10. Before you remove the jump leads, switch off the headlights (if they are switched on).
11. Turn on the heater blower and heated rear window in the vehi- cle with the flat battery. This helps minimise voltage peaks
which are generated when the leads are disconnected.
12. When the engine is running, disconnect the leads in reverse order to the details given above.
Connect the battery clamps so they have good metal-to-metal contact with
the battery terminals.
If the engine fails to start, switch off the starter after about 10 seconds and
try again after about half a minute.
WARNING
● Please note the safety warnings referring to working in the engine
compartment ⇒ page 193, Working in the engine compartment.
● The battery providing assistance must have the same voltage as the
flat battery (12V) and approximately the same capacity (see imprint on
battery). Failure to comply could result in an explosion.
● Never use jump leads when one of the batteries is frozen. Danger of
explosion! Even after the battery has thawed, battery acid could leak and
cause chemical burns. If a battery freezes, it should be replaced.
● Keep sparks, flames and lighted cigarettes away from batteries, dan-
ger of explosion. Failure to comply could result in an explosion.
● Observe the instructions provided by the manufacturer of the jump
leads.
● Do not connect the negative cable from the other vehicle directly to
the negative terminal of the flat battery. The gas emitted from the battery
could be ignited by sparks. Danger of explosion.
● Do not attach the negative cable from the other vehicle to parts of the
fuel system or to the brake line.
● The non-insulated parts of the battery clamps must not be allowed to
touch. The jump lead attached to the positive battery terminal must not
touch metal parts of the vehicle, this can cause a short circuit.
● Position the leads in such a way that they cannot come into contact
with any moving parts in the engine compartment.
● Do not bend over the batteries. This could result in chemical burns.
Note
The vehicles must not touch each other, otherwise electricity could flow as
soon as the positive terminals are connected.