2011 Seat Altea XL tailgate
[x] Cancel search: tailgatePage 160 of 319
Seats and storage compartments
158Retractable rear shelf
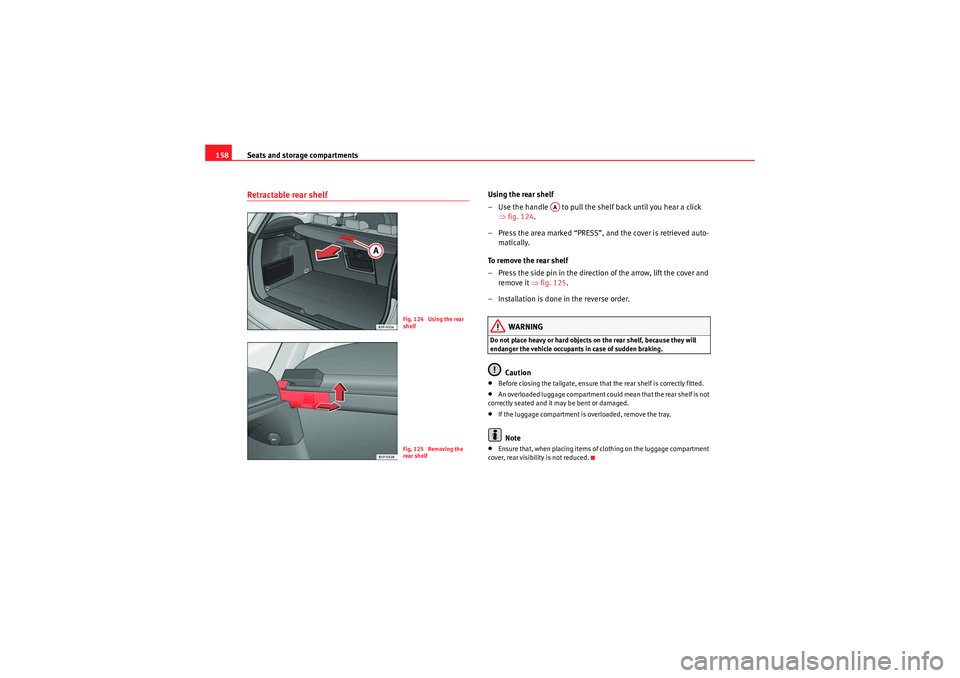
Using the rear shelf
– Use the handle to pull the shelf back until you hear a click
⇒fig. 124 .
– Press the area marked “PRESS”, and the cover is retrieved auto- matically.
To remove the rear shelf
– Press the side pin in the direction of the arrow, lift the cover and remove it ⇒fig. 125 .
– Installation is done in the reverse order.
WARNING
Do not place heavy or hard objects on the rear shelf, because they will
endanger the vehicle occupants in case of sudden braking.
Caution
•Before closing the tailgate, ensure that the rear shelf is correctly fitted.•An overloaded luggage compartment could mean that the rear shelf is not
correctly seated and it may be bent or damaged.•If the luggage compartment is overloaded, remove the tray.Note
•Ensure that, when placing items of clothing on the luggage compartment
cover, rear visibility is not reduced.
Fig. 124 Using the rear
shelfFig. 125 Removing the
rear shelf
AA
AlteaXL_EN.book Seite 158 Donnerstag, 9. September 2010 12:13 12
Page 219 of 319

Vehicle maintenance and cleaning217
Safety First
Operating Instructions
Practical Tips
Technical Specifications
•Water, ice and salt on the brakes can reduce braking efficiency. Risk of
accident.Caution
•Never remove dirt, mud or dust if the vehicle surface is dry. Never use a
dry cloth or sponge for cleaning purposes. This could scratch the paintwork
or glass on your vehicle.•Washing the vehicle in low temperatures: when washing the vehicle with
a hose, do not direct water into the lock cylinders or the gaps around the
doors, tailgate, or sunroof. Risk of freezing.For the sake of the environment
To protect environment, the vehicle should be washed only in specially
provided wash bays. This prevents toxic, oil-laden waste water entering the
sewerage system. In some places, washing vehicles outside wash bays is
prohibited.
Note
Do not wash the vehicle in direct sunlight.Washing the vehicle with a high pressure cleaner
Be particularly careful when using a high pressure cleaner!– Always observe the instructions for the high-pressure cleaner, particularly those concerning the pressure and the spraying
distance. – Increase the spraying distance
for soft materials and painted
bumpers.
– Do not use a high pressure cleaner to remove ice or snow from windows ⇒page 218.
– Never use concentrated jet nozzles (“rotating jets”) ⇒.
– After washing, avoid sudden and sharp braking. Dry the brakes by braking several times ⇒page 205.
WARNING
•Never wash tyres with a concentrated jet (“rotating nozzle”). Even at
large spraying distances and short cleaning times, visible and invisible
damage can occur to the tyres. This may cause an accident.•Water, ice and salt on the brakes can reduce braking efficiency. Risk of
accident.Caution
•Do not use water hotter than 60 °C. This could damage the vehicle.•To avoid damage to the vehicle, keep a sufficient distance from sensitive
materials such as flexible hoses, plastic, soundproofing material, etc. This is
also important for bumpers painted in the colour of the bodywork. The closer
the nozzle is to the surface, the greater the wear on the material.Vehicle paint maintenance
Regular waxing protects the paintwork.You need to apply wax to your vehicle if water does not form small drops and
run off the paintwork when it is clean.
WARNING (continued)
AlteaXL_EN.book Seite 217 Donnerstag, 9. September 2010 12:13 12
Page 221 of 319

Vehicle maintenance and cleaning219
Safety First
Operating Instructions
Practical Tips
Technical Specifications
If possible, use a de-icing spray to remove ice. If you use an ice scraper, push
it in one direction only without swinging it.
Use window cleaner or a silicone remover
to clean rubber, oil, grease and sili-
cone deposits off.
Wax deposits can be removed with a special cleaner available in your Author-
ised Service Centre. Wax deposits on the windscreen could cause the wiper
blades to judder. Adding a window cleaner that dissolves wax to the wind-
screen washer fluid prevents wiper blades from juddering, but wax deposits
are not removed.
Caution
•Never use warm or hot water to remove snow and ice from windows and
mirrors. This could cause the glass to crack!•The heating element for the rear window is located on the inner side of the
window. To prevent damage, do not put stickers on the heating elements
inside the window.Cleaning windscreen wiper bladesClean wiper blades improve visibility.
1. Use a soft cloth to remove dust and dirt from the windscreen wiper blades.
2. Use window cleaner to clean the windscreen wiper blades. Use a sponge or a cloth to remove stubborn dirt.
Rubber seals maintenance
If rubber seals are well looked after, they will not freeze so
quickly.1. Use a soft cloth to remove dust and dirt from the rubber seals.
2. Apply a specialist care product to the rubber seals.The rubber strips on the doors, windows, bonnet and tailgate will remain
pliable and last longer if they are treated with a suitable care product (for
example silicone spray).
Caring for rubber seals will also prevent premature ageing and leaks. The
doors will be easier to open. If rubber seals are well looked after, they will not
freeze so quickly in winter.Door lock cylinders
The door lock cylinders can freeze up in winter.To de-ice the lock cylinders you should only use spray with lubricating and
anti-corrosive properties.Cleaning chrome parts1. Clean chrome parts with a damp cloth.
2. Polish chrome parts with a soft, dry cloth.
AlteaXL_EN.book Seite 219 Donnerstag, 9. September 2010 12:13 12
Page 276 of 319
If and when
274Fog lights
Fog lights - H3
Fixed tail light
Stop/Position - P21W
28)
Turn signal - P21W
Mobile tailgate light
Fog light (driver side) - P21W
Reverse (passenger side) - P21W
Position - W5W
Side turn signal
Side turn signal - W5W
Number plate light
Number plate light - C5W
Note
•Depending on weather conditions (cold or wet), the front lights, the fog
lights, the tail lights and the turn signals may be temporarily misted. This has
no influence on the useful life of the lighting system. By switching on the
lights, the area through which the beam of light is projected will quickly be
demisted. However, the edges may continue to be misted.•Please check at regular intervals that all lighting (especially the exterior
lighting) on your vehicle is functioning properly. This is not only in the interest
of your own safety, but also that of all other road users.•Due to the difficulty in accessing some of the bulbs, any replacement work
should be done by a SEAT dealer. However, the following is a description of
how to change the lamps except for the fog lights* and interior lamps.
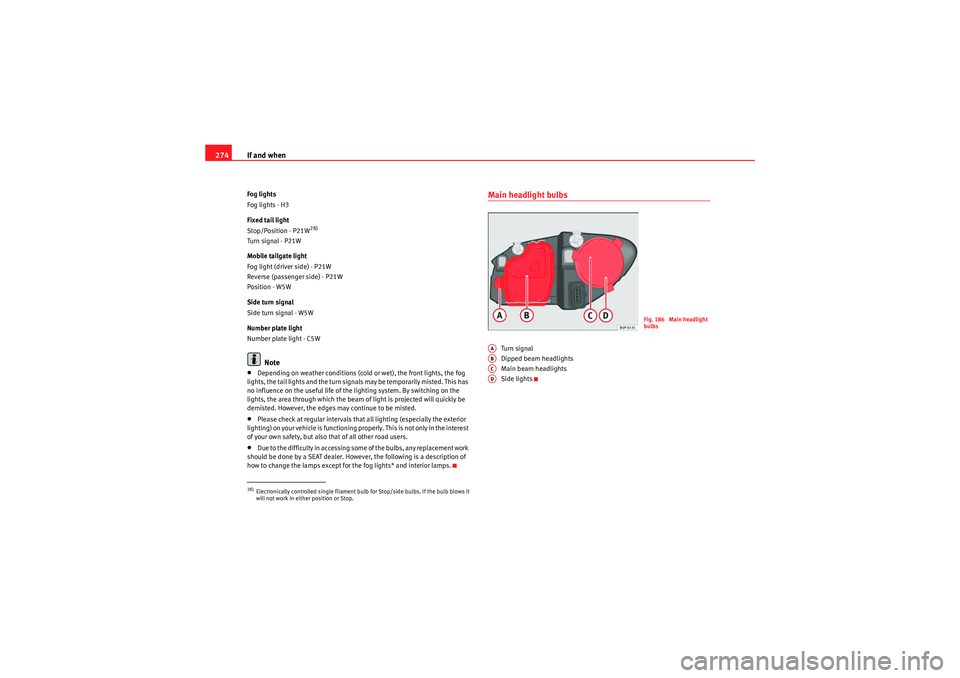
Main headlight bulbs
Turn signal
Dipped beam headlights
Main beam headlights
Side lights
28)Electronically controlled single filament bulb for Stop/side bulbs. If the bulb blows it
will not work in either position or Stop.
Fig. 186 Main headlight
bulbs
AAABACAD
AlteaXL_EN.book Seite 274 Donnerstag, 9. September 2010 12:13 12
Page 279 of 319
If and when277
Safety First
Operating Instructions
Practical Tips
Technical Specifications
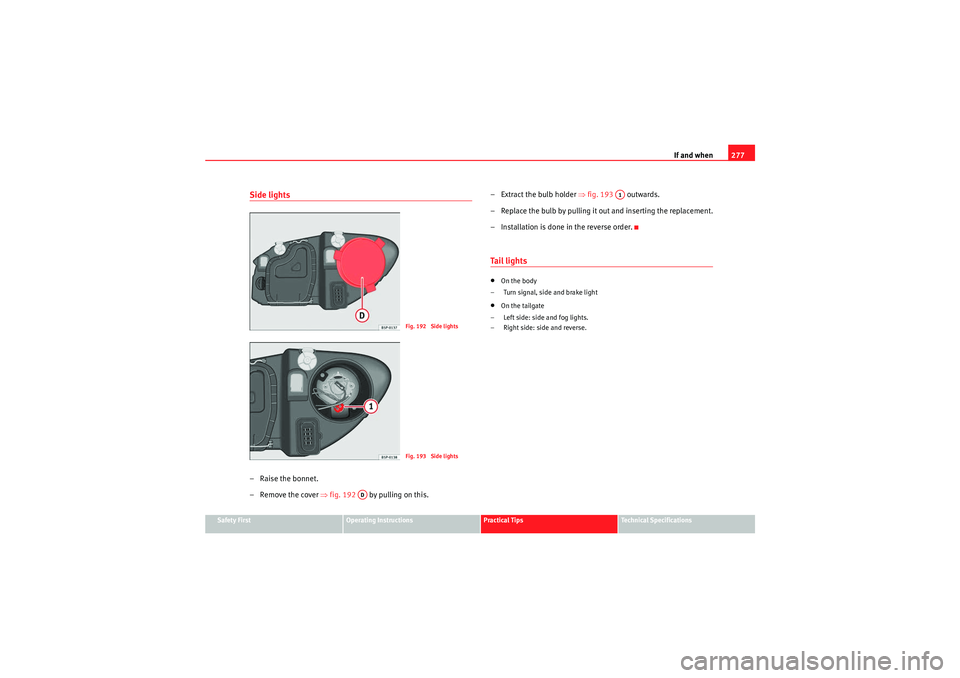
Side lights– Raise the bonnet.
– Remove the cover ⇒fig. 192 by pulling on this. – Extract the bulb holder
⇒fig. 193 outwards.
– Replace the bulb by pulling it out and inserting the replacement.
– Installation is done in the reverse order.
Ta i l l i g h t s•On the body
– Turn signal, side and brake light•On the tailgate
– Left side: side and fog lights.
– Right side: side and reverse.
Fig. 192 Side lightsFig. 193 Side lights
AD
A1
AlteaXL_EN.book Seite 277 Donnerstag, 9. September 2010 12:13 12
Page 281 of 319
If and when279
Safety First
Operating Instructions
Practical Tips
Technical Specifications
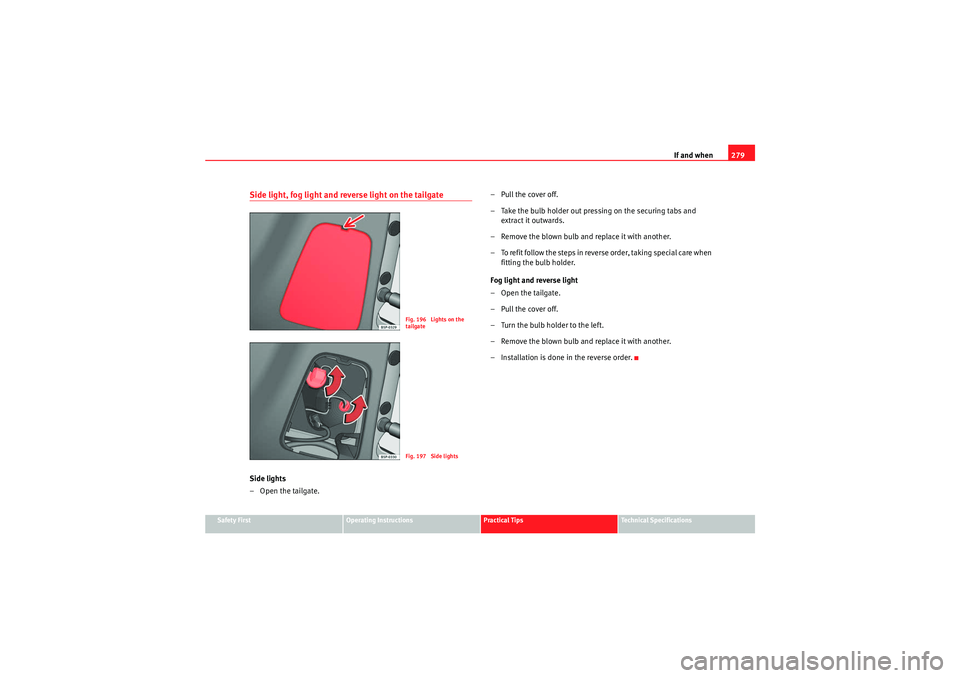
Side light, fog light and reverse light on the tailgateSide lights
–Open the tailgate. –Pull the cover off.
– Take the bulb holder out pressing on the securing tabs and
extract it outwards.
– Remove the blown bulb and replace it with another.
– To refit follow the steps in reverse order, taking special care when fitting the bulb holder.
Fog light and reverse light
–Open the tailgate.
–Pull the cover off.
– Turn the bulb holder to the left.
– Remove the blown bulb and replace it with another.
– Installation is done in the reverse order.
Fig. 196 Lights on the
tailgateFig. 197 Side lights
AlteaXL_EN.book Seite 279 Donnerstag, 9. September 2010 12:13 12
Page 310 of 319

Index
308CCatalytic converter . . . . . . . . . . . . . . . . . . . . . . 206
CD changer . . . . . . . . . . . . . . . . . . . . . . . . . . . . 144
Central locking . . . . . . . . . . . . . . . . . . . . . . . . . . 99
Automatic speed dependent locking and un-locking system* . . . . . . . . . . . . . . . . . . . . 101
Emergency unlocking system . . . . . . . . . . . 101
Locking system for involuntary unlocking . 101
Selective unlocking system* . . . . . . . . . . . 100
Unlocking system* . . . . . . . . . . . . . . . . . . . 101
Central locking button Locking . . . . . . . . . . . . . . . . . . . . . . . . . . . . 102
Unlocking . . . . . . . . . . . . . . . . . . . . . . . . . . . 102
Centre armrest . . . . . . . . . . . . . . . . . . . . . . . . . . 144
Cetane number . . . . . . . . . . . . . . . . . . . . . . . . . 232
Changing a wheel . . . . . . . . . . . . . . . . . . . . . . . 260
Changing gear See Manual gearbox . . . . . . . . . . . . . . . . . . 182
Changing gear in tiptronic mode . . . . . . . . . . . 186
Changing the bulbs Main headlight bulbs . . . . . . . . . . . . . . . . . 274
Tail lights . . . . . . . . . . . . . . . . . . . . . . . . . . . 277
Changing the main headlight bulbs dipped beam headlights . . . . . . . . . . . . . . 275
Main beam headlights . . . . . . . . . . . . . . . . 276
Side lights . . . . . . . . . . . . . . . . . . . . . . . . . . 277
Turn signal bulbs . . . . . . . . . . . . . . . . . . . . 275
Changing the tail light bulbs Side light, fog light and tail light on the tailgate279 Changing the tail lights
Luggage compartment lights . . . . . . . . . . . 280
Turn signal, side and brake lights on the body278
Changing windscreen wiper blades . . . . . . . . . 243
Chassis number . . . . . . . . . . . . . . . . . . . . . . . . 290
Checking . . . . . . . . . . . . . . . . . . . . . . . . . . . . . . 248
Checking battery electrolyte level . . . . . . . . . . 248
Checking engine oil level . . . . . . . . . . . . . . . . . 237
Child safety . . . . . . . . . . . . . . . . . . . . . . . . . . . . . 46
Child seat . . . . . . . . . . . . . . . . . . . . . . . . . . . . . . . 48 Categorisation in groups . . . . . . . . . . . . . . . 48
Group 1 . . . . . . . . . . . . . . . . . . . . . . . . . . . . . 49
Group 2 . . . . . . . . . . . . . . . . . . . . . . . . . . . . . 49
Group 3 . . . . . . . . . . . . . . . . . . . . . . . . . . . . . 49
Groups 0 and 0+ . . . . . . . . . . . . . . . . . . . . . . 48
Safety notes . . . . . . . . . . . . . . . . . . . . . . . . . . 46
Securing . . . . . . . . . . . . . . . . . . . . . . . . . . . . . 51
Child seats ISOFIX system . . . . . . . . . . . . . . . . . . . . . . . . 52
on the front passenger seat . . . . . . . . . . . . . 31
Top Tether system . . . . . . . . . . . . . . . . . . . . . 52
Cigarette lighter* . . . . . . . . . . . . . . . . . . . . . . . . 153
Cleaning alloy wheels . . . . . . . . . . . . . . . . . . . . 220
Cleaning chrome . . . . . . . . . . . . . . . . . . . . . . . . 219
Cleaning engine compartment . . . . . . . . . . . . . 221
Cleaning steel wheel rims . . . . . . . . . . . . . . . . 220
Cleaning windows . . . . . . . . . . . . . . . . . . . . . . . 218
Climatic* . . . . . . . . . . . . . . . . . . . . . . . . . . . . . . 162
Climatronic General notes . . . . . . . . . . . . . . . . . . . . . . . 170 Clock . . . . . . . . . . . . . . . . . . . . . . . . . . . . . . . . . . 59
Cloth seat covers cleaning . . . . . . . . . . . . . . . . 222
Clothes hook . . . . . . . . . . . . . . . . . . . . . . . . . . . 148
Cockpit . . . . . . . . . . . . . . . . . . . . . . . . . . . . . . . . . 55
Coming/leaving home function . . . . . . . . . . . . 121
Compartment for on-board documentation . . 144
Control lamps . . . . . . . . . . . . . . . . . . . . . . . . . . . 77
Control lighting . . . . . . . . . . . . . . . . . . . . . . . . . . 55
Controls
Electric windows . . . . . . . . . . . . . . . . . . . . . 113
Exterior mirrors . . . . . . . . . . . . . . . . . . . . . . 135
Sliding/tilting sunroof . . . . . . . . . . . . . . . . 115
Convenience closing Sliding/tilting sunroof . . . . . . . . . . . . . . . . 116
Windows . . . . . . . . . . . . . . . . . . . . . . . . . . . 115
Convenience opening Windows . . . . . . . . . . . . . . . . . . . . . . . . . . . 115
Coolant . . . . . . . . . . . . . . . . . . . . . . . . . . . 240, 241 Warning lamp . . . . . . . . . . . . . . . . . . . . . . . . 66
Coolant level . . . . . . . . . . . . . . . . . . . . . . . . . . . 241 Warning lamp . . . . . . . . . . . . . . . . . . . . . . . . 82
Coolant loss . . . . . . . . . . . . . . . . . . . . . . . . . . . . 241
Coolant temperature Gauge . . . . . . . . . . . . . . . . . . . . . . . . . . . . . . 58
Safety instructions . . . . . . . . . . . . . . . . . . . . 83
Correct adjustment of front seat head restraints . . 13
Correct adjustment of rear seat head restraints In-use and non-use positions . . . . . . . . . . . 14
AlteaXL_EN.book Seite 308 Donnerstag, 9. September 2010 12:13 12
Page 316 of 319
Index
314TTail lights . . . . . . . . . . . . . . . . . . . . . . . . . . . . . . 277
Tailgate . . . . . . . . . . . . . . . . . . . . . . . . . . . . . . . 111
Emergency opening . . . . . . . . . . . . . . . . . . 112
warning lamp . . . . . . . . . . . . . . . . . . . . . . . . . 88
Tank Fuel level . . . . . . . . . . . . . . . . . . . . . . . . . . . . 58
Reserve indicator . . . . . . . . . . . . . . . . . . . . . 58
Tank capacity . . . . . . . . . . . . . . . . . . . . . . . . . 58
TCS . . . . . . . . . . . . . . . . . . . . . . . . . . . . . . . . . . . 198
TCS (Traction control system) Warning lamp . . . . . . . . . . . . . . . . . . . . . . . . 89
Technical modifications . . . . . . . . . . . . . . . . . . 224
The danger of not using the seat belt . . . . . . . . 22
Tilting sunroof . . . . . . . . . . . . . . . . . . . . . . . . . . 115
Tools . . . . . . . . . . . . . . . . . . . . . . . . . . . . . . . . . . 258
Top Tether system . . . . . . . . . . . . . . . . . . . . . . . . 52
Towing . . . . . . . . . . . . . . . . . . . . . . . . . . . . . . . . 285
Towing a trailer . . . . . . . . . . . . . . . . . . . . . . . . . 291
Towing bracket . . . . . . . . . . . . . . . . . . . . . . . . . 212
Towing bracket, fitting . . . . . . . . . . . . . . . . . . . 213
Towing eye . . . . . . . . . . . . . . . . . . . . . . . . . . . . . 285
Tow-starting . . . . . . . . . . . . . . . . . . . . . . . . . . . . 285
Traction control system Warning lamp . . . . . . . . . . . . . . . . . . . . . . . . 89
Trailer Trailer towing . . . . . . . . . . . . . . . . . . . . . . . . 211
Trailer turn signals Warning lamp . . . . . . . . . . . . . . . . . . . . . . . 125 Trailer weights . . . . . . . . . . . . . . . . . . . . . . . . . . 291
Turn signals . . . . . . . . . . . . . . . . . . . . . . . . . . . . 125
Indicator lamp . . . . . . . . . . . . . . . . . . . . . . . . 83
Warning lamp . . . . . . . . . . . . . . . . . . . . . . . 125
Tyre Mobility System (Tyre repair kit) . . . . . . . . 267
Tyre Mobility-System (Tyre repair kit) . . . . . . . 259
Tyre pressure . . . . . . . . . . . . . . . . . . . . . . . . . . . 250 Loss . . . . . . . . . . . . . . . . . . . . . . . . . . . . . . . 252
Tyre pressure monitoring . . . . . . . . . . . . . . . . . 251
Tyre pressure warning lamp . . . . . . . . . . . . . . . . 85
Tyre repair kit . . . . . . . . . . . . . . . . . . . . . . . 259, 267
Tyres and wheels Dimensions . . . . . . . . . . . . . . . . . . . . . . . . . 255
Tyres service life . . . . . . . . . . . . . . . . . . . . . . . . 252
Tyres tread depth . . . . . . . . . . . . . . . . . . . . . . . 253
Tyres with directional tread pattern . . . . . . . . . 250
UUnderbody protection . . . . . . . . . . . . . . . . . . . . 221
Unlocking and locking Personalisation . . . . . . . . . . . . . . . . . . . . . . 103VVehicle battery . . . . . . . . . . . . . . . . . . . . . . . . . 247
Vehicle data . . . . . . . . . . . . . . . . . . . . . . . . . . . . 290
Vehicle identification data . . . . . . . . . . . . . . . . 290
Vehicle identification number . . . . . . . . . . . . . 290
Vehicle MaintenanceExterior . . . . . . . . . . . . . . . . . . . . . . . . . . . . . 216 Vehicle modifications . . . . . . . . . . . . . . . . . . . . 224
Vehicle paintwork
Maintenance . . . . . . . . . . . . . . . . . . . . . . . . 217
Products for vehicle maintenance . . . . . . . 215
Vehicle tools Storage . . . . . . . . . . . . . . . . . . . . . . . . . . . . 258
Vehicle washing . . . . . . . . . . . . . . . . . . . . . . . . 216
Ventilation slits . . . . . . . . . . . . . . . . . . . . . . . . . . 17
Volumetric sensor* Activation . . . . . . . . . . . . . . . . . . . . . . . . . . . 109
Deactivation . . . . . . . . . . . . . . . . . . . . . . . . 109
WWarning lamp . . . . . . . . . . . . . . . . . . . . . . . . . . . 31
Warning lamps . . . . . . . . . . . . . . . . . . . . . . . . . . 77
Warning messages in the display . . . . . . . . . . . 66
Warning reportsRed . . . . . . . . . . . . . . . . . . . . . . . . . . . . . . 66, 80
Yellow . . . . . . . . . . . . . . . . . . . . . . . . . . . 66, 81
Warning symbols . . . . . . . . . . . . . . . . . . . . . . . . 80
Warning triangle and first-aid kit . . . . . . . . . . . 156
Washer fluid . . . . . . . . . . . . . . . . . . . . . . . . . . . 242
Washing by hand . . . . . . . . . . . . . . . . . . . . . . . 216
Washing with high pressure cleaners . . . . . . . 217
Water Warning message . . . . . . . . . . . . . . . . . . . . . 67
Water in the windscreen washer tank . . . . . . . 242
Wear indicators . . . . . . . . . . . . . . . . . . . . . . . . . 253
Wearing suitable shoes . . . . . . . . . . . . . . . . . . . 16
AlteaXL_EN.book Seite 314 Donnerstag, 9. September 2010 12:13 12