Page 124 of 472

1. Press the Voice Command button, say “System
Setup” and once you are in that menu then say “Voice
Training.” This will train your own voice to the system
and will improve recognition.
2. Repeat the words and phrases when prompted by
Uconnect™ Voice. For best results, the “Voice Training”
session should be completed when the vehicle is parked,
engine running, all windows closed, and the blower fan
switched off. This procedure may be repeated with a new
user. The system will adapt to the last trained voice only.
SEATS
Seats are a part of the Occupant Restraint System of the
vehicle. WARNING!• It is extremely dangerous to ride in a cargo area,
inside or outside of a vehicle. In an accident,
people riding in these areas are more likely to be
seriously injured or killed.
• Do not allow people to ride in any area of your
vehicle that is not equipped with seats and seat
belts.
• Be sure everyone in your vehicle is in a seat and
using a seat belt properly.
Manual Seat Adjuster — If Equipped
Both front seats are independently adjustable forward or
rearward and are equipped with a seatback recliner. The
manual forward or rearward seat adjustment handle is
found under the seat cushion at the front edge of each
seat. Pull up on the handle and slide the seat forward or
backward to move the seat into the most comfortable 3 UNDERSTANDING THE FEATURES OF YOUR VEHICLE 123
Page 125 of 472
position, then release the handle to lock the seat into
position. Using body pressure, move forward and rear-
ward on the seat to be sure that the seat adjusters have
latched.
WARNING!Adjusting a seat while the vehicle is moving is
dangerous. The sudden movement of the seat could
cause you to lose control. The seat belt might not be
properly adjusted and you could be injured. Adjust
any seat only while the vehicle is parked.
Manual Reclining Seats — If Equipped
The recliner handle is located on the outside of the seat
cushion and is used to adjust the seatback position. To
adjust the seatback, lift upward on the handle, lean back
on the seatback and release the handle at the desired
position. To return the seatback, lift upward on the
handle, lean forward and release the handle at the
desired position.Manual Seat Adjuster124 UNDERSTANDING THE FEATURES OF YOUR VEHICLE
Page 127 of 472

WARNING! (Continued)• You can be seriously, even fatally, injured riding in
a seat with the seatback reclined. Do not ride with
the seatback reclined so that the shoulder belt is
no longer resting against your chest. If you ride in
this position, the shoulder harness will no longer
be restraining you. In an accident you could slide
under the seat belt and receive serious or fatal
injuries. Recline in a seat only when the vehicle is
parked.
Head Restraints
Head restraints are designed to reduce the risk of injury
by restricting head movement in the event of a rear
impact. Head restraints should be adjusted so that the top
of the head restraint is located above the top of your ear. WARNING!The head restraints for all occupants must be prop-
erly adjusted prior to operating the vehicle or occu-
pying a seat. Head restraints should never be ad-
justed while the vehicle is in motion. Driving a
vehicle with the head restraints improperly adjusted
or removed could cause serious injury or death in the
event of an accident.
Front Head Restraints
To raise the head restraint, pull upward on the head
restraint. To lower the head restraint, press the large
button, located on the base of the head restraint, and
push downward on the head restraint.126 UNDERSTANDING THE FEATURES OF YOUR VEHICLE
Page 130 of 472

Reclining the seatback
The angle of the seatback can be adjusted forward or
rearward. Push the seatback switch forward or rearward,
the seat will move in the direction of the switch. Release
the switch when you have reached the desired position.
WARNING!• Adjusting a seat while driving may be dangerous.
Moving a seat while driving could result in loss of
control which could cause an accident and serious
injury or death.
• Seats should be adjusted before fastening the
seatbelts and while the vehicle is parked. Serious
injury or death could result from a poorly adjusted
seatbelt.
(Continued) WARNING! (Continued)• Do not ride with the seatback reclined so that the
shoulder belt is no longer resting against your
chest. In an accident you could slide under the seat
belt, which could result in serious injury or death.
CAUTION!Do not place any article under a power seat or
impede its ability to move as it may cause damage to
the seat controls. Seat travel may become limited if
movement is stopped by an obstruction in the seat’s
path.
3 UNDERSTANDING THE FEATURES OF YOUR VEHICLE 129
Page 151 of 472

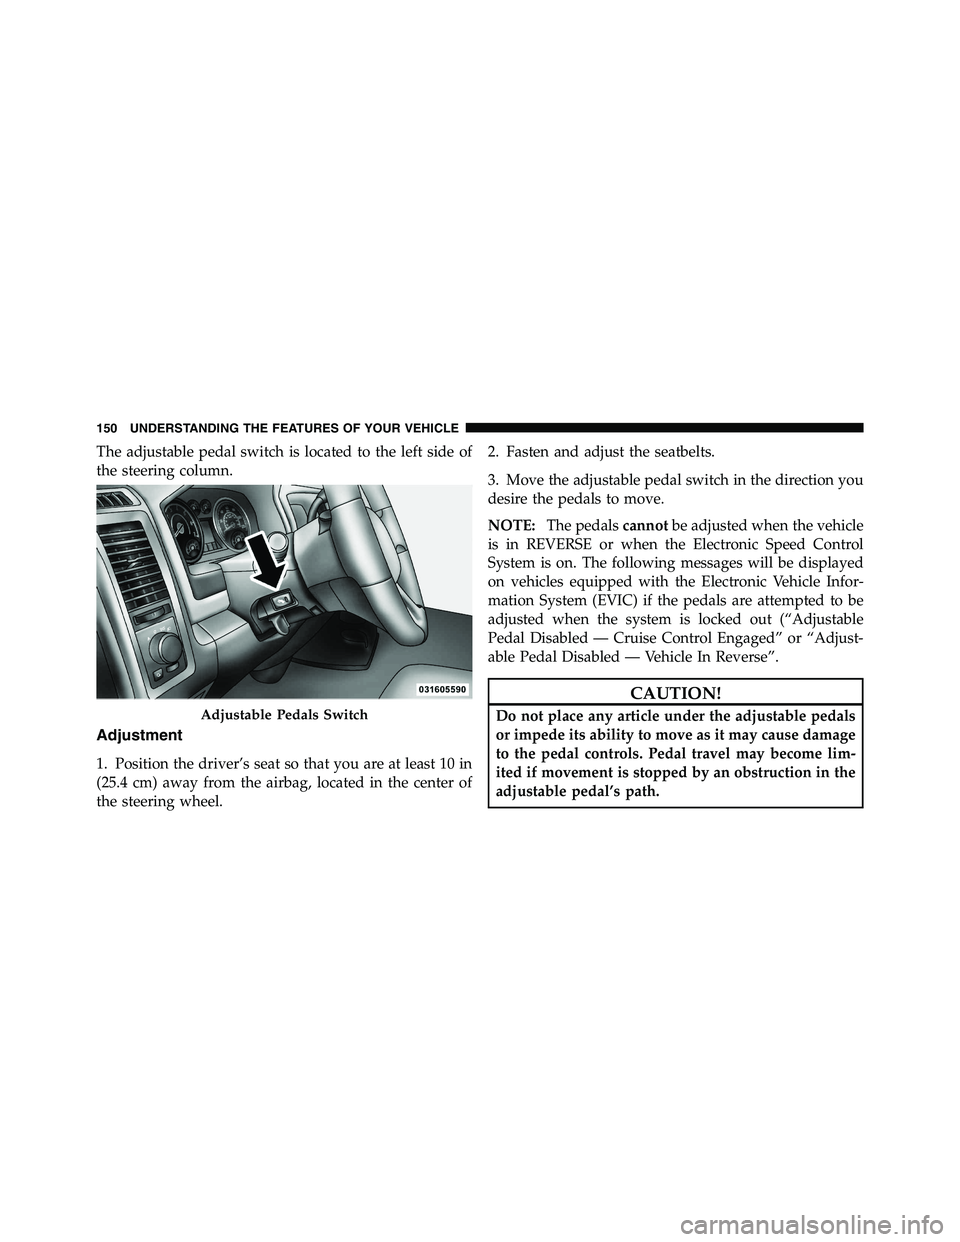
The adjustable pedal switch is located to the left side of
the steering column.
Adjustment
1. Position the driver’s seat so that you are at least 10 in
(25.4 cm) away from the airbag, located in the center of
the steering wheel. 2. Fasten and adjust the seatbelts.
3. Move the adjustable pedal switch in the direction you
desire the pedals to move.
NOTE: The pedals cannot be adjusted when the vehicle
is in REVERSE or when the Electronic Speed Control
System is on. The following messages will be displayed
on vehicles equipped with the Electronic Vehicle Infor-
mation System (EVIC) if the pedals are attempted to be
adjusted when the system is locked out (“Adjustable
Pedal Disabled — Cruise Control Engaged” or “Adjust-
able Pedal Disabled — Vehicle In Reverse”.
CAUTION!Do not place any article under the adjustable pedals
or impede its ability to move as it may cause damage
to the pedal controls. Pedal travel may become lim-
ited if movement is stopped by an obstruction in the
adjustable pedal’s path.Adjustable Pedals Switch150 UNDERSTANDING THE FEATURES OF YOUR VEHICLE
Page 192 of 472

27. Transmission Temperature Warning Light
This light indicates that there is excessive trans-
mission fluid temperature that might occur
with severe usage such as trailer towing. It may
also occur when operating the vehicle in a high
torque converter slip condition, such as 4-wheel-drive
operation (e.g., snow plowing, off- road operation). If this
light comes on, stop the vehicle and run the engine at idle
or faster, with the transmission in NEUTRAL until the
light goes off.
CAUTION!Continuous driving with the Transmission Tempera-
ture Warning Light illuminated will eventually cause
severe transmission damage or transmission failure. WARNING!Continued operation with the Transmission Tem-
perature Warning Light illuminated could cause the
fluid to boil over, come in contact with hot engine or
exhaust components causing a fire that may result in
personal injury.
For vehicles equipped with a premium cluster this warn-
ing light will display in the Electronic Vehicle Informa-
tion Center (EVIC). Refer to ”Electronic Vehicle Informa-
tion Center (EVIC) — If Equipped” for further
information.
28. Seat Belt Reminder Light
When the ignition switch is first turned to ON/
RUN, this light will turn on for five to eight
seconds as a bulb check. During the bulb check, if
the driver’s seat belt is unbuckled, a chime will sound.
After the bulb check or when driving, if the driver’s seat 4 UNDERSTANDING YOUR INSTRUMENT PANEL 191
Page 193 of 472

belt remains unbuckled, the seat belt reminder light will
flash or remain on continuously. Refer to “Occupant
Restraints” in “Things To Know Before Starting Your
Vehicle” for further information.
29. Charging System Light
This light shows the status of the electrical charg-
ing system. The light should come on when the
ignition switch is first turned to ON/RUN and remain on
briefly as a bulb check. If the light stays on or comes on
while driving, turn off some of the vehicle’s non-essential
electrical devices or increase engine speed (if at idle). If
the charging system light remains on, it means that the
vehicle is experiencing a problem with the charging
system. Obtain SERVICE IMMEDIATELY. See an autho-
rized dealer. If jump starting is required, refer to “Jump Starting
Procedures” in “What To Do In Emergencies”.
For vehicles equipped with a premium cluster this indi-
cator will display in the Electronic Vehicle Information
Center (EVIC). Refer to ”Electronic Vehicle Information
Center (EVIC) — If Equipped” for further information.
ELECTRONIC VEHICLE INFORMATION CENTER
(EVIC) — IF EQUIPPED
The Electronic Vehicle Information Center (EVIC) fea-
tures a driver-interactive display that is located in the
instrument cluster.192 UNDERSTANDING YOUR INSTRUMENT PANEL
Page 198 of 472

• Memory System Unavailable — Seatbelt Buckled
• Memory 1 Profile Recall
• Memory 2 Profile Recall
• Adjustable Pedals Unavailable — Vehicle in Reverse
• Adjustable Pedals Unavailable — Cruise Engaged
• To Tow Vehicle Safely, Read Neutral Shift Procedure in
Owners Manual
EVIC Warning Lights
• Door Ajar
This light will turn on to indicate that one or
more door may be ajar.
• Oil Pressure Warning Light
This light indicates low engine oil pressure. The
light should turn on momentarily when the engine is started. If the light turns on while driving, stop the
vehicle and shut off the engine as soon as possible. A
chime will sound for four minutes when this light turns
on.
Do not operate the vehicle until the cause is corrected.
This light does not show how much oil is in the engine.
The engine oil level must be checked under the hood.
• Charging System Light
This light shows the status of the electrical charg-
ing system. The light should come on when the
ignition switch is first turned ON and remain on briefly
as a bulb check. If the light stays on or comes on while
driving, turn off some of the vehicle’s non-essential
electrical devices or increase engine speed (if at idle). If
the charging system light remains on, it means that the
vehicle is experiencing a problem with the charging
system. Obtain SERVICE IMMEDIATELY. See an autho-
rized dealer. 4 UNDERSTANDING YOUR INSTRUMENT PANEL 197