Page 143 of 232

141
Battery
QUICK HEL
P
7
BATTERY
Before disconnecting the battery, you
must wait for 2 minutes after switching
off the ignition.
Never disconnect a terminal when the
engine is running.
Never charge a battery without fi rst
disconnecting the terminals.
After every reconnection of the battery,
switch on the ignition and wait 1 minute
before starting to allow the electronic
systems to be initialised. If slight
diffi culties are experienced after this,
please contact a PEUGEOT dealer.
After changing bulbs, wait
approximately 3 minutes before
reconnecting the battery. It is advisable to disconnect the
battery if the vehicle is not to be used
for a period of more than one month.
To charge the battery using a
battery charger
- Disconnect the battery,
- Follow the instructions for use
given by the battery charger
manufacturer,
- Reconnect starting with the
negative (-) terminal,
- Check that the terminals and
connectors are clean. If they are
covered with sulphate (white or
greenish deposit), disconnect them
and clean them.
To start the vehicle from
another battery
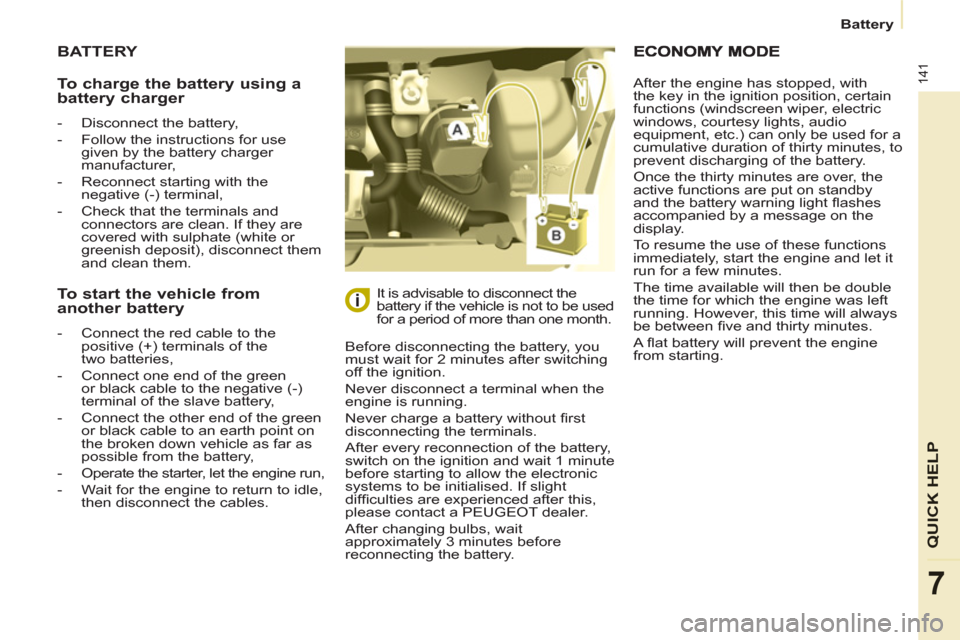
- Connect the red cable to the
positive (+) terminals of the
two batteries,
- Connect one end of the green
or black cable to the negative (-)
terminal of the slave battery,
- Connect the other end of the green
or black cable to an earth point on
the broken down vehicle as far as
possible from the battery,
- Operate the starter, let the engine run,
- Wait for the engine to return to idle,
then disconnect the cables. After the engine has stopped, with
the key in the ignition position, certain
functions (windscreen wiper, electric
windows, courtesy lights, audio
equipment, etc.) can only be used for a
cumulative duration of thirty minutes, to
prevent discharging of the battery.
Once the thirty minutes are over, the
active functions are put on standby
and the battery warning light fl ashes
accompanied by a message on the
display.
To resume the use of these functions
immediately, start the engine and let it
run for a few minutes.
The time available will then be double
the time for which the engine was left
running. However, this time will always
be between fi ve and thirty minutes.
A fl at battery will prevent the engine
from starting.
Page 172 of 232

01
11
55
101
22
334466
131
111
99
144155
77881212161
9.4
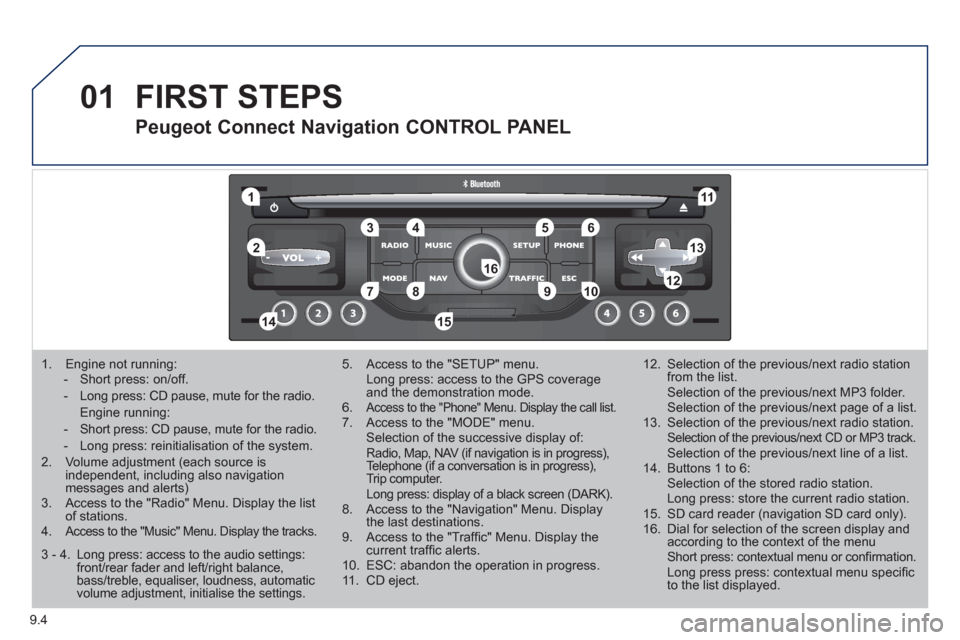
1. Engine not running: - Short press: on/off.
- Long press: CD pause, mute for the radio.
Engine running:
- Short press: CD pause, mute for the radio.
- Long press: reinitialisation of the system.
2. Volume adjustment (each source is independent, including also navigation messages and alerts)3. Access to the "Radio" Menu. Display the list of stations. 4.Access to the "Music" Menu. Display the tracks.
5. Access to the "SETUP" menu. Long press: access to the GPS coverage and the demonstration mode.6.Access to the "Phone" Menu. Display the call list.7. Access to the "MODE" menu. Selection of the successive display of:Radio, Map, NAV (if navigation is in progress), Telephone (if a conversation is in progress),Trip computer. Long press: display of a black screen (DARK).8. Access to the "Navigation" Menu. Display the last destinations.9. Access to the "Traffi c" Menu. Display thecurrent traffi c alerts. 10. ESC: abandon the operation in progress. 11. CD eject.
12. Selection of the previous/next radio station from the list. Selection of the previous/next MP3 folder. Selection of the previous/next page of a list.
13. Selection of the previous/next radio station. Selection of the previous/next CD or MP3 track. Selection of the previous/next line of a list.
14. Buttons 1 to 6: Selection of the stored radio station. Long press: store the current radio station.
15. SD card reader (navigation SD card only).
16. Dial for selection of the screen display andaccording to the context of the menu Short press: contextual menu or confi rmation. Long press press: contextual menu specifi c to the list displayed.
FIRST STEPS
Peugeot Connect Navigation CONTROL PANEL
3 - 4. Long press: access to the audio settings: front/rear fader and left/right balance,bass/treble, equaliser, loudness, automatic volume adjustment, initialise the settings.
Page 174 of 232
03
9.6
GENERAL OPERATION
For a detailed global view of the menus available, refer to the"Screen menu map" section.
Press the M
ODE button several times in succession for access to the following menus:
For cleaning the screen, the use of a soft, non-abrasive cloth (spectacles cloth) is recommended, with no additional product.
RADIO/MUSIC MEDIA PLAYERS
TELEPHONE
(If a conversation is in progress)
FULL SCREEN MA
P
NAVIGATION
(If guidance is in progress)
SETUP:
system language * , date and time * , display, vehiclesettings * , unit and system settings, "Demo mode". TRAFFIC:
TMC information and messages.
*
Available accordin
g to model. TRIP COMPUTE
R
Page 175 of 232
03
9.7
GENERAL OPERATION
A press on the OK dial gives access to short-cut menus according to the displayon the screen.
DISPLAY ACCORDING TO THE CONTEXT
NAVIGATION (IF GUIDANCE IS IN PROGRESS):
TRIP COMPUTER:
Abort guidance
Repeat advice
Block road
Route info
Show destination
Trip info
Route t
ype
Avoid
SatellitesZ
oom/Scroll
Voice advice
Route options
Alert log
Status of functions
1
2
3
3
2
1
1
1
3
1
1
1
1
2
TELEPHONE:
End call
Hold call
Dial
DTMF-Tones
Private mod
e
Micro off
1
1
1
1
1
1
Page 176 of 232
03
9.8
GENERAL OPERATION
DISPLAY ACCORDING TO THE CONTEXT
FULL SCREEN MAP:
Abort guidance/Resume guidance
Set destination
POIs nearb
y
Position info
Map settings
Zoom/Scroll
1
1
1
1
1
1
RADIO:
In FM mode
Traffi c info (TA)
RD
S
R
adiotext
Regional prog.
In AM mode
AM
TA
R
efresh AM list
FM
1
2
1
2
2
2
2
2
2
2
MUSIC MEDIA PLAYERS:
Traffi c info (TA)
Play options
Normal order
R
andom track
Re
peat folder
Select musi
c
Scan
1
1
2
2
2
2
1
Page 178 of 232

04
7
8
9
9.10
To clear a destination; from steps 1 to 3, select "Choose from last destinations".
A long press on one of the destinations displays a list of actions from which you can select:
Delete entr
y
D
elete listRepeat steps 5 to 7
for the "Street" and "House number" functions. Turn the dial and select
OK.
Pr
ess the dial to confi rm.
Select the "Save to address book" function to record the address
entered in a directory fi le. Press the dial to confi rm the selection.
Peu
geot Connect Navigation allows up to 500 contact fi les to be
recorded.
To speed up the process, the post code can be entered directl
y
after selecting the "Postal code" function.
Use the virtual ke
ypad to enter the letters and digits.
Then select "
Start route guidance"
and the press the dial to confi rm.
During guidance, pressing the endof the lighting stalk repeats the last guidance instruction.
Map settin
gs
You can zoom in/zoom out on the map usin
g the dial.
It is possible to move the map or select its orientation via theshort-cut menu of the FULL SCREEN MAP.
Press M
ODE until the map is displayed full screen. Press the dial
then select "Map settings". Select "2.5D Map" or "2D Map" and in
the latter case, select "North Up" or "Heading Up".
Select the route type:
"Fast route", "
Short route" or "Optimized route" and press the dial
to confi rm.
It is also
possible to select a destination via "Choose from address
book" or "Choose from last destinations".
Choose from last destinations Choose from address bookStart route
guidance
NAVIGATION - GUIDANCE
Page 179 of 232
04
1
2
3
5
4
9.11
NAVIGATION - GUIDANCE
SETTING AND NAVIGATING TO MY
"HOME ADDRESS"
Press the NAV button twice to display
the Navigation Menu.
To be set as the "Home address"
, an address must fi rst be entered in the address book, for example from "Destination
input"/"Address input" then "Save to address book".
Select "Address book" and confi rm.
Then select "Search entry (complete address book)" and confi rm. Select "Destination in
put" and confi rm.
Then select "Choose from addressbook" and confi rm.
Select "Set as home address" andconfi rm to save.
Select
your home address and confi rm.
Then select "Edit entry" and confi rm.
To start navi
gation towards "Home address", press NAV twice
to display the Navigation Menu, select "Destination input" and confi rm.
Then select "Navi
gate HOME" and confi rm to start guidance.
Navigation Menu
Destination input
Address book
Edit entry
Set as "Home address"
Page 184 of 232

04
5
6
3 2 1
4
NAVIGATION SETTINGS
Select "Set parameters for risk
areas" for access to the "Display
on map", "Visual alert" and "Soundalert" functions.
Select the "POI categories on Map"function to select the POIs to be
displayed on the map by default. Pr
ess the NAV button.
Press the NAV button a
gain or select
the Navigation Menu function and
press the dial to confi rm.
Select the "Settings" function andpress the dial to confi rm.
POI categories on Map
Settin
gsSet parameters for risk area
s
Navigation Menu
NAVIGATION - GUIDANCE
Select the "Navi volume" function and turn the dial to set the volume
of each voice synthesiser (traffi c
information, alert messagesÖ).
Navi volum
e
The adjustment of the volume for the Risk Areas POIs is used only
during the transmission of an alert.
UPDATING THE RISK AREAS POIs
(Speed camera information)
This requires an SDHC (High Capacity) compatible reader.
Download the update fi le from the Internet
(www.peugeot.fr or
www.peugeot.co.uk).
Open this fi le and copy the extracted documents to the
DATABASE folder on the SD card, replacing the existing fi les.
To activate or deactivate vocal
guidance, with guidance active and
the map displayed on the screen, press the dial and then select or deselect "Voice advice".
Voice advice