Page 128 of 232

126
Child safety
126
ADVICE ON CHILD SEATS
The incorrect installation of a child seat
in a vehicle compromises the child's
protection in the event of an accident.
Remember to fasten the seat belts or
the child seat harnesses keeping the
slack
in relation to the child's body to a
minimum
, even for short journeys.
For optimum installation of the "forward
facing" child seat, ensure that the back
of the child seat is in contact with the
back of the vehicle's seat and that the
head restraint does not cause any
discomfort.
If the head restraint has to be removed,
ensure that it is stored or attached
securely to prevent it from being
thrown around the vehicle in the event
of sharp braking.
Children under the age of 10 must not
travel in the "forward facing" position
on the front passenger seat, unless
the rear seats are already occupied by
other children, cannot be used or are
absent.
Deactivate the passenger airbag when
a "rear facing" child seat is installed on
the front seat.
Otherwise, the child would risk being
seriously injured or killed if the airbag
were to infl ate.
As a safety precaution, do not leave:
- one or more children alone and
unsupervised in a vehicle,
- a child or an animal in a vehicle
which is exposed to the sun, with
the windows closed,
- the keys within reach of children
inside the vehicle.
Installing a booster seat
The chest part of the seat belt must
be positioned on the child's shoulder
without touching the neck.
Ensure that the lap part of the seat belt
passes correctly over the child's thighs.
PEUGEOT recommends the use of a
booster seat which has a back, fi tted
with a seat belt guide at shoulder level.
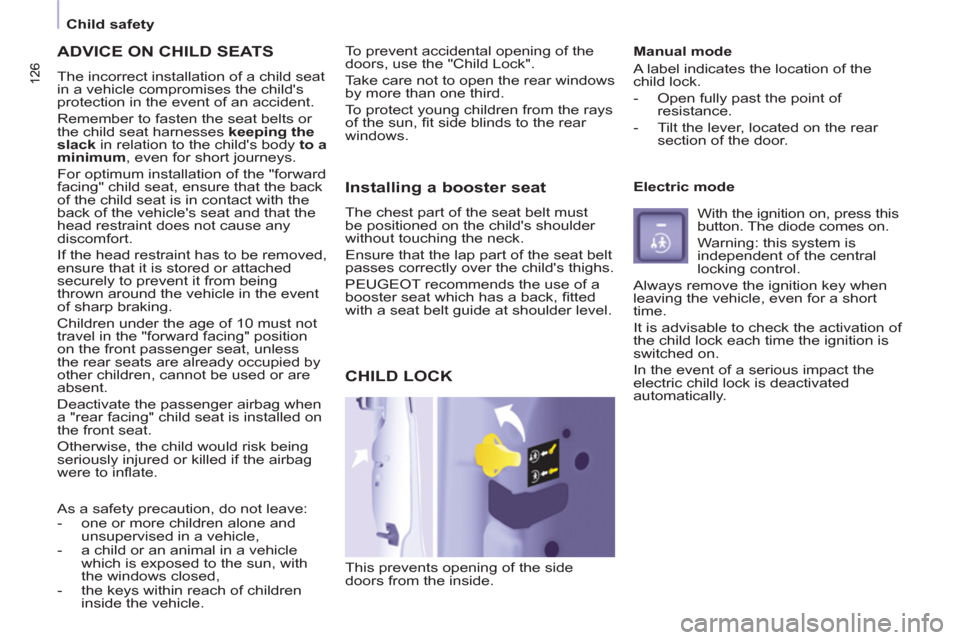
CHILD LOCK
This prevents opening of the side
doors from the inside.
Manual mode
A label indicates the location of the
child lock.
- Open fully past the point of
resistance.
- Tilt the lever, located on the rear
section of the door.
Electric mode
With the ignition on, press this
button. The diode comes on.
Warning: this system is
independent of the central
locking control.
Always remove the ignition key when
leaving the vehicle, even for a short
time.
It is advisable to check the activation of
the child lock each time the ignition is
switched on.
In the event of a serious impact the
electric child lock is deactivated
automatically.
To prevent accidental opening of the
doors, use the "Child Lock".
Take care not to open the rear windows
by more than one third.
To protect young children from the rays
of the sun, fi t side blinds to the rear
windows.
Page 141 of 232

139
6
Fuel
FILLING WITH FUEL
Low fuel level
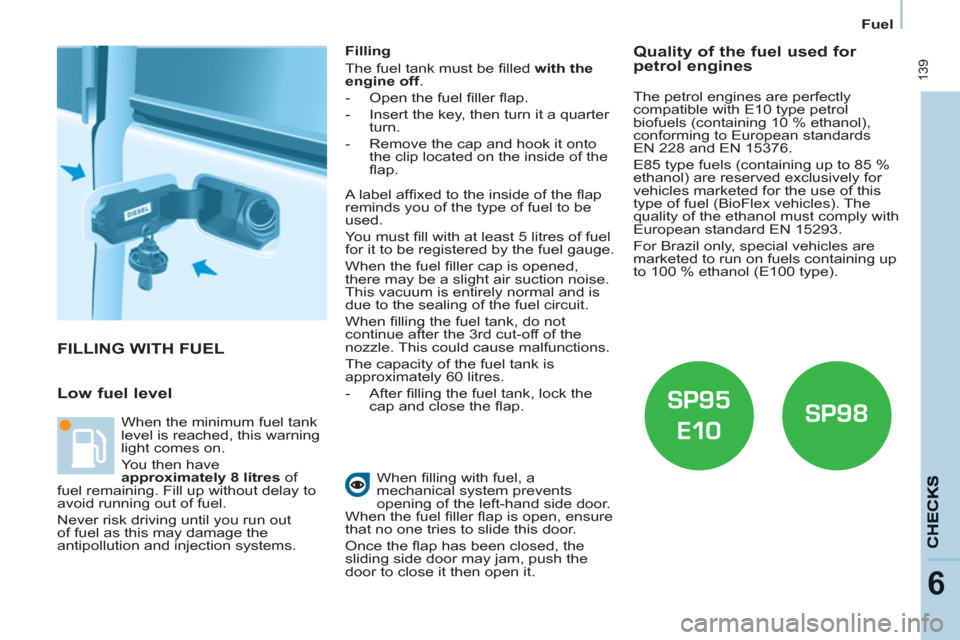
Filling
The fuel tank must be fi lled with the
engine off
.
- Open the fuel fi ller fl ap.
- Insert the key, then turn it a quarter
turn.
- Remove the cap and hook it onto
the clip located on the inside of the
fl ap.
When fi lling with fuel, a
mechanical system prevents
opening of the left-hand side door.
When the fuel fi ller fl ap is open, ensure
that no one tries to slide this door.
Once the fl ap has been closed, the
sliding side door may jam, push the
door to close it then open it. When the minimum fuel tank
level is reached, this warning
light comes on.
You then have
approximately 8 litres
of
fuel remaining. Fill up without delay to
avoid running out of fuel.
Never risk driving until you run out
of fuel as this may damage the
antipollution and injection systems. A label affi xed to the inside of the fl ap
reminds you of the type of fuel to be
used.
You must fi ll with at least 5 litres of fuel
for it to be registered by the fuel gauge.
When the fuel fi ller cap is opened,
there may be a slight air suction noise.
This vacuum is entirely normal and is
due to the sealing of the fuel circuit.
When fi lling the fuel tank, do not
continue after the 3 rd cut-off of the
nozzle. This could cause malfunctions.
The capacity of the fuel tank is
approximately 60 litres.
- After fi lling the fuel tank, lock the
cap and close the fl ap.
Quality of the fuel used for
petrol engines
The petrol engines are perfectly
compatible with E10 type petrol
biofuels (containing 10 % ethanol),
conforming to European standards
EN 228 and EN 15376.
E85 type fuels (containing up to 85 %
ethanol) are reserved exclusively for
vehicles marketed for the use of this
type of fuel (BioFlex vehicles). The
quality of the ethanol must comply with
European standard EN 15293.
For Brazil only, special vehicles are
marketed to run on fuels containing up
to 100 % ethanol (E100 type).
Page 153 of 232

151
QUICK HELP
7
Changing a bulb
REAR LAMPS
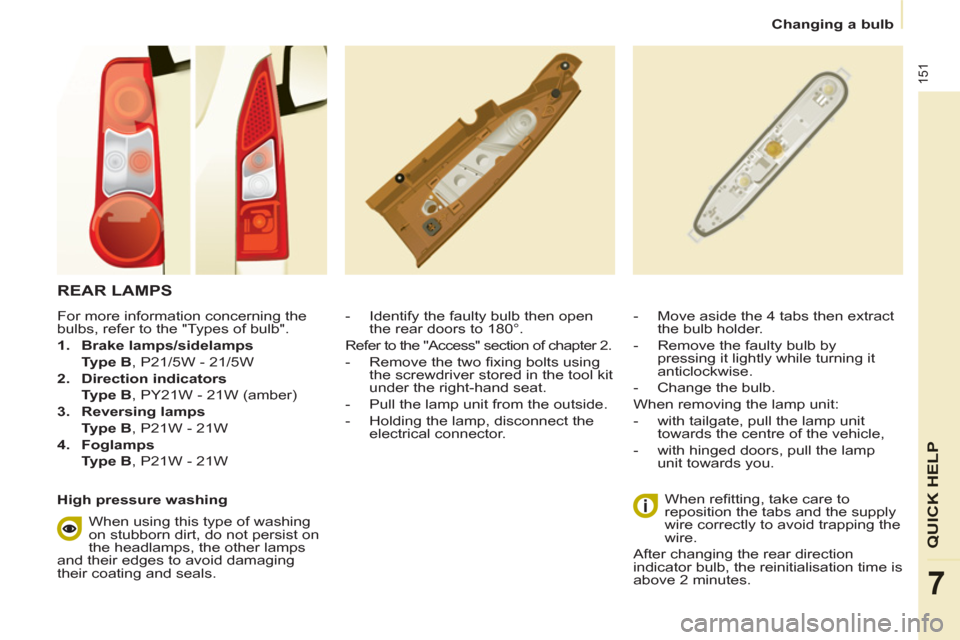
- Identify the faulty bulb then open
the rear doors to 180°.
Refer to the "Access" section of chapter 2.
- Remove the two fi xing bolts using
the screwdriver stored in the tool kit
under the right-hand seat.
- Pull the lamp unit from the outside.
- Holding the lamp, disconnect the
electrical connector.
When refi tting, take care to
reposition the tabs and the supply
wire correctly to avoid trapping the
wire.
After changing the rear direction
indicator bulb, the reinitialisation time is
above 2 minutes.
- Move aside the 4 tabs then extract
the bulb holder.
- Remove the faulty bulb by
pressing it lightly while turning it
anticlockwise.
- Change the bulb.
When removing the lamp unit:
- with tailgate, pull the lamp unit
towards the centre of the vehicle,
- with hinged doors, pull the lamp
unit towards you.
For more information concerning the
bulbs, refer to the "Types of bulb".
1.
Brake lamps/sidelamps
Type B
, P21/5W - 21/5W
2.
Direction indicators
Type B
, PY21W - 21W (amber)
3.
Reversing lamps
Type B
, P21W - 21W
4.
Foglamps
Type B
, P21W - 21W
High pressure washing
When using this type of washing
on stubborn dirt, do not persist on
the headlamps, the other lamps
and their edges to avoid damaging
their coating and seals.
Page 154 of 232
152
Changing a bulb
NUMBER PLATE LAMPS
- Unscrew the two nuts.
- Push the pins.
- If necessary, disconnect the
connector to remove the light.
- Change the bulb.
With tailgate
- Move aside the plastic lens using a
screwdriver.
- Change the bulb.
- Replace the plastic lens and press
on it.
THIRD BRAKE LIGHT
Type A, W16W - 16W
With hinged doors
- Unclip the interior trim.
- Disconnect the connector by
moving aside its tab.
- Turn the bulb holder a quarter turn
anticlockwise.
- Change the bulb.
- Put the bulb holder back in place
and reconnect the connector.
- Put the trim back in place.
Type A
, W5W - 5W
Page 225 of 232

167
Exterior
VISUAL SEARCH
10
EXTERIOR
Remote control 17-18
Changing the battery,
reinitialisation 18
Key 17
Starting 46
Hill start assist 47
Central locking/unlocking 17, 26
Filler cap, fuel tank 139
Fuel cut-off, Diesel priming 140
Wiper blade 157
Door mirrors 102
Side repeaters 150
Front lamps, foglamps, direction
indicators 48-49, 149-150
Headlamp beam height
adjustment 50
Changing front bulbs 148, 149-150
Headlamp wash 52, 136
Snow cover 147
Front doors 20
Sliding side doors 20-21
Key 17
Opening the bonnet 132
Child lock 126
Towing, lifting 127-128, 158
Towbar 127-128
Parking sesnsors 106-107
Rear roof fl ap 25
Emergency control 22
Spare wheel, jack,
changing a wheel, tools 143-147
Temporary puncture repair kit 142
Infl ation, pressures 165
Zenith roof 86
Roof bars 90, 91
Rear lamps,
direction indicators 48-49, 151
3rd brake lamp 152
Changing rear bulbs 148, 151
Doors, tailgate 22-24
Accessories 129
Number plate lamp 152
Dimensions 160-163
Brakes, pads 105, 137
Emergency braking 108
ABS, EBFD 108
ASR, ESP 109
"Grip control" 110
Tyres, pressures 165
Tyre under-infl ation detection 36
Page:
< prev 1-8 9-16 17-24