2011 Peugeot Expert VU key
[x] Cancel search: keyPage 112 of 260
11 0
Fuel
FILLING WITH FUEL
Filling with fuel
The fuel tank must be filled with the engine
off
.
Low fuel level
When this warning light fi rst comes
on and when the needle is at the
start of the red zone, the minimum
fuel tank level has been reached.
At this moment, you have approximately
8 litres
of fuel remaining.
Fill up without delay to avoid running out of fuel. When filling with fuel, do not open the
left-hand side door, if fitted on your
vehicle, as there is a risk of damage to the
fuel filler flap.
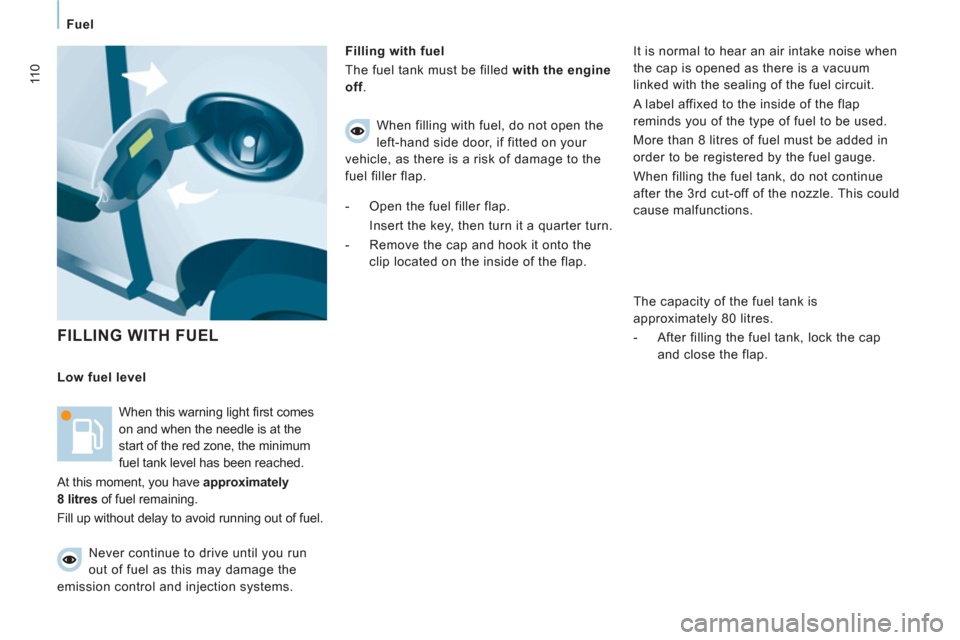
- Open the fuel filler flap.
Insert the key, then turn it a quarter turn.
- Remove the cap and hook it onto the
clip located on the inside of the flap.
It is normal to hear an air intake noise when
the cap is opened as there is a vacuum
linked with the sealing of the fuel circuit.
A label affixed to the inside of the flap
reminds you of the type of fuel to be used.
More than 8 litres of fuel must be added in
order to be registered by the fuel gauge.
When filling the fuel tank, do not continue
after the 3 rd cut-off of the nozzle. This could
cause malfunctions.
The capacity of the fuel tank is
approximately 80 litres.
- After filling the fuel tank, lock the cap
and close the flap.
Never continue to drive until you run
out of fuel as this may damage the
emission control and injection systems.
Page 113 of 260

DIESEL
111
Fuel
CHECK
S
6
FUEL CIRCUIT DISARMED
DIESEL REPRIMING
PUMP
If you should run out of fuel, it is necessary
to re-prime the circuit:
- fill the fuel tank with at least five litres of
diesel,
- squeeze and release the manual
re-priming pump, under the bonnet
under the protective cover, until fuel
appears in the transparent pipe,
- operate the starter until the engine
starts. In a serious collision, a mechanism
automatically prevents fuel from reaching
the engine.
The flashing of this warning light
is accompanied by a message on
the display.
Check that there is no odour or leakage of
fuel outside the vehicle and re-establish the
fuel supply:
- switch off the ignition (STOP position),
- remove the key,
- put the key back in the ignition,
- switch on the ignition and start.
Quality of the fuel used for petrol
engines
Quality of the fuel used for Diesel
engines
The petrol engines are perfectly compatible
with E10 or E24 type petrol biofuels
(containing 10 % or 24 % ethanol),
conforming to European standards EN 228
and EN 15376.
E85 type fuels (containing up to 85 %
ethanol) are reserved exclusively for
vehicles marketed for the use of this type
of fuel (BioFlex vehicles). The quality of
the ethanol must comply with European
standard EN 15293.
For Brazil only, special vehicles are
marketed to run on fuels containing up to
100 % ethanol (E100 type).
The Diesel engines are perfectly compatible
with biofuels which conform to current
and future European standards (Diesel
fuel which complies with standard EN 590
mixed with a biofuel which complies with
standard EN 14214) available at the pumps
(containing up to 7 % Fatty Acid Methyl
Ester).
The B30 biofuel can be used in certain
Diesel engines; however, this use is subject
to strict application of the special servicing
conditions. Contact a PEUGEOT dealer or a
qualified workshop.
The use of any other type of (bio)fuel
(vegetable or animal oils, pure or diluted,
domestic fuel...) is strictly prohibited (risk of
damage to the engine and fuel system).
Page 115 of 260

11
3
Battery
QUICK HELP
7
BATTERY
This is housed in a compartment located
underneath the floor, in front of the front
right seat.
Before disconnecting the battery, you must
wait for 2 minutes after switching off the
ignition.
Never disconnect a terminal when the
engine is running.
Never charge a battery without first
disconnecting the terminals.
After every reconnection of the battery,
switch on the ignition and wait 1 minute
before starting to allow the electronic
systems to be initialised. If some problems
persist after this operation, please contact a
PEUGEOT dealer or a qualified workshop. It is advisable to disconnect the battery
if the vehicle is not to be used for a
period of more than one month. After the engine has stopped, with the key
in the ignition position, certain functions
(windscreen wiper, electric windows,
courtesy lights, audio equipment, etc.)
can only be used for a cumulative duration
of thirty minutes, to prevent discharging of
the battery.
To charge the battery using a battery
charger
- Disconnect the battery,
- Follow the instructions for use given by
the battery charger manufacturer,
- Reconnect starting with the negative (-)
terminal,
- Check that the terminals and connectors
are clean. If they are covered with
sulphate (white or greenish deposit),
disconnect them and clean them.
To start the vehicle from another
battery
- Connect the red cable to the positive (+)
terminals of the two batteries,
- Connect one end of the green or black
cable to the negative (-) terminal of the
slave battery,
- Connect the other end of the green or
black cable to an earth point on the
broken down vehicle as far as possible
from the battery,
- Operate the starter, let the engine run,
- Wait for the engine to return to idle, then
disconnect the cables. Once the thirty minutes are over, the active
functions are put on standby and the battery
warning light flashes accompanied by a
message on the display.
To resume the use of these functions
immediately, start the engine and let it run
for a few minutes.
The time available will then be double the
time for which the engine was left running.
However, this time will always be between
five and thirty minutes.
A flat battery will prevent the engine from
starting.
Page 148 of 260
9.4
01
2
8
16
18 17
71114 3
59
4 1512 13
61
10
FIRST STEPS
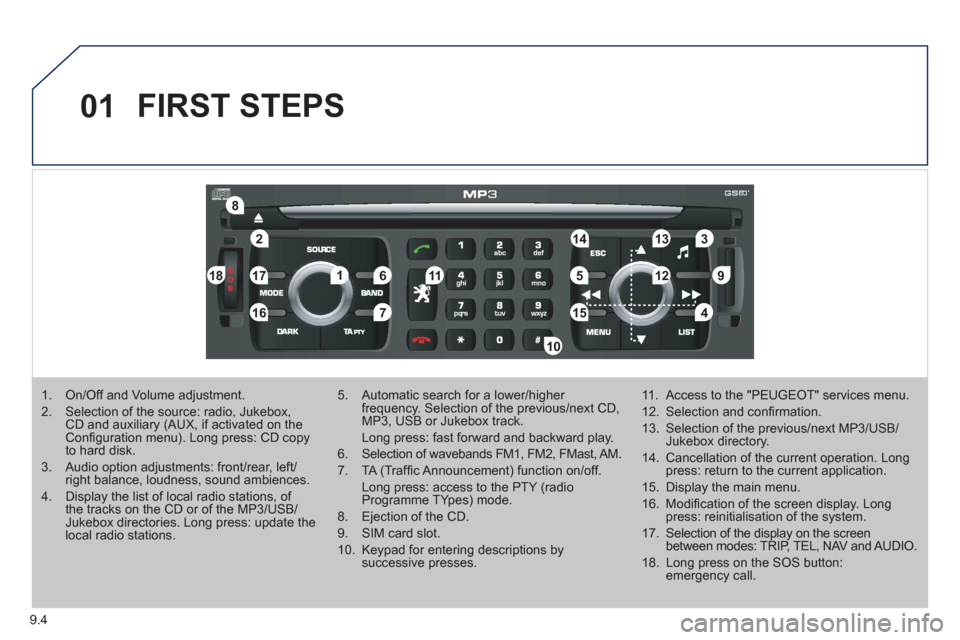
1. On/Off and Volume adjustment.
2. Selection of the source: radio, Jukebox, CD and auxiliary (AUX, if activated on the Confi guration menu). Long press: CD copyto hard disk.
3. Audio option adjustments: front/rear, left/right balance, loudness, sound ambiences.
4. Display the list of local radio stations, of the tracks on the CD or of the MP3/USB/Jukebox directories. Long press: update the local radio stations.
5. Automatic search for a lower/higher frequency. Selection of the previous/next CD, MP3, USB or Jukebox track.
Long press: fast forward and backward play.
6. Selection of wavebands FM1, FM2, FMast, AM.
7. TA (Traffi c Announcement) function on/off.
Long press: access to the PTY (radioProgramme TYpes) mode.
8. Ejection of the CD.
9. SIM card slot.
10. Keypad for entering descriptions by successive presses.
11. Access to the "PEUGEOT" services menu.
12. Selection and confi rmation.
13. Selection of the previous/next MP3/USB/Jukebox directory.
14. Cancellation of the current operation. Longpress: return to the current application.
15. Display the main menu.
16. Modifi cation of the screen display. Longpress: reinitialisation of the system.
17. Selection of the display on the screenbetween modes: TRIP, TEL, NAV and AUDIO.
18. Long press on the SOS button:emergency call.
Page 173 of 260
9.29
06
5
6
7
8
AUDIO/VIDEO
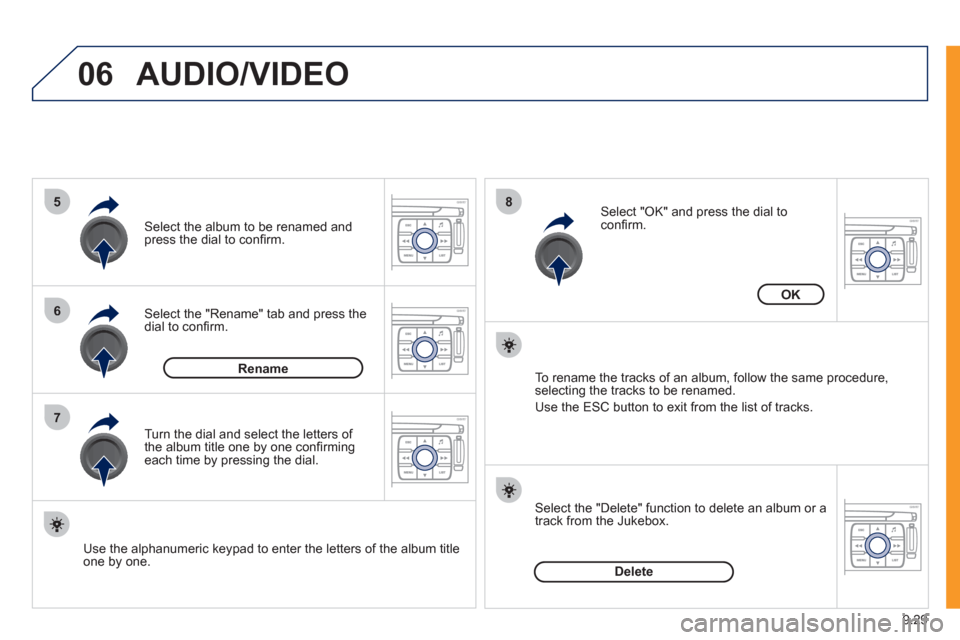
Select the "Rename" tab and press the dial to confi rm.
Select the album to be renamed andpress the dial to confi rm.
Use the alphanumeric keypad to enter the letters o
f the album title one by one.T
urn the dial and select the letters of
the album title one by one confi rming each time by pressing the dial.
Rename
To rename the tracks of an album, follow the same procedure,selecting the tracks to be renamed.
Use the ESC button to exit from the list of tracks.
Select "OK" and press the dial toconfi rm.
OK
Select the "Delete" function to delete an album or a
track from the Jukebox.
Delete
Page 179 of 260

9.35
07
1
2
4
3
6
5
CALLING A CONTACT
Select "Call list" or "Phone book" and press "OK". Select thenumber required and confi rm to make the call. Press the PICK UP button to displa
ythe telephone short-cut menu.
Dial the telephone number of
your contact using the alphanumeric keypad. Pr
ess the dial to confi rm the selection.
Press the HANG UP button to end the call.
Press the PICK UP button to call thenumber dialled.
Press the HANG UP button to re
ject a call.
Press the PI
CK UP button to accept a call.
ACCEPTING OR REJECTING A CALL Turn the dial and select the "Dial" function.
Dial
To select the telephone used, press MENU, then select "Telematics", then
"Bluetooth functions", then "Bluetooth activation mode". Then select:
-
"Deactivated": to use the internal telephone,
- "Activated and visible": to use the Bluetooth telephone, visible to all
telephones,
- "Activated and not visible": to use the Bluetooth tele
phone, not visible
to other telephones, it is not possible to match a new telephone.
Press the end of the steerin
g wheel stalk for more
than 2 seconds to access the telephone menu: calls
log, directory, voice mailbox.
Page 199 of 260
9.55
04
1
2
3
5
6
4
NAVIGATION - GUIDANCE
SELECTING A DESTINATION
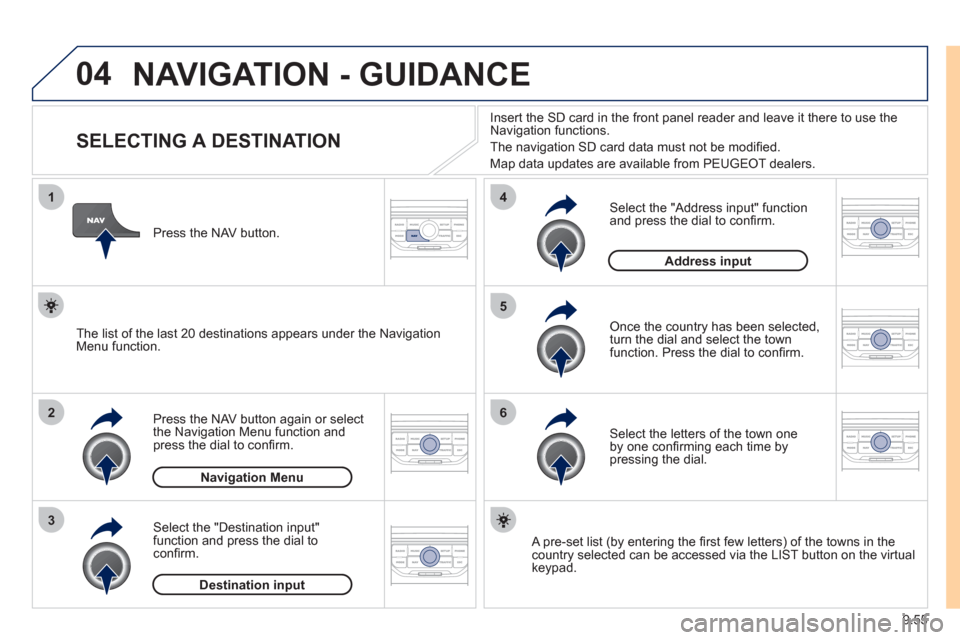
Press the NAV button again or select
the Navigation Menu function and
press the dial to confi rm.
Select the "Destination in
put"
function and press the dial to
confi rm. Pr
ess the NAV button.
Select the letters of the town one
by one confi rming each time by pressing the dial.
Once the country has been selected,
turn the dial and select the townfunction. Press the dial to confi rm. Insert the
SD card in the front panel reader and leave it there to use the
Navigation functions.
The navi
gation SD card data must not be modifi ed.
Map data updates are available
from PEUGEOT dealers.
A pre-set list (by entering the fi rst few letters) of the towns in thecountry selected can be accessed via the LIST button on the virtual
keypad.
Select the "Address input" function
and press the dial to confi rm.
The list o
f the last 20 destinations appears under the NavigationMenu function.
Navigation Menu
Destination input
Address input
Page 204 of 260
9.60
04
8
6
7
4
3
5
2
1
NAVIGATION - GUIDANCE
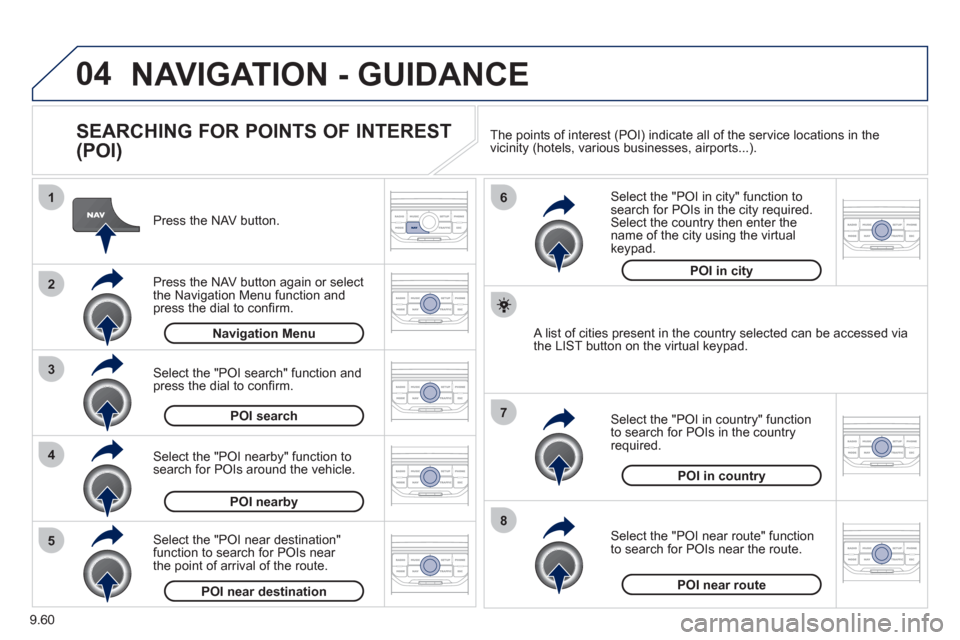
SEARCHING FOR POINTS OF INTEREST
(POI)
Press the NAV button.
Press the NAV button again or select
the Navigation Menu function and press the dial to confi rm.
Select the "POI nearby" function to search for POIs around the vehicle.
Select the "POI search" function and press the dial to confi rm. Navigation Menu
POI search
POI nearby
Select the "POI in city" function tosearch for POIs in the city required.Select the country then enter the name of the city using the virtual
keypad.
Select the "POI near route" function
to search for POIs near the route.
Select the "P
OI in country" function
to search for POIs in the country
required.
Select the "POI near destination"function to search for POIs near
the point of arrival of the route.
POI near destinationPOI near route
POI in country
POI in city
A list of cities present in the country selected can be accessed via
the LIST button on the virtual keypad. The points o
f interest (POI) indicate all of the service locations in the
vicinity (hotels, various businesses, airports...).