2011 Peugeot 308 SW BL oil pressure
[x] Cancel search: oil pressurePage 31 of 336

!
29
INSTRUMENTS and CONTROLS
When the engine is running or the ve-
hicle is moving, the lighting of one of the
following warning lamps indicates the
occurrence of a fault requiring interven-
tion on the part of the driver.
Central alert.
Lighting is associated with
the displaying of another
warning lamp:
- punctured wheel,
- braking,
- power steering,
- engine oil pressure,
- coolant temperature,
stop the vehicle as soon as it is safe to
do so.
Service.
If this comes on, it indicates the
occurrence of a problem in one
of the systems which does not
have a specifi c warning lamp.
To identify the problem, consult the
message on the multifunction screen.
Braking.
If this comes on, it indicates the
occurrence of a fault in one of
the braking systems:
- signifi cant drop in the brake fl uid
level,
- electronic brake force distribution
(EBFD) faulty (simultaneous
lighting of the ABS warning lamp),
stop the vehicle as soon as it is safe to
do so.
When the vehicle is moving, check that
the parking brake is fully released. Any fault resulting in the displaying
of a warning lamp must be investi-
gated further by reading the associ-
ated message on the multifunction
screen.
In the event of diffi culty, do not
hesitate to contact a PEUGEOT
dealer.
Warning lamps
Common warning lamps After checking:
- that the doors, boot, the rear
screen and bonnet are closed,
- the engine oil level,
- the screenwash fl uid level,
- the remote control battery,
- the pressure of the tyres,
- the end of saturation of the particle
emission
fi lter (Diesel),
for any other situations, contact a
PEUGEOT dealer.
Anti-lock braking system
(ABS).
If this comes on, it indicates the
occurrence of a fault in the anti-
lock braking system.
However, this does not prevent op-
eration of the vehicle's servo-assisted
braking.
Page 32 of 336

!
30
INSTRUMENTS and CONTROLS
Engine autodiagnostics
system.
If this comes on, it indicates the
occurrence of a fault in the en-
gine management system.
If it fl ashes, it indicates the occurrence
of a fault in the emission control system.
Maximum coolant
temperature.
If this comes on, it indicates that
the temperature in the cooling
system is too high. Stop the vehicle as
soon as it is safe to do so.
Low fuel level.
When this fi rst comes on, you
have approximately 6 litres
of
fuel remaining in the tank.
Refuel as soon as possible to avoid run-
ning out of fuel.
Until suffi cient fuel has been added,
this warning lamp comes on again each
time the ignition is switched on, along
with an audible signal and a message.
According to version, this audible signal
and this message are repeated, at in-
creasingly shorter intervals as the level
decreases towards "0"
.
Capacity of the tank: approximately
60 litres
.
Door open.
A door, the boot or the rear
screen is open:
Battery charge.
If this comes on, it indicates
the occurrence of a fault in the
battery charging circuit (dirty or
loose terminals, slack or cut alternator
belt...).
Engine oil pressure.
If this comes on, it indicates the
occurrence of a fault in the en-
gine lubrication system. Stop the
vehicle as soon as it is safe to do so.
Specifi c warning lamps
Dynamic stability control
(ESP/ASR).
The ESP/ASR system is put
into service automatically when
the vehicle is started.
Unless the system has been deactivat-
ed, if this warning lamp and the indicator
lamp on the button come on continuously,
this indicates the occurrence of a fault in
the ESP/ASR system or in the hill start
assist system.
- if the speed is below 6 mph
(10 km/h), this warning lamp
comes on continuously.
- if the speed is higher than 6 mph
(10 km/h), this warning lamp comes
on continuously, accompanied by
an audible signal.
Never continue to drive until you
run out of fuel, this could damage
the emission control and injection
systems.
Foot on brake.
On the 6-speed electronic gear
system gearbox, with the gear
lever in position N
, press the
brake pedal to start the engine.
On the automatic gearbox, with the en-
gine running, press the brake pedal to
release the gear lever and disengage
position P
.
Page 34 of 336

!
32
INSTRUMENTS and CONTROLS
Airbags.
If this is displayed, it indicates
the occurrence of a fault in one
of the airbag or pretensioning
seat belt systems.
Braking.
If this is displayed, it indicates
the occurrence of a fault in one
of the braking systems:
- signifi cant drop in the brake fl uid
level,
- electronic brake force distribution
(EBFD) faulty (simultaneous
lighting of the ABS warning lamp).
Stop the vehicle as soon as it is safe to
do so.
If the vehicle is moving, check that the
parking brake is fully released.
Anti-lock braking system
(ABS).
If this is displayed, it indicates
the occurrence of a fault in the
anti-lock braking system.
However, this does not prevent op-
eration of the vehicle's servo-assisted
braking.
Door open.
A door, the boot or the rear
screen is open:
Parking brake.
If this is displayed, while the ve-
hicle is moving, it indicates that
the parking brake has not been
fully released.
Electronic immobiliser.
If this is displayed, it indicates
the occurrence of a fault in the
electronic engine immobiliser
system or that the remote control bat-
tery is fl at.
Fuel level.
When this fi rst comes on, you
have approximately 6 litres
of
fuel remaining in the tank
Refuel as soon as possible to avoid run-
ning out of fuel.
Until suffi cient fuel has been added,
this warning lamp comes on again each
time the ignition is switched on, along
with an audible signal and a message.
According to version, this audible signal
and this message are repeated, at in-
creasingly shorter intervals as the level
decreases towards "0"
.
Capacity of the tank: approximately
60 litres
.
Screenwash fl uid level.
If this is displayed, following an
action on the wiper stalk, it indi-
cates that the screenwash fl uid
level is low.
Fill the screenwash/headlamp wash fl uid
reservoir when you next stop.
-
if the speed is below 6 mph (10 km/h),
this warning lamp is displayed in orange,
- if the speed is higher than 6 mph (10 km/h),
this warning lamp is displayed in red.
Never continue to drive until you
run out of fuel, this could damage
the emissions control and injection
systems.
Engine oil pressure.
If this is displayed, it indicates
the occurrence of a fault in the
engine lubrication circuit. Stop
the vehicle as soon as it is safe
to do so.
Engine oil level.
If this is displayed, it indicates
that the engine oil level is too
low. Stop the vehicle as soon
as it is safe to do so.
Coolant temperature.
If this is displayed, it indicates
that the temperature in the cool-
ing system is too high. Stop the
vehicle as soon as it is safe to
do so.
Coolant level.
If this is displayed, it indicates
that the coolant level is too low.
Stop the vehicle as soon as it is
safe to do so.
Page 163 of 336

10
!
161
CHECKS
CHECKING LEVELS
Check all of these levels regularly and
top them up if necessary, unless other-
wise indicated.
If a level drops signifi cantly, have the
corresponding system checked by a
PEUGEOT dealer.
Brake fluid level
In addition, as the cooling system is
pressurised, wait at least one hour after
switching off the engine before carrying
out any work.
To avoid any risk of scalding, unscrew
the cap by two turns to allow the pres-
sure to drop. When the pressure has
dropped, remove the cap and top up
the level.
Oil level
The reading will only be correct
if the vehicle is on level ground
and the engine has been off for
more than 15 minutes.
The check is carried out either when the igni-
tion is switched on using the oil level indicator
on the instrument panel, or using the dipstick.
The brake fl uid level should be
close to the "MAX" mark. If it is
not, check the brake pad wear.
Changing the fl uid
Refer to the Warranty and Maintenance
Record for details of the interval for this
operation.
Power steering fluid level
The power steering fl uid level
should be close to the "MAX"
mark. Unscrew the cap, with the
engine cold, to check the level.
Screenwash and headlamp
wash fluid
In the case of vehicles fi tted
with headlamp washers, the
minimum level of this fl uid is
indicated by an audible signal
and a message on the multifunction
screen.
Top up the level when you stop the ve-
hicle.
Engine oil change
Refer to the Warranty and Maintenance
Record for details of the interval for this
operation.
In order to maintain the reliability of the
engine and emission control system,
the use of additives in the engine oil is
prohibited.
Oil specifi cation
The oil must correspond to your engine
and conform to the manufacturer's rec-
ommendations.
Fluid specifi cation
The brake fl uid must conform to the
manufacturer's recommendations and
fulfi l the DOT4 standards.
Changing the coolant
The coolant does not have to be
changed.
Fluid specifi cation
For optimum cleaning and to avoid
freezing, this fl uid must not be topped
up with or replaced with water.
Coolant level
The coolant level should be
close to the "MAX" mark but
should never exceed it.
When the engine is warm, the tempera-
ture of the coolant is regulated by the fan.
This can operate with the ignition off.
On vehicles which are fi tted with a
particle emission fi lter, the fan may
operate after the vehicle has been
switched off, even if the engine is
cold.
Fluid specifi cation
The coolant must conform to the manu-
facturer's recommendations.
When working under the bonnet,
take care, as certain areas of the
engine may be extremely hot (risk
of burns).
Page 165 of 336

10
!
163
CHECKS
Only use products recommended
by PEUGEOT or products of equiv-
alent quality and specifi cations.
In order to optimise the operation
of units as important as the braking
system, PEUGEOT selects and of-
fers very specifi c products.
To avoid damaging the electrical
units, the use of a high pressure
washer in the engine compartment
is strictly prohibited
.
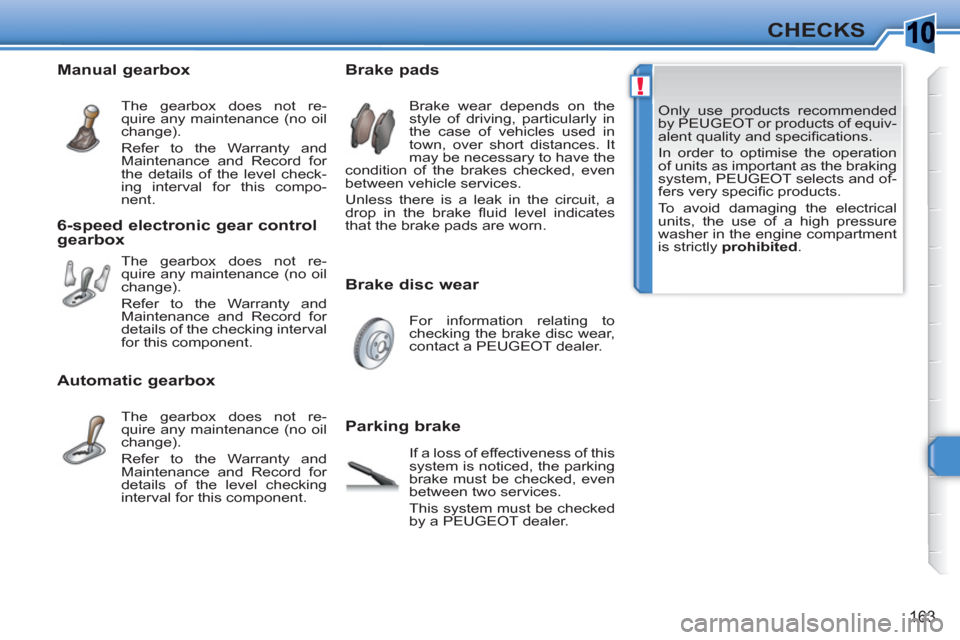
Brake disc wear
Brake pads
Parking brake
Brake wear depends on the
style of driving, particularly in
the case of vehicles used in
town, over short distances. It
may be necessary to have the
condition of the brakes checked, even
between vehicle services.
Unless there is a leak in the circuit, a
drop in the brake fl uid level indicates
that the brake pads are worn.
For information relating to
checking the brake disc wear,
contact a PEUGEOT dealer.
If a loss of effectiveness of this
system is noticed, the parking
brake must be checked, even
between two services.
This system must be checked
by a PEUGEOT dealer.
Manual gearbox
The gearbox does not re-
quire any maintenance (no oil
change).
Refer to the Warranty and
Maintenance and Record for
the details of the level check-
ing interval for this compo-
nent.
6-speed electronic gear control
gearbox
The gearbox does not re-
quire any maintenance (no oil
change).
Refer to the Warranty and
Maintenance and Record for
details of the checking interval
for this component.
Automatic gearbox
The gearbox does not re-
quire any maintenance (no oil
change).
Refer to the Warranty and
Maintenance and Record for
details of the level checking
interval for this component.
Page 169 of 336

1
!
167
PRACTICAL INFORMATION
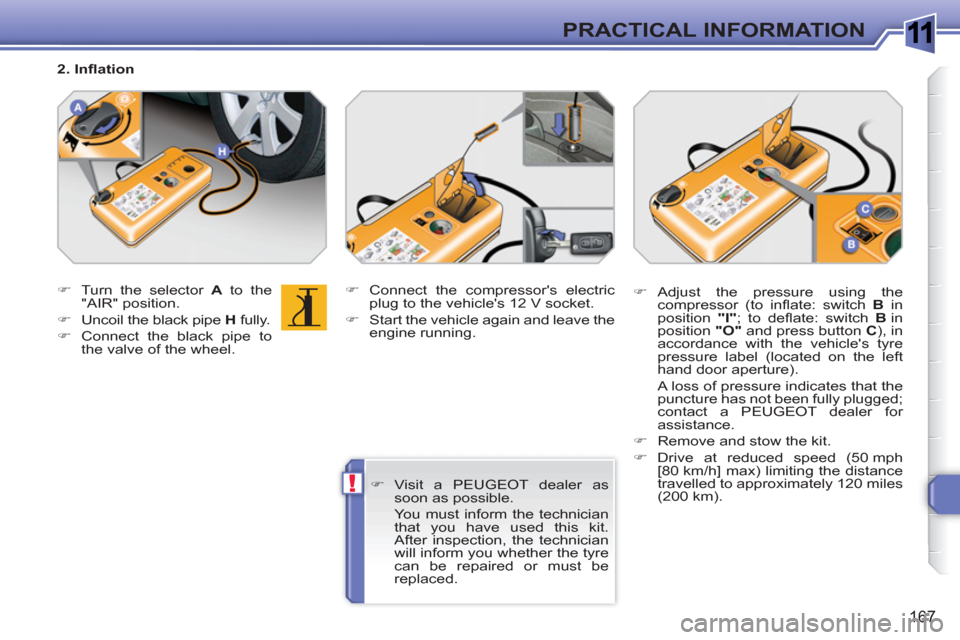
�)
Turn the selector A
to the
"AIR" position.
�)
Uncoil the black pipe H
fully.
�)
Connect the black pipe to
the valve of the wheel.
�)
Connect the compressor's electric
plug to the vehicle's 12 V socket.
�)
Start the vehicle again and leave the
engine running.
�)
Visit a PEUGEOT dealer as
soon as possible.
You must inform the technician
that you have used this kit.
After inspection, the technician
will inform you whether the tyre
can be repaired or must be
replaced.
2. Infl ation
�)
Adjust the pressure using the
compressor (to infl ate: switch B
in
position "I"
; to defl ate: switch B
in
position "O"
and press button C
), in
accordance with the vehicle's tyre
pressure label (located on the left
hand door aperture).
A loss of pressure indicates that the
puncture has not been fully plugged;
contact a PEUGEOT dealer for
assistance.
�)
Remove and stow the kit.
�)
Drive at reduced speed (50 mph
[80 km/h] max) limiting the distance
travelled to approximately 120 miles
(200 km).
Page 170 of 336

1
!
168
PRACTICAL INFORMATION
Beware of discharges of fl uid.
The expiry date of the fl uid is indi-
cated on the cartridge
The sealant cartridge is designed
for single use; even if only partly
used, it must be replaced.
After use, do not discard the car-
tridge into the environment, take
it to an authorised waste disposal
site or a PEUGEOT dealer.
Do not forget to obtain a new
sealant cartridge, available from
PEUGEOT dealers.
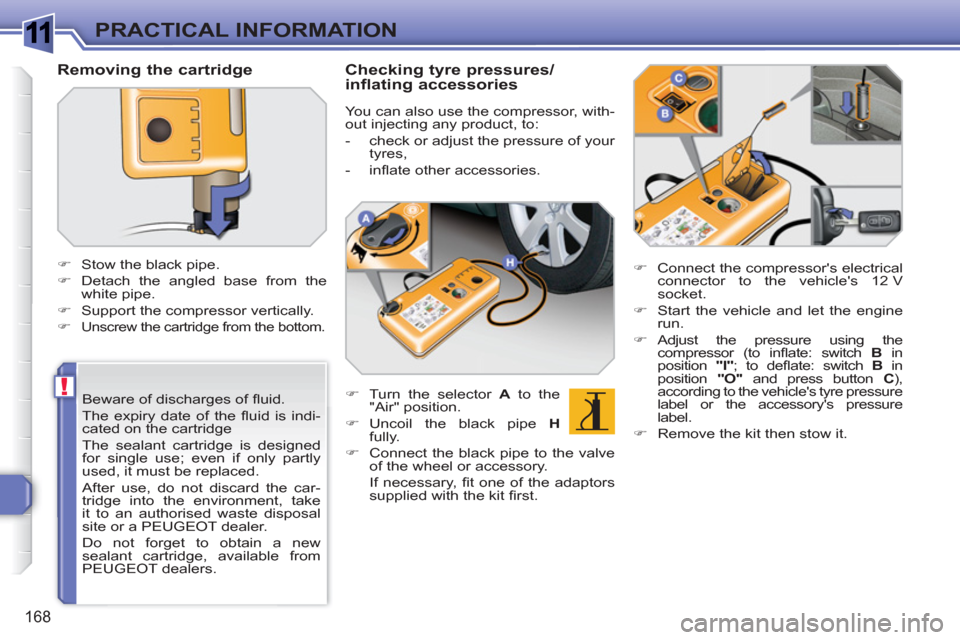
Removing the cartridge
�)
Stow the black pipe.
�)
Detach the angled base from the
white pipe.
�)
Support the compressor vertically.
�)
Unscrew the cartridge from the bottom.
Checking tyre pressures/
inflating accessories
You can also use the compressor, with-
out injecting any product, to:
- check or adjust the pressure of your
tyres,
- infl ate other accessories.
�)
Turn the selector A
to the
"Air" position.
�)
Uncoil the black pipe H
fully.
�)
Connect the black pipe to the valve
of the wheel or accessory.
If necessary, fi t one of the adaptors
supplied with the kit fi rst.
�)
Connect the compressor's electrical
connector to the vehicle's 12 V
socket.
�)
Start the vehicle and let the engine
run.
�)
Adjust the pressure using the
compressor (to infl ate: switch B
in
position "I"
; to defl ate: switch B
in
position "O"
and press button C
),
according to the vehicle's tyre pressure
label or the accessory's pressure
label.
�)
Remove the kit then stow it.
Page 191 of 336

1
189
PRACTICAL INFORMATION
Engine compartment fuses
The fusebox is placed in the engine
compartment near the battery (left-hand
side).
Access to the fuses
�)
Unclip the cover.
�)
Change the fuse (see corresponding
paragraph).
�)
When you have fi nished, close the
cover carefully to ensure sealing of
the fusebox.
Fuse table
Fuse N°
Rating
Functions
F1
20 A
Engine control unit supply, injection pump and EGR
electrovalves (2 L HDI), injectors (2 L HDI).
F2
15 A
Horn.
F3
10 A
Front/rear wash-wipe.
F4
20 A
Headlamp wash.
F5
15 A
Canister purge, turbine discharge and Turbo
pressure regulation electrovalves (1.6 l THP 16V),
oil vapour heater (1.6 l THP 16V), diesel heater
(1.6 l HDI).
F6
10 A
Vehicle speed sensor, ABS/ESP control unit.
F7
10 A
Power steering control unit, automatic gearbox,
engine coolant level detector.
F8
25 A
Starter motor control.
F9
10 A
Diagnostic socket, directional headlamps, air
fl ow sensor (Diesel), particle emission fi lter pump
(Diesel)
F10
30 A
Engine control unit actuators (petrol: ignition coils,
electrovalves, oxygen sensors, injectors, heaters, fuel
pump, electronic thermostat) (Diesel: electrovalves,
heaters).
F11
40 A
Air conditioning blower.