Page 315 of 356
313
Avoid ferries
Recalculate
Settings
Navi volume
POI categories on Map
Set parameters for risk areas
Display on map
Visual alert
Sound alert
3
2
4
3
3
3
4
4
4
Dial number
Dial from address book
"Phone" Menu
Search phone
Call lists
Connect phone
Select ring tone
Phone/Ring tone volume
Phones connected
Enter mailbox number
Settings Disconnect phone
Rename phone
Delete pairing
Delete all pairings
Show details
"SETUP" menu
System language *
English
Español
Deutsch
Italiano
Français
Nederlands
Polski
Portuguese
Date & Time *
Set date & time
Date format
Time format
1
2
2
2
2
3
3
4
4
4
4
4
2
3
3
3
1
2
3
3
3
3
3
3
3
3
3
3
3
2
Avoid motorways
Route dynamics
Traffi c independent
Semi-dynamic
Avoidance criteria
Avoid toll roads Optimized route
3
3
4
4
4
4
4
* Available according to model.
Page 320 of 356
318
QUESTION
ANSWER
SOLUTION
There is a long waiting
time after inserting a CD. When a new medium is inserted, the system reads a certain amount of
data (directory, title, artist, etc.). This may take a few seconds. This phenomenon is normal.
I cannot connect my
Bluetooth telephone. The telephone's Bluetooth function may be deactivated or the equipment
may not be visible.
- Check that your telephone's Bluetooth
function is activated.
- Check that your telephone is visible.
A telephone connected
by Bluetooth is inaudible. The volume level depends on both the system and the telephone. Increase the Peugeot Connect Navigation volume
setting, possibly to maximum, and increase the
telephone volume level if necessary.
Page 322 of 356

320
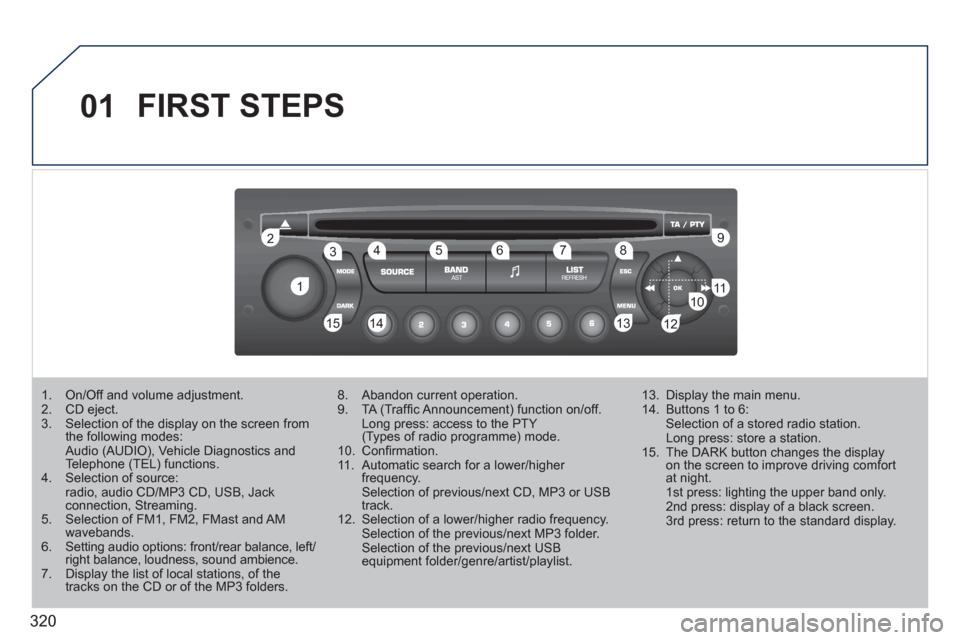
01
1 2
1011
13 14 153456 789
12
FIRST STEPS
1. On/Off and volume adjustment.
2. CD eject.
3. Selection of the display on the screen from
the following modes:
Audio (AUDIO), Vehicle Diagnostics and
Telephone (TEL) functions.
4. Selection of source:
radio, audio CD/MP3 CD, USB, Jack
connection, Streaming.
5. Selection of FM1, FM2, FMast and AM
wavebands.
6. Setting audio options: front/rear balance, left/
right balance, loudness, sound ambience.
7. Display the list of local stations, of the
tracks on the CD or of the MP3 folders.
8. Abandon current operation.
9. TA (Traffi c Announcement) function on/off.
Long press: access to the PTY
(Types of radio programme) mode.
10. Confi rmation.
11. Automatic search for a lower/higher
frequency.
Selection of previous/next CD, MP3 or USB
track.
12. Selection of a lower/higher radio frequency.
Selection of the previous/next MP3 folder.
Selection of the previous/next USB
equipment folder/genre/artist/playlist.
13. Display the main menu.
14. Buttons 1 to 6:
Selection of a stored radio station.
Long press: store a station.
15. The DARK button changes the display
on the screen to improve driving comfort
at night.
1st press: lighting the upper band only.
2nd press: display of a black screen.
3rd press: return to the standard display.
Page 323 of 356

321
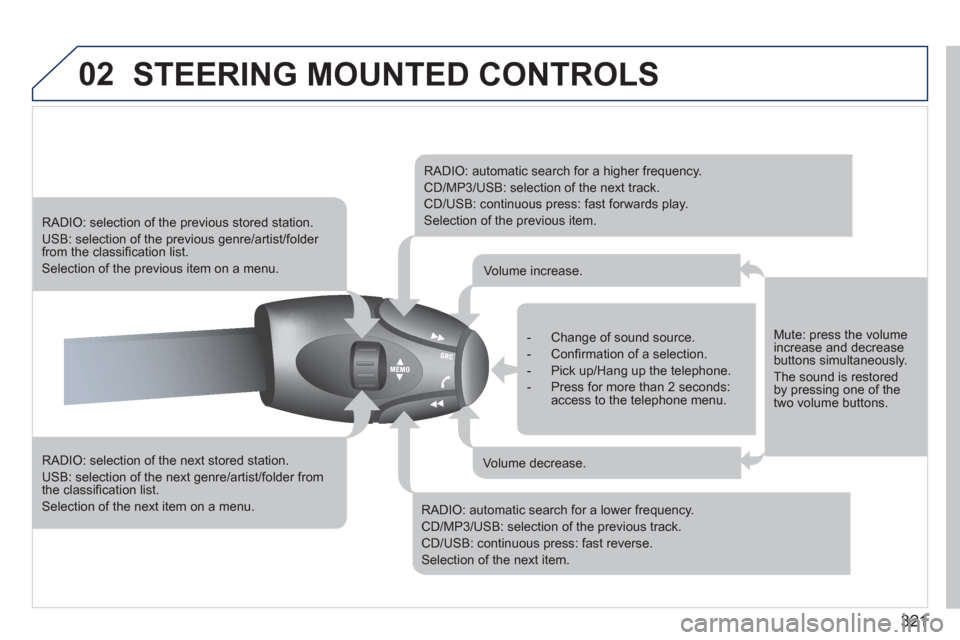
02 STEERING MOUNTED CONTROLS
RADIO: selection of the next stored station.
USB: selection of the next genre/artist/folder from
the classifi cation list.
Selection of the next item on a menu.
RADIO: selection of the previous stored station.
USB: selection of the previous genre/artist/folder
from the classifi cation list.
Selection of the previous item on a menu.
RADIO: automatic search for a higher frequency.
CD/MP3/USB: selection of the next track.
CD/USB: continuous press: fast forwards play.
Selection of the previous item.
RADIO: automatic search for a lower frequency.
CD/MP3/USB: selection of the previous track.
CD/USB: continuous press: fast reverse.
Selection of the next item.
- Change of sound source.
- Confi rmation of a selection.
- Pick up/Hang up the telephone.
- Press for more than 2 seconds:
access to the telephone menu.
Volume increase.
Volume decrease.
Mute: press the volume
increase and decrease
buttons simultaneously.
The sound is restored
by pressing one of the
two volume buttons.
Page 324 of 356
322
03 MAIN MENU
AUDIO FUNCTIONS
: radio,
CD, USB, options.
> MONOCHROME SCREEN C
> MONOCHROME SCREEN A
For a detailed global view of the
menus available, refer to the
"Screen menu map" section of
this chapter.
TELEPHONE
: hands-free kit,
pairing, management of a call.
VEHICLE DIAGNOSTICS
: alerts log.
PERSONALISATION-
CONFIGURATION
: vehicle
parameters, display, languages.
Page 331 of 356

329
06
1
2
3
4
5
6
7
8
9
10
BLUETOOTH
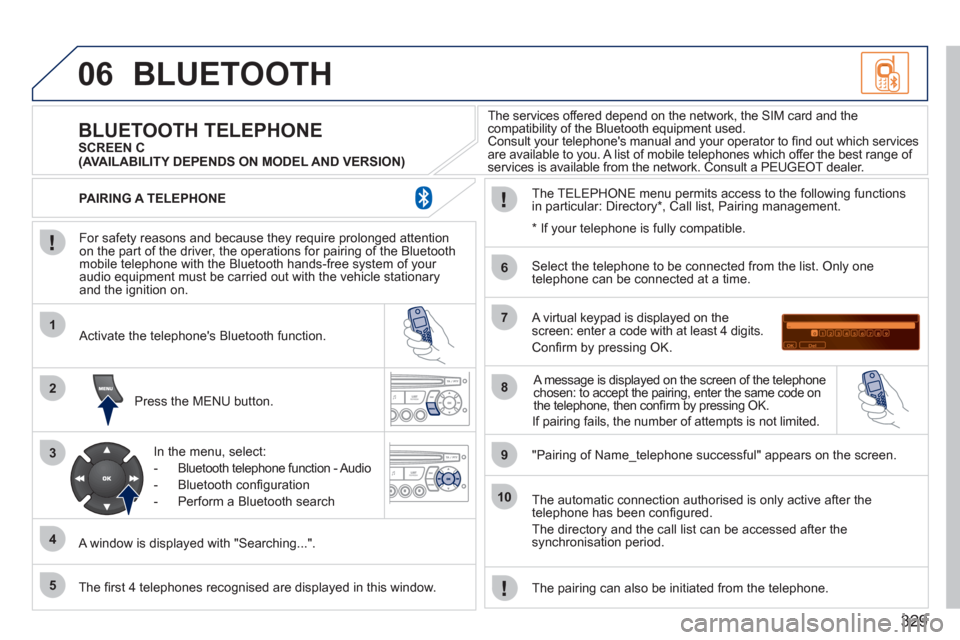
For safety reasons and because they require prolonged attention
on the part of the driver, the operations for pairing of the Bluetooth
mobile telephone with the Bluetooth hands-free system of your
audio equipment must be carried out with the vehicle stationary
and the ignition on.
Press the MENU button.
A window is displayed with "Searching...".
Activate the telephone's Bluetooth function.
In the menu, select:
- Bluetooth telephone function - Audio
- Bluetooth confi guration
- Perform a Bluetooth search
The services offered depend on the network, the SIM card and the
compatibility of the Bluetooth equipment used.
Consult your telephone's manual and your operator to fi nd out which services
are available to you. A list of mobile telephones which offer the best range of
services is available from the network. Consult a PEUGEOT dealer.
BLUETOOTH TELEPHONE
SCREEN C
The TELEPHONE menu permits access to the following functions
in particular: Directory * , Call list, Pairing management.
The fi rst 4 telephones recognised are displayed in this window.
A virtual keypad is displayed on the
screen: enter a code with at least 4 digits.
Confi rm by pressing OK.
"Pairing of Name_telephone successful" appears on the screen.
Select the telephone to be connected from the list. Only one
telephone can be connected at a time.
A message is displayed on the screen of the telephone
chosen: to accept the pairing, enter the same code on
the telephone, then confi rm by pressing OK.
The automatic connection authorised is only active after the
telephone has been confi gured.
The directory and the call list can be accessed after the
synchronisation period.
PAIRING A TELEPHONE
The pairing can also be initiated from the telephone.
(AVAILABILITY DEPENDS ON MODEL AND VERSION)
*
If your telephone is fully compatible.
If pairing fails, the number of attempts is not limited.
Page 332 of 356

330
06
1
2
1
2
1
2
3
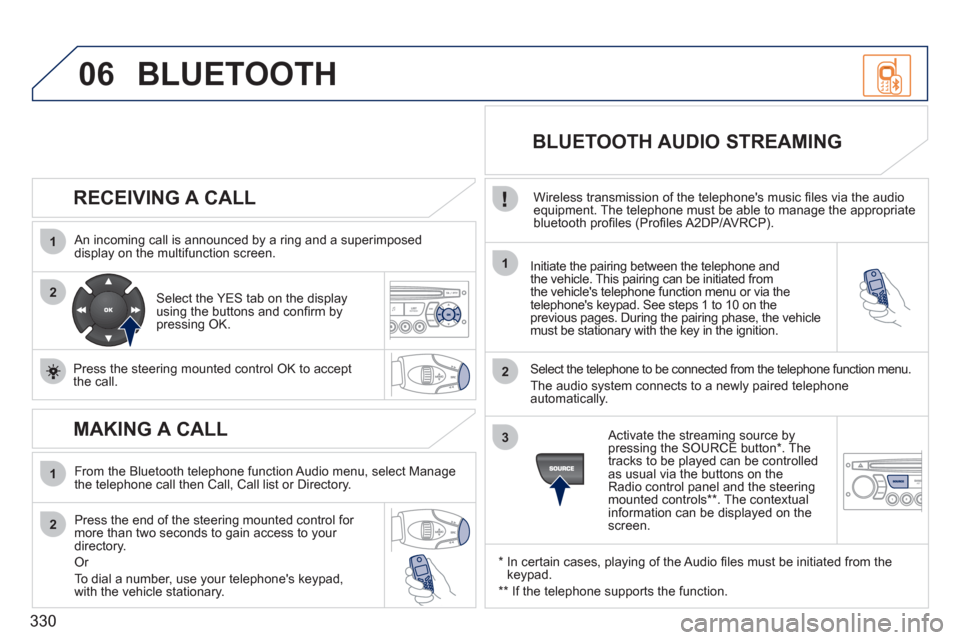
RECEIVING A CALL
An incoming call is announced by a ring and a superimposed
display on the multifunction screen.
Initiate the pairing between the telephone and
the vehicle. This pairing can be initiated from
the vehicle's telephone function menu or via the
telephone's keypad. See steps 1 to 10 on the
previous pages. During the pairing phase, the vehicle
must be stationary with the key in the ignition.
Select the telephone to be connected from the telephone function menu.
The audio system connects to a newly paired telephone
automatically.
Select the YES tab on the display
using the buttons and confi rm by
pressing OK.
Press the steering mounted control OK to accept
the call.
BLUETOOTH AUDIO STREAMING
Wireless transmission of the telephone's music fi les via the audio
equipment. The telephone must be able to manage the appropriate
bluetooth profi les (Profi les A2DP/AVRCP).
*
In certain cases, playing of the Audio fi les must be initiated from the
keypad.
**
If the telephone supports the function.
Activate the streaming source by
pressing the SOURCE button * . The
tracks to be played can be controlled
as usual via the buttons on the
Radio control panel and the steering
mounted controls ** . The contextual
information can be displayed on the
screen.
BLUETOOTH
MAKING A CALL
From the Bluetooth telephone function Audio menu, select Manage
the telephone call then Call, Call list or Directory.
Press the end of the steering mounted control for
more than two seconds to gain access to your
directory.
Or
To dial a number, use your telephone's keypad,
with the vehicle stationary.
Page 338 of 356
336
08SCREEN MENU MAP
BLUETOOTH TELEPHONE
Connect/Disconnect a device
Consult the paired device
BLUETOOTH CONFIGURATION
Telephone function
Audio Streaming function
Delete a paired device
Perform a Bluetooth search
Calls list
CALL
Directory
Terminate the current call
MANAGE THE TELEPHONE CALL
Activate private mode
1
2
3
3
3
4
4
4
2
3
4
2
3
3