Page 98 of 356

4
i
!
96
ACCESS
More than 5 litres of fuel must be add-
ed in order to be registered by the fuel
gauge.
FUEL TANK
Capacity of the tank: approximately
60 litres.
The key cannot be removed from
the lock until the cap is put back on
the tank.
Opening the cap may cause an in-
rush of air. This vacuum, which is
perfectly normal, is caused by the
sealing of the fuel system.
Low fuel level
Operating fault
A fuel gauge malfunction is indicated by the
return of the fuel gauge needle to zero.
Have it checked by a PEUGEOT dealer
or a qualifi ed workshop.
Filling
A label affi xed to the inside of the fl ap
reminds you of the type of fuel to be
used according to your engine.
When the low fuel level is reached,
this warning lamp comes on on
the instrument panel, accompa-
nied by an audible signal and an
alert message. When it fi rst comes on,
you have approximately 6 litres
of fuel
remaining.
Until suffi cient fuel has been added, this
warning lamp comes on every time the
ignition is switched on, accompanied
by an audible signal and a message.
When driving, this audible signal and
the display of the alert message are re-
peated with increasing frequency as the
fuel level drops towards "0"
.
Refuel as soon as possible to avoid run-
ning out of fuel.
If you run out of fuel (Diesel), refer also
to the "Checks" section.
With Stop & Start, never refuel with
the system in STOP mode; you must
switch off the ignition with the key.
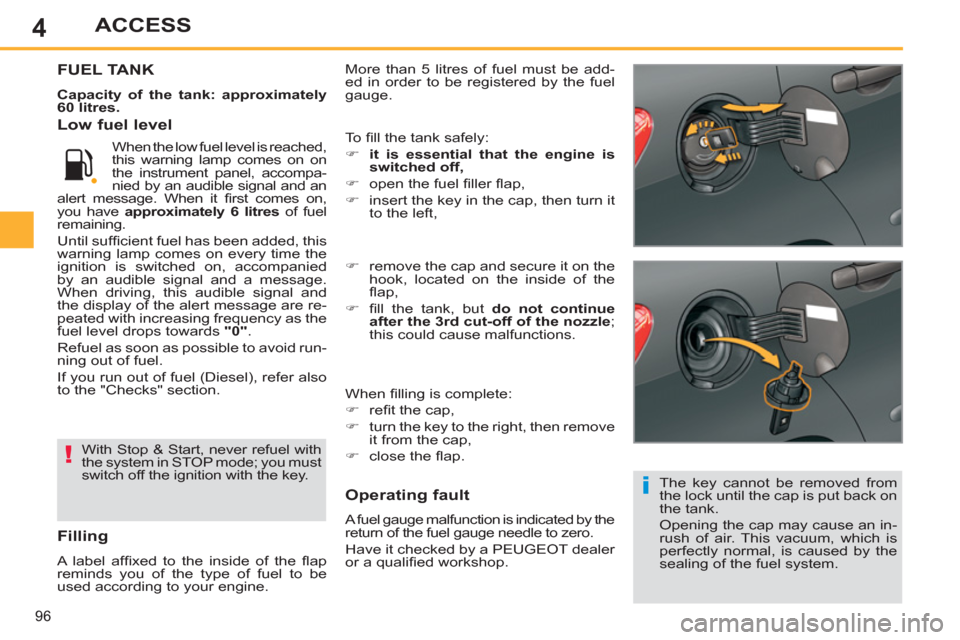
�)
remove the cap and secure it on the
hook, located on the inside of the
fl ap,
�)
fi ll the tank, but do not continue
after the 3rd cut-off of the nozzle
;
this could cause malfunctions.
When fi lling is complete:
�)
refi t the cap,
�)
turn the key to the right, then remove
it from the cap,
�)
close the fl ap.
To fi ll the tank safely:
�)
it is essential that the engine is
switched off,
�)
open the fuel fi ller fl ap,
�)
insert the key in the cap, then turn it
to the left,
Page 100 of 356

5
98
VISIBILITY
EXTERIOR LIGHTING
CONTROLS
Control stalk for the selection and con-
trol of the various front and rear lamps
providing the vehicle's lighting.
Main lighting
The various front and rear lamps of the
vehicle are designed to adapt the driver's
visibility progressively in relation to the cli-
matic conditions:
- sidelamps, to be seen,
- dipped beam headlamps to see
without dazzling other drivers,
- main beam headlamps to see clearly
when the road is clear.
Additional lighting
Other lamps are fi tted to fulfi l the require-
ments of particular driving conditions:
- a rear foglamp to be seen from a
distance,
- front foglamps for even better
forward vision,
- directional headlamps for improved
visibility when cornering,
- daytime running lamps to be seen
during the day.
Programming
Various automatic lighting control
modes are also available depending on
options:
- guide-me-home lighting,
- automatic illumination of headlamps,
- directional lighting.
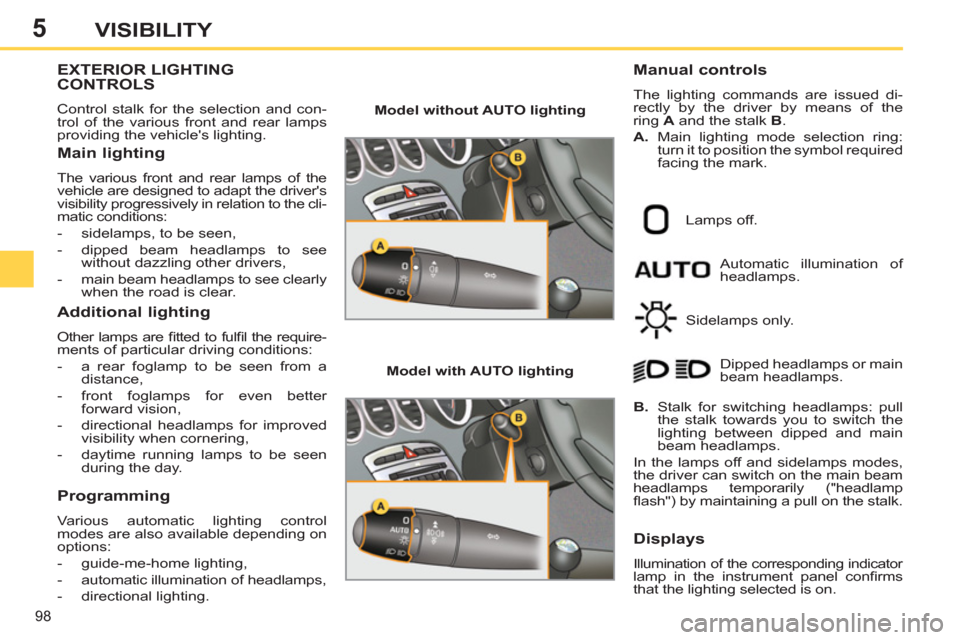
Model without AUTO lighting
Model with AUTO lighting
Automatic illumination of
headlamps.
Manual controls
The lighting commands are issued di-
rectly by the driver by means of the
ring A
and the stalk B
.
A.
Main lighting mode selection ring:
turn it to position the symbol required
facing the mark.
Lamps off.
Sidelamps only.
B.
Stalk for switching headlamps: pull
the stalk towards you to switch the
lighting between dipped and main
beam headlamps.
In the lamps off and sidelamps modes,
the driver can switch on the main beam
headlamps temporarily ("headlamp
fl ash") by maintaining a pull on the stalk. Dipped headlamps or main
beam headlamps.
Displays
Illumination of the corresponding indicator
lamp in the instrument panel confi rms
that the lighting selected is on.
Page 107 of 356

5
!
105
VISIBILITY
Windscreen and headlamp
wash
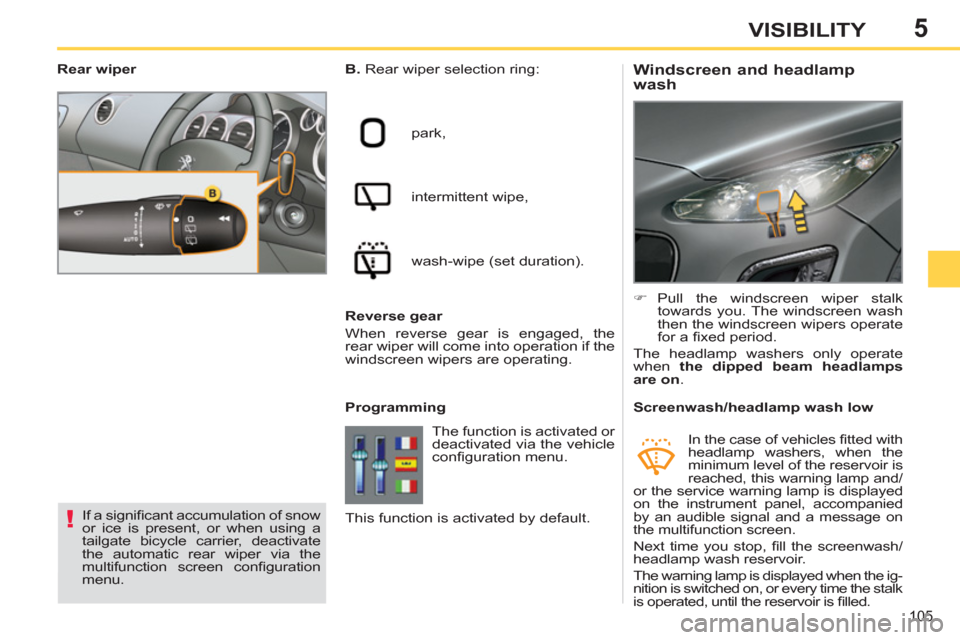
B.
Rear wiper selection ring:
park,
intermittent wipe,
wash-wipe (set duration).
Programming
�)
Pull the windscreen wiper stalk
towards you. The windscreen wash
then the windscreen wipers operate
for a fi xed period.
The headlamp washers only operate
when the dipped beam headlamps
are on
.
Rear wiper
If a signifi cant accumulation of snow
or ice is present, or when using a
tailgate bicycle carrier, deactivate
the automatic rear wiper via the
multifunction screen confi guration
menu.
Screenwash/headlamp wash low
In the case of vehicles fi tted with
headlamp washers, when the
minimum level of the reservoir is
reached, this warning lamp and/
or the service warning lamp is displayed
on the instrument panel, accompanied
by an audible signal and a message on
the multifunction screen.
Next time you stop, fi ll the screenwash/
headlamp wash reservoir.
The warning lamp is displayed when the ig-
nition is switched on, or every time the stalk
is operated, until the reservoir is fi lled.
The function is activated or
deactivated via the vehicle
confi guration menu.
Reverse gear
When reverse gear is engaged, the
rear wiper will come into operation if the
windscreen wipers are operating.
This function is activated by default.
Page 117 of 356
6
11 5
FITTINGS
BOOT FITTINGS
1.
Rear parcel shelf
(see details on following page)
2.
Hooks
(see details on following page)
3.
Stowing rings
4.
Luggage retaining strap
5.
Enclosed storage tray
6.
Open storage tray
7.
Storage box
(see details on following page)
Page 119 of 356
6
11 7
FITTINGS
BOOT FITTINGS
1.
Rear parcel shelf
(see details on following page)
2.
12 V accessories socket
(see details on following page)
3.
Hooks
(see details on following page)
4.
Stowing rings
5.
Storage tray
6.
High load retaining net
(see details on following page)
7.
Luggage retaining strap
Page 122 of 356
6
120
FITTINGS
BOOT FITTINGS
1.
Load space cover
(see details on following page)
2.
Storage box
3.
12 V accessories socket
(see details on following page)
4.
Hooks
(see details on following page)
5.
Stowing rings
6.
High load retaining net
(see details on following page)
7.
Rear armrests with cup holder
8.
Luggage retaining strap
9.
Location for torch
(see details on following page)
Page 132 of 356
7
i
130
CHILD SAFETY
"ISOFIX" MOUNTINGS
Your vehicle has been approved in accor-
dance with the new ISOFIX regulation
.
The seats, represented below, are fi tted
with regulation ISOFIX mountings: Rear seats The Isofi x mountings are three rings for
each seat:
- two rings A
, located between the
vehicle seat back and cushion,
indicated by a label,
- a ring B
, located behind the seat,
referred to as the TOP TETHER
for
fi xing the upper strap.
Rear seats Rear seats of the 2nd row
When installing an ISOFIX child
seat in the left hand rear position
of the bench seat, before fi tting the
child seat, fi rst move the centre
rear seat belt towards the middle of
the vehicle so as to avoid the child
seat interfering with the operation
of the seat belt.
Page 137 of 356

8
ii
135
SAFETY
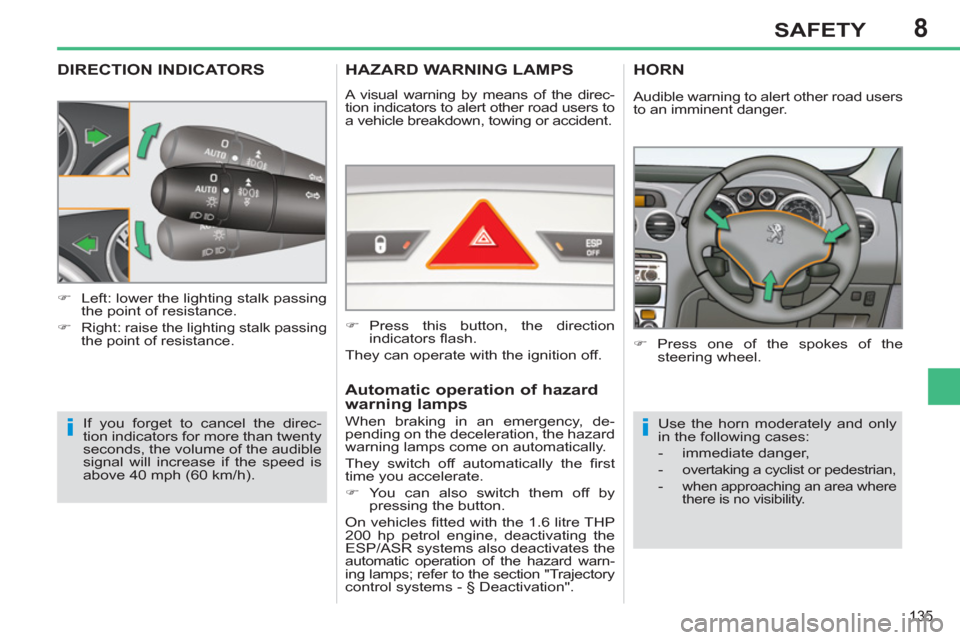
DIRECTION INDICATORS
If you forget to cancel the direc-
tion indicators for more than twenty
seconds, the volume of the audible
signal will increase if the speed is
above 40 mph (60 km/h).
�)
Left: lower the lighting stalk passing
the point of resistance.
�)
Right: raise the lighting stalk passing
the point of resistance.
HAZARD WARNING LAMPS
A visual warning by means of the direc-
tion indicators to alert other road users to
a vehicle breakdown, towing or accident.
�)
Press this button, the direction
indicators fl ash.
They can operate with the ignition off.
Automatic operation of hazard
warning lamps
HORN
�)
Press one of the spokes of the
steering wheel.
Use the horn moderately and only
in the following cases:
- immediate danger,
- overtaking a cyclist or pedestrian,
-
when approaching an area where
there is no visibility.
Audible warning to alert other road users
to an imminent danger.
When braking in an emergency, de-
pending on the deceleration, the hazard
warning lamps come on automatically.
They switch off automatically the fi rst
time you accelerate.
�)
You can also switch them off by
pressing the button.
On vehicles fi tted with the 1.6 litre THP
200 hp petrol engine, deactivating the
ESP/ASR systems also deactivates the
automatic operation of the hazard warn-ing lamps; refer to the section "Trajectory
control systems - § Deactivation".