2011 Peugeot 308 CC instrument panel
[x] Cancel search: instrument panelPage 41 of 292
1
i
i
39
INSTRUMENTS and CONTROLS
Following this operation, if you wish
to disconnect the battery, lock the
vehicle and wait at least fi ve minutes
for the zero reset to be registered.
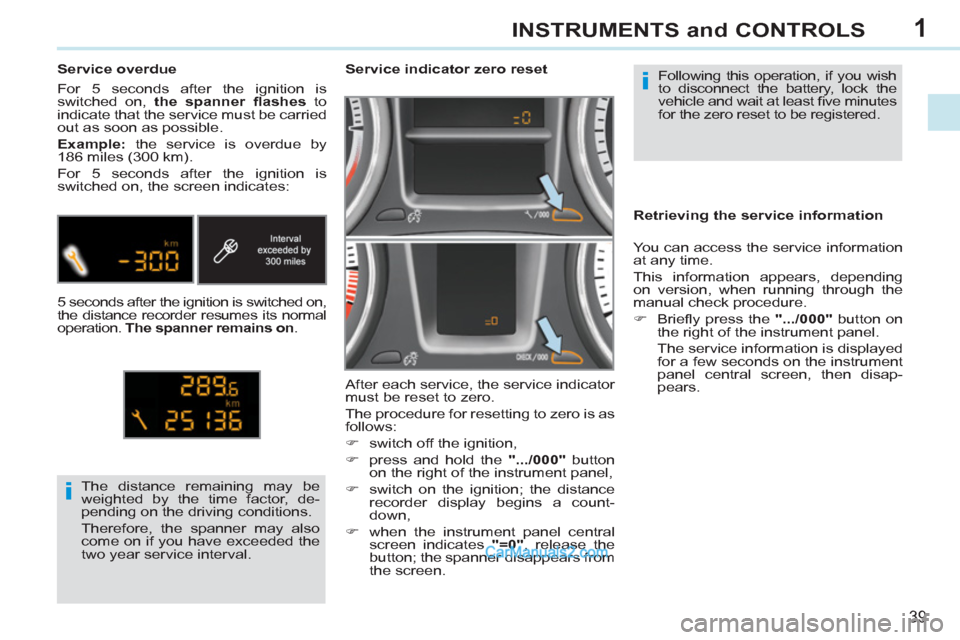
Service indicator zero reset
After each service, the service indicator
must be reset to zero.
The procedure for resetting to zero is as
follows:
�)
switch off the ignition,
�)
press and hold the ".../000"
button
on the right of the instrument panel,
�)
switch on the ignition; the distance
recorder display begins a count-
down,
�)
when the instrument panel central
screen indicates "=0"
, release the
button; the spanner disappears from
the screen. The distance remaining may be
weighted by the time factor, de-
pending on the driving conditions.
Therefore, the spanner may also
come on if you have exceeded the
two year service interval.
Service overdue
For 5 seconds after the ignition is
switched on, the spanner fl ashes
to
indicate that the service must be carried
out as soon as possible.
Example:
the service is overdue by
186 miles (300 km).
For 5 seconds after the ignition is
switched on, the screen indicates:
5 seconds after the ignition is switched on,
the distance recorder resumes its normal
operation. The spanner remains on
.
Retrieving the service information
You can access the service information
at any time.
This information appears, depending
on version, when running through the
manual check procedure.
�)
Briefl y press the ".../000"
button on
the right of the instrument panel.
The service information is displayed
for a few seconds on the instrument
panel central screen, then disap-
pears.
Page 42 of 292
1
40
INSTRUMENTS and CONTROLS
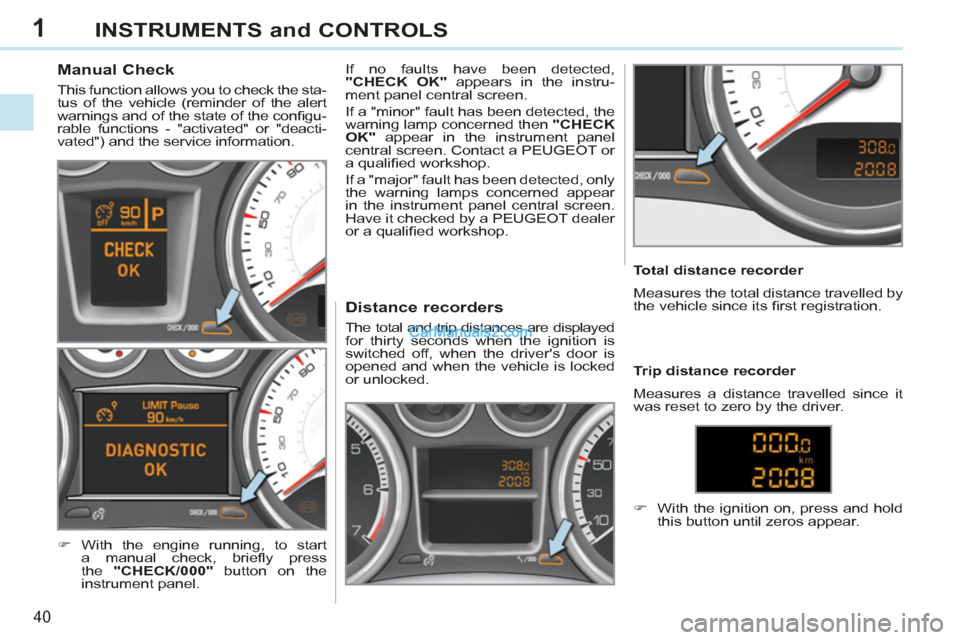
Manual Check
This function allows you to check the sta-
tus of the vehicle (reminder of the alert
warnings and of the state of the confi gu-
rable functions - "activated" or "deacti-
vated") and the service information.
�)
With the engine running, to start
a manual check, briefl y press
the "CHECK/000"
button on the
instrument panel. If no faults have been detected,
"CHECK OK"
appears in the instru-
ment panel central screen.
If a "minor" fault has been detected, the
warning lamp concerned then "CHECK
OK"
appear in the instrument panel
central screen. Contact a PEUGEOT or
a qualifi ed workshop.
If a "major" fault has been detected, only
the warning lamps concerned appear
in the instrument panel central screen.
Have it checked by a PEUGEOT dealer
or a qualifi ed workshop.
Distance recorders
The total and trip distances are displayed
for thirty seconds when the ignition is
switched off, when the driver's door is
opened and when the vehicle is locked
or unlocked.
Total distance recorder
Measures the total distance travelled by
the vehicle since its fi rst registration.
�)
With the ignition on, press and hold
this button until zeros appear.
Trip distance recorder
Measures a distance travelled since it
was reset to zero by the driver.
Page 52 of 292
2
i
50
MULTIFUNCTION SCREENS
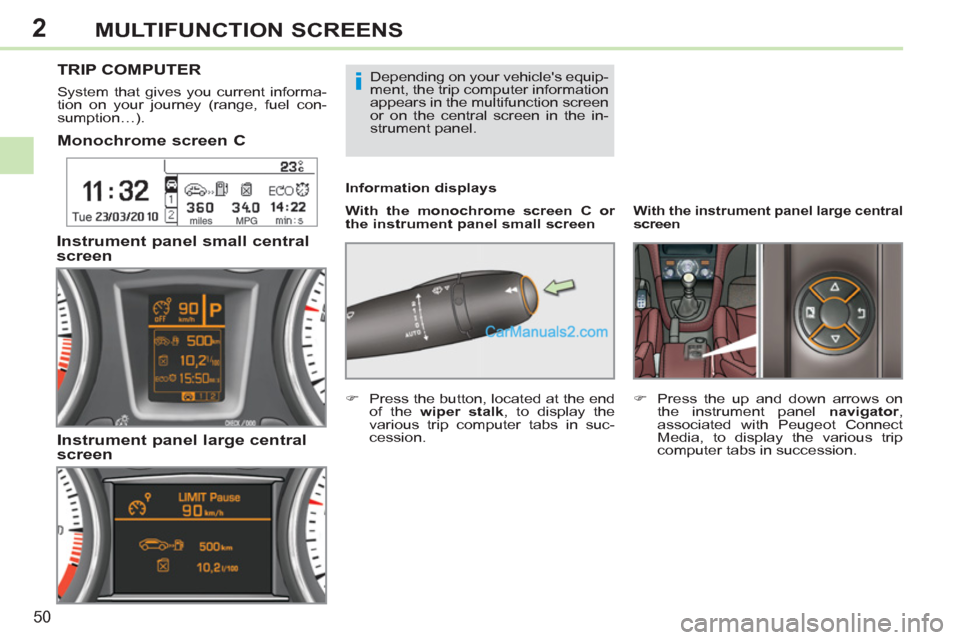
Monochrome screen C
With the monochrome screen C or
the instrument panel small screen
Information displays
TRIP COMPUTER
System that gives you current informa-
tion on your journey (range, fuel con-
sumption…).
Instrument panel small central
screen
Instrument panel large central
screen
Depending on your vehicle's equip-
ment, the trip computer information
appears in the multifunction screen
or on the central screen in the in-
strument panel.
With the instrument panel
large central
screen
�)
Press the up and down arrows on
the instrument panel navigator
,
associated with Peugeot Connect
Media, to display the various trip
computer tabs in succession.
�)
Press the button, located at the end
of the wiper stalk
, to display the
various trip computer tabs in suc-
cession.
Page 53 of 292

2
51
MULTIFUNCTION SCREENS
- The current information tab
with:
●
the range,
●
the current fuel
consumption,
●
the distance remaining to
be travelled or the Stop &
Start counter.
- The trip "1"
tab with:
●
the distance travelled,
●
the average fuel
consumption,
●
the average speed,
for the fi rst trip.
- The trip "2"
tab with:
●
the distance travelled,
●
the average fuel
consumption,
●
the average speed,
for the second trip.
�)
Pressing the button again takes you
to a black screen.
A further press returns you to the normal
display.
Trip zero reset
With the monochrome screen C or
the instrument panel small screen
�)
When the trip required is displayed,
press the button on the end of the
wiper stalk
for more than two sec-
onds.
With the instrument panel
large central screen
�)
When the required trip is displayed,
press the "OK"
button on the instru-
ment panel navigator
, associated
with Peugeot Connect Media, for
more than two seconds.
Trips "1"
and "2"
are independent but
their use is identical.
For example, trip "1"
can be used for
daily fi gures, and trip "2"
for monthly
fi gures.
Page 87 of 292
5
85
VISIBILITY
EXTERIOR LIGHTING
CONTROLS
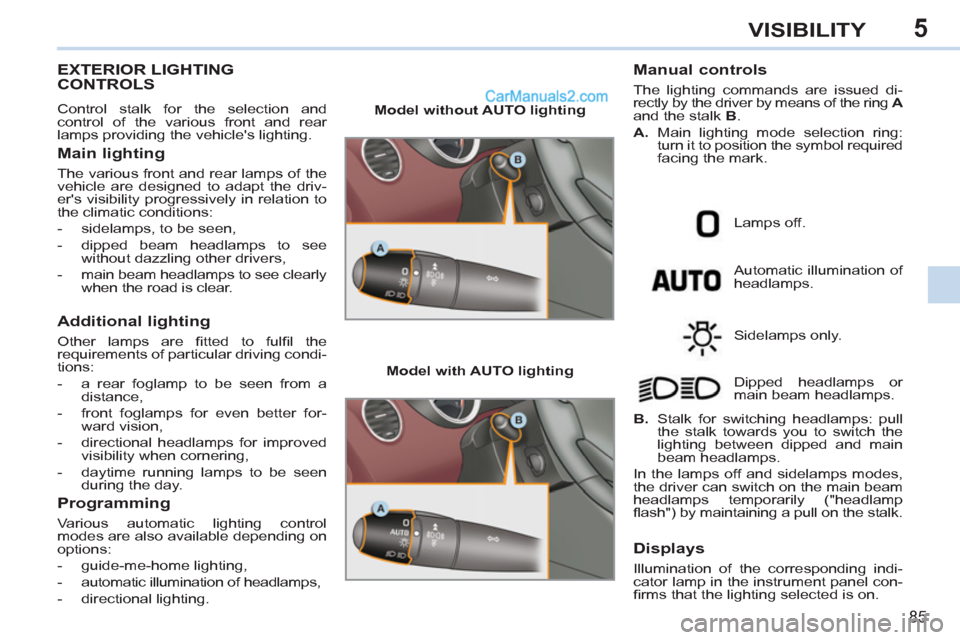
Control stalk for the selection and
control of the various front and rear
lamps providing the vehicle's lighting.
Main lighting
The various front and rear lamps of the
vehicle are designed to adapt the driv-
er's visibility progressively in relation to
the climatic conditions:
- sidelamps, to be seen,
- dipped beam headlamps to see
without dazzling other drivers,
- main beam headlamps to see clearly
when the road is clear.
Additional lighting
Other lamps are fi tted to fulfi l the
requirements of particular driving condi-
tions:
- a rear foglamp to be seen from a
distance,
- front foglamps for even better for-
ward vision,
- directional headlamps for improved
visibility when cornering,
- daytime running lamps to be seen
during the day.
Programming
Various automatic lighting control
modes are also available depending on
options:
- guide-me-home lighting,
- automatic illumination of headlamps,
- directional lighting.
Model without AUTO lighting
Model with AUTO lighting
Automatic illumination of
headlamps.
Manual controls
The lighting commands are issued di-
rectly by the driver by means of the ring A
and the stalk B
.
A.
Main lighting mode selection ring:
turn it to position the symbol required
facing the mark.
Lamps off.
Sidelamps only.
B.
Stalk for switching headlamps: pull
the stalk towards you to switch the
lighting between dipped and main
beam headlamps.
In the lamps off and sidelamps modes,
the driver can switch on the main beam
headlamps temporarily ("headlamp
fl ash") by maintaining a pull on the stalk. Dipped headlamps or
main beam headlamps.
Displays
Illumination of the corresponding indi-
cator lamp in the instrument panel con-
fi rms that the lighting selected is on.
Page 89 of 292
5
87
VISIBILITY
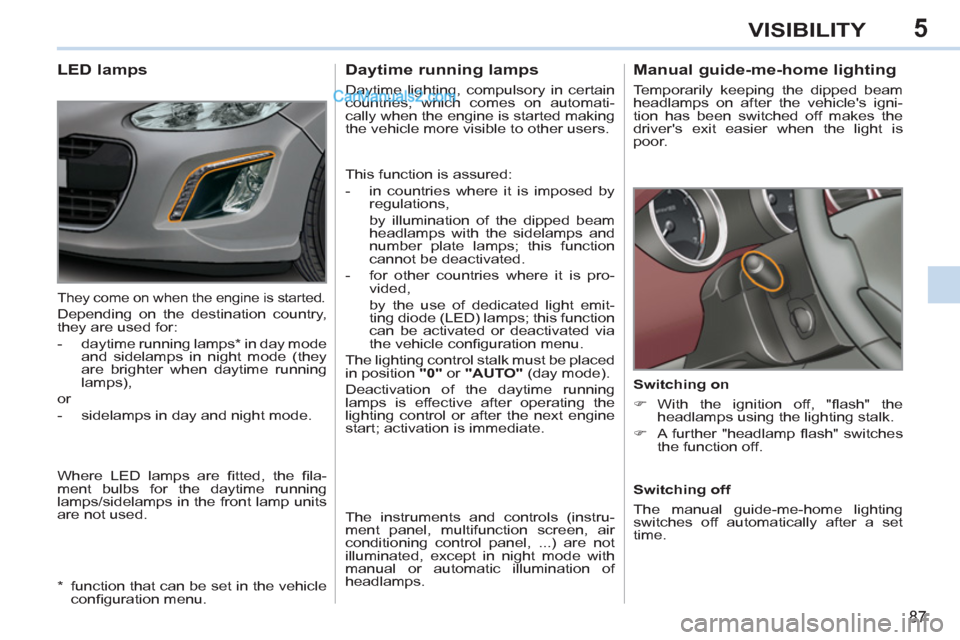
Manual guide-me-home lighting
Temporarily keeping the dipped beam
headlamps on after the vehicle's igni-
tion has been switched off makes the
driver's exit easier when the light is
poor.
Switching on
�)
With the ignition off, "fl ash" the
headlamps using the lighting stalk.
�)
A further "headlamp fl ash" switches
the function off.
Switching off
The manual guide-me-home lighting
switches off automatically after a set
time.
Daytime running lamps
Daytime lighting, compulsory in certain
countries, which comes on automati-
cally when the engine is started making
the vehicle more visible to other users.
This function is assured:
- in countries where it is imposed by
regulations,
by illumination of the dipped beam
headlamps with the sidelamps and
number plate lamps; this function
cannot be deactivated.
- for other countries where it is pro-
vided,
by the use of dedicated light emit-
ting diode (LED) lamps; this function
can be activated or deactivated via
the vehicle confi guration menu.
The lighting control stalk must be placed
in position "0"
or "AUTO"
(day mode).
Deactivation of the daytime running
lamps is effective after operating the
lighting control or after the next engine
start; activation is immediate.
The instruments and controls (instru-
ment panel, multifunction screen, air
conditioning control panel, ...) are not
illuminated, except in night mode with
manual or automatic illumination of
headlamps.
LED lamps
Where LED lamps are fi tted, the fi la-
ment bulbs for the daytime running
lamps/sidelamps in the front lamp units
are not used.
They come on when the engine is started.
Depending on the destination country,
they are used for:
- daytime running lamps * in day mode
and sidelamps in night mode (they
are brighter when daytime running
lamps),
or
- sidelamps in day and night mode.
* function that can be set in the vehicle
confi guration menu.
Page 92 of 292
5
!
i
90
VISIBILITY
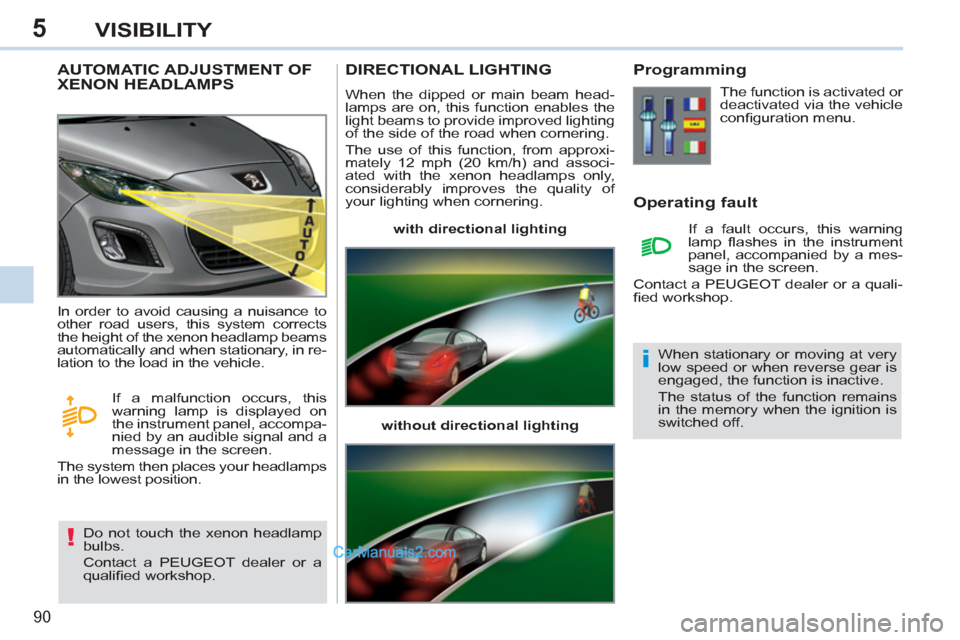
AUTOMATIC ADJUSTMENT OF
XENON HEADLAMPS
Do not touch the xenon headlamp
bulbs.
Contact a PEUGEOT dealer or a
qualifi ed workshop. In order to avoid causing a nuisance to
other road users, this system corrects
the height of the xenon headlamp beams
automatically and when stationary, in re-
lation to the load in the vehicle.
If a malfunction occurs, this
warning lamp is displayed on
the instrument panel, accompa-
nied by an audible signal and a
message in the screen.
The system then places your headlamps
in the lowest position.
DIRECTIONAL LIGHTING
When the dipped or main beam head-
lamps are on, this function enables the
light beams to provide improved lighting
of the side of the road when cornering.
The use of this function, from approxi-
mately 12 mph (20 km/h) and associ-
ated with the xenon headlamps only,
considerably improves the quality of
your lighting when cornering.
with directional lighting
without directional lighting
Programming
Operating fault
The function is activated or
deactivated via the vehicle
confi guration menu.
If a fault occurs, this warning
lamp fl ashes in the instrument
panel, accompanied by a mes-
sage in the screen.
Contact a PEUGEOT dealer or a quali-
fi ed workshop.
When stationary or moving at very
low speed or when reverse gear is
engaged, the function is inactive.
The status of the function remains
in the memory when the ignition is
switched off.
Page 94 of 292

5
!
i
92
VISIBILITY
Windscreen and headlamp
wash
�)
Pull the windscreen wiper stalk to-
wards you. The windscreen wash
then the windscreen wipers operate
for a fi xed period.
The headlamp washers only operate
when the dipped beam headlamps
are on
.
Screenwash/headlamp wash low
In the case of vehicles fi tted with
headlamp washers, when the
minimum level of the reservoir is
reached, this warning lamp and/
or the service warning lamp is displayed
on the instrument panel, accompanied by
an audible signal and a message on the
multifunction screen.
Next time you stop, fi ll the screenwash/
headlamp wash reservoir.
The warning lamp is displayed when the
ignition is switched on, or every time the
stalk is operated, until the reservoir is fi lled.
Automatic rain sensitive
windscreen wipers
The windscreen wipers operate automati-
cally, without any action on the part of the
driver, if rain is detected (sensor behind
the rear view mirror), adapting their speed
to the intensity of the rainfall.
Activation
This is controlled manually by the driver
by pushing the stalk downwards to the
"AUTO"
position.
It is accompanied by a message in the
screen.
Do not cover the rain sensor, linked
with the sunshine sensor and locat-
ed in the centre of the windscreen
behind the rear view mirror.
Switch off the automatic rain sen-
sitive wipers when using an auto-
matic car wash.
In winter, to avoid damaging the
wiper blades, it is advisable to wait
until the windscreen is completely
clear of ice before activating the
automatic rain sensitive wipers.
The automatic rain sensitive wip-
ers must be reactivated if the igni-
tion has been off for more than one
minute, by pushing the stalk down-
wards.
Switching off
This is controlled manually by the driver
by moving the stalk upwards then re-
turning it to position "0"
.
It is accompanied by a message in the
screen.
Operating fault
If an automatic wiping malfunction oc-
curs, the wipers will operate in intermit-
tent mode.
Have it checked by a PEUGEOT dealer
or a qualifi ed workshop.