Page 139 of 248

9
i
PRACTICAL INFORMATION
137
CHANGING A WHEEL *
Procedure for changing a faulty wheel
for the spare wheel using the tools pro-
vided with the vehicle.
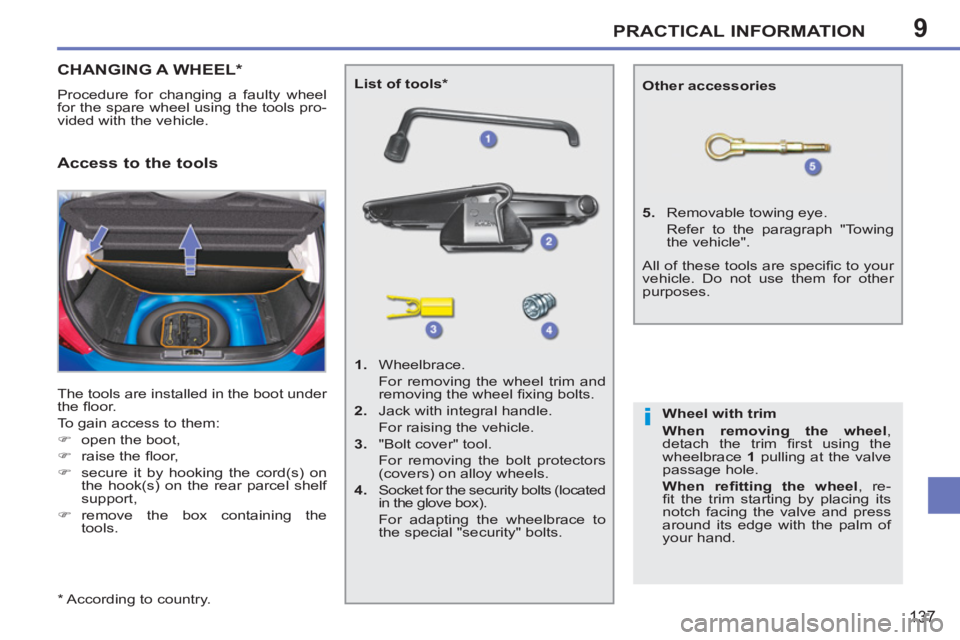
The tools are installed in the boot under
the fl oor.
To gain access to them:
�)
open the boot,
�)
raise the fl oor,
�)
secure it by hooking the cord(s) on
the hook(s) on the rear parcel shelf
support,
�)
remove the box containing the
tools.
Access to the tools
List of tools
*
1.
Wheelbrace.
For removing the wheel trim and
removing the wheel fi xing bolts.
2.
Jack with integral handle.
For raising the vehicle.
3.
"Bolt cover" tool.
For removing the bolt protectors
(covers) on alloy wheels.
4.
Socket for the security bolts (located
in the glove box).
For adapting the wheelbrace to
the special "security" bolts.
5.
Removable towing eye.
Refer to the paragraph "Towing
the vehicle".
Other accessories
Wheel with trim
When removing the wheel
,
detach the trim fi rst using the
wheelbrace 1
pulling at the valve
passage hole.
When refi tting the wheel
, re-
fi t the trim starting by placing its
notch facing the valve and press
around its edge with the palm of
your hand.
All of these tools are specifi c to your
vehicle. Do not use them for other
purposes.
*
According to country.
Page 140 of 248
9
i
PRACTICAL INFORMATION
138
Access to the spare wheel
(Saloon)
The spare wheel is installed in the boot
under the fl oor.
To gain access to it, refer to the paragraph
"Access to the tools" on the previous
page.
Fitting the steel spare wheel
If your vehicle is fi tted with al-
loy wheels, it is normal to notice,
when tightening the bolts on fi tting,
that the washers do not come into
contact with the steel spare wheel.
The wheel is secured by the coni-
cal contact of each bolt.
Taking out the wheel
�)
Unscrew the yellow central bolt.
�)
Raise the spare wheel towards you
from the rear.
�)
Take the wheel out of the boot.
Putting the wheel back in place
�)
Put the wheel back in its housing.
�)
Unscrew the yellow central bolt by a
few turns then put it in place in the
centre of the wheel.
�)
Tighten fully until the central bolt
clicks to retain the wheel correctly.
�)
Put the box back in place in the centre
of the wheel.
�)
Put the boot fl oor back in place.
Page 141 of 248
9
i
PRACTICAL INFORMATION
139
Access to the spare wheel (SW)
The spare wheel is installed in the boot
under the fl oor.
To gain access to it, refer to the para-
graph "Access to the tools".
Fitting the steel spare wheel
If your vehicle is fi tted with al-
loy wheels, it is normal to notice,
when tightening the bolts on fi tting,
that the washers do not come into
contact with the steel spare wheel.
The wheel is secured by the coni-
cal contact of each bolt.
Taking out the wheel
�)
Unscrew the yellow central bolt.
�)
Raise the spare wheel towards you
from the rear.
�)
Take the wheel out of the boot.
Putting the wheel back in place
�)
Put the wheel back in its housing.
�)
Unscrew the yellow central bolt by a
few turns then put it in place in the
centre of the wheel.
�)
Tighten fully until the central bolt
clicks to retain the wheel correctly.
�)
Put the box back in place in the cen-
tre of the wheel.
�)
Put the boot fl oor back in place.
Page 142 of 248

9
i
PRACTICAL INFORMATION
140
Parking the vehicle
Immobilise the vehicle where it
does not block traffi c: the ground
must be level, stable and non-
slippery.
Apply the parking brake, switch off
the ignition and engage fi rst gear *
to lock the wheels.
If necessary, place a chock under
the wheel diagonally opposite the
wheel to be changed.
You should ensure that the occu-
pants get out of the vehicle and
wait where they are safe.
Never go underneath a vehicle
raised using a jack; use an axle
stand.
Removing the wheel
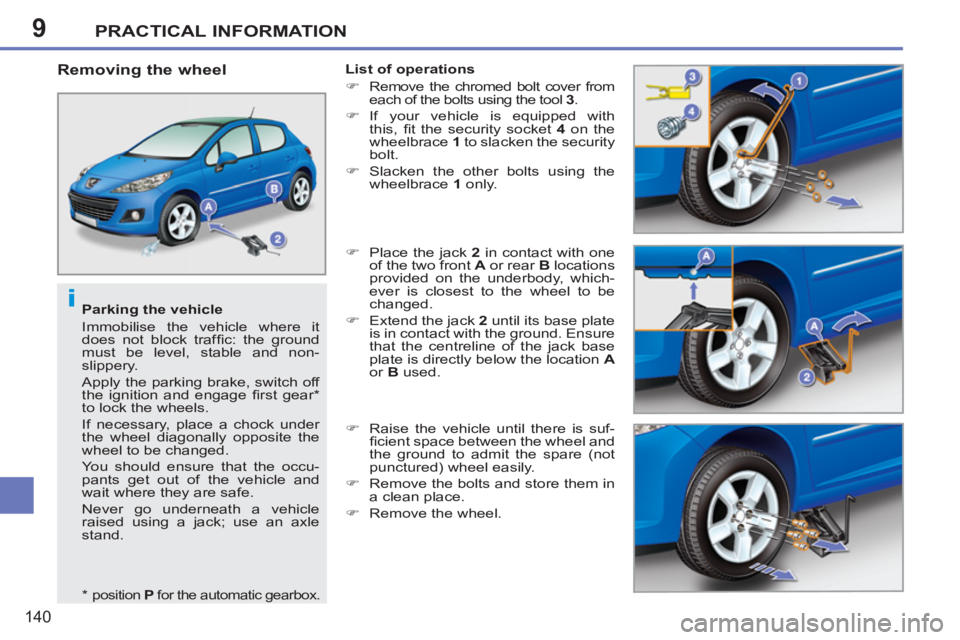
List of operations
�)
Remove the chromed bolt cover from
each of the bolts using the tool 3
.
�)
If your vehicle is equipped with
this, fi t the security socket 4
on the
wheelbrace 1
to slacken the security
bolt.
�)
Slacken the other bolts using the
wheelbrace 1
only.
�)
Place the jack 2
in contact with one
of the two front A
or rear B
locations
provided on the underbody, which-
ever is closest to the wheel to be
changed.
�)
Extend the jack 2
until its base plate
is in contact with the ground. Ensure
that the centreline of the jack base
plate is directly below the location A
or B
used.
�)
Raise the vehicle until there is suf-
fi cient space between the wheel and
the ground to admit the spare (not
punctured) wheel easily.
�)
Remove the bolts and store them in
a clean place.
�)
Remove the wheel.
*
position P
for the automatic gearbox.
Page 143 of 248

9
i
PRACTICAL INFORMATION
141
After changing a wheel
To store the punctured wheel in
the boot correctly, fi rst remove the
central cover.
Have the tightening of the bolts
and the pressure of the spare
wheel checked by a PEUGEOT
dealer or a qualifi ed workshop
without delay.
Have the punctured wheel repaired
and replace it on the vehicle as soon
as possible.
Fitting the wheel
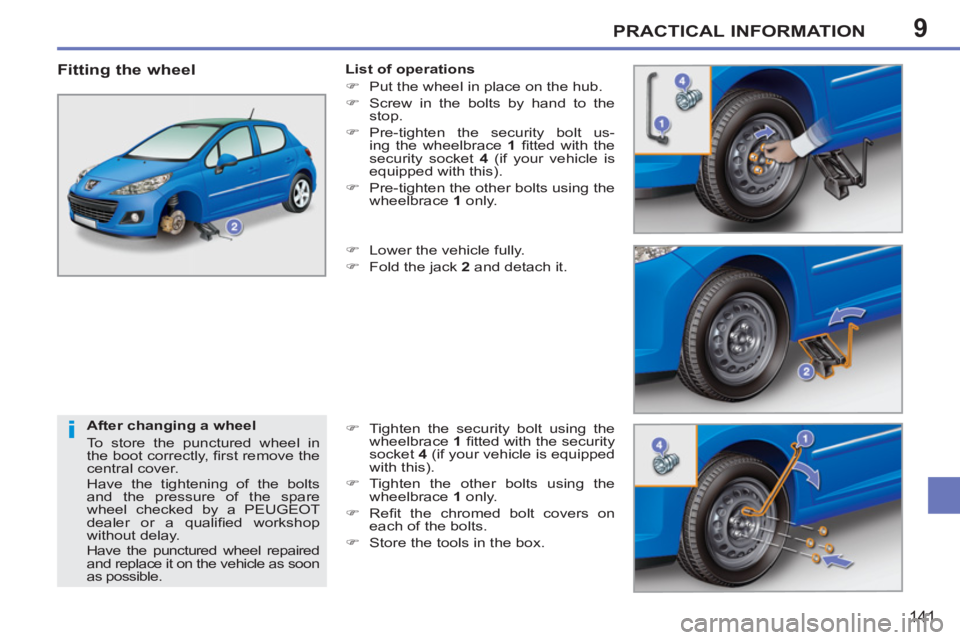
List of operations
�)
Put the wheel in place on the hub.
�)
Screw in the bolts by hand to the
stop.
�)
Pre-tighten the security bolt us-
ing the wheelbrace 1
fi tted with the
security socket 4
(if your vehicle is
equipped with this).
�)
Pre-tighten the other bolts using the
wheelbrace 1
only.
�)
Lower the vehicle fully.
�)
Fold the jack 2
and detach it.
�)
Tighten the security bolt using the
wheelbrace 1
fi tted with the security
socket 4
(if your vehicle is equipped
with this).
�)
Tighten the other bolts using the
wheelbrace 1
only.
�)
Refi t the chromed bolt covers on
each of the bolts.
�)
Store the tools in the box.
Page 162 of 248

9PRACTICAL INFORMATION
160
ACCESSORIES
A wide range of accessories and
genuine parts is available from the
PEUGEOT dealer network.
These accessories and parts have been
tested and approved for reliability and
safety.
They are all adapted to your vehicle and
benefi t from PEUGEOT's recommenda-
tion and warranty.
Conversion kits
You can obtain an "Enterprise" kit to
convert a trade vehicle to a private car
and vice-versa.
"Transport solutions":
boot liner, luggage net, cigarette lighter,
roof bars, bicycle carrier on roof bars,
ski carrier, roof box...
Tow bar, which mst be fi tted by PEUGEOT
dealer or a qualifi ed workshop.
"Comfort":
door defl ectors, side blinds and rear
blind, coat hanger fi xed to head restraint,
front centre armrest, under shelf storage,
front and rear parking sensors...
"Styling":
aluminium gear lever knob, spoiler, styl-
ing strips, alloy wheels, trims, chromed
mirror shells, body kit...
*
To avoid any risk of jamming of the
pedals:
- ensure that the mat is positioned
and secured correctly,
- never fi t one mat on top of another.
"Security":
anti-theft alarm, window engraving,
wheel security bolts, child seats and
booster cushions, breathalyzer, fi rst aid
kit, warning triangle, high visibility jack-
et, stolen vehicle tracking system, tem-
porary puncture repair kit, snow chains,
non-slip covers, front foglamps kit...
"Protection":
mats * , seat covers compatible with lat-
eral airbags, aluminium or PVC door
aperture fi nishers...