2011 PEUGEOT 207 ECU
[x] Cancel search: ECUPage 142 of 248
9
i
PRACTICAL INFORMATION
140
Parking the vehicle
Immobilise the vehicle where it
does not block traffi c: the ground
must be level, stable and non-
slippery.
Apply the parking brake, switch off
the ignition and engage fi rst gear *
to lock the wheels.
If necessary, place a chock under
the wheel diagonally opposite the
wheel to be changed.
You should ensure that the occu-
pants get out of the vehicle and
wait where they are safe.
Never go underneath a vehicle
raised using a jack; use an axle
stand.
Removing the wheel
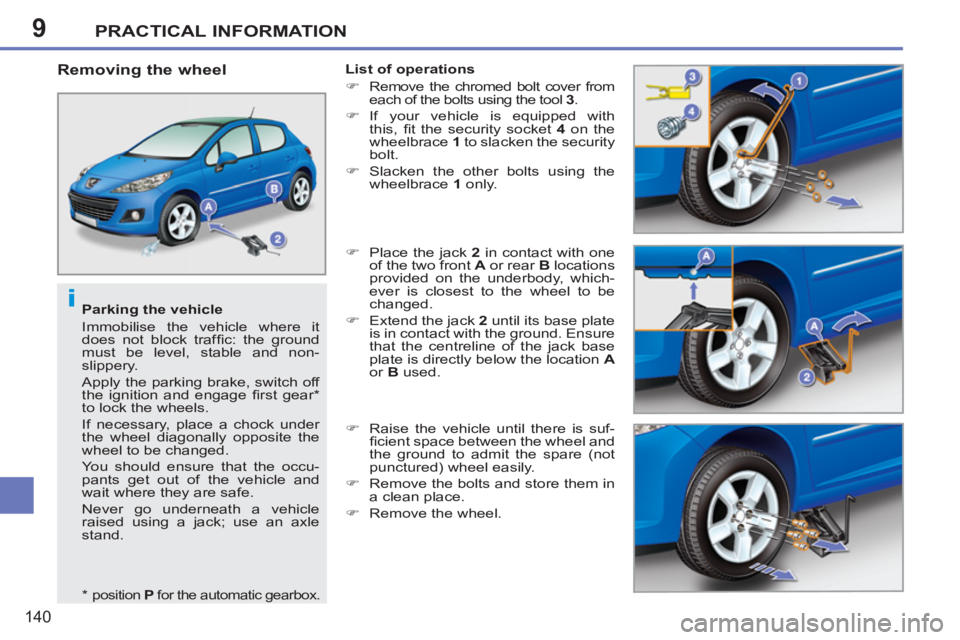
List of operations
�)
Remove the chromed bolt cover from
each of the bolts using the tool 3
.
�)
If your vehicle is equipped with
this, fi t the security socket 4
on the
wheelbrace 1
to slacken the security
bolt.
�)
Slacken the other bolts using the
wheelbrace 1
only.
�)
Place the jack 2
in contact with one
of the two front A
or rear B
locations
provided on the underbody, which-
ever is closest to the wheel to be
changed.
�)
Extend the jack 2
until its base plate
is in contact with the ground. Ensure
that the centreline of the jack base
plate is directly below the location A
or B
used.
�)
Raise the vehicle until there is suf-
fi cient space between the wheel and
the ground to admit the spare (not
punctured) wheel easily.
�)
Remove the bolts and store them in
a clean place.
�)
Remove the wheel.
*
position P
for the automatic gearbox.
Page 143 of 248
9
i
PRACTICAL INFORMATION
141
After changing a wheel
To store the punctured wheel in
the boot correctly, fi rst remove the
central cover.
Have the tightening of the bolts
and the pressure of the spare
wheel checked by a PEUGEOT
dealer or a qualifi ed workshop
without delay.
Have the punctured wheel repaired
and replace it on the vehicle as soon
as possible.
Fitting the wheel
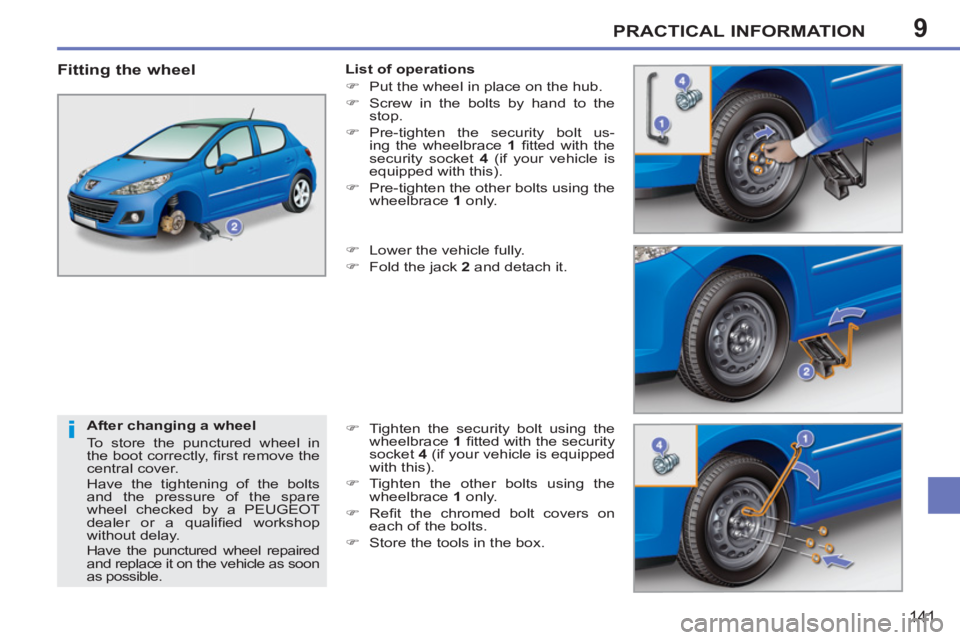
List of operations
�)
Put the wheel in place on the hub.
�)
Screw in the bolts by hand to the
stop.
�)
Pre-tighten the security bolt us-
ing the wheelbrace 1
fi tted with the
security socket 4
(if your vehicle is
equipped with this).
�)
Pre-tighten the other bolts using the
wheelbrace 1
only.
�)
Lower the vehicle fully.
�)
Fold the jack 2
and detach it.
�)
Tighten the security bolt using the
wheelbrace 1
fi tted with the security
socket 4
(if your vehicle is equipped
with this).
�)
Tighten the other bolts using the
wheelbrace 1
only.
�)
Refi t the chromed bolt covers on
each of the bolts.
�)
Store the tools in the box.
Page 155 of 248
9PRACTICAL INFORMATION
153
BATTERY
Procedure for charging your battery
when it is fl at or for starting the engine
using another battery.
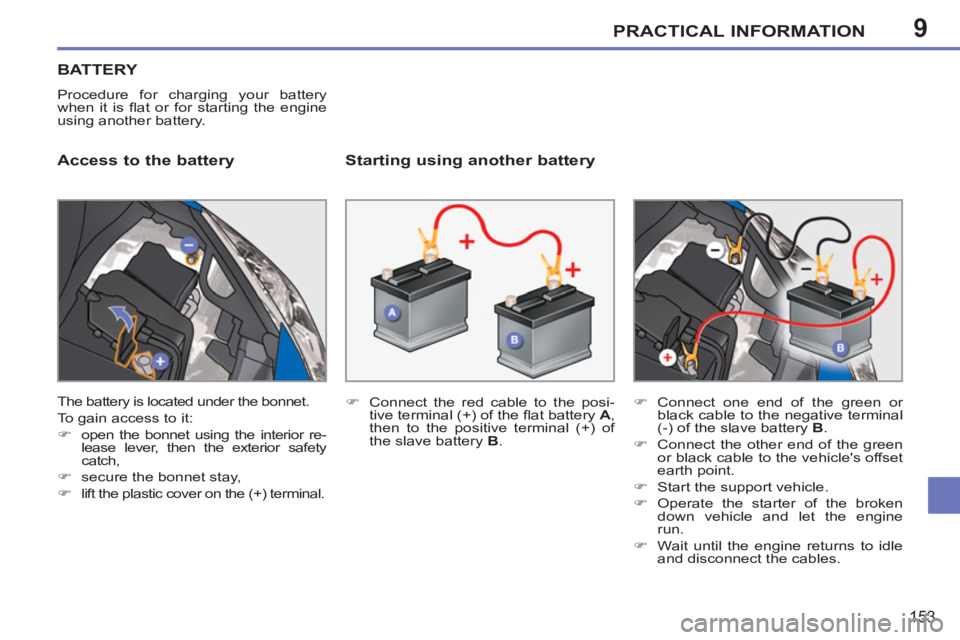
Access to the battery
Starting using another battery
�)
Connect the red cable to the posi-
tive terminal (+) of the fl at battery A
,
then to the positive terminal (+) of
the slave battery B
.
�)
Connect one end of the green or
black cable to the negative terminal
(-) of the slave battery B
.
�)
Connect the other end of the green
or black cable to the vehicle's offset
earth point.
�)
Start the support vehicle.
�)
Operate the starter of the broken
down vehicle and let the engine
run.
�)
Wait until the engine returns to idle
and disconnect the cables.
The battery is located under the bonnet.
To gain access to it:
�)
open the bonnet using the interior re-
lease lever, then the exterior safety
catch,
�)
secure the bonnet stay,
�)
lift the plastic cover on the (+) terminal.
Page 158 of 248
9
i
i
PRACTICAL INFORMATION
156
TOWING THE VEHICLE
Procedure for having your vehicle towed
or for towing another vehicle using a re-
movable towing eye.
Access to the tools
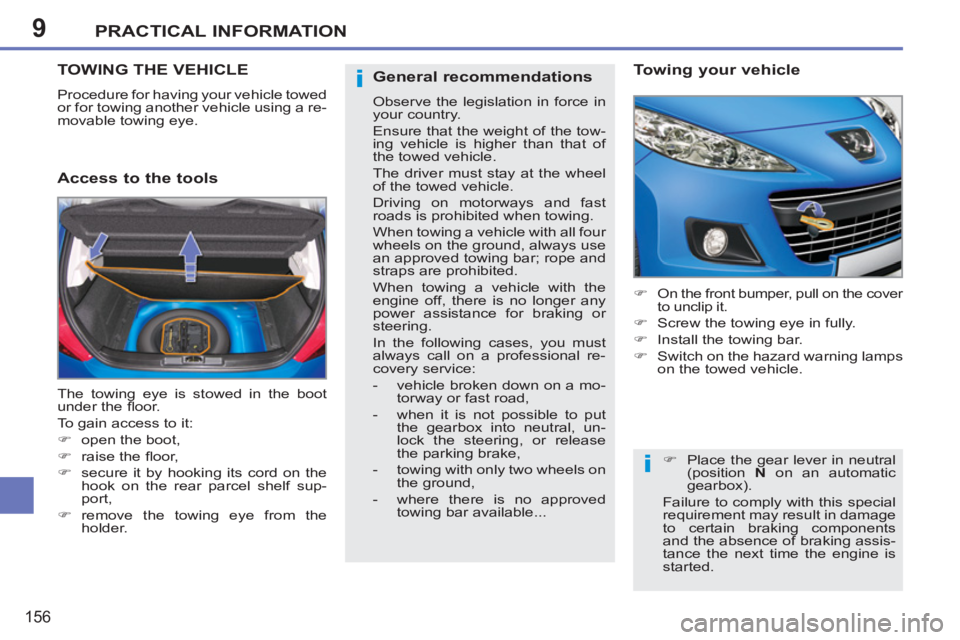
Towing your vehicle
�)
On the front bumper, pull on the cover
to unclip it.
�)
Screw the towing eye in fully.
�)
Install the towing bar.
�)
Switch on the hazard warning lamps
on the towed vehicle.
The towing eye is stowed in the boot
under the fl oor.
To gain access to it:
�)
open the boot,
�)
raise the fl oor,
�)
secure it by hooking its cord on the
hook on the rear parcel shelf sup-
port,
�)
remove the towing eye from the
holder.
�)
Place the gear lever in neutral
(position N
on an automatic
gearbox).
Failure to comply with this special
requirement may result in damage
to certain braking components
and the absence of braking assis-
tance the next time the engine is
started.
General recommendations
Observe the legislation in force in
your country.
Ensure that the weight of the tow-
ing vehicle is higher than that of
the towed vehicle.
The driver must stay at the wheel
of the towed vehicle.
Driving on motorways and fast
roads is prohibited when towing.
When towing a vehicle with all four
wheels on the ground, always use
an approved towing bar; rope and
straps are prohibited.
When towing a vehicle with the
engine off, there is no longer any
power assistance for braking or
steering.
In the following cases, you must
always call on a professional re-
covery service:
- vehicle broken down on a mo-
torway or fast road,
- when it is not possible to put
the gearbox into neutral, un-
lock the steering, or release
the parking brake,
- towing with only two wheels on
the ground,
- where there is no approved
towing bar available...
Page 162 of 248

9PRACTICAL INFORMATION
160
ACCESSORIES
A wide range of accessories and
genuine parts is available from the
PEUGEOT dealer network.
These accessories and parts have been
tested and approved for reliability and
safety.
They are all adapted to your vehicle and
benefi t from PEUGEOT's recommenda-
tion and warranty.
Conversion kits
You can obtain an "Enterprise" kit to
convert a trade vehicle to a private car
and vice-versa.
"Transport solutions":
boot liner, luggage net, cigarette lighter,
roof bars, bicycle carrier on roof bars,
ski carrier, roof box...
Tow bar, which mst be fi tted by PEUGEOT
dealer or a qualifi ed workshop.
"Comfort":
door defl ectors, side blinds and rear
blind, coat hanger fi xed to head restraint,
front centre armrest, under shelf storage,
front and rear parking sensors...
"Styling":
aluminium gear lever knob, spoiler, styl-
ing strips, alloy wheels, trims, chromed
mirror shells, body kit...
*
To avoid any risk of jamming of the
pedals:
- ensure that the mat is positioned
and secured correctly,
- never fi t one mat on top of another.
"Security":
anti-theft alarm, window engraving,
wheel security bolts, child seats and
booster cushions, breathalyzer, fi rst aid
kit, warning triangle, high visibility jack-
et, stolen vehicle tracking system, tem-
porary puncture repair kit, snow chains,
non-slip covers, front foglamps kit...
"Protection":
mats * , seat covers compatible with lat-
eral airbags, aluminium or PVC door
aperture fi nishers...
Page 180 of 248

178
EMERGENCY OR ASSISTANCE CALL
If an impact is detected by the airbag ECU, andindependently of the deployment of any airbags, anemergency call is made automatically.
Pressing this button again immediately cancels the request. The green LED goes off.
A press
(at any time) of more than 8 seconds on this button, cancels the
request.
When the ignition is switched on, the green
LED comes on for 3 seconds indicating that
the system is operating correctly. Pressin
g this button again immediately cancels the request.
The cancellation is confi rmed b
y a voice message.
Press this button for more than 2 seconds to request
assistance if the vehicle breaks down.
A voice message confi rms that the call has been made *
.
OPERATION OF THE SYSTEM
The green LED remains on (without fl ashing) when communication is established. It goes off at the end of communication.
This call is dealt with b
y the PEUGEOT Emergency team which receiveslocating information from the vehicle and can send a detailed alert to theappropriate emergency services. In countries in which the team is not
operational, or when the locating service has been expressly declined,
the call is dealt with directly by the emergency services (11 2) without the
vehicle location.
In an emergency, press this button
for more than 2 seconds.
Flashing of the green LED and a voice message confi rm that the call has been made to the PEUGEOT Emergency team * .
*
These services are sub
ject to conditions and availability.
Consult a PEUGEOT dealer.
If the oran
ge LED fl ashes: there is a system
fault.
If the oran
ge LED is on continuously: the backup battery must be replaced.
In either case, contact a PEU
GEOT.
I
f you purchased your vehicle outside the PEUGEOT dealer network,
we invite you to have a dealer check the confi guration of these services
and, if desired, modifi ed to suit your wishes. In a multi-lingual country,confi guration is possible in the offi cial national language of your choice.
For technical reasons, particularl
y to improve the quality of PEUGEOTCONNECT services to customers, the manufacturer reserves the right tocarry out updates to the vehicle's on-board telematic system.
Page 182 of 248
180
01
1
55
101
22
334466
131
111
99
144155
77881212161
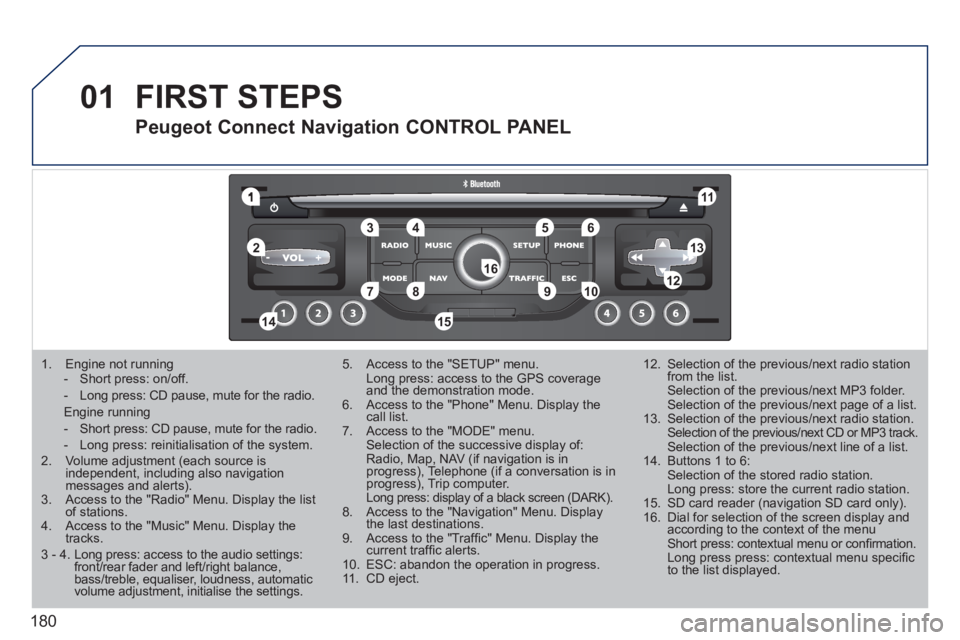
1. Engine not running
- Short press: on/off.
- Long press: CD pause, mute for the radio.
Engine running
- Short press: CD pause, mute for the radio.
- Long press: reinitialisation of the system. 2. Volume adjustment (each source is independent, including also navigation messages and alerts).3. Access to the "Radio" Menu. Display the list of stations. 4. Access to the "Music" Menu. Display thetracks.
5. Access to the "SETUP" menu. Long press: access to the GPS coverage and the demonstration mode.6. Access to the "Phone" Menu. Display thecall list. 7. Access to the "MODE" menu. Selection of the successive display of:Radio, Map, NAV (if navigation is inprogress), Telephone (if a conversation is inprogress), Trip computer. Long press: display of a black screen (DARK).8. Access to the "Navigation" Menu. Display the last destinations.9. Access to the "Traffi c" Menu. Display thecurrent traffi c alerts. 10. ESC: abandon the operation in progress. 11. CD eject.
12. Selection of the previous/next radio station from the list. Selection of the previous/next MP3 folder. Selection of the previous/next page of a list.
13. Selection of the previous/next radio station. Selection of the previous/next CD or MP3 track. Selection of the previous/next line of a list.
14. Buttons 1 to 6: Selection of the stored radio station. Long press: store the current radio station.
15. SD card reader (navigation SD card only).
16. Dial for selection of the screen display andaccording to the context of the menu Short press: contextual menu or confi rmation. Long press press: contextual menu specifi c to the list displayed.
FIRST STEPS
Peugeot Connect Navigation CONTROL PANEL
3 - 4. Long press: access to the audio settings:front/rear fader and left/right balance,bass/treble, equaliser, loudness, automatic volume adjustment, initialise the settings.
Page 232 of 248
230
09SCREEN MENU MAP
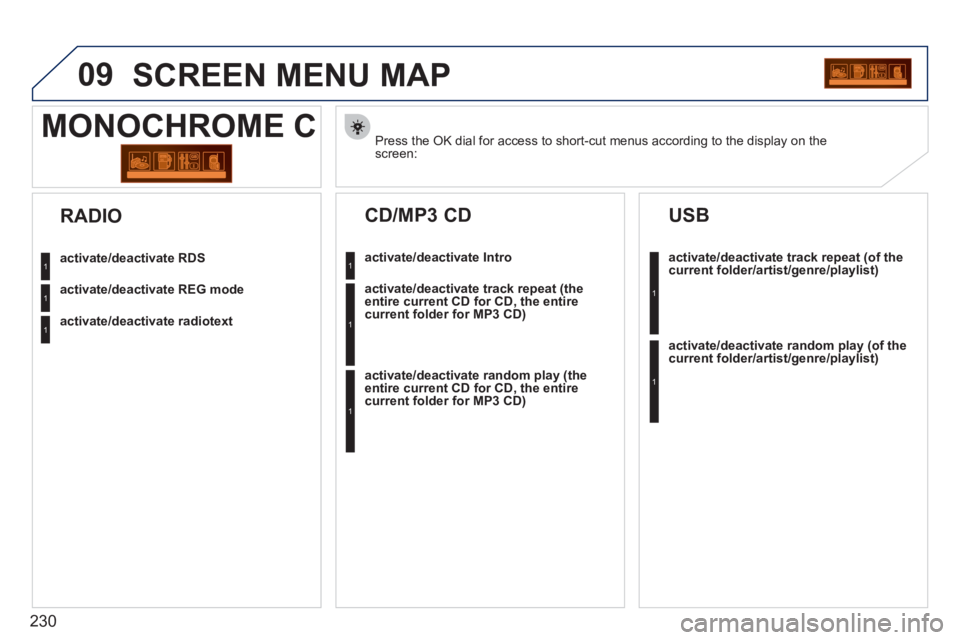
Press the OK dial for access to short-cut menus according to the display on thescreen:
MONOCHROME C
activate/deactivate RDS
activate/deactivate REG mode
activate/deactivate radiotext
RADIO
activate/deactivate Intro
CD/MP3 CD
activate/deactivate track repeat (the
entire current CD for CD, the entire
current folder for MP3 CD)
activate/deactivate random play (the
entire current CD for CD, the entire
current folder for MP3 CD)
activate/deactivate track repeat (of the current folder/artist/genre/playlist)
USB
activate/deactivate random play(of thecurrent folder/artist/genre/playlist)
1
1
1
1
1
1
1
1