Page 77 of 339

2 Instruments and controls
Instrument panel...................................2-2
Meters and gauges ................................2-3
Speedometer and odometer .....................2-4
Tachometer ....................................2-6
Engine coolant temperature gauge ...............2-6
Fuel gauge ....................................2-7
Engine oil pressure gauge .......................2-8
Voltmeter ......................................2-8
Trip computer (if so equipped) ...................2-9
Compass display (if so equipped) ..................2-10
Compass display .............................. 2-10
Warning/indicator lights and audible reminders ......2-13
Checking bulbs ............................... 2-14
Warning lights ................................ 2-14
Indicator lights ................................ 2-19
Audible reminders ............................. 2-22
Security systems ................................. 2-23
Vehicle security system ......................... 2-23
NISSAN vehicle immobilizer system .............2-24
Windshield wiper and washer switch ...............2-25
Switch operation .............................. 2-25
Rear window wiper and washer switch ..............2-26Rear window and outside mirror (if so equipped)
defroster switch
.................................. 2-27
Headlight and turn signal switch ....................2-27
Headlight control switch ........................ 2-27
Daytime running light system (Canada only) ......2-28
Instrument brightness control ...................2-29
Turn signal switch ............................. 2-29
Fog light switch (if so equipped) ................2-30
Off road lamps switch (if so equipped) ...........2-30
Hazard warning flasher switch .....................2-31
Horn ............................................ 2-31
Vehicle Dynamic Control (VDC) OFF switch .........2-32
Hill descent control switch (if so equipped) ..........2-32
Electronic locking rear differential (E-Lock) system
switch (if so equipped) ............................ 2-33
Clutch interlock (clutch start) switch
(if so equipped) .................................. 2-34
P ower
outlet ..................................... 2-35
Storage ......................................... 2-36
Storage trays ................................. 2-36
Console box .................................. 2-37
Glove box .................................... 2-38
Page 79 of 339
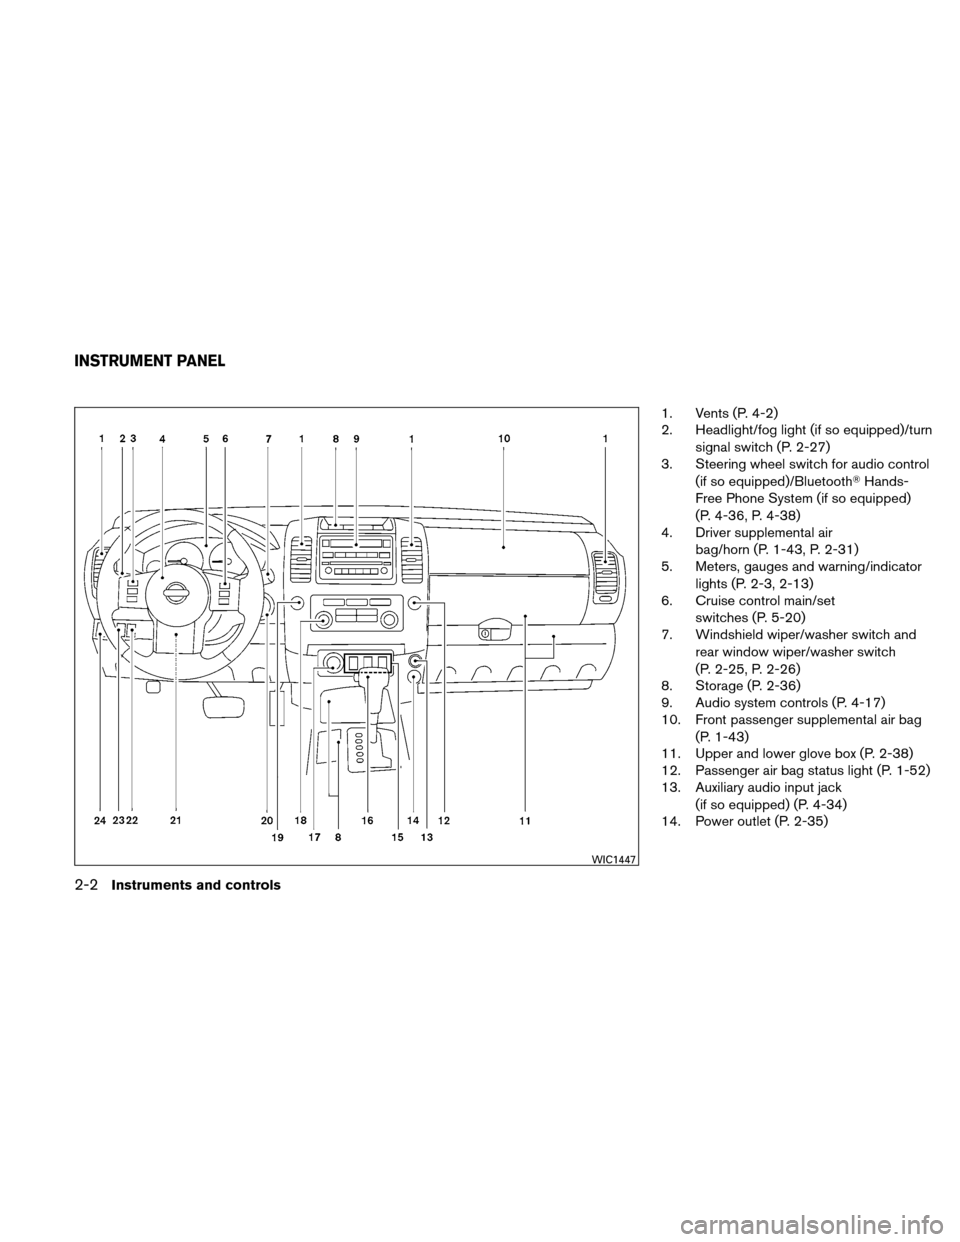
1. Vents (P. 4-2)
2. Headlight/fog light (if so equipped)/turnsignal switch (P. 2-27)
3. Steering wheel switch for audio control
(if so equipped)/Bluetooth� Hands-
Free Phone System (if so equipped)
(P. 4-36, P. 4-38)
4. Driver supplemental air
bag/horn (P. 1-43, P. 2-31)
5. Meters, gauges and warning/indicator
lights (P. 2-3, 2-13)
6. Cruise control main/set
switches (P. 5-20)
7. Windshield wiper/washer switch and
rear window wiper/washer switch
(P. 2-25, P. 2-26)
8. Storage (P. 2-36)
9. Audio system controls (P. 4-17)
10. Front passenger supplemental air bag
(P. 1-43)
11. Upper and lower glove box (P. 2-38)
12. Passenger air bag status light (P. 1-52)
13. Auxiliary audio input jack
(if so equipped) (P. 4-34)
14. Power outlet (P. 2-35)
WIC1447
INSTRUMENT PANEL
2-2Instruments and controls
Page 104 of 339
To defrost the rear window glass and outside
mirrors (if so equipped) , start the engine and
push the rear window defroster switch on. The
rear window defroster indicator light comes on.
Push the switch again to turn the defroster off.
The rear window defroster automatically turns off
after approximately 15 minutes.
CAUTION
When cleaning the inner side of the rear
window, be careful not to scratch or dam-
age the rear window defroster.
HEADLIGHT CONTROL SWITCH
Lighting
�1When turning the switch to theposi-
tion, the front parking, tail, license plate and
instrument panel lights come on.
�2When turning the switch to theposi-
tion, the headlights come on and all the other
lights remain on.
Type A
LIC0783
Type B
LIC1419
Type A
LIC0706
REAR WINDOW AND OUTSIDE
MIRROR (if so equipped)
DEFROSTER SWITCH HEADLIGHT AND TURN SIGNAL
SWITCH
Instruments and controls2-27
Page 106 of 339

If the parking brake is applied before the engine is
started, the daytime running lights do not illumi-
nate. The daytime running lights illuminate when
the parking brake is released. The daytime run-
ning lights will remain on until the ignition switch
is placed in the OFF position.
WARNING
When the daytime running light system is
active, tail lights on your vehicle are not
on. It is necessary at dusk to turn on your
headlights. Failure to do so could cause
an accident injuring yourself and others.
INSTRUMENT BRIGHTNESS
CONTROL
The instrument brightness control operates when
the headlight control switch is in the
,
or
position.
Turn the control
�Ato adjust the brightness of
instrument panel lights when driving at night.
TURN SIGNAL SWITCH
Turn signal
�1Move the lever up or down to signal the
turning direction. When the turn is com-
pleted, the turn signals cancel automatically.
Lane change signal
�2To signal a lane change, move the lever up or
down to the point where the indicator light
begins to flash, but the lever does not latch.
WIC0917WIC0860
Instruments and controls2-29
Page 112 of 339

To use the clutch interlock switch:1. Set the parking brake.
2. Depress the brake pedal with your right foot.
3. Place your left foot on the brake pedal and release the parking brake.
4. Turn the ignition switch to the ON position.
5. Press and release the clutch interlock switch. The CANCEL light on the switch will
illuminate.
6. Turn the ignition to the START position to start the engine and, at the same time, de-
press the accelerator pedal with your right
foot. As the vehicle begins to move, take
your left foot off the brake. Once the engine
has started, the clutch interlock switch
CANCEL light shuts off. Do not use the
interlock switch to start the engine under
normal driving conditions. The power outlets are for powering electrical
accessories such as cellular telephones.
The power outlet located on the instrument panel
and the power outlet located in the cargo area are
powered directly by the vehicle’s battery.
Open the cap to use a power outlet.
CAUTION
●
The outlet and plug may be hot during
or immediately after use.
● Only certain power outlets are designed
for use with a cigarette lighter unit. Do
not use any other power outlet for an
accessory lighter. See your NISSAN
dealer for additional information.
● Do not use with accessories that ex-
ceed a 12 volt, 120W (10A) power draw.
Do not use double adapters or more
than one electrical accessory.
Front row
WIC1420
Center console
LIC0761
POWER OUTLET
Instruments and controls2-35
Page 124 of 339

POWER WINDOWS
WARNING
●Make sure that all passengers have
their hands, etc. inside the vehicle while
it is in motion and before closing the
windows. Use the window lock switch
to prevent unexpected use of the power
windows.
● Do not leave children unattended inside
the vehicle. They could unknowingly ac-
tivate switches or controls and become
trapped in a window. Unattended chil-
dren could become involved in serious
accidents.
The power windows operate when the ignition
switch is placed in the ON position, or for about
45 seconds after the ignition switch is placed in
the OFF position. If the driver’s or passenger’s
door is opened during this period of about 45
seconds, power to the windows is canceled.
1. Window lock button
2. Power door lock switch
3. Front passenger’s side window switch
4. Right rear passenger’s window switch
5. Left rear passenger’s window switch
6. Driver’s side automatic switch
Driver’s side power window switch
The driver’s side control panel is equipped with
switches to open or close the front and rear
passenger windows.
To open a window, push the switch and hold it
down. To close a window, pull the switch and
hold it up. To stop the opening or closing function
at any time, simply release the switch.
WIC1100
WINDOWS
Instruments and controls2-47
Page 136 of 339

�1Pull the hood lock release handle located
below the driver’s side instrument panel. The
hood will spring up slightly.
�2Push the lever at the front of the hood to the
side as illustrated with your fingertips and
raise the hood.
�3Insert the support rod into the slot on the
underside of the hood.
When closing the hood, return the hood rod to its
original position. Lower the hood approximately
12 inch (30 cm) above the latch and release it.
This allows proper engagement of the hood latch.
WARNING
● Make sure the hood is completely
closed and latched before driving. Fail-
ure to do so could cause the hood to fly
open and result in an accident.
● If you see steam or smoke coming from
the engine compartment, to avoid injury
do not open the hood.
WARNING
●Always be sure the lift gate has been
closed securely to prevent it from open-
ing while driving.
● Do not drive with the lift gate open. This
could allow dangerous exhaust gases
to be drawn into the vehicle. See “Ex-
haust gas” in the “Starting and driving”
section of this manual.
● Make sure that all passengers have
their hands, etc., inside the vehicle be-
fore closing the lift gate.
LPD0302
HOOD LIFT GATE
Pre-driving checks and adjustments3-9
Page 212 of 339

position, the tr")
Overdrive switch
Each time your vehicle is started, the transmis-
sion is automatically “reset” to overdrive ON.
ON: With the engine running and theshift selector in the D (Drive)
position, the transmission upshifts
into Overdrive as vehicle speed
increases.
Overdrive does not engage until the engine
has reached operating temperature.
OFF: For driving up and down longslopes where engine braking is nec-
essary push the Overdrive switch
once. The O/D OFF indicator light
in the instrument panel comes on at
this time.
When cruising at a low speed or climbing a
gentle slope, you may feel uncomfortable shift
shocks as the transmission shifts into and out of
Overdrive repeatedly. In this case, depress the
Overdrive switch to turn the Overdrive off. The
O/D OFF indicator light in the instrument panel
comes on at this time.
When driving conditions change, depress the
Overdrive switch to turn the Overdrive on.
Remember not to drive at high speeds for ex-
tended periods of time with the Overdrive off.
This reduces fuel economy.
MANUAL TRANSMISSION (if so
equipped)
WARNING
●Do not downshift abruptly on slippery
roads. This may cause a loss of control.
● Do not over-rev the engine when shift-
ing to a lower gear. This may cause a
loss of control or engine damage.
CAUTION
●Do not rest your foot on the clutch pedal
while driving. This may cause clutch
damage.
● Fully depress the clutch pedal before
shifting to help prevent transmission
damage.
● Stop your vehicle completely before
shifting into R (Reverse) .
● When the vehicle is stopped with the
engine running (for example, at a stop
light) , shift to N (Neutral) and release
the clutch pedal with the foot brake
applied.
LSD0142
Starting and driving5-17
 , start the engine and
push the rear window defroster switch on. The
rear window defroster indicator light comes on.
Push the swit")