Page 98 of 350
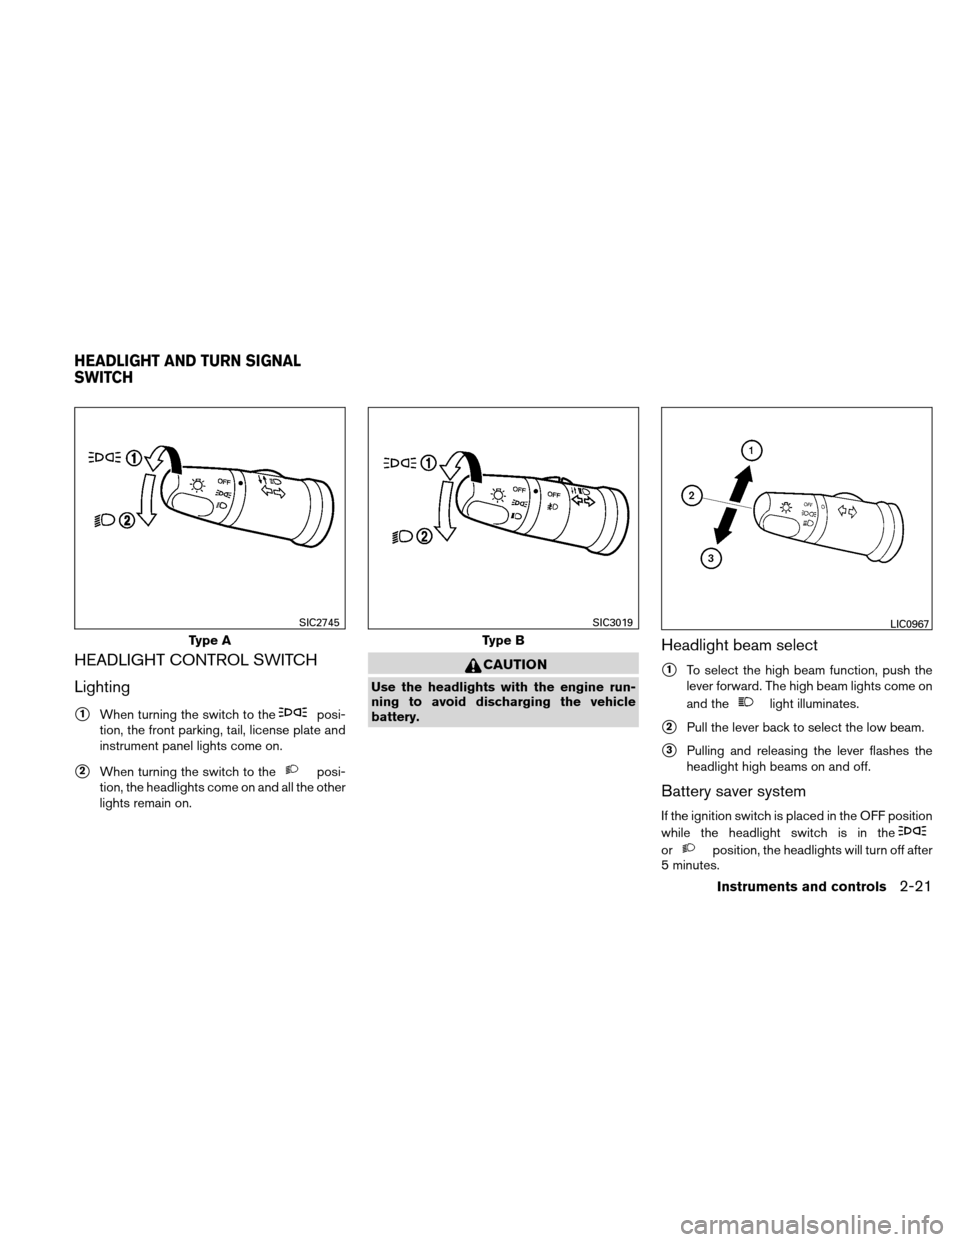
HEADLIGHT CONTROL SWITCH
Lighting
�1When turning the switch to theposi-
tion, the front parking, tail, license plate and
instrument panel lights come on.
�2When turning the switch to theposi-
tion, the headlights come on and all the other
lights remain on.
CAUTION
Use the headlights with the engine run-
ning to avoid discharging the vehicle
battery.
Headlight beam select
�1To select the high beam function, push the
lever forward. The high beam lights come on
and the
light illuminates.
�2Pull the lever back to select the low beam.
�3Pulling and releasing the lever flashes the
headlight high beams on and off.
Battery saver system
If the ignition switch is placed in the OFF position
while the headlight switch is in the
orposition, the headlights will turn off after
5 minutes.
Type A
SIC2745
Type B
SIC3019LIC0967
HEADLIGHT AND TURN SIGNAL
SWITCH
Instruments and controls2-21
Page 99 of 350

CAUTION
Even though the battery saver feature au-
tomatically turns off the headlights after a
period of time, you should turn the head-
light switch to the OFF position when the
engine is not running to avoid discharging
the vehicle battery.
DAYTIME RUNNING LIGHT SYSTEM
(Canada only)
The headlights automatically illuminate at a re-
duced intensity when the engine is started with
the parking brake released. The daytime running
lights operate with the headlight switch in the
OFF position or in the
position. Turn the
headlight switch to the
position for full
illumination when driving at night.
If the parking brake is applied before the engine is
started, the daytime running lights do not illumi-
nate. The daytime running lights illuminate when
the parking brake is released. The daytime run-
ning lights will remain on until the ignition switch
is placed in the OFF position.
WARNING
When the daytime running light system is
active, tail lights on your vehicle are not
on. It is necessary at dusk to turn on your
headlights. Failure to do so could cause
an accident injuring yourself and others.
INSTRUMENT BRIGHTNESS
CONTROL
The instrument brightness control operates when
the headlight control switch is in the
orposition.
Turn the control to adjust the brightness of instru-
ment panel lights when driving at night.
LIC0392
2-22Instruments and controls
Page 100 of 350

TURN SIGNAL SWITCH
Turn signal
�1Move the lever up or down to signal the
turning direction. When the turn is com-
pleted, the turn signals cancel automatically.
Lane change signal
�2To signal a lane change, move the lever up or
down to the point where the indicator light
begins to flash, but the lever does not latch.
FOG LIGHT SWITCH (if so equipped)
To turn the fog lights on, turn the headlight switch
to the
position, then turn the fog light
switch to the
position.
To turn the fog lights off, turn the fog light switch
to the OFF position.
The headlights must be on and the low beams
selected for the fog lights to operate. The fog
lights automatically turn off when the high beam
headlights are selected. Push the switch on to warn other drivers when
you must stop or park under emergency condi-
tions. All turn signal lights flash.WARNING
●
If stopping for an emergency, be sure to
move the vehicle well off the road.
● Do not use the hazard warning flashers
while moving on the highway unless
unusual circumstances force you to
drive so slowly that your vehicle might
become a hazard to other traffic.
● Turn signals do not work when the haz-
ard warning flasher lights are on.
LIC0968SIC3020LIC0394
HAZARD WARNING FLASHER
SWITCH
Instruments and controls2-23
Page 102 of 350
 maximum.
CAUTION
●The outlet and plug may be hot during
or immediat")
The power outlet is for powering electrical acces-
sories such as cellular telephones. The outlet is
rated at 12 volt, 120 W (10A) maximum.
CAUTION
●The outlet and plug may be hot during
or immediately after use.
● Only certain power outlets are designed
for use with a cigarette lighter unit. Do
not use any other power outlet for an
accessory lighter. See your NISSAN
dealer for additional information. ●
Do not use with accessories that ex-
ceed a 12 volt, 120W (10A) power draw.
Do not use double adapters or more
than one electrical accessory.
● Use power outlets with the engine run-
ning to avoid discharging the vehicle
battery.
● Avoid using power outlets when the air
conditioner, headlights or rear window
defroster is on.
● Before inserting or disconnecting a
plug, be sure the electrical accessory
being used is turned OFF.
● Push the plug in as far as it will go. If
good contact is not made, the plug may
overheat or the internal temperature
fuse may open.
● When not in use, be sure to close the
cap. Do not allow water or any other
liquids to contact the outlet.
MAP POCKETS
LIC0969LIC0971
POWER OUTLET STORAGE
Instruments and controls2-25
Page 104 of 350
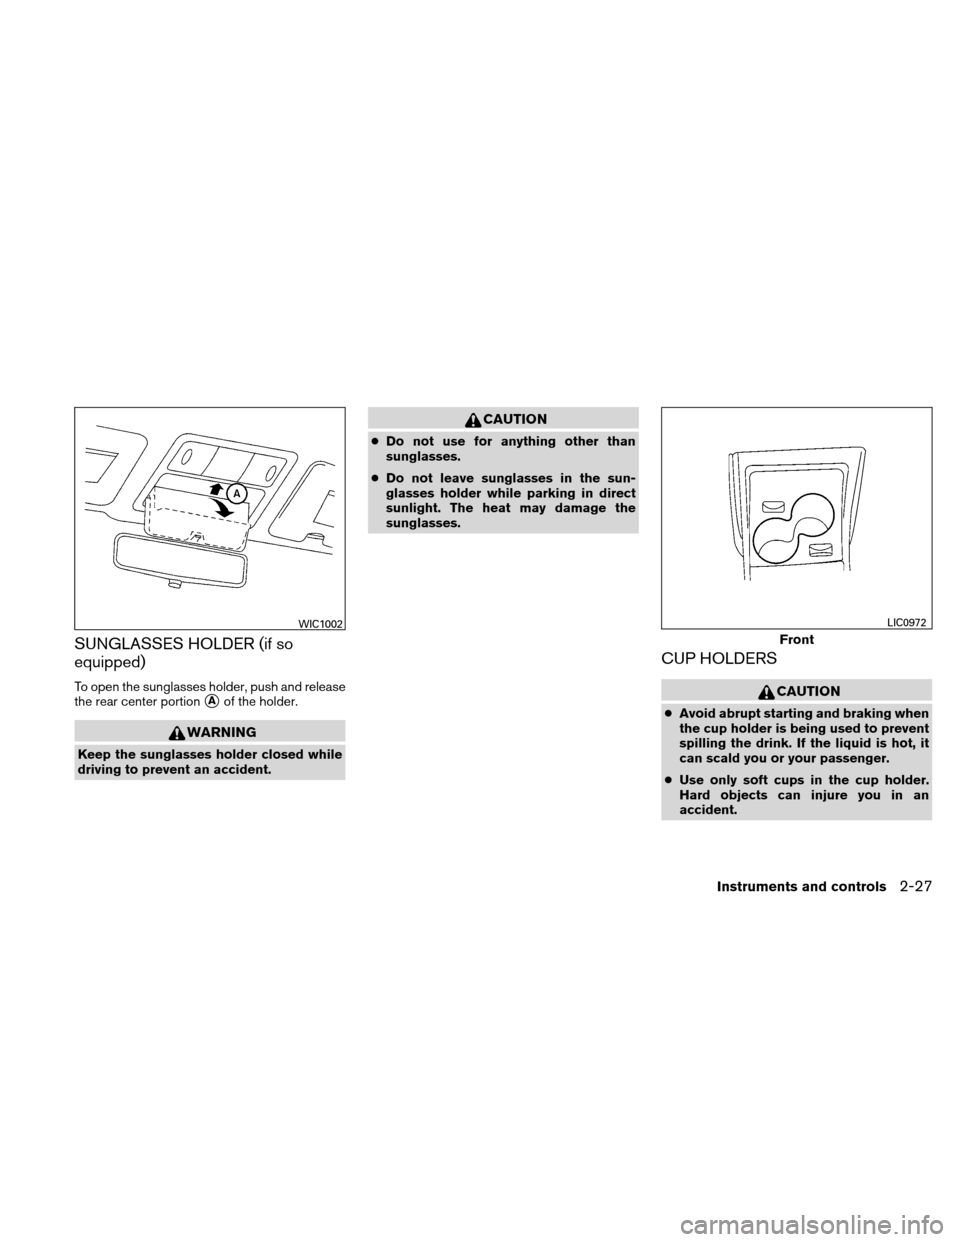
SUNGLASSES HOLDER (if so
equipped)
To open the sunglasses holder, push and release
the rear center portion
�Aof the holder.
WARNING
Keep the sunglasses holder closed while
driving to prevent an accident.
CAUTION
●Do not use for anything other than
sunglasses.
● Do not leave sunglasses in the sun-
glasses holder while parking in direct
sunlight. The heat may damage the
sunglasses.
CUP HOLDERS
CAUTION
●Avoid abrupt starting and braking when
the cup holder is being used to prevent
spilling the drink. If the liquid is hot, it
can scald you or your passenger.
● Use only soft cups in the cup holder.
Hard objects can injure you in an
accident.
WIC1002
Front
LIC0972
Instruments and controls2-27
Page 111 of 350

AUTOMATIC MOONROOF
The moonroof will only operate when the ignition
switch is placed in the ON position. The auto-
matic moonroof is operational for about 45 sec-
onds, even if the ignition switch is placed in the
ACC or OFF position. If the driver’s door or the
front passenger’s door is opened during this
period of about 45 seconds, power to the moon-
roof is canceled.
Sliding the moonroof
To fully open the moonroof, push the switch
toward
�1.To fully close the moonroof, push the switch
toward
�2.
To open or close the moonroof part way, push the
switch in any direction while the moonroof is
sliding to stop it in the desired position.
Tilting the moonroof
Close the moonroof by pushing the switch
toward
�2. Release the switch, then push
the switch toward
�2again to tilt the
moonroof up.
To tilt the moonroof down, push the switch
toward
�1.
WARNING
● In an accident you could be thrown from
the vehicle through an open moonroof.
Always use seat belts and child
restraints.
● Do not allow anyone to stand up or
extend any portion of their body out of
the moonroof opening while the vehicle
is in motion or while the moonroof is
closing.
CAUTION
●Remove water drops, snow, ice or sand
from the moonroof before opening.
● Do not place heavy objects on the
moonroof or surrounding area.
Resetting the moonroof switch
The moonroof switch may not operate properly
after the battery terminal is disconnected, the
electrical supply interrupted and/or some mal-
function is detected. Use the following reset pro-
cedure to return moonroof operation to normal.
1. If the moonroof is open, close it fully by repeatedly pushing the
side of the
moonroof switch.
2. Push and hold the
side of the moon-
roof switch to tilt the moonroof up.
3. Release the moonroof switch after the moonroof moves slightly up and down.
4. Push and hold the
side of the moon-
roof switch to fully tilt the moonroof down.
5. Check if the moonroof switch operates nor- mally.
If the moonroof still does not operate properly,
have the moonroof system checked, and if nec-
essary repaired, by a NISSAN dealer.
LIC0977
MOONROOF (if so equipped)
2-34Instruments and controls
Page 113 of 350

The interior light has a three-position switch and
operates regardless of ignition switch position.
When the switch is in the ON position
�1, the
interior lights illuminate, regardless of door posi-
tion. The lights will go off after about 15 minutes
unless the ignition switch is placed in the ACC or
ON position.
When the switch is in the DOOR position
�2, the
interior lights will stay on for about 30 seconds
when: ●
The doors are unlocked by the keyfob, a key
or the power door lock switch while all doors
are closed and the ignition switch is placed
in the OFF position.
● The driver’s door is opened and then closed
while the key is removed from the ignition
switch.
● The key is removed from the ignition switch
while all doors are closed.
The lights will turn off while the 30 second timer is
activated when: ● The driver’s door is locked by the keyfob, a
key, or the power door lock switch.
● The ignition switch is placed in the ON po-
sition.
When the switch is in the OFF position
�3, the
interior lights do not illuminate, regardless of door
position.
The lights will turn off automatically after 15 min-
utes while doors are open to prevent the battery
from becoming discharged.
CAUTION
Do not use for extended periods of time
with the engine stopped. This could result
in a discharged battery. To turn the map lights on, press the lenses. To
turn them off, press the lenses of the lights again.
CAUTION
Do not use for extended periods of time
with the engine stopped. This could result
in a discharged battery.
SIC2063ALIC1472
INTERIOR LIGHT
MAP LIGHTS (if so equipped)
2-36Instruments and controls
Page 114 of 350

The light illuminates when the rear hatch is
opened. When the rear hatch is closed, the light
will turn off.
The light also illuminates with other interior lights
when the interior light switch is in the DOOR
position. See “Interior light” earlier in this section.
The lights will turn off automatically after 15 min-
utes while doors are open to prevent the battery
from becoming discharged.The light illuminates when the trunk lid is opened.
When the trunk lid is closed, the light goes off.
The light also illuminates with other interior lights
when the interior light switch is in the DOOR
position. See “Interior light” earlier in this section.
The lights will turn off automatically after 15 min-
utes while the trunk lid is open to prevent the
battery from becoming discharged.
For bulb replacement procedures, refer to “Exte-
rior and interior lights” in the “Maintenance and
do-it-yourself” section of this manual.
LUGGAGE COMPARTMENT LIGHT
(Hatchback)
TRUNK LIGHT (Sedan) (if so
equipped)
Instruments and controls2-37