Page 297 of 350

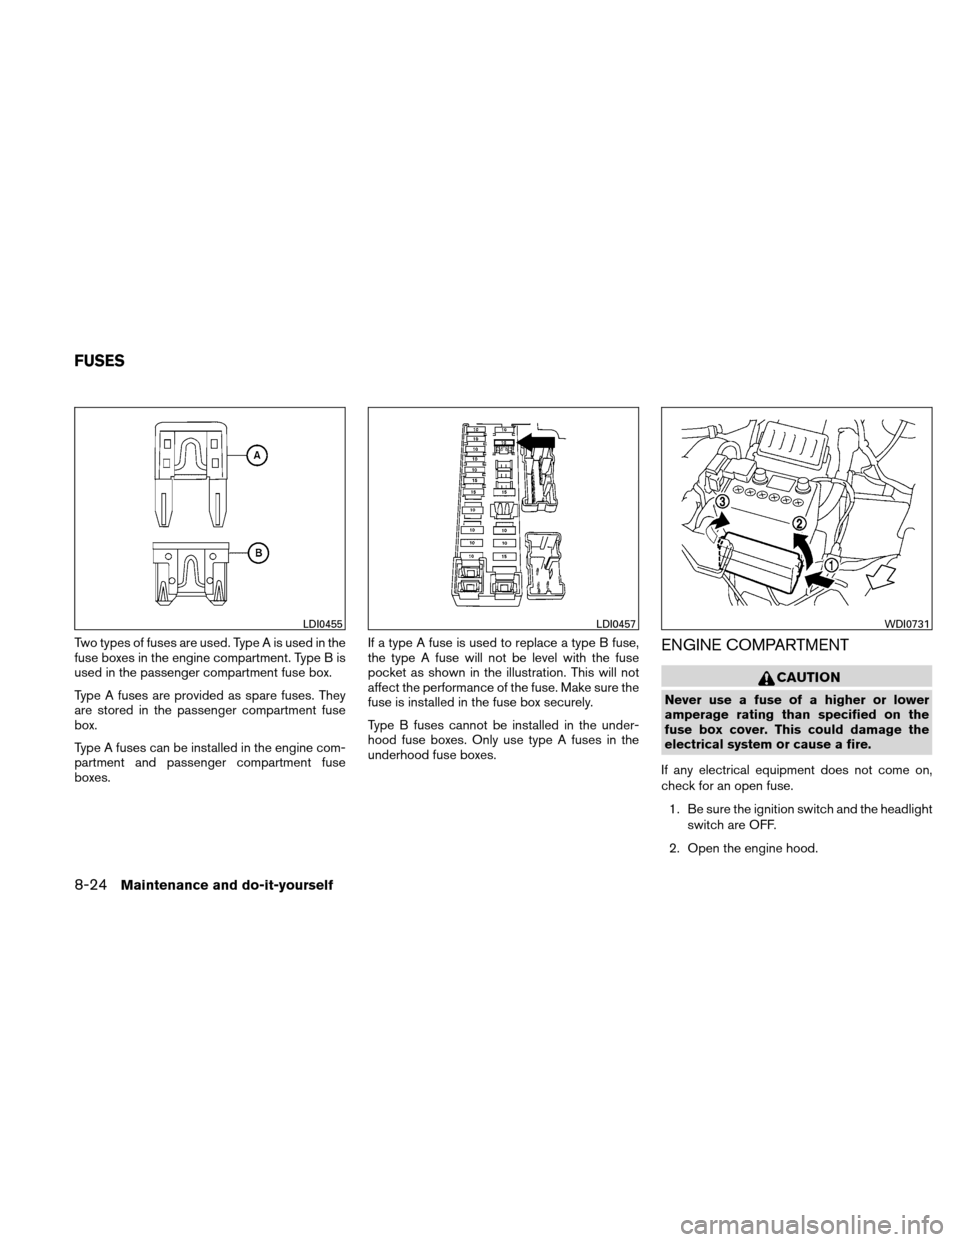
Two types of fuses are used. Type A is used in the
fuse boxes in the engine compartment. Type B is
used in the passenger compartment fuse box.
Type A fuses are provided as spare fuses. They
are stored in the passenger compartment fuse
box.
Type A fuses can be installed in the engine com-
partment and passenger compartment fuse
boxes.If a type A fuse is used to replace a type B fuse,
the type A fuse will not be level with the fuse
pocket as shown in the illustration. This will not
affect the performance of the fuse. Make sure the
fuse is installed in the fuse box securely.
Type B fuses cannot be installed in the under-
hood fuse boxes. Only use type A fuses in the
underhood fuse boxes.ENGINE COMPARTMENT
CAUTION
Never use a fuse of a higher or lower
amperage rating than specified on the
fuse box cover. This could damage the
electrical system or cause a fire.
If any electrical equipment does not come on,
check for an open fuse. 1. Be sure the ignition switch and the headlight switch are OFF.
2. Open the engine hood.
LDI0455LDI0457WDI0731
FUSES
8-24Maintenance and do-it-yourself
Page 299 of 350
PASSENGER COMPARTMENT
CAUTION
Never use a fuse of a higher or lower
amperage rating than specified on the
fuse box cover. This could damage the
electrical system or cause a fire.
If any electrical equipment does not operate,
check for an open fuse. NOTE:
The fuse box is located on the driver’s side
of the instrument panel.
1. Be sure the ignition switch and the headlight switch are OFF.
2. Pull the fuse box cover to remove
�1.
3. Remove the fuse with the fuse puller
�2. 4. If the fuse is open
�A, replace it with an
equivalent good fuse
�B.
5. Push the fuse box cover to install.
6. If a new fuse also opens, have the electrical system checked and repaired by a NISSAN
dealer.
SDI1870
Type A
WDI0452
8-26Maintenance and do-it-yourself
Page 300 of 350
Extended storage switch (if so
equipped)
If any electrical equipment does not operate,
remove the extended storage switch and check
for an open fuse.
NOTE:
The extended storage switch is used for
long term vehicle storage. Even if the ex-
tended storage switch is broken it is not
necessary to replace it. Replace only the
open fuse in the switch with a new fuse.How to replace the extended storage switch:
1. To remove the extended storage switch, be sure the ignition switch is in the OFF or
LOCK position.
2. Be sure the headlight switch is in the OFF position.
3. Remove the fuse box cover.
4. Pinch the locking tabs
�1found on each
side of the storage switch.
5. Pull the storage switch straight out from the fuse box
�2.
Type B
LDI0456LDI2035
Maintenance and do-it-yourself8-27
Page 304 of 350

HEADLIGHTS
Replacing the halogen headlight bulb
The headlight is a semi-sealed beam type which
uses a replaceable headlight (halogen) bulb.
They can be replaced from inside the engine
compartment without removing the headlight as-
sembly.
See a NISSAN dealer for replacing the head-
lights.
CAUTION
●Aiming is not necessary after replacing
the bulb. When aiming adjustment is
necessary, contact a NISSAN dealer.
● Do not leave the headlight assembly
open without a bulb installed for a long
period of time. Dust, moisture, smoke,
etc. entering the headlight body may
affect bulb performance. Remove the
bulb from the headlight assembly just
before a replacement bulb is installed.
● Only touch the base when handling the
bulb. Never touch the glass envelope.
Touching the glass could significantly
affect bulb life and/or headlight
performance. ●
High pressure halogen gas is sealed
inside the halogen bulb. The bulb may
break if the glass envelope is scratched
or the bulb is dropped.
● Use the same number and wattage as
shown in the chart.
Fog may temporarily form inside the lens of the
exterior lights in the rain or in a car wash. A
temperature difference between the inside and
the outside of the lens causes the fog. This is not
a malfunction. If large drops of water collect
inside the lens, contact a NISSAN dealer.
LIGHTS
Maintenance and do-it-yourself8-31
Page 305 of 350
EXTERIOR AND INTERIOR LIGHTS
ItemWattage (W)Bulb No.*1
Headlight assembly*2 High/low (Halogen) 60/55HB2
Turn 217507LF
Front clearance light 5WY5W
Front fog light*2 (if so equipped) 35H8
Map lights (if so equipped) 87Y
Interior light 87Y
Luggage compartment light (hatchback) / Trunk
light (sedan) (if so equipped) 5—
High-mounted stop light Inside 18921
Spoiler*2 (if so equipped) —LED
Hatchback*2 —LED
Rear combination light*2 Turn signal light 217507 LF
Stop/Tail 21/512499 LL
Backup (reversing) 2112498
License plate light*2 5W5W
*1 Always check with the Parts Department at a NISSAN dealer for the latest parts information.
*2 If replacement is required contact a NISSAN dealer.
8-32Maintenance and do-it-yourself
Page 306 of 350
�1Front view
1. Map lights (if so equipped)
2. Interior light
3. Front fog light (if so equipped)
4. Headlight assembly
�2Rear view (hatchback)
�3Rear view (sedan)
5. Luggage compartment light (hatchback)
Trunk light (sedan) (if so equipped)
6. High-mounted stop light
7. License plate light
8. Rear combination light
WDI0575
Maintenance and do-it-yourself8-33
Page 318 of 350

Replacing wheels and tires
When replacing a tire, use the same size, tread
design, speed rating and load carrying capacity
as originally equipped. Recommended types and
sizes are shown in “Wheels and tires” in the
“Technical and consumer information” section of
this manual.
WARNING
●The use of tires other than those recom-
mended or the mixed use of tires of
different brands, construction (bias,
bias-belted or radial) , or tread patterns
can adversely affect the ride, braking,
handling, VDC system, ground clear-
ance, body-to-tire clearance, tire chain
clearance, speedometer calibration,
headlight aim and bumper height.
Some of these effects may lead to acci-
dents and could result in serious per-
sonal injury.
● If your vehicle was originally equipped
with 4 tires that were the same size and
you are only replacing 2 of the 4 tires,
install the new tires on the rear axle.
Placing new tires on the front axle may
cause loss of vehicle control in some
driving conditions and cause an acci-
dent and personal injury. ●
If the wheels are changed for any rea-
son, always replace with wheels which
have the same off-set dimension.
Wheels of a different off-set could
cause premature tire wear, degrade ve-
hicle handling characteristics, affect
the VDC system and/or interference
with the brake discs/drums. Such inter-
ference can lead to decreased braking
efficiency and/or early brake pad/shoe
wear. Refer to “Wheels and tires” in the
“Technical and consumer information”
section of this manual for wheel off-set
dimensions.
● When a spare tire is mounted or a wheel
is replaced, tire pressure will not be
indicated, the TPMS will not function
and the low tire pressure warning light
will flash for approximately 1 minute.
The light will remain on after 1 minute.
Contact your NISSAN dealer as soon as
possible for tire replacement and/or
system resetting.
● Replacing tires with those not originally
specified by NISSAN could affect the
proper operation of the TPMS. ●
Do not install a damaged or deformed
wheel or tire even if it has been re-
paired. Such wheels or tires could have
structural damage and could fail with-
out warning.
● The use of retread tires is not
recommended.
● For additional information regarding
tires, refer to “Important Tire Safety In-
formation” (US) or “Tire Safety Informa-
tion” (Canada) in the Warranty Informa-
tion Booklet.
Wheel balance
Unbalanced wheels may affect vehicle handling
and tire life. Even with regular use, wheels can get
out of balance. Therefore, they should be bal-
anced as required.
Wheel balance service should be per-
formed with the wheels off the vehicle.
Spin balancing the wheels on the vehicle
could lead to mechanical damage.
Maintenance and do-it-yourself8-45
Page 344 of 350

Front air bag system
(See supplemental restraint system)......1-48
Front seats .....................1-2
Fuel Capacities and recommended
fuel/lubricants .................9-2
Fuel economy ................5-27
Fuel-filler door and cap ...........3-26
Fuel-filler door lock opener lever ......3-26
Fuel gauge ...................2-5
Fuel octane rating ...............9-5
Fuel recommendation .............9-4
Loose fuel cap warning ........2-5, 3-27
Fuses .......................8-24
Fusible links ...................8-25
G
Gascap .....................3-26
Gauge Fuel gauge ...................2-5
Odometer ...................2-4
Speedometer .................2-4
Tachometer ..................2-5
Trip odometer .................2-4
General maintenance ...............8-2
Glove box .....................2-28
H
Hands-free phone system, Bluetooth� .....4-56
Hazard warning flasher switch .........2-23
Headlight and turn signal switch ........2-21
Headlight control switch ............2-21 Headlights
....................8-31
Heater Heater and air conditioner controls .....4-9
Heater operation ...............4-11
Hood release ...................3-22
Horn .......................2-24
I
Ignition switch ...................5-7
Immobilizer system .........2-17, 3-4, 5-12
Important vehicle information label .......9-11
Increasing fuel
economy .............5-27
Indicator lights and audible reminders
(See warning/indicator lights and audible
reminders) .....................2-7
Inside mirror ...................3-30
Instrument brightness control ..........2-22
Instrument panel ...............0-7, 2-2
Instrument panel dimmer switch ........2-22
Intelligent Key system Key operating range .............3-12
Mechanical key ................3-3
Remote keyless entry operation .......3-17
Troubleshooting guide ............3-21
Warning signals ...............3-21
Interior light ....................2-36
Interior trunk lid release .............3-26
iPod� Player................4-47, 4-49
ISOFIX child restraints .............1-24
J
Jump starting ...................6-7 K
Keyfob battery replacement ...........8-28
Keyless entry With Intelligent Key system
(See Intelligent Key system) .........3-17
Keys, Except Intelligent Key ............3-2
Keys, For Intelligent Key system .........3-2
L
Labels Air conditioner specification label .....9-12
C.M.V.S.S. certification label ........9-11
Emission control information label .....9-12
Engine serial number ............9-11
F.M.V.S.S. certification label .........9-11
Tire and Loading Information label .....9-12
Vehicle identification number (VIN) plate . .9-10
Warning labels (for SRS) ..........1-55
LATCH (Lower Anchors and Tethers for CHildren)
System ......................1-24
License plate Installing the license plate ..........9-13
Light Air bag warning light .........1-55, 2-12
Brake light
(See stop light) .........8-32
Bulb check/instrument panel .........2-8
Bulb replacement ..............8-32
Charge warning light .............2-9
Fog light switch ...............2-23
Headlight and turn signal switch ......2-21
Headlight control switch ..........2-21
Headlights ..................8-31
10-3