Page 191 of 350

Tuning with the touchscreen:
When in AM or FM mode, the radio can be tuned
using the touchscreen. To bring up the visual
tuner, touch the “Tune” key on the lower right
corner of the screen. A screen appears with a bar
running from low frequencies on the left to high
frequencies on the right. Touch the screen at the
location of the frequency you wish to tune and the
station will change to that frequency. To return to
the regular radio display screen, touch the “OK”
key.
Tuning with the TUNE/SCROLL knob:
The radio can also be manually tuned using the
TUNE/SCROLL knob. When in FM or AM mode,turn the TUNE/SCROLL knob to the left for lower
frequencies or to the right for higher frequencies.
When in XM mode, turn the TUNE/SCROLL
knob to change the channel.
SEEK tuning:
When in FM or AM mode, press the
SEEK/CATEGORY button
orto
tune from low to high or high to low frequencies
and to stop at the next broadcasting station.
When in XM mode, press the SEEK/CATEGORY
button
orto change the category.
1 to 6 Station memory operations:
Twelve stations can be set for the FM band (6 for
FM1, 6 for FM2) and six stations can be set for
the AM band. Eighteen stations can be set for the
XM band (6 for XM1, 6 for XM2, 6 for XM3) . 1. Choose the radio band AM, FM1 or FM2 using the FM·AM select button or choose
the radio band XM1, XM2 or XM3 using the
XM button.
2. Tune to the desired station using manual or seek tuning. Press and hold any of the de-
sired station memory buttons (1 – 6) until a
beep sound is heard. 3. The channel indicator will then come on and
the sound will resume. Programming is now
complete.
4. Other buttons can be set in the same man- ner.
If the battery cable is disconnected or if the fuse
opens, the radio memory will be canceled. In that
case, reset the desired stations.
Compact disc (CD) player operation
Place the ignition switch in the ACC or ON
position and carefully insert the compact disc
into the slot with the label side up. The compact
disc is automatically pulled into the slot and starts
to play.
If the radio is already operating, it automatically
turns off and the compact disc begins to play.
CD button:
When the CD button is pressed with the system
off and the compact disc loaded, the system will
turn on and the compact disc will start to play.
When the CD button is pressed with a compact
disc loaded and the radio playing, the radio will
automatically be turned off and the compact disc
will start to play.
LHA1489
4-44Display screen, heater, air conditioner, audio and phone systems
Page 216 of 350

TROUBLESHOOTING GUIDE
The system should respond correctly to all voice
commands without difficulty. If problems are en-
countered, try the following solutions.
Where the solutions are listed by number, try
each solution in turn, starting with number 1, until
the problem is resolved.
SymptomSolution
System fails to interpret the command correctly. 1. Ensure that the command is valid. See “List of voice commands” in this section.
2. Ensure that the command is spoken after the tone.
3. Speak clearly without pausing between words and at a level appropriate to the ambient noise level in the vehicle.
4. Ensure that the ambient noise level is not excessive (for example, windows open or defroster on) . NOTE: If it is too
noisy to use the phone, it is likely that the voice commands will not be recognized.
5. If more than one command was said at a time, try saying the commands separately.
6. If the system consistently fails to recognize commands, the voice training procedure should be carried out to im-
prove the recognition response for the speaker. See “Speaker Adaptation (SA) mode” in this section.
The system consistently selects the wrong entry from the
phone book. 1. Ensure that the phone book entry name requested matches what was originally stored. This can be confirmed by
using the “List Names” command. See “Phonebook” in this section.
2. Replace one of the names being confused with a new name.
Display screen, heater, air conditioner, audio and phone systems4-69
Page 274 of 350

8 Maintenance and do-it-yourself
Maintenance requirements..........................8-2
General maintenance ..............................8-2
Explanation of general maintenance items .........8-2
Maintenance precautions . . .........................8-5
Engine compartment check locations ................8-6
Engine cooling system .............................8-8
Checking engine coolant level ...................8-9
Changing engine coolant ........................8-9
Engine oil ........................................ 8-10
Checking engine oil level .......................8-10
Changing engine oil ........................... 8-11
Changing engine oil filter .......................8-12
Continuously Variable Transmission (CVT) fluid ......8-13
4-speed automatic transmission fluid ...............8-14
Temperature conditions for checking .............8-14
Brake and clutch (if so equipped) fluid ..............8-15
Brake fluid .................................... 8-16
Clutch fluid (if so equipped) ....................8-16
Windshield-washer fluid ........................... 8-16
Windshield-washer fluid reservoir ...............8-16
Battery .......................................... 8-17
Jump starting ................................. 8-18
Drive belt ........................................ 8-19Spark plugs .
..................................... 8-20
Replacing spark plugs ......................... 8-20
Air cleaner ....................................... 8-21
Windshield wiper blades .......................... 8-21
Cleaning ..................................... 8-21
Replacing .................................... 8-22
Brakes .......................................... 8-23
Fuses ........................................... 8-24
Engine compartment ........................... 8-24
Passenger compartment .......................8-26
Battery replacement .............................. 8-28
Keyfob (if so equipped) ........................ 8-28
NISSAN Intelligent Key™ (if so equipped) ........8-30
Lights ........................................... 8-31
Headlights .................................... 8-31
Exterior and
interior lights ....................... 8-32
Wheels and tires ................................. 8-36
Tire pressure .................................. 8-36
Tire labeling ................................... 8-40
Types of tires .................................. 8-42
Tire chains .................................... 8-43
Changing wheels and tires .....................8-43
Page 279 of 350
HR16DE Engine Model
1. Engine oil filler cap
2. Brake and clutch (*1) fluid reservoir
3. Air cleaner
4. Battery
5. Fuse/fusible link box
6. Automatic Transmission Fluid (ATF)dipstick (*2)
7. Radiator cap
8. Engine coolant reservoir
9. Engine oil dipstick
10. Drive belt location
11. Windshield-washer fluid reservoir
*1: For Manual Transmission (M/T) model
*2: For Automatic Transmission (A/T)
model
WDI0715
ENGINE COMPARTMENT CHECK
LOCATIONS
8-6Maintenance and do-it-yourself
Page 280 of 350
MR18DE Engine Model
1. Engine oil filler cap
2. Brake and clutch (*1) fluid reservoir
3. Air cleaner
4. Battery
5. Fuse/Fusible link box
6. Automatic Transmission Fluid (ATF)/Continuously Variable Transmission
(CVT) dipstick (*2)
7. Radiator cap
8. Engine oil dipstick
9. Engine coolant reservoir
10. Drive belt location
11. Windshield-washer fluid reservoir
*1: For Manual Transmission (M/T) model
*2: For Automatic Transmission (A/T)
model/Continuously Variable
Transmission (CVT) model
WDI0733
Maintenance and do-it-yourself8-7
Page 297 of 350

Two types of fuses are used. Type A is used in the
fuse boxes in the engine compartment. Type B is
used in the passenger compartment fuse box.
Type A fuses are provided as spare fuses. They
are stored in the passenger compartment fuse
box.
Type A fuses can be installed in the engine com-
partment and passenger compartment fuse
boxes.If a type A fuse is used to replace a type B fuse,
the type A fuse will not be level with the fuse
pocket as shown in the illustration. This will not
affect the performance of the fuse. Make sure the
fuse is installed in the fuse box securely.
Type B fuses cannot be installed in the under-
hood fuse boxes. Only use type A fuses in the
underhood fuse boxes.ENGINE COMPARTMENT
CAUTION
Never use a fuse of a higher or lower
amperage rating than specified on the
fuse box cover. This could damage the
electrical system or cause a fire.
If any electrical equipment does not come on,
check for an open fuse. 1. Be sure the ignition switch and the headlight switch are OFF.
2. Open the engine hood.
LDI0455LDI0457WDI0731
FUSES
8-24Maintenance and do-it-yourself
Page 298 of 350
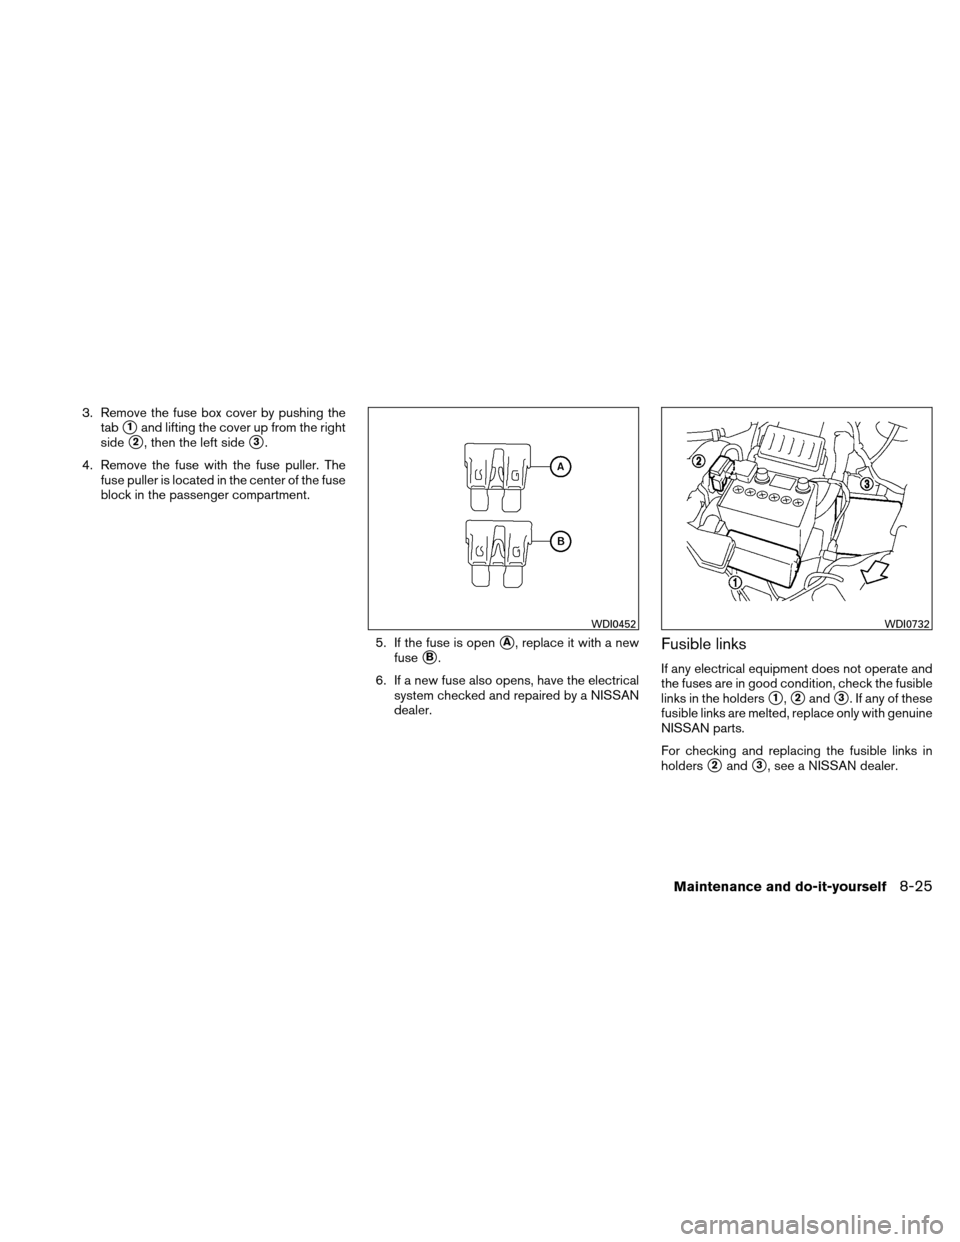
3. Remove the fuse box cover by pushing thetab
�1and lifting the cover up from the right
side
�2, then the left side�3.
4. Remove the fuse with the fuse puller. The fuse puller is located in the center of the fuse
block in the passenger compartment.
5. If the fuse is open
�A, replace it with a new
fuse
�B.
6. If a new fuse also opens, have the electrical system checked and repaired by a NISSAN
dealer.Fusible links
If any electrical equipment does not operate and
the fuses are in good condition, check the fusible
links in the holders
�1,�2and�3. If any of these
fusible links are melted, replace only with genuine
NISSAN parts.
For checking and replacing the fusible links in
holders
�2and�3, see a NISSAN dealer.
WDI0452WDI0732
Maintenance and do-it-yourself8-25
Page 299 of 350
PASSENGER COMPARTMENT
CAUTION
Never use a fuse of a higher or lower
amperage rating than specified on the
fuse box cover. This could damage the
electrical system or cause a fire.
If any electrical equipment does not operate,
check for an open fuse. NOTE:
The fuse box is located on the driver’s side
of the instrument panel.
1. Be sure the ignition switch and the headlight switch are OFF.
2. Pull the fuse box cover to remove
�1.
3. Remove the fuse with the fuse puller
�2. 4. If the fuse is open
�A, replace it with an
equivalent good fuse
�B.
5. Push the fuse box cover to install.
6. If a new fuse also opens, have the electrical system checked and repaired by a NISSAN
dealer.
SDI1870
Type A
WDI0452
8-26Maintenance and do-it-yourself
 fluid reservoir
3. Air cleaner
4. Battery
5. Fuse/fusible link box
6. Automatic Transmission Fluid (ATF)dipstick (*2)
7. Radiator")
 fluid reservoir
3. Air cleaner
4. Battery
5. Fuse/Fusible link box
6. Automatic Transmission Fluid (ATF)/Continuously Variable Tra")