2011 NISSAN NOTE child
[x] Cancel search: childPage 41 of 235
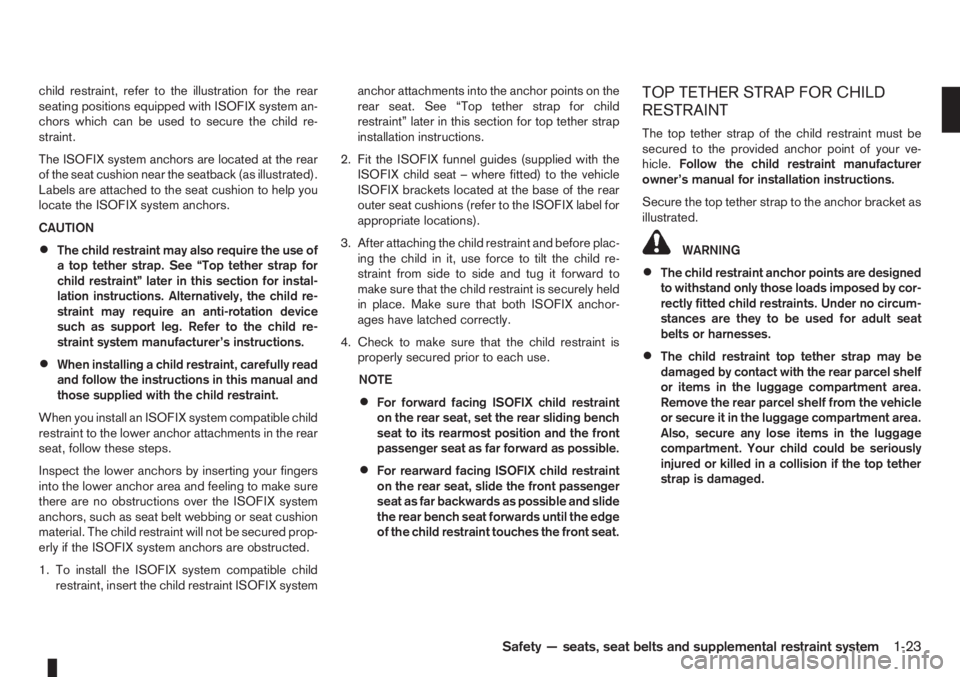
child restraint, refer to the illustration for the rear
seating positions equipped with ISOFIX system an-
chors which can be used to secure the child re-
straint.
The ISOFIX system anchors are located at the rear
of the seat cushion near the seatback (as illustrated).
Labels are attached to the seat cushion to help you
locate the ISOFIX system anchors.
CAUTION
•The child restraint may also require the use of
a top tether strap. See “Top tether strap for
child restraint” later in this section for instal-
lation instructions. Alternatively, the child re-
straint may require an anti-rotation device
such as support leg. Refer to the child re-
straint system manufacturer’s instructions.
•When installing a child restraint, carefully read
and follow the instructions in this manual and
those supplied with the child restraint.
When you install an ISOFIX system compatible child
restraint to the lower anchor attachments in the rear
seat, follow these steps.
Inspect the lower anchors by inserting your fingers
into the lower anchor area and feeling to make sure
there are no obstructions over the ISOFIX system
anchors, such as seat belt webbing or seat cushion
material. The child restraint will not be secured prop-
erly if the ISOFIX system anchors are obstructed.
1. To install the ISOFIX system compatible child
restraint, insert the child restraint ISOFIX systemanchor attachments into the anchor points on the
rear seat. See “Top tether strap for child
restraint” later in this section for top tether strap
installation instructions.
2. Fit the ISOFIX funnel guides (supplied with the
ISOFIX child seat – where fitted) to the vehicle
ISOFIX brackets located at the base of the rear
outer seat cushions (refer to the ISOFIX label for
appropriate locations).
3. After attaching the child restraint and before plac-
ing the child in it, use force to tilt the child re-
straint from side to side and tug it forward to
make sure that the child restraint is securely held
in place. Make sure that both ISOFIX anchor-
ages have latched correctly.
4. Check to make sure that the child restraint is
properly secured prior to each use.
NOTE
•For forward facing ISOFIX child restraint
on the rear seat, set the rear sliding bench
seat to its rearmost position and the front
passenger seat as far forward as possible.
•For rearward facing ISOFIX child restraint
on the rear seat, slide the front passenger
seat as far backwards as possible and slide
the rear bench seat forwards until the edge
of the child restraint touches the front seat.
TOP TETHER STRAP FOR CHILD
RESTRAINT
The top tether strap of the child restraint must be
secured to the provided anchor point of your ve-
hicle.Follow the child restraint manufacturer
owner’s manual for installation instructions.
Secure the top tether strap to the anchor bracket as
illustrated.
WARNING
•The child restraint anchor points are designed
to withstand only those loads imposed by cor-
rectly fitted child restraints. Under no circum-
stances are they to be used for adult seat
belts or harnesses.
•The child restraint top tether strap may be
damaged by contact with the rear parcel shelf
or items in the luggage compartment area.
Remove the rear parcel shelf from the vehicle
or secure it in the luggage compartment area.
Also, secure any lose items in the luggage
compartment. Your child could be seriously
injured or killed in a collision if the top tether
strap is damaged.
Safety — seats, seat belts and supplemental restraint system1-23
Page 42 of 235
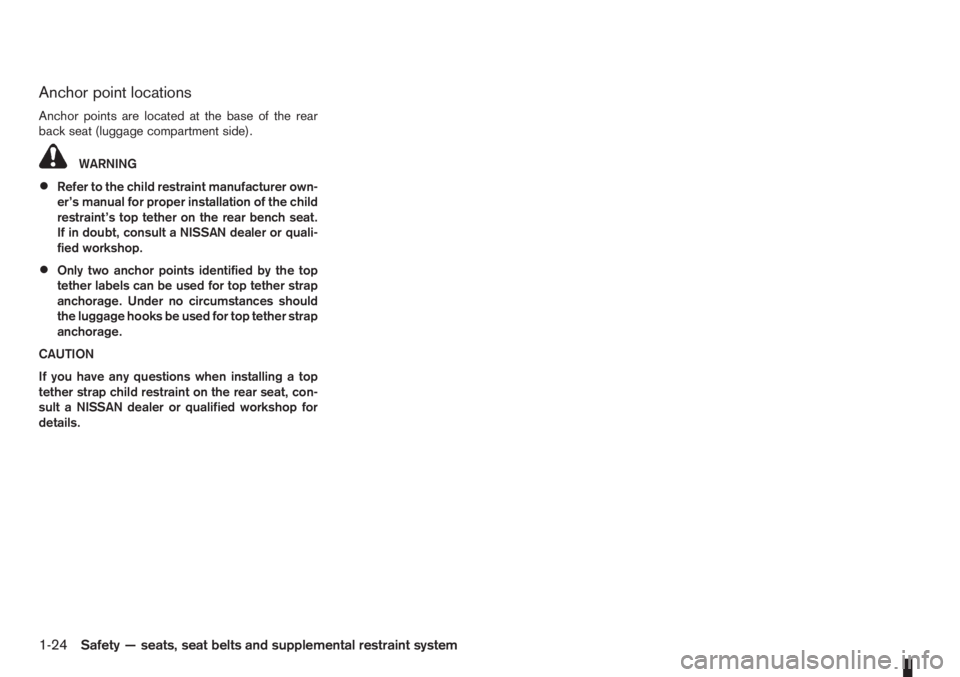
Anchor point locations
Anchor points are located at the base of the rear
back seat (luggage compartment side).
WARNING
•Refer to the child restraint manufacturer own-
er’s manual for proper installation of the child
restraint’s top tether on the rear bench seat.
If in doubt, consult a NISSAN dealer or quali-
fied workshop.
•Only two anchor points identified by the top
tether labels can be used for top tether strap
anchorage. Under no circumstances should
the luggage hooks be used for top tether strap
anchorage.
CAUTION
If you have any questions when installing a top
tether strap child restraint on the rear seat, con-
sult a NISSAN dealer or qualified workshop for
details.
1-24Safety — seats, seat belts and supplemental restraint system
Page 67 of 235
WARNING
Always secure cargo with ropes or straps to help
prevent it from sliding or shifting. Do not place
cargo higher than the seatbacks. In a sudden
stop or collision, unsecured cargo could cause
personal injury.
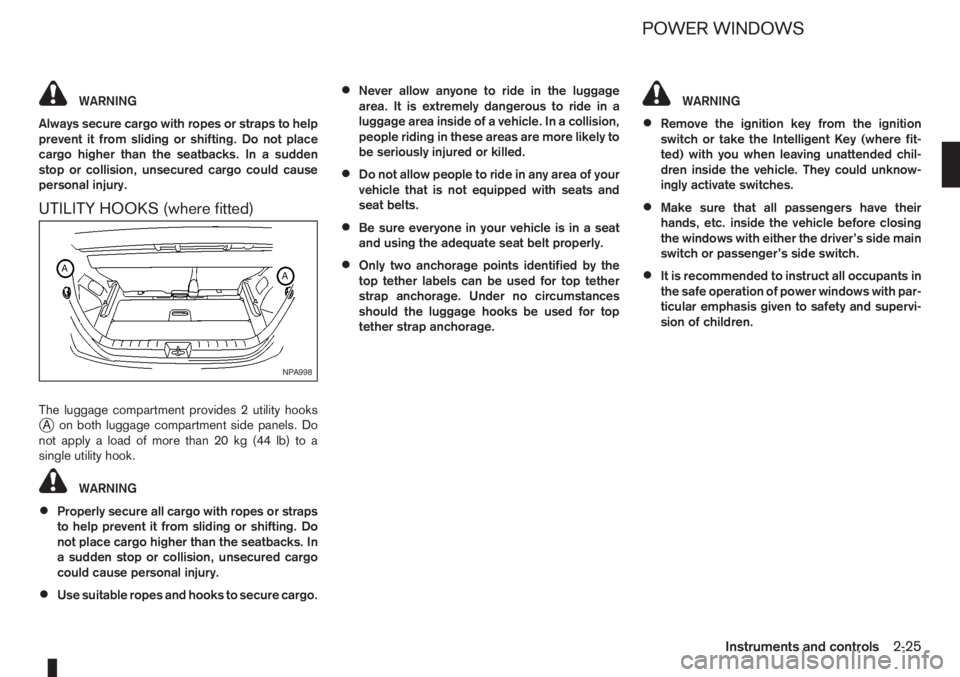
UTILITY HOOKS (where fitted)
The luggage compartment provides 2 utility hooksjA on both luggage compartment side panels. Do
notapplyaloadofmorethan20kg(44lb)toa
single utility hook.
WARNING
•Properly secure all cargo with ropes or straps
to help prevent it from sliding or shifting. Do
not place cargo higher than the seatbacks. In
a sudden stop or collision, unsecured cargo
could cause personal injury.
•Use suitable ropes and hooks to secure cargo.
•Never allow anyone to ride in the luggage
area. It is extremely dangerous to ride in a
luggage area inside of a vehicle. In a collision,
people riding in these areas are more likely to
be seriously injured or killed.
•Do not allow people to ride in any area of your
vehicle that is not equipped with seats and
seat belts.
•Be sure everyone in your vehicle is in a seat
and using the adequate seat belt properly.
•Only two anchorage points identified by the
top tether labels can be used for top tether
strap anchorage. Under no circumstances
should the luggage hooks be used for top
tether strap anchorage.
WARNING
•Remove the ignition key from the ignition
switch or take the Intelligent Key (where fit-
ted) with you when leaving unattended chil-
dren inside the vehicle. They could unknow-
ingly activate switches.
•Make sure that all passengers have their
hands, etc. inside the vehicle before closing
the windows with either the driver’s side main
switch or passenger’s side switch.
•It is recommended to instruct all occupants in
the safe operation of power windows with par-
ticular emphasis given to safety and supervi-
sion of children.
NPA998
POWER WINDOWS
Instruments and controls2-25
Page 71 of 235

3Pre-driving checks and adjustmentsPre-driving checks and adjustments
Keys ........................................................................ 3-2
Integrated keyfob/remote control system .................. 3-3
Using the remote keyless entry system ................ 3-3
Locking the doors ............................................... 3-3
Unlocking the doors – convenience mode ........... 3-4
Unlocking the doors – anti-hijack mode ............... 3-4
Switching from convenience mode to
anti-hijack mode.................................................. 3-4
Keyfob operation failure ...................................... 3-4
Intelligent Key system (where fitted) ......................... 3-5
Locking/unlocking .............................................. 3-5
Starting the engine with the Intelligent Key .......... 3-6
Door locks ............................................................... 3-6
Super Lock System (Right-hand drive models) .... 3-6
Vehicle dead battery – left-hand side door
handle ................................................................ 3-7
Locking with power door lock switch .................. 3-7Child safety rear door lock .................................. 3-8
Back door lock ................................................... 3-8
Security system ....................................................... 3-9
NISSAN Anti-Theft System (NATS)..................... 3-9
Bonnet release ........................................................ 3-10
Fuel filler lid ............................................................. 3-11
Fuel filler lid opener lever .................................... 3-11
Fuel filler cap ...................................................... 3-11
Handbrake lever ...................................................... 3-11
Tilting steering wheel ............................................... 3-12
Mirrors..................................................................... 3-12
Inside rear-view mirror ........................................ 3-12
Outside rear-view mirrors.................................... 3-12
Vanity mirror ....................................................... 3-13
Rear parcel shelf...................................................... 3-14
Rear parcel shelf removal.................................... 3-14
Rear parcel shelf installation................................ 3-14
Page 76 of 235
•The Intelligent Key contains a miniature radio
transmitter that may be affected when placed
near metal objects.
•Keep the Intelligent Key away from mobile
phones, lap-top computers and other metal
objects or electronics.
STARTING THE ENGINE WITH THE
INTELLIGENT KEY
See “Ignition knob (where fitted)” in the “5. Starting
and driving” section.
CAUTION
•Make sure you carry the Intelligent Key with
you when starting and driving the vehicle.
•If the Intelligent Key is too far away from the
passenger compartment, the vehicle may not
start.
WARNING
•Always look before opening any doors, to
avoid an accident with oncoming traffic.
•Never leave children or adults who would nor-
mally require the support of others alone in
the vehicle. They could unknowingly activate
switches or controls and inadvertently
become involved in a serious accident.
SUPER LOCK SYSTEM (Right-hand
drive models)
WARNING
For Super Lock System equipped models, failure
to follow the precautions below may lead to haz-
ardous situations. Make sure the Super Lock Sys-
tem activation is always safely conducted.
•When the vehicle is occupied, never lock the
doors with the integrated keyfob. Doing so
will trap the occupants, since the Super Lock
System prevents the doors from being opened
from the inside of the vehicle.
•Only operate the integrated keyfob lock but-
ton when there is a clear view of the vehicle.
This is to prevent anybody from being trapped
inside the vehicle through the Super Lock
System activation.
Locking the doors with the integrated keyfob will
lock all doors including the back door and activate
the Super Lock System. This means that none ofthe doors can be opened from the inside, adding
extra security in case of break-in or theft.
The system will be released when the door is un-
locked with the integrated keyfob.
The Super Lock System will not activate when the
doors are locked with the power door lock switch or
the key.
Emergency situations
If the Super Lock System is activated due to a traf-
fic accident or other unexpected circumstances
while you are in the vehicle:
•Insert the key/emergency key in the ignition
switch, turn it to the ON position, the Super Lock
system will be released and all doors can be
unlocked.
•Open or break the door window on the front
passenger’s side, remove the protection cap on
the passenger’s side door handle, insert the key
into the passenger’s side door key cylinder and
turn it to the unlock position, after which you will
be able to open the door.
•Remove the key from the ignition switch and un-
lock the door using the integrated keyfob.
DOOR LOCKS
3-6Pre-driving checks and adjustments
Page 78 of 235
lock button (central door lock equipped mod-
els), the indicator lightj3 remains illuminated
and the door unlocks.
•When the power door lock switch is moved to
the lock positionj1 while the driver’s door is
open and the integrated Intelligent Keyfob
(where fitted) is left inside the vehicle, all
doors unlock as the driver’s door is closed
and the buzzer sounds (central door lock
equipped models and Super Lock equipped
models). This is to prevent from locking the
vehicle while the Intelligent Key has been left
inside the vehicle.
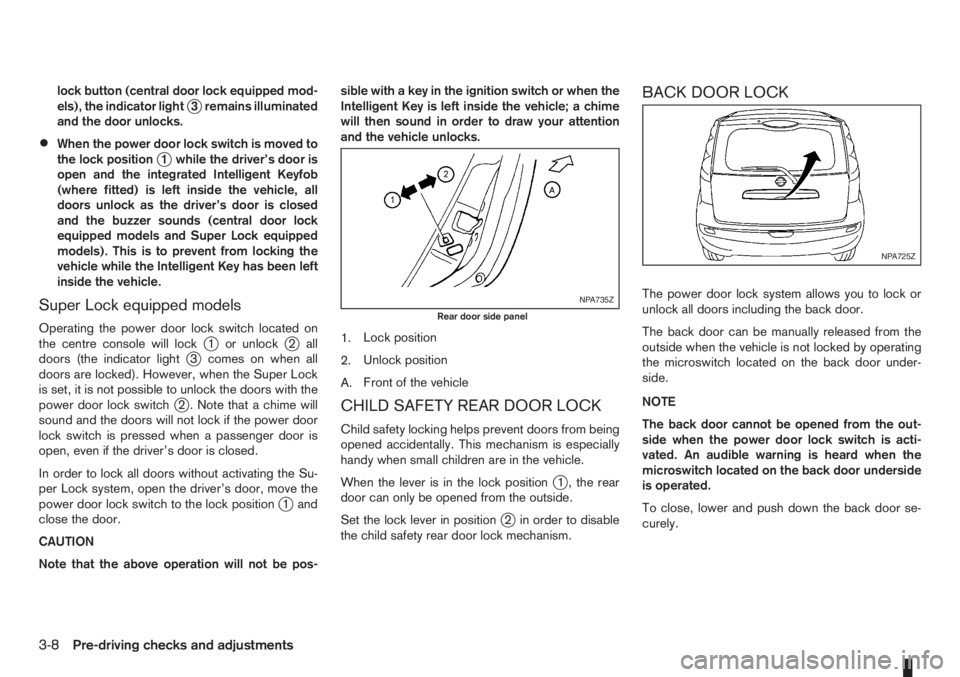
Super Lock equipped models
Operating the power door lock switch located on
the centre console will lockj1 or unlockj2all
doors (the indicator lightj3 comes on when all
doors are locked). However, when the Super Lock
is set, it is not possible to unlock the doors with the
power door lock switch
j2 . Note that a chime will
sound and the doors will not lock if the power door
lock switch is pressed when a passenger door is
open, even if the driver’s door is closed.
In order to lock all doors without activating the Su-
per Lock system, open the driver’s door, move the
power door lock switch to the lock position
j1and
close the door.
CAUTION
Note that the above operation will not be pos-sible with a key in the ignition switch or when the
Intelligent Key is left inside the vehicle; a chime
will then sound in order to draw your attention
and the vehicle unlocks.
1.Lock position
2.Unlock position
A.Front of the vehicle
CHILD SAFETY REAR DOOR LOCK
Child safety locking helps prevent doors from being
opened accidentally. This mechanism is especially
handy when small children are in the vehicle.
When the lever is in the lock position
j1 , the rear
door can only be opened from the outside.
Set the lock lever in position
j2 in order to disable
the child safety rear door lock mechanism.
BACK DOOR LOCK
The power door lock system allows you to lock or
unlock all doors including the back door.
The back door can be manually released from the
outside when the vehicle is not locked by operating
the microswitch located on the back door under-
side.
NOTE
The back door cannot be opened from the out-
side when the power door lock switch is acti-
vated. An audible warning is heard when the
microswitch located on the back door underside
is operated.
To close, lower and push down the back door se-
curely.NPA735Z
Rear door side panel
NPA725Z
3-8Pre-driving checks and adjustments
Page 79 of 235

WARNING
•Do not drive with the back door opened. This
could allow dangerous exhaust gases to be
drawn into the vehicle.
•Closely supervise children when they are
around the vehicle to prevent them from play-
ing and being locked in the luggage compart-
ment where they could be seriously injured.
Keep the vehicle locked, with the back door
closed, when not in use, and prevent chil-
dren’s access to the vehicle’s keys.
NISSAN ANTI-THEFT SYSTEM (NATS)
The NISSAN Anti-Theft System (NATS)* will not
allow the engine to start without the use of the reg-
istered NATS key.
* Immobilizer
If the engine fails to start using the registered NATS
key, it may be due to interference from another
NATS key, an automated toll road device or an auto-
mated payment device on the key ring. Restart the
engine using the following procedure:
1. Leave the ignition switch in the ON position for
approximately 5 seconds.
2. Turn the ignition switch to the “OFF” or LOCK
position and wait approximately 5 seconds.
3. Repeat steps 1 and 2.
4. Restart the engine while holding the device
(which may have caused the interference) sepa-
rated from the registered NATS key or NATS
Intelligent Key (where fitted).
If this procedure allows the engine to start,
NISSAN recommends placing the registered
NATS key or NATS Intelligent Key (where fitted)
on a separate key-ring to avoid interference from
other devices.
NATS security warning light
The security warning light blinks whenever the igni-
tion switch is in the LOCK, “OFF” or Acc position.
This function indicates that NATS is equipped on
the vehicle.
If the NISSAN Anti-Theft System (NATS) is mal-
functioning, this light will remain on while the ignition
key is in the ON position.
If the light remains on and/or the engine will not
start, see your NISSAN dealer for NATS service
as soon as possible. Please bring all NATS keys
or NATS Intelligent Keys when visiting your
NISSAN dealer for service.
Additional information for RHD models
If the NATS is malfunctioning, this light will turn on
after flashing six times while the ignition switch is in
the ON position.
However, if the NATS security warning light turns
off after the light has remained on for 15 minutes,
SIC2045Z
Meters and gauges
SECURITY SYSTEM
Pre-driving checks and adjustments3-9
Page 86 of 235
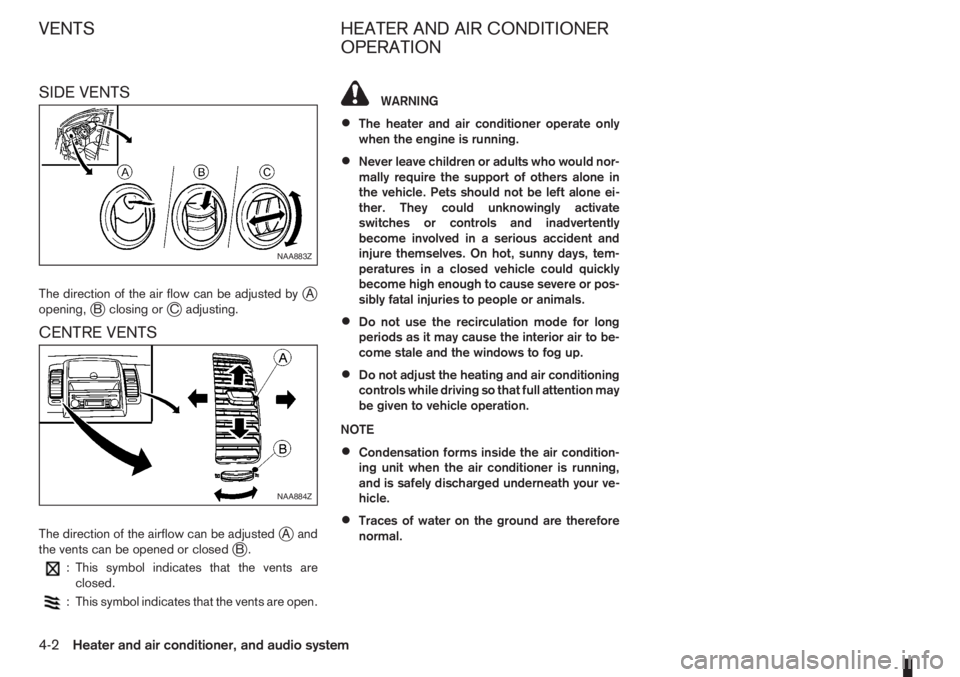
SIDE VENTS
The direction of the air flow can be adjusted byjA
opening,jB closing orjC adjusting.
CENTRE VENTS
The direction of the airflow can be adjustedjAand
the vents can be opened or closedjB.
: This symbol indicates that the vents are
closed.
: This symbol indicates that the vents are open.
WARNING
•The heater and air conditioner operate only
when the engine is running.
•Never leave children or adults who would nor-
mally require the support of others alone in
the vehicle. Pets should not be left alone ei-
ther. They could unknowingly activate
switches or controls and inadvertently
become involved in a serious accident and
injure themselves. On hot, sunny days, tem-
peratures in a closed vehicle could quickly
become high enough to cause severe or pos-
sibly fatal injuries to people or animals.
•Do not use the recirculation mode for long
periods as it may cause the interior air to be-
come stale and the windows to fog up.
•Do not adjust the heating and air conditioning
controls while driving so that full attention may
be given to vehicle operation.
NOTE
•Condensation forms inside the air condition-
ing unit when the air conditioner is running,
and is safely discharged underneath your ve-
hicle.
•Traces of water on the ground are therefore
normal.
NAA883Z
NAA884Z
VENTS HEATER AND AIR CONDITIONER
OPERATION
4-2Heater and air conditioner, and audio system