2011 NISSAN MURANO towing
[x] Cancel search: towingPage 38 of 433

Black plate (36,1)
Model "Z51-D" EDITED: 2010/ 7/ 23
SSS0225
Stowing rear center seat belt:
When folding down the rear seat, the rear center
seat belt can be retracted into a stowed position
as follows:
1. Hold the connector tongue
*1
so that the
seat belt does not retract suddenly when the
tongue is released from the connector
buckle. Release the connector tongue by
inserting a suitable tool such as key
*A
into
the connector buckle.
2. Insert the seat belt tongue into the retractor base first
*2.
3. Then secure the connector tongue into the retractor base*3.WARNING
.Do not unfasten the rear center seat
belt connector except when folding
down the rear seat.
. When attaching the rear center seat
belt connector, be certain that the
seatbacks are completely secured in
the latched position and the rear
center seat belt connector is com-
pletely secured.
. If the rear center seat belt connector
and the seatbacks are not secured in the correct position, serious per-
sonal injury may result in an acci-
dent or sudden stop.
1-22
Safety — Seats, seat belts and supplemental restraint system
Page 311 of 433
Black plate (309,1)
Model "Z51-D" EDITED: 2010/ 7/ 23
movement which could result in
serious vehicle damage or personal
injury. (AWD models)
. When a wheel is off the ground due
to an unlevel surface, do not spin
the wheel excessively.
. Accelerating quickly, sharp steering
maneuvers or sudden braking may
cause loss of control.
. If at all possible, avoid sharp turning
maneuvers, particularly at high
speeds. Your vehicle has a higher
center of gravity than a conventional
passenger car. The vehicle is not
designed for cornering at the same
speeds as conventional passenger
cars. Failure to operate this vehicle
correctly could result in loss of
control and/or a rollover accident.
. Always use tires of the same type,
size, brand, construction (bias, bias-
belted or radial) , and tread pattern
on all four wheels. Install tire chains
on the front wheels when driving on
slippery roads and drive carefully.
. Be sure to check the brakes imme-
diately after driving in mud or water.
See “BRAKE SYSTEM” later in this section for wet brakes.
. Avoid parking your vehicle on steep
hills. If you get out of the vehicle
and it rolls forward, backward or
sideways, you could be injured.
. Whenever you drive off-road
through sand, mud or water as deep
as the wheel hub, more frequent
maintenance may be required. See
the maintenance information in the
“NISSAN Service and Maintenance
Guide”.
. Spinning the front wheels on slip-
pery surfaces may cause the AWD
warning light to flash and the AWD
system to automatically switch from
the AWD mode to the 2WD mode.
This could reduce traction. Be espe-
cially careful when towing a trailer.
(AWD models)
WARNING
Do not operate the push-button ignition
switch while driving the vehicle except
in an emergency. (The engine will stop
when the ignition switch is pushed 3
consecutive times or the ignition switch
is pushed and held for more than 2
seconds.) If the engine stops while the
vehicle is being driven, this could lead
to a crash and serious injury.
Before operating the push-button ignition
switch, be sure to move the selector lever to
the P (Park) position.INTELLIGENT KEY SYSTEMThe Intelligent Key system can operate the
ignition switch without taking the Intelligent
Key out from your pocket or purse. The
operating environment and/or conditions may
affect the Intelligent Key system operation.
CAUTION
. Be sure to carry the Intelligent Key
with you when operating the vehi-
cle.
. Never leave the Intelligent Key in-
side the vehicle when you leave thePUSH-BUTTON IGNITION SWITCH
Starting and driving
5-9
Page 318 of 433

Black plate (316,1)
Model "Z51-D" EDITED: 2010/ 7/ 23
R (Reverse):
Use this position to back up. Make sure the
vehicle is completely stopped before selecting
the R (Reverse) position.The brake pedal
must be depressed and the selector lever
button pushed in to move the selector
lever from P (Park) , N (Neutral) or any
driving position to R (Reverse) .
N (Neutral):
Neither forward nor reverse gear is engaged.
The engine can be started in this position. You
may shift to N (Neutral) and restart a stalled
engine while the vehicle is moving.
D (Drive):
Use this position for all normal forward driving.
L (Low):
Use this position for maximum engine braking on
steep downhill gradients/climbing steep slopes
and whenever approaching sharp bends. Do not
use the L position in any other circumstances.
SSD0692
Overdrive (O/D) OFF switchWhen the O/D OFF switch is pushed with the
selector lever in the D (Drive) position, theindicator light in the instrument panel illuminates.
Use the overdrive off mode when you need
improved engine braking.
To turn off the overdrive off mode, push the O/D
OFF switch again. The
indicator light will
turn off.
Each time the engine is started, or when the
selector lever is shifted to any position other
than the D (Drive) position, the overdrive off
mode will be automatically turned off.
Accelerator downshift
— In D position —For passing or hill climbing, fully depress the
accelerator pedal to the floor. This shifts the
transmission down into a lower gear, depending
on the vehicle speed.High fluid temperature protection modeThis transmission has a high fluid temperature
protection mode. If the fluid temperature be-
comes too high (for example, when climbing
steep grades in high temperature with heavy
loads, such as when towing a trailer) , engine
power and, under some conditions, vehicle
speed will be decreased automatically to reduce
the chance of transmission damage. Vehicle
speed can be controlled with the accelerator
pedal, but the engine and vehicle speed may be
limited.Fail-safeIf the vehicle is driven under extreme
conditions, such as excessive wheel spin-
ning and subsequent hard braking, the
fail-safe system may be activated. The MIL
may illuminate to indicate the fail-safe
mode is activated. (See “Malfunction In-
dicator Light (MIL)” in the “2. Instruments
and controls” section.) This will occur even
if all electrical circuits are functioning
properly. In this case, place the ignition
switch in the OFF position and wait for 10
5-16
Starting and driving
Page 335 of 433
Black plate (19,1)
6 In case of emergency
Model "Z51-D" EDITED: 2010/ 7/ 23
Emergency engine shut off................................... 6-2
Flat tire ............................................................ 6-2
Tire Pressure Monitoring System (TPMS) ............. 6-2
Changing a flat tire ......................................... 6-3
Jump starting .................................................... 6-9 Push starting
................................................... 6-11
If your vehicle overheats. .................................... 6-11
Towing your vehicle .......................................... 6-12
Towing recommended by NISSAN ................... 6-13
Vehicle recovery (freeing a stuck vehicle) ........... 6-15
Page 342 of 433
Black plate (340,1)
Model "Z51-D" EDITED: 2010/ 7/ 23
SCE0039
Installing the spare tireThe spare tire is designed for emergency
use. (See specific instructions under the
heading “WHEELS AND TIRES” in the “8.
Maintenance and do-it-yourself” section.)
1. Clean any mud or dirt from the surfacebetween the wheel and hub.
2. Carefully put the spare tire on and tighten the wheel nuts finger tight. Check that all the
wheel nuts contact the wheel surface
horizontally.
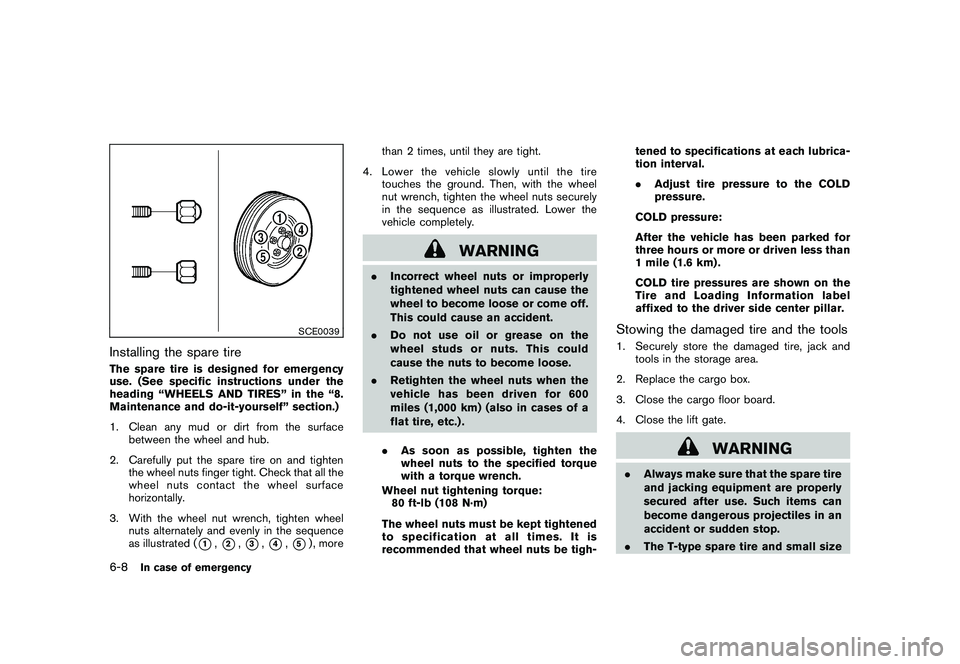
3. With the wheel nut wrench, tighten wheel nuts alternately and evenly in the sequence
as illustrated (
*1,*2,*3,*4,*5) , more than 2 times, until they are tight.
4. Lower the vehicle slowly until the tire touches the ground. Then, with the wheel
nut wrench, tighten the wheel nuts securely
in the sequence as illustrated. Lower the
vehicle completely.
WARNING
.Incorrect wheel nuts or improperly
tightened wheel nuts can cause the
wheel to become loose or come off.
This could cause an accident.
. Do not use oil or grease on the
wheel studs or nuts. This could
cause the nuts to become loose.
. Retighten the wheel nuts when the
vehicle has been driven for 600
miles (1,000 km) (also in cases of a
flat tire, etc.) .
. As soon as possible, tighten the
wheel nuts to the specified torque
with a torque wrench.
Wheel nut tightening torque: 80 ft-lb (108 N·m)
The wheel nuts must be kept tightened
to specification at all times. It is
recommended that wheel nuts be tigh- tened to specifications at each lubrica-
tion interval.
.
Adjust tire pressure to the COLD
pressure.
COLD pressure:
After the vehicle has been parked for
three hours or more or driven less than
1 mile (1.6 km) .
COLD tire pressures are shown on the
Tire and Loading Information label
affixed to the driver side center pillar.
Stowing the damaged tire and the tools1. Securely store the damaged tire, jack and tools in the storage area.
2. Replace the cargo box.
3. Close the cargo floor board.
4. Close the lift gate.
WARNING
. Always make sure that the spare tire
and jacking equipment are properly
secured after use. Such items can
become dangerous projectiles in an
accident or sudden stop.
. The T-type spare tire and small size
6-8
In case of emergency
Page 346 of 433
Black plate (344,1)
Model "Z51-D" EDITED: 2010/ 7/ 23
6. After the engine cools down, check thecoolant level in the reservoir tank with the
engine running. Add coolant to the reservoir
tank if necessary. Have your vehicle repaired
at a NISSAN dealer. When towing your vehicle, all State (Provincial in
Canada) and local regulations for towing must
be followed. Incorrect towing equipment could
damage your vehicle. Towing instructions are
available from a NISSAN dealer. Local service
operators are familiar with the applicable laws
and procedures for towing. To assure proper
towing and to prevent accidental damage to
your vehicle, NISSAN recommends that you
have a service operator tow your vehicle. It is
advisable to have the service operator carefully
read the following precautions.
WARNING
.
Never ride in a vehicle that is being
towed.
. Never get under your vehicle after it
has been lifted by a tow truck.
CAUTION
.When towing, make sure that the
transmission, axles, steering system
and drivetrain are in working condi-
tion. If any unit is damaged, dollies
must be used.
. Always attach safety chains before
towing. For information about towing your vehicle behind
a recreational vehicle (RV) , see “FLAT TOW-
ING” in the “9. Technical and consumer
information” section of this manual.TOWING YOUR VEHICLE
6-12
In case of emergency
Page 347 of 433
Black plate (345,1)
Model "Z51-D" EDITED: 2010/ 7/ 23
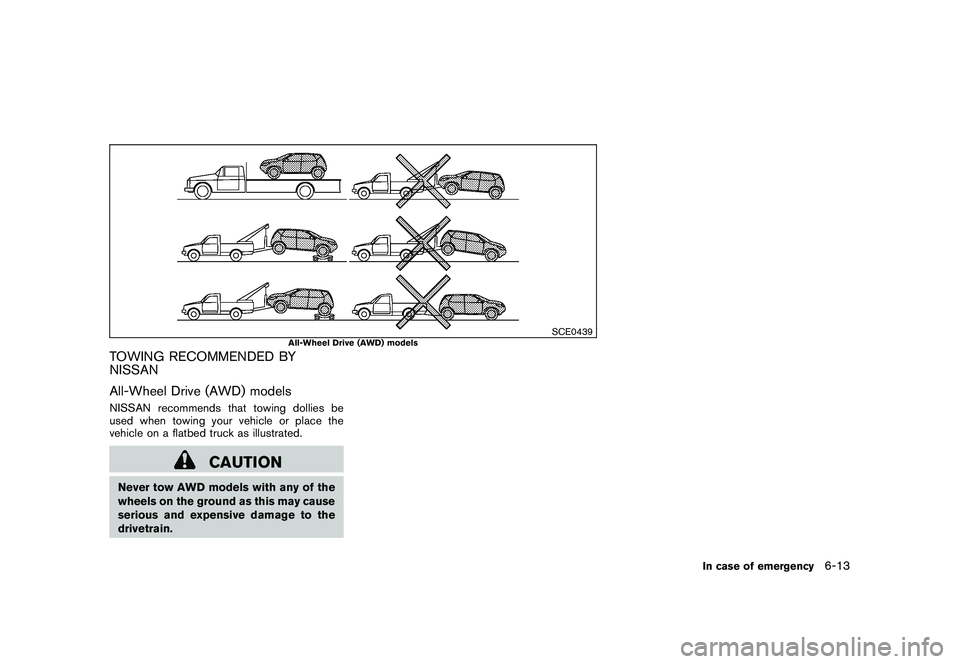
SCE0439
All-Wheel Drive (AWD) models
TOWING RECOMMENDED BY
NISSAN
All-Wheel Drive (AWD) modelsNISSAN recommends that towing dollies be
used when towing your vehicle or place the
vehicle on a flatbed truck as illustrated.
CAUTION
Never tow AWD models with any of the
wheels on the ground as this may cause
serious and expensive damage to the
drivetrain.
In case of emergency
6-13
Page 348 of 433
Black plate (346,1)
Model "Z51-D" EDITED: 2010/ 7/ 23
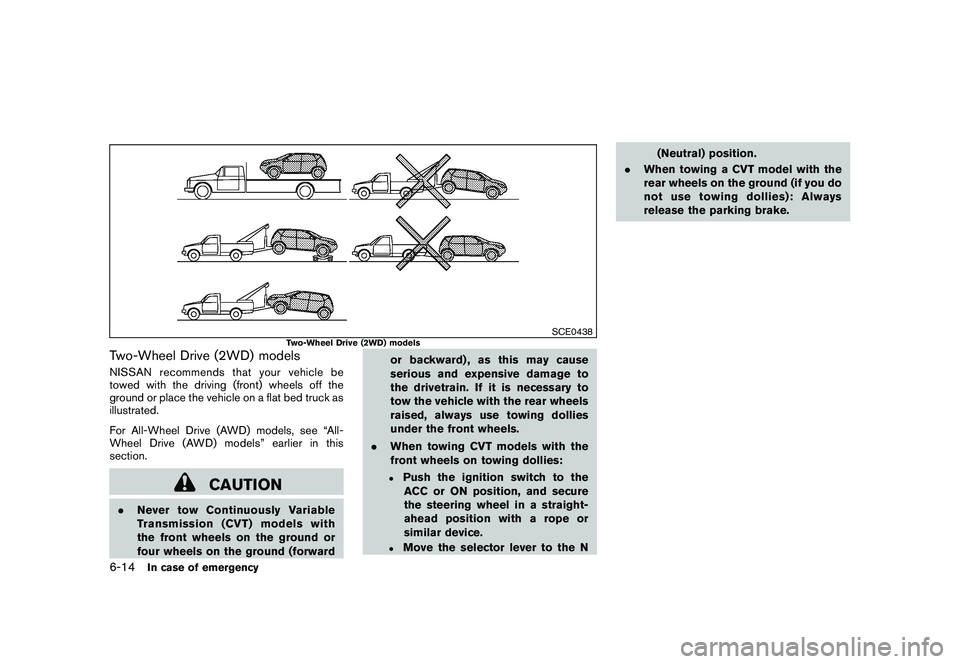
SCE0438
Two-Wheel Drive (2WD) models
Two-Wheel Drive (2WD) modelsNISSAN recommends that your vehicle be
towed with the driving (front) wheels off the
ground or place the vehicle on a flat bed truck as
illustrated.
For All-Wheel Drive (AWD) models, see “All-
Wheel Drive (AWD) models” earlier in this
section.
CAUTION
.Never tow Continuously Variable
Transmission (CVT) models with
the front wheels on the ground or
four wheels on the ground (forward or backward) , as this may cause
serious and expensive damage to
the drivetrain. If it is necessary to
tow the vehicle with the rear wheels
raised, always use towing dollies
under the front wheels.
. When towing CVT models with the
front wheels on towing dollies:
.
Push the ignition switch to the
ACC or ON position, and secure
the steering wheel in a straight-
ahead position with a rope or
similar device.
.
Move the selector lever to the N (Neutral) position.
. When towing a CVT model with the
rear wheels on the ground (if you do
not use towing dollies): Always
release the parking brake.
6-14
In case of emergency