2011 NISSAN MURANO window
[x] Cancel search: windowPage 152 of 433
Black plate (150,1)
Model "Z51-D" EDITED: 2010/ 7/ 23
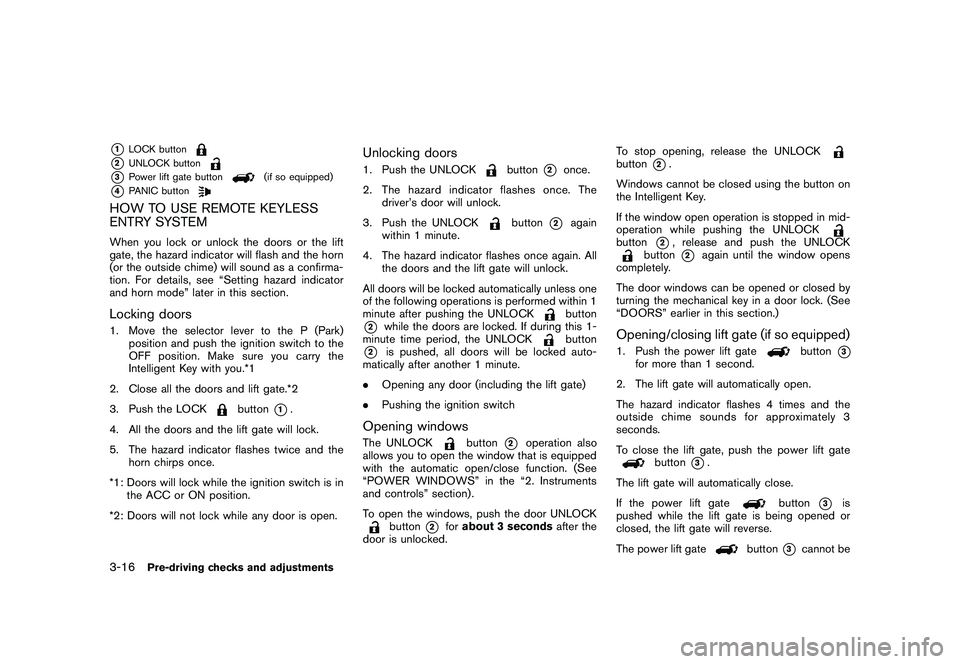
*1
LOCK button
*2
UNLOCK button
*3
Power lift gate button
(if so equipped)
*4
PANIC button
HOW TO USE REMOTE KEYLESS
ENTRY SYSTEMWhen you lock or unlock the doors or the lift
gate, the hazard indicator will flash and the horn
(or the outside chime) will sound as a confirma-
tion. For details, see “Setting hazard indicator
and horn mode” later in this section.Locking doors1. Move the selector lever to the P (Park)position and push the ignition switch to the
OFF position. Make sure you carry the
Intelligent Key with you.*1
2. Close all the doors and lift gate.*2
3. Push the LOCK
button
*1.
4. All the doors and the lift gate will lock.
5. The hazard indicator flashes twice and the horn chirps once.
*1: Doors will lock while the ignition switch is in the ACC or ON position.
*2: Doors will not lock while any door is open.
Unlocking doors1. Push the UNLOCK
button
*2
once.
2. The hazard indicator flashes once. The driver’s door will unlock.
3. Push the UNLOCK
button
*2
again
within 1 minute.
4. The hazard indicator flashes once again. All the doors and the lift gate will unlock.
All doors will be locked automatically unless one
of the following operations is performed within 1
minute after pushing the UNLOCKbutton
*2
while the doors are locked. If during this 1-
minute time period, the UNLOCK
button
*2
is pushed, all doors will be locked auto-
matically after another 1 minute.
. Opening any door (including the lift gate)
. Pushing the ignition switch
Opening windowsThe UNLOCK
button
*2
operation also
allows you to open the window that is equipped
with the automatic open/close function. (See
“POWER WINDOWS” in the “2. Instruments
and controls” section) .
To open the windows, push the door UNLOCK
button
*2
for about 3 seconds after the
door is unlocked. To stop opening, release the UNLOCK
button
*2.
Windows cannot be closed using the button on
the Intelligent Key.
If the window open operation is stopped in mid-
operation while pushing the UNLOCK
button
*2, release and push the UNLOCK
button
*2
again until the window opens
completely.
The door windows can be opened or closed by
turning the mechanical key in a door lock. (See
“DOORS” earlier in this section.)
Opening/closing lift gate (if so equipped)1. Push the power lift gate
button
*3
for more than 1 second.
2. The lift gate will automatically open.
The hazard indicator flashes 4 times and the
outside chime sounds for approximately 3
seconds.
To close the lift gate, push the power lift gate
button
*3.
The lift gate will automatically close.
If the power lift gate
button
*3
is
pushed while the lift gate is being opened or
closed, the lift gate will reverse.
The power lift gate
button
*3
cannot be
3-16
Pre-driving checks and adjustments
Page 166 of 433
Black plate (164,1)
Model "Z51-D" EDITED: 2010/ 7/ 23
SPA2319
OUTSIDE MIRRORS
WARNING
Objects viewed in the outside mirror on
the passenger side are closer than they
appear. Be careful when moving to the
right. Using only this mirror could cause
an accident. Use the inside mirror or
glance over your shoulder to properly
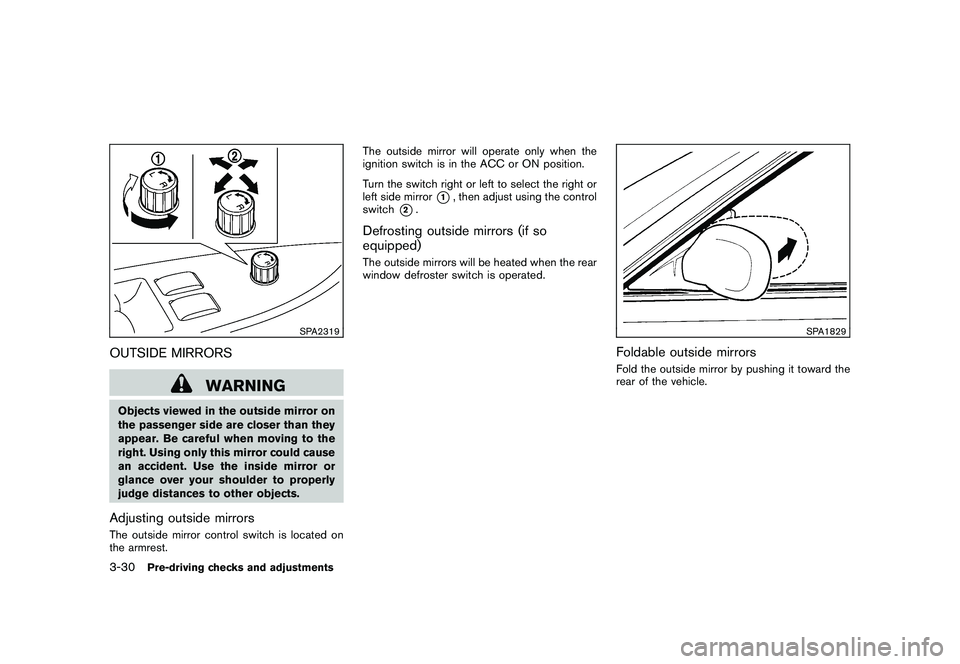
judge distances to other objects.Adjusting outside mirrorsThe outside mirror control switch is located on
the armrest.The outside mirror will operate only when the
ignition switch is in the ACC or ON position.
Turn the switch right or left to select the right or
left side mirror
*1, then adjust using the control
switch
*2.
Defrosting outside mirrors (if so
equipped)The outside mirrors will be heated when the rear
window defroster switch is operated.
SPA1829
Foldable outside mirrorsFold the outside mirror by pushing it toward the
rear of the vehicle.
3-30
Pre-driving checks and adjustments
Page 197 of 433
Black plate (195,1)
Model "Z51-D" EDITED: 2010/ 7/ 23
.When the temperature is extremely high or
low, the screen may not clearly display
objects. This is not a malfunction.
. When strong light directly enters the cam-
era, objects may not be displayed clearly.
This is not a malfunction.
. Vertical lines may be seen in objects on the
screen. This is due to strong reflected light
from the bumper. This is not a malfunction.
. The screen may flicker under fluorescent
light. This is not a malfunction.
. The colors of objects on the RearView
Monitor may differ somewhat from those of
the actual object.
. Objects on the monitor may not be clear in a
dark place or at night. This is not a
malfunction.
. If dirt, rain or snow attaches to the camera,
the RearView Monitor may not clearly dis-
play objects. Clean the camera.
. Do not use alcohol, benzine or thinner to
clean the camera. This will cause discolora-
tion. To clean the camera, wipe with a cloth
dampened with diluted mild cleaning agent
and then wipe with a dry cloth.
. Do not damage the camera as the monitor
screen may be adversely affected. .
Do not use wax on the camera window.
Wipe off any wax with a clean cloth
dampened with mild detergent diluted with
water.
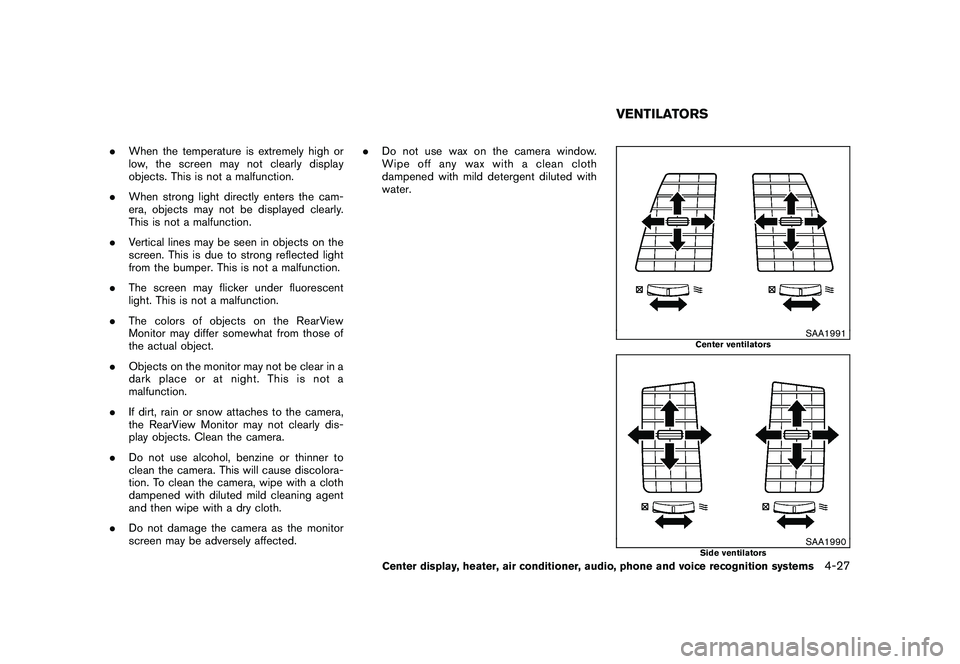
SAA1991
Center ventilators
SAA1990
Side ventilators
VENTILATORS
Center display, heater, air conditioner, audio, phone and voice recognition systems
4-27
Page 198 of 433
Black plate (196,1)
Model "Z51-D" EDITED: 2010/ 7/ 23
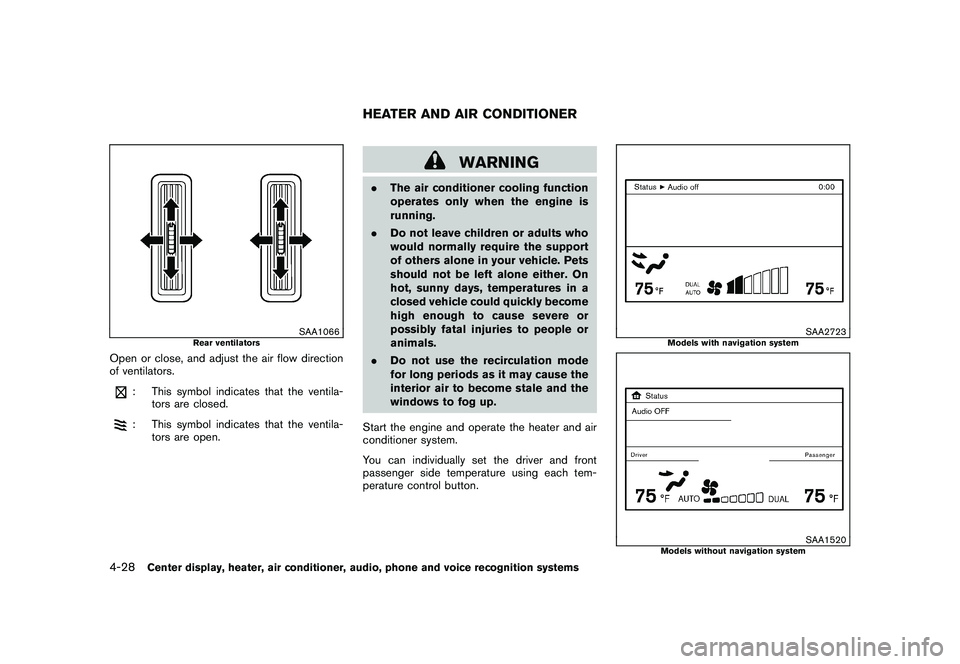
SAA1066
Rear ventilators
Open or close, and adjust the air flow direction
of ventilators.
: This symbol indicates that the ventila-tors are closed.: This symbol indicates that the ventila-
tors are open.
WARNING
.The air conditioner cooling function
operates only when the engine is
running.
. Do not leave children or adults who
would normally require the support
of others alone in your vehicle. Pets
should not be left alone either. On
hot, sunny days, temperatures in a
closed vehicle could quickly become
high enough to cause severe or
possibly fatal injuries to people or
animals.
. Do not use the recirculation mode
for long periods as it may cause the
interior air to become stale and the
windows to fog up.
Start the engine and operate the heater and air
conditioner system.
You can individually set the driver and front
passenger side temperature using each tem-
perature control button.
SAA2723
Models with navigation system
SAA1520
Models without navigation system
HEATER AND AIR CONDITIONER
4-28
Center display, heater, air conditioner, audio, phone and voice recognition systems
Page 199 of 433
Black plate (197,1)
Model "Z51-D" EDITED: 2010/ 7/ 23
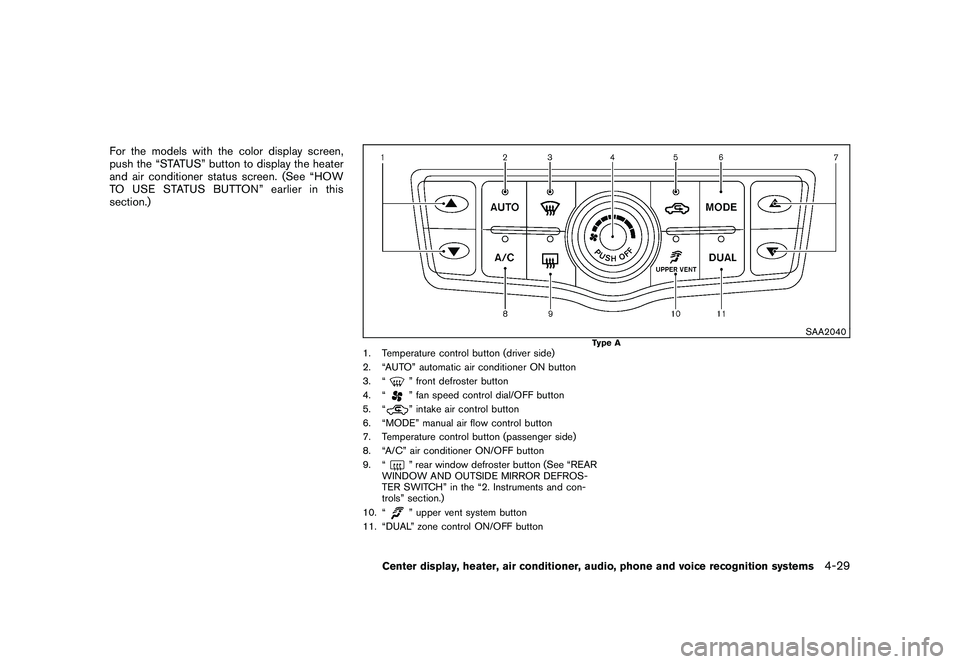
For the models with the color display screen,
push the “STATUS” button to display the heater
and air conditioner status screen. (See “HOW
TO USE STATUS BUTTON” earlier in this
section.)
SAA2040
Type A
1. Temperature control button (driver side)
2. “AUTO” automatic air conditioner ON button
3. “
” front defroster button
4. “” fan speed control dial/OFF button
5. “” intake air control button
6. “MODE” manual air flow control button
7. Temperature control button (passenger side)
8. “A/C” air conditioner ON/OFF button
9. “” rear window defroster button (See “REAR
WINDOW AND OUTSIDE MIRROR DEFROS-
TER SWITCH” in the “2. Instruments and con-
trols” section.)
10. “” upper vent system button
11. “DUAL” zone control ON/OFF button
Center display, heater, air conditioner, audio, phone and voice recognition systems
4-29
Page 200 of 433
Black plate (198,1)
Model "Z51-D" EDITED: 2010/ 7/ 23
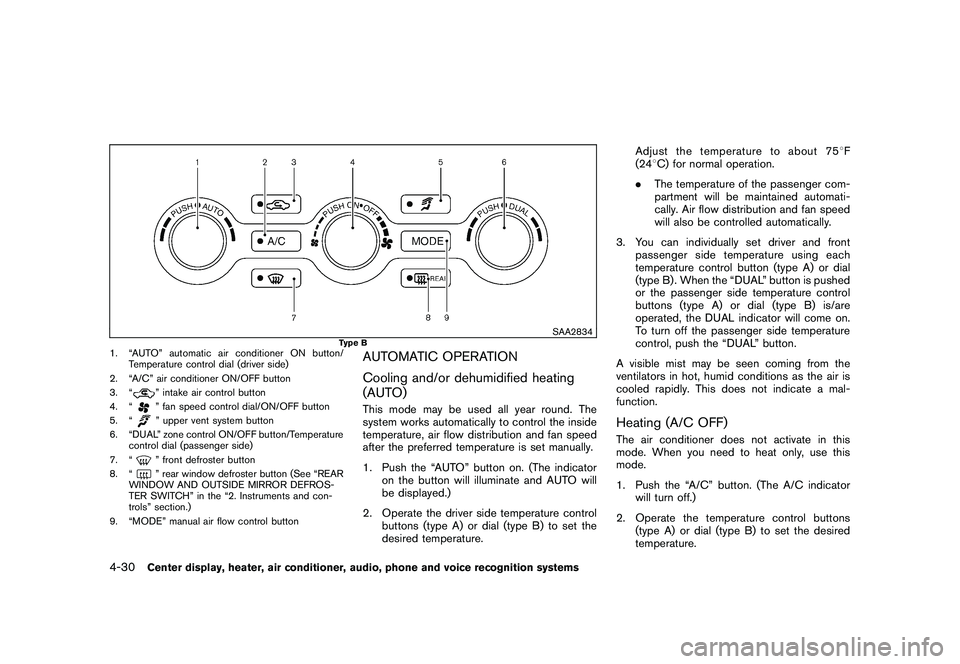
SAA2834
Type B
1. “AUTO” automatic air conditioner ON button/Temperature control dial (driver side)
2. “A/C” air conditioner ON/OFF button
3. “
” intake air control button
4. “” fan speed control dial/ON/OFF button
5. “” upper vent system button
6. “DUAL” zone control ON/OFF button/Temperature control dial (passenger side)
7. “” front defroster button
8. “” rear window defroster button (See “REAR
WINDOW AND OUTSIDE MIRROR DEFROS-
TER SWITCH” in the “2. Instruments and con-
trols” section.)
9. “MODE” manual air flow control button
AUTOMATIC OPERATION
Cooling and/or dehumidified heating
(AUTO)This mode may be used all year round. The
system works automatically to control the inside
temperature, air flow distribution and fan speed
after the preferred temperature is set manually.
1. Push the “AUTO” button on. (The indicator on the button will illuminate and AUTO will
be displayed.)
2. Operate the driver side temperature control buttons (type A) or dial (type B) to set the
desired temperature. Adjust the temperature to about 75
8F
(24 8C) for normal operation.
. The temperature of the passenger com-
partment will be maintained automati-
cally. Air flow distribution and fan speed
will also be controlled automatically.
3. You can individually set driver and front passenger side temperature using each
temperature control button (type A) or dial
(type B) . When the “DUAL” button is pushed
or the passenger side temperature control
buttons (type A) or dial (type B) is/are
operated, the DUAL indicator will come on.
To turn off the passenger side temperature
control, push the “DUAL” button.
A visible mist may be seen coming from the
ventilators in hot, humid conditions as the air is
cooled rapidly. This does not indicate a mal-
function.
Heating (A/C OFF)The air conditioner does not activate in this
mode. When you need to heat only, use this
mode.
1. Push the “A/C” button. (The A/C indicator will turn off.)
2. Operate the temperature control buttons (type A) or dial (type B) to set the desired
temperature.
4-30
Center display, heater, air conditioner, audio, phone and voice recognition systems
Page 201 of 433

Black plate (199,1)
Model "Z51-D" EDITED: 2010/ 7/ 23
.The temperature of the passenger compart-
ment will be maintained automatically. Air
flow distribution and fan speed are also
controlled automatically.
. Do not set the temperature lower than the
outside air temperature. Otherwise the
system may not work properly.
. Not recommended if windows fog up.Dehumidified defrosting or defogging1. Push the “
” front defroster button. (The
indicator light on the button will come on.)
2. Operate the temperature control buttons (type A) or dial (type B) to set the desired
temperature.
. To quickly remove ice from the outside of the
windows, turn the “
” fan speed control
dial and set it to the maximum position.
. As soon as possible after the windshield is
clean, push the “AUTO” button to return to
the auto mode.
. When the “
” front defroster button is
pushed, the air conditioner will automatically
be turned on at outside temperatures above
23 8F( �58C) to defog the windshield, and
the air recirculate mode will automatically be
turned off.
Outside air is drawn into the passenger compartment to improve the defogging
performance.
MANUAL OPERATION
Fan speed controlTu r n t h e “
” fan speed control dial to
manually control the fan speed.
Push the “AUTO” button to return to automatic
control of the fan speed.
Air recirculationPush the intake air control button “
”to
recirculate interior air inside the vehicle. The
indicator light “
” will come on.
The air recirculation mode cannot be activated
when the air conditioner is in the front defrosting
mode “
”.
Outside air circulationPush the intake air control button “
”to
change the air circulation from the intake air to
the outside air. The indicator light “
” will turn
off.
Automatic air intake controlIn the AUTO mode, the intake air will be
controlled automatically. To manually control
the intake air, push the intake air control button
“
”. To return to the automatic control mode,
push the intake air control button “
” for about 2 seconds. The indicator lights will flash
twice, and then the intake air will be controlled
automatically.
Air flow controlPushing the “MODE” manual air flow control
button selects the air outlet to:
: Air flows from center and side ventila-
tors.: Air flows from center and side ventila-tors and foot outlets.: Air flows mainly from foot outlets.: Air flows from defroster and foot out-lets.
Upper vent systemWhen the “
” upper vent button is pushed,
the air flow against the driver’s or passenger’s
upper body becomes gentle. The indicator light
on the button will come on.
In this mode, air from the center ventilators flows
both straight and upward in order to control the
cabin temperature without blowing air directly
on the occupants.
If you want strong air flow against your upper
body, push the “
” button to turn the
indicator light off.
Center display, heater, air conditioner, audio, phone and voice recognition systems
4-31
Page 202 of 433

Black plate (200,1)
Model "Z51-D" EDITED: 2010/ 7/ 23
TO TURN THE SYSTEM ON/OFFPush the “OFF” or “ON·OFF” button when the
heater and air conditioner is off. The system will
turn on with the settings that were used
immediately before the system was turned off.
SAA1989
OPERATING TIPSThe sunload sensor
*A
on the instrument panel
helps maintain a constant temperature. Do not
put anything on or around this sensor.
IN-CABIN MICROFILTERThe air conditioning system is equipped with an
in-cabin microfilter which collects dirt, pollen,
dust, etc. To make sure the air conditioner heats,
defogs, and ventilates efficiently, replace the
filter in accordance with the maintenance
schedule in the NISSAN Service and Mainte-
nance Guide. To replace the filter, contact a
NISSAN dealer. The filter should be replaced if air flow is
extremely decreased or when windows fog
up easily when operating heater or air
conditioning system.
SERVICING AIR CONDITIONERThe air conditioning system in your NISSAN is
charged with a refrigerant designed with the
environment in mind.
This refrigerant will not
harm the earth’s ozone layer. However,
special charging equipment and lubricant are
required when servicing your NISSAN air con-
ditioner. Using improper refrigerants or lubri-
cants will cause severe damage to your air
conditioning system. (See “CAPACITIES AND
RECOMMENDED FUEL/LUBRICANTS” in the
“9. Technical and consumer information” section
for air conditioning system refrigerant and
lubricant recommendations.)
Your NISSAN dealer will be able to service your
environmentally friendly air conditioning system.
WARNING
The system contains refrigerant under
high pressure. To avoid personal injury,
any air conditioner service should be
done only by an experienced technician
with the proper equipment.
4-32
Center display, heater, air conditioner, audio, phone and voice recognition systems