2011 NISSAN MURANO oil
[x] Cancel search: oilPage 180 of 433
Black plate (178,1)
Model "Z51-D" EDITED: 2010/ 7/ 23
SAA2481
Models with navigation system
SAA2830
Models without navigation system
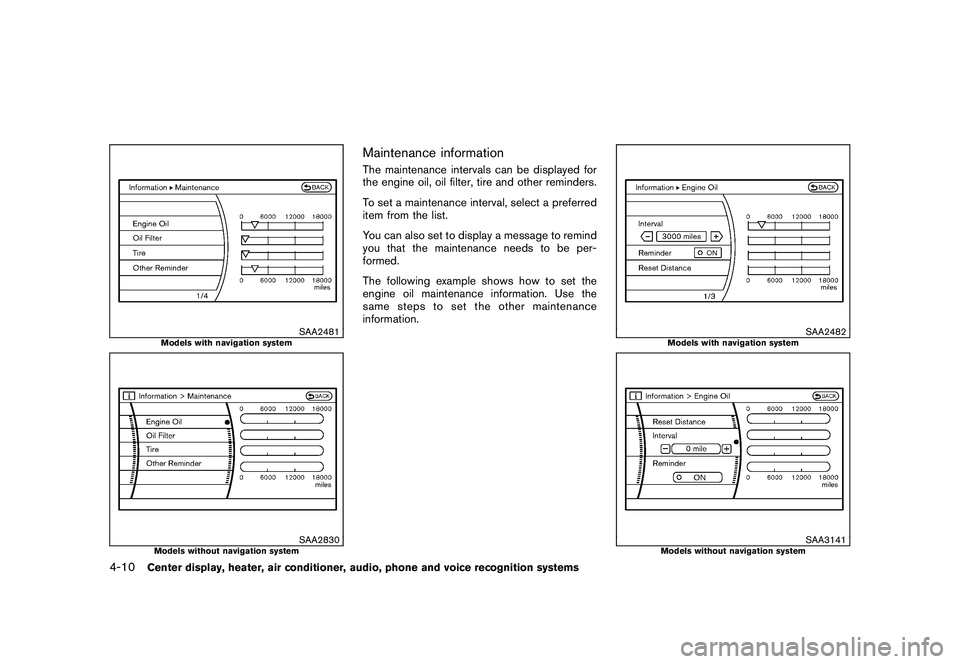
Maintenance informationThe maintenance intervals can be displayed for
the engine oil, oil filter, tire and other reminders.
To set a maintenance interval, select a preferred
item from the list.
You can also set to display a message to remind
you that the maintenance needs to be per-
formed.
The following example shows how to set the
engine oil maintenance information. Use the
same steps to set the other maintenance
information.
SAA2482
Models with navigation system
SAA3141
Models without navigation system
4-10
Center display, heater, air conditioner, audio, phone and voice recognition systems
Page 315 of 433

Black plate (313,1)
Model "Z51-D" EDITED: 2010/ 7/ 23
so may cause damage to the equip-
ment.
. Make sure the Intelligent Key is in
the correct direction when inserting
it to the key port. The engine may
not start if it is in the incorrect
direction.
. Remove the Intelligent Key from the
key port after the ignition switch is
pushed to the OFF position. .
Make sure the area around the vehicle is
clear.
. Check fluid levels such as engine oil, cool-
ant, brake fluid and window washer fluid as
frequently as possible, or at least whenever
you refuel.
. Check that all windows and lights are clean.
. Visually inspect tires for their appearance
and condition. Also check tires for proper
inflation.
. Lock all doors.
. Position seats and adjust head restraints/
headrests.
. Adjust inside and outside mirrors.
. Fasten seat belts and ask all passengers to
do likewise.
. Check the operation of warning lights when
the ignition switch is pushed to the ON
position. (See “WA RNING/INDICATOR
LIGHTS AND AUDIBLE REMINDERS” in
the “2. Instruments and controls” section.) 1. Apply the parking brake.
2. Move the selector lever to the P (Park) or N
(Neutral) position. (P is recommended.)
The starter is designed not to operate unless
the selector lever is in either of the above
positions.
3. Push the ignition switch to the ON position. Depress the brake pedal and push the
ignition switch to start the engine.
To start the engine immediately, push and
release the ignition switch while depressing
the brake pedal with the ignition switch in
any position.
.If the engine is very hard to start in
extremely cold weather or when restart-
ing, depress the accelerator pedal a little
(approximately 1/3 to the floor) and
while holding, crank the engine. Release
the accelerator pedal when the engine
starts.
. If the engine is very hard to start
because it is flooded, depress the
accelerator pedal all the way to the floor
and hold it. Push the ignition switch to
the ON position to start cranking the
engine. After 5 or 6 seconds, stop
cranking by pushing the ignition switch
to OFF. After cranking the engine,
release the accelerator pedal. Crank
BEFORE STARTING THE ENGINE STARTING THE ENGINE
Starting and driving
5-13
Page 323 of 433
Black plate (321,1)
Model "Z51-D" EDITED: 2010/ 7/ 23
.Accelerate slowly and smoothly. Maintain
cruising speeds with a constant accelerator
position.
. Drive at moderate speeds on the highway.
Driving at high speed lowers fuel economy.
. Avoid unnecessary stopping and braking.
Keep a safe distance behind other vehicles.
. Select a gear range suitable to road condi-
tions.
. Avoid unnecessary engine idling.
. Keep your engine tuned up.
. Follow the recommended periodic mainte-
nance schedule.
. Keep the tires inflated to the correct
pressure. Low tire pressure increases tire
wear and lowers fuel economy.
. Keep the wheels in correct alignment.
Improper alignment increases tire wear and
lowers fuel economy.
. Air conditioner operation lowers fuel econ-
omy. Use the air conditioner only when
necessary.
. When cruising at highway speeds, it is more
economical to use the air conditioner and
leave the windows closed to reduce drag. .
Use the recommended viscosity engine oil.
(See “ENGINE OIL AND OIL FILTER
RECOMMENDATION” in the “9. Technical
and consumer information” section.)
WARNING
.For AWD equipped vehicles, do not
attempt to raise two wheels off the
ground and shift the transmission to
any drive or reverse position with
the engine running. Doing so may
result in drivetrain damage or un-
expected vehicle movement which
could result in serious vehicle da-
mage or personal injury.
. Do not attempt to test an AWD
equipped vehicle on a 2-wheel dy-
namometer (such as the dynam-
ometers used by some states for
emissions testing) or similar equip-
ment even if the other two wheels
are raised off the ground. Make sure
that you inform the test facility
personnel that your vehicle is
equipped with AWD before it is
placed on a dynamometer. Using
the wrong test equipment may re-
sult in drivetrain damage or unex-
pected vehicle movement which
could result in serious vehicle da-
mage or personal injury.
INCREASING FUEL ECONOMY ALL-WHEEL DRIVE (AWD) (if so
equipped)
Starting and driving
5-21
Page 324 of 433

Black plate (322,1)
Model "Z51-D" EDITED: 2010/ 7/ 23
SSD0418
ALL-WHEEL DRIVE (AWD) LOCK
SWITCH OPERATIONSThe AWD LOCK switch located on the lower
side of the instrument panel. This switch is used
to select the AUTO or LOCK mode depending
on the driving conditions.
Each time you push the lower part of the switch*A
, the AWD mode will switch:
AUTO ?LOCK ?AUTO.
LOCK modeThe AWD LOCK indicator light
will
illuminate.
AUTO modeThe AWD LOCK indicator light will turn off.AWD
mode Wheel driven AWD
LOCK
indica-
tor lightUse condi-
tions
AUTO Distribution of tor-
que to the front and
rear wheels changes
automatically, de-
pending on road
conditions encoun-
tered
[100:0]
↔[50:50].
This results in im-
proved driving stabi-
lity.*1 Turns
off.
For driving
on paved
or slippery
roads
LOCK All-wheel drive*2, *3 AWD
LOCK
For driving
on rough
roads
*1: When the rotation difference between the
front and rear wheels is large, the AWD
mode may change from AUTO to LOCK for
a while, however, this is not a malfunction. *2: LOCK mode will change to AUTO mode
automatically when the vehicle has been
driven at a high speed. The AWD LOCK
indicator light turns off.
*3: LOCK mode will automatically be cancelled when the ignition switch is placed in the OFF
position.
. If the AWD LOCK switch is operated while
accelerating or decelerating, or if the ignition
switch is turned off, you may feel a jolt. This
is normal.
. The oil temperature of power train parts will
increase if the vehicle is continuously
operated under conditions where the differ-
ence in rotation between the front and rear
wheels is large (wheel slip) , such as when
driving the vehicle on rough roads through
sand, mud or freeing a stuck vehicle. In
these cases, the AWD warning light blinks
rapidly and the AWD mode changes to
2WD to protect the powertrain parts. If you
stop driving with the engine idling and wait
until the warning light stops blinking, the
AWD returns to the AUTO mode.
5-22
Starting and driving
Page 325 of 433
Black plate (323,1)
Model "Z51-D" EDITED: 2010/ 7/ 23
WARNING
.When driving straight, shift the AWD
LOCK switch to AUTO. Do not oper-
ate the AWD LOCK switch when
making a turn or backing up.
. Do not operate the AWD LOCK
switch with the front wheel spin-
ning.
. Engine idling speed is high while
warming up the engine. Be espe-
cially careful when starting or driv-
ing on slippery surfaces.
. When turning the vehicle in LOCK
mode on paved roads, you may feel
a braking effect. This is a normal
condition of the AWD model.
SSD0336B
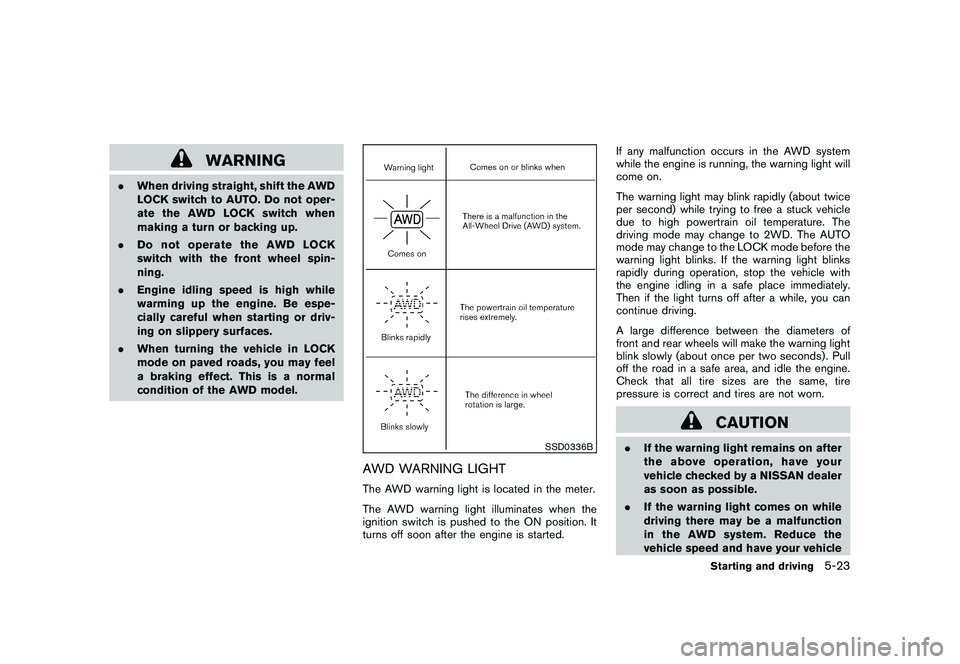
AWD WARNING LIGHTThe AWD warning light is located in the meter.
The AWD warning light illuminates when the
ignition switch is pushed to the ON position. It
turns off soon after the engine is started. If any malfunction occurs in the AWD system
while the engine is running, the warning light will
come on.
The warning light may blink rapidly (about twice
per second) while trying to free a stuck vehicle
due to high powertrain oil temperature. The
driving mode may change to 2WD. The AUTO
mode may change to the LOCK mode before the
warning light blinks. If the warning light blinks
rapidly during operation, stop the vehicle with
the engine idling in a safe place immediately.
Then if the light turns off after a while, you can
continue driving.
A large difference between the diameters of
front and rear wheels will make the warning light
blink slowly (about once per two seconds) . Pull
off the road in a safe area, and idle the engine.
Check that all tire sizes are the same, tire
pressure is correct and tires are not worn.
CAUTION
.
If the warning light remains on after
the above operation, have your
vehicle checked by a NISSAN dealer
as soon as possible.
. If the warning light comes on while
driving there may be a malfunction
in the AWD system. Reduce the
vehicle speed and have your vehicle
Starting and driving
5-23
Page 342 of 433
Black plate (340,1)
Model "Z51-D" EDITED: 2010/ 7/ 23
SCE0039
Installing the spare tireThe spare tire is designed for emergency
use. (See specific instructions under the
heading “WHEELS AND TIRES” in the “8.
Maintenance and do-it-yourself” section.)
1. Clean any mud or dirt from the surfacebetween the wheel and hub.
2. Carefully put the spare tire on and tighten the wheel nuts finger tight. Check that all the
wheel nuts contact the wheel surface
horizontally.
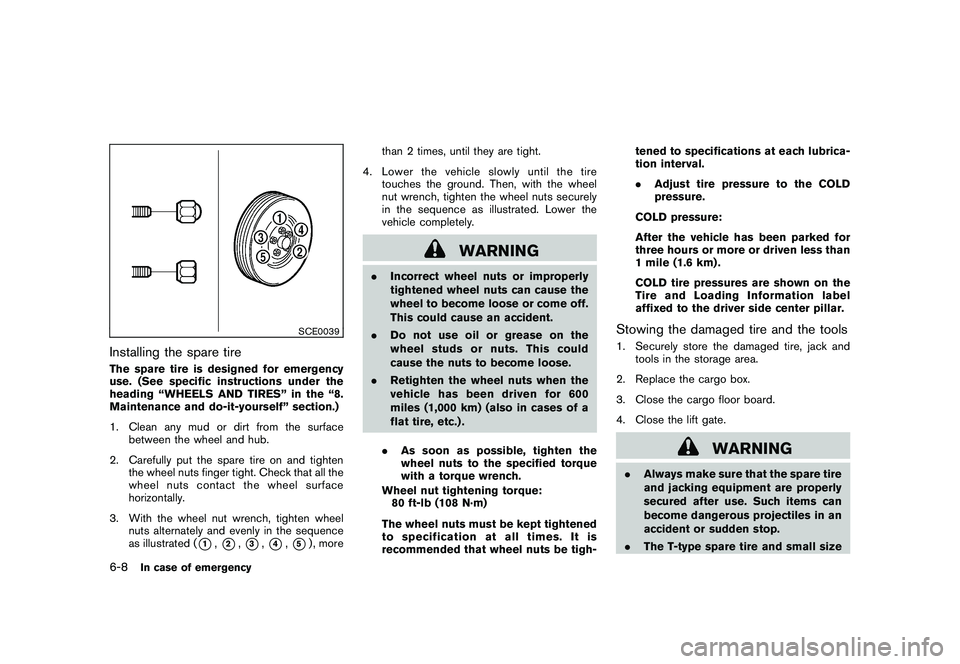
3. With the wheel nut wrench, tighten wheel nuts alternately and evenly in the sequence
as illustrated (
*1,*2,*3,*4,*5) , more than 2 times, until they are tight.
4. Lower the vehicle slowly until the tire touches the ground. Then, with the wheel
nut wrench, tighten the wheel nuts securely
in the sequence as illustrated. Lower the
vehicle completely.
WARNING
.Incorrect wheel nuts or improperly
tightened wheel nuts can cause the
wheel to become loose or come off.
This could cause an accident.
. Do not use oil or grease on the
wheel studs or nuts. This could
cause the nuts to become loose.
. Retighten the wheel nuts when the
vehicle has been driven for 600
miles (1,000 km) (also in cases of a
flat tire, etc.) .
. As soon as possible, tighten the
wheel nuts to the specified torque
with a torque wrench.
Wheel nut tightening torque: 80 ft-lb (108 N·m)
The wheel nuts must be kept tightened
to specification at all times. It is
recommended that wheel nuts be tigh- tened to specifications at each lubrica-
tion interval.
.
Adjust tire pressure to the COLD
pressure.
COLD pressure:
After the vehicle has been parked for
three hours or more or driven less than
1 mile (1.6 km) .
COLD tire pressures are shown on the
Tire and Loading Information label
affixed to the driver side center pillar.
Stowing the damaged tire and the tools1. Securely store the damaged tire, jack and tools in the storage area.
2. Replace the cargo box.
3. Close the cargo floor board.
4. Close the lift gate.
WARNING
. Always make sure that the spare tire
and jacking equipment are properly
secured after use. Such items can
become dangerous projectiles in an
accident or sudden stop.
. The T-type spare tire and small size
6-8
In case of emergency
Page 353 of 433
Black plate (353,1)
Model "Z51-D" EDITED: 2010/ 7/ 23
REMOVING SPOTSRemove tar and oil spots, industrial dust,
insects, and tree sap as quickly as possible
from the paint surface to avoid lasting damage
or staining. Special cleaning products are
available at a NISSAN dealer or any automotive
accessory stores.UNDERBODYIn areas where road salt is used in winter, the
underbody must be cleaned regularly. This will
prevent dirt and salt from building up and
causing the acceleration of corrosion on the
underbody and suspension. Before the winter
period and again in the spring, the underseal
must be checked and, if necessary, re-treated.GLASSUse glass cleaner to remove smoke and dust
film from the glass surfaces. It is normal for glass
to become coated with a film after the vehicle is
parked in the hot sun. Glass cleaner and a soft
cloth will easily remove this film.
CAUTION
When cleaning the inside of the win-
dows, do not use sharp-edged tools,
abrasive cleaners or chlorine-based
disinfectant cleaners. They could da-mage the electrical conductors, radio
antenna elements or rear window
defroster elements.
ALUMINUM ALLOY WHEELSWash regularly with a sponge dampened in a
mild soap solution, especially during winter
months in areas where road salt is used. Salt
could discolor the wheels if not removed.
CAUTION
Follow the directions below to avoid
staining or discoloring the wheels:
.
Do not use a cleaner that uses
strong acid or alkali contents to
clean the wheels.
. Do not apply wheel cleaners to the
wheels when they are hot. The
wheel temperature should be the
same as ambient temperature.
. Rinse the wheel to completely re-
move the cleaner within 15 minutes
after the cleaner is applied.CHROME PARTSClean chrome parts regularly with a non-
abrasive chrome polish to maintain the finish.
TIRE DRESSINGNISSAN does not recommend the use of tire
dressings. Tire manufacturers apply a coating to
the tires to help reduce discoloration of the
rubber. If a tire dressing is applied to the tires, it
may react with the coating and form a com-
pound. This compound may come off the tire
while driving and stain the vehicle paint.
If you choose to use a tire dressing, take the
following precautions:
.Use a water-based tire dressing. The coat-
ing on the tire dissolves more easily with an
oil-based tire dressing.
. Apply a light coat of tire dressing to help
prevent it from entering the tire tread/
grooves (where it would be difficult to
remove) .
. Wipe off excess tire dressing using a dry
towel. Make sure the tire dressing is
completely removed from the tire tread/
grooves.
. Allow the tire dressing to dry as recom-
mended by tire dressing manufacturer.
Appearance and care
7-3
Page 354 of 433

Black plate (354,1)
Model "Z51-D" EDITED: 2010/ 7/ 23
Occasionally remove loose dust from the interior
trim, plastic parts and seats using a vacuum
cleaner or soft bristled brush. Wipe the vinyl and
leather surfaces with a clean, soft cloth dam-
pened in mild soap solution, then wipe clean
with a dry soft cloth.
Regular care and cleaning is required in order to
maintain the appearance of the leather.
Before using any fabric protector, read the
manufacturer’s recommendations. Some fabric
protectors contain chemicals that may stain or
bleach the seat material.
Use a cloth dampened only with water, to clean
the meter and gauge lens.
WARNING
Do not use water or acidic cleaners (hot
steam cleaners) on the seat. This can
damage the seat or occupant classifica-
tion sensor. This can also affect the
operation of the air bag system and
result in serious personal injury.
CAUTION
.Never use benzine, thinner, or any
similar material.
. Small dirt particles can be abrasive and damaging to the leather sur-
faces and should be removed
promptly. Do not use saddle soap,
car waxes, polishes, oils, cleaning
fluids, solvents, detergents or am-
monia-based cleaners as they may
damage the leather’s natural finish.
. Only use fabric protectors approved
by NISSAN.
. Do not use glass or plastic cleaner
on meter or gauge lens covers. It
may damage the lens cover.
AIR FRESHENERSMost air fresheners use a solvent that could
affect the vehicle interior. If you use an air
freshener, take the following precautions:
.Hanging-type air fresheners can cause
permanent discoloration when they contact
vehicle interior surfaces. Place the air
freshener in a location that allows it to hang
free and not contact an interior surface.
. Liquid-type air fresheners typically clip on
the ventilators. These products can cause
immediate damage and discoloration when
spilled on interior surfaces.
Carefully read and follow the manufacturer’s
instructions before using air fresheners.
FLOOR MATS
WARNING
To avoid potential pedal interference
that may result in a collision or injury:
. NEVER place a floor mat on top of
another floor mat in the driver front
position.
. Use only genuine NISSAN floor
mats specifically designed for use
in your vehicle model. See your
NISSAN dealer for more informa-
tion.
. Properly position the mats in the
floorwell using the floor mat posi-
tioning aid. See “Floor mat posi-
tioning aid” later in this section.
The use of genuine NISSAN floor mats can
extend the life of your vehicle carpet and make it
easier to clean the interior. Mats should be
maintained with regular cleaning and replaced if
they become excessively worn.
CLEANING INTERIOR7-4
Appearance and care