2011 NISSAN MURANO start
[x] Cancel search: startPage 344 of 433
Black plate (342,1)
Model "Z51-D" EDITED: 2010/ 7/ 23
SCE0719
WARNING
Always follow the instructions below.
Failure to do so could result in damage
to the charging system and cause
personal injury.
1. If the booster battery is in another vehicle*B, position the two vehicles (
*A
and
*B)
to bring their batteries into close proximity to
each other.
Do not allow the two vehicles to touch.
2. Apply the parking brake. Move the selector lever to the P (Park) position. Switch off all unnecessary electrical systems (lights, hea-
ter, air conditioner, etc.) .
3. Remove vent caps on the battery (if so equipped) . Cover the battery with a firmly
wrung out moist cloth to reduce explosion
hazard.
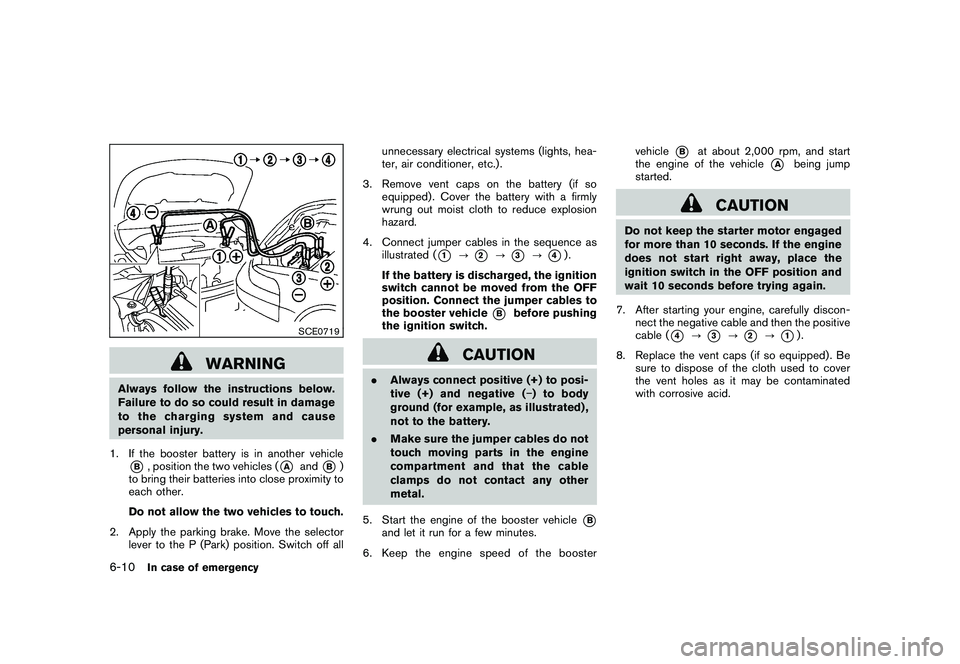
4. Connect jumper cables in the sequence as illustrated (
*1
?
*2
?
*3
?
*4).
If the battery is discharged, the ignition
switch cannot be moved from the OFF
position. Connect the jumper cables to
the booster vehicle
*B
before pushing
the ignition switch.
CAUTION
. Always connect positive (+) to posi-
tive (+) and negative ( �) to body
ground (for example, as illustrated) ,
not to the battery.
. Make sure the jumper cables do not
touch moving parts in the engine
compartment and that the cable
clamps do not contact any other
metal.
5. Start the engine of the booster vehicle
*B
and let it run for a few minutes.
6. Keep the engine speed of the booster vehicle
*B
at about 2,000 rpm, and start
the engine of the vehicle
*A
being jump
started.
CAUTION
Do not keep the starter motor engaged
for more than 10 seconds. If the engine
does not start right away, place the
ignition switch in the OFF position and
wait 10 seconds before trying again.
7. After starting your engine, carefully discon- nect the negative cable and then the positive
cable (
*4
?
*3
?
*2
?
*1).
8. Replace the vent caps (if so equipped) . Be sure to dispose of the cloth used to cover
the vent holes as it may be contaminated
with corrosive acid.
6-10
In case of emergency
Page 345 of 433
Black plate (343,1)
Model "Z51-D" EDITED: 2010/ 7/ 23
Do not attempt to start the engine by pushing.
CAUTION
Continuously Variable Transmission
(CVT) models cannot be push-started
or tow-started. Attempting to do so may
cause transmission damage.
CAUTION
.Do not continue to drive if your
vehicle overheats. Doing so could
cause engine damage or a vehicle
fire.
. To avoid the danger of being
scalded, never remove the radiator
cap while the engine is still hot.
When the radiator cap is removed,
pressurized hot water will spurt out,
possibly causing serious injury.
. Do not open the hood if steam is
coming out.
If your vehicle is overheating (indicated by an
extremely high temperature gauge reading) , or if
you feel a lack of engine power, detect abnormal
noise, etc., take the following steps:
1. Move the vehicle safely off the road, apply the parking brake and move the selector
lever to the P (Park) position.
Do not stop the engine.
2. Turn off the air conditioner. Open all the windows, move the heater or air conditioner
temperature control to maximum hot and fan
control to high speed. 3. Get out of the vehicle. Look and listen for
steam or coolant escaping from the radiator
before opening the hood. (If steam or
coolant is escaping, turn off the engine.)
Do not open the hood further until no steam
or coolant can be seen.
4. Open the engine hood.
WARNING
If steam or water is coming from the
engine, stand clear to prevent getting
burned.
5. Visually check drive belts for damage or looseness. Also check if the cooling fan is
running. The radiator hoses and radiator
should not leak water. If coolant is leaking,
the water pump belt is missing or loose, or
the cooling fan does not run, stop the
engine.
WARNING
Be careful not to allow your hands, hair,
jewelry or clothing to come into contact
with, or get caught in, engine belts or
the engine cooling fan. The engine
cooling fan can start at any time.
PUSH STARTING IF YOUR VEHICLE OVERHEATS
In case of emergency
6-11
Page 357 of 433
Black plate (25,1)
8 Maintenance and do-it-yourself
Model "Z51-D" EDITED: 2010/ 7/ 23
Maintenance requirement..................................... 8-2
Scheduled maintenance ................................... 8-2
General maintenance ...................................... 8-2
Where to go for service ................................... 8-2
General maintenance .......................................... 8-2
Explanation of maintenance items ....................... 8-2
Maintenance precautions ..................................... 8-5
Engine compartment check locations ...................... 8-6
VQ35DE engine ............................................ 8-6
Engine cooling system ......................................... 8-7
Checking engine coolant level ........................... 8-7
Changing engine coolant ................................. 8-8
Engine oil ......................................................... 8-8
Checking engine oil level ................................. 8-8
Changing engine oil and filter ............................ 8-8
Continuously Variable Transmission (CVT) fluid ........ 8-11
Power steering fluid .......................................... 8-11
Brake fluid ...................................................... 8-12
Window washer fluid ........................................ 8-12
Battery .......................................................... 8-13
Jump starting .............................................. 8-14
Variable voltage control system (if so equipped) ...... 8-15
Drive belt ....................................................... 8-15 Spark plugs
.................................................... 8-16
Replacing spark plugs ................................... 8-16
Air cleaner ...................................................... 8-16
Windshield wiper blades .................................... 8-17
Cleaning .................................................... 8-17
Replacing ................................................... 8-18
Rear window wiper blade ................................... 8-19
Brakes ........................................................... 8-19
Self-adjusting brakes .................................... 8-19
Brake pad wear warning ................................ 8-19
Fuses ............................................................ 8-20
Engine compartment ..................................... 8-20
Passenger compartment ................................ 8-21
Intelligent Key battery replacement ....................... 8-22
Lights ............................................................ 8-24
Headlights .................................................. 8-25
Exterior and interior lights ............................... 8-27
Wheels and tires .............................................. 8-30
Tire pressure ............................................... 8-30
Tire labeling ................................................ 8-33
Types of tires .............................................. 8-35
Tire chains .................................................. 8-36
Changing wheels and tires ............................. 8-36
Page 360 of 433
Black plate (362,1)
Model "Z51-D" EDITED: 2010/ 7/ 23
Windshield defroster:Check that the air
comes out of the defroster outlets properly and
in sufficient quantity when operating the heater
or air conditioner.
Windshield wiper and washer*: Check that
the wipers and washer operate properly and that
the wipers do not streak.Under the hood and vehicleThe maintenance items listed here should be
checked periodically (for example, each time you
check the engine oil or refuel) .
Battery*: Check the fluid level in each cell.
It should be between the MAX and MIN lines.
Vehicles operated in high temperatures or under
severe condition require frequent checks of the
battery fluid level.
Brake fluid level*: Make sure that the brake
fluid level is between the MAX and MIN lines on
the reservoir.
Engine coolant level*: Check the coolant level
when the engine is cold.
Engine drive belts*: Make sure that the drive
belts are not frayed, worn, cracked or oily.
Engine oil level*: Check the level after parking
the vehicle on a level surface and turning off the
engine. Wait more than 10 minutes for the oil to
drain back into the oil pan. Exhaust system:
Make sure there are no loose
supports, cracks or holes. If the sound of the
exhaust seems unusual or there is a smell of
exhaust fumes, immediately have the exhaust
system inspected by a NISSAN dealer. (See
“PRECAUTIONS WHEN STARTING AND
DRIVING” in the “5. St arting and driving”
section for exhaust gas (carbon monoxide) .)
Fluid leaks: Check under the vehicle for fuel,
oil, water or other fluid leaks after the vehicle has
been parked for a while. Water dripping from the
air conditioner after use is normal. If you should
notice any leaks or if gasoline fumes are evident,
check for the cause and have it corrected
immediately.
Power steering fluid level* and lines: Check
the level when the fluid is cold, with the engine
off. Check the lines for proper attachment, leaks,
cracks, etc.
Radiator and hoses: Check the front of the
radiator and clean off any dirt, insects, leaves,
etc., that may have accumulated. Make sure the
hoses have no cracks, deformation, rot or loose
connections.
Underbody: The underbody is frequently ex-
posed to corrosive substances such as those
used on icy roads or to control dust. It is very
important to remove these substances, other-
wise rust will form on the floor pan, frame, fuel
lines and around the exhaust system. At the end of winter, the underbody should be thoroughly
flushed with plain water, being careful to clean
those areas where mud and dirt may accumu-
late. For additional information, see “CLEANING
EXTERIOR” in the “7. Appearance and care”
section.
Windshield washer fluid*:
Check that there is
adequate fluid in the reservoir.8-4
Maintenance and do-it-yourself
Page 364 of 433
Black plate (366,1)
Model "Z51-D" EDITED: 2010/ 7/ 23
CHANGING ENGINE COOLANTMajor cooling system repairs should be per-
formed by a NISSAN dealer. The service
procedures can be found in the appropriate
NISSAN Service Manual.
Improper servicing can result in reduced
heater performance and engine overheat-
ing.
WARNING
.To avoid the danger of being
scalded, never change the coolant
when the engine is hot.
. Never remove the radiator cap when
the engine is hot. Serious burns
could be caused by high pressure
fluid escaping from the radiator.
. Avoid direct skin contact with used
coolant. If skin contact is made,
wash thoroughly with soap or hand
cleaner as soon as possible.
. Keep coolant out of reach of chil-
dren and pets.
Engine coolant must be disposed of properly.
Check your local regulations.
SDI2174
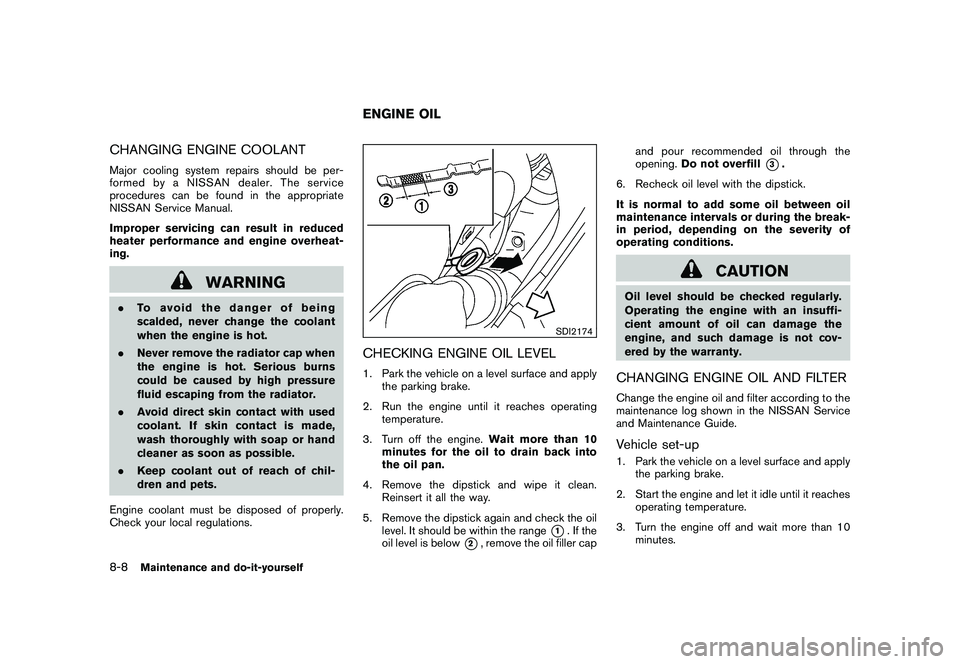
CHECKING ENGINE OIL LEVEL1. Park the vehicle on a level surface and apply the parking brake.
2. Run the engine until it reaches operating temperature.
3. Turn off the engine. Wait more than 10
minutes for the oil to drain back into
the oil pan.
4. Remove the dipstick and wipe it clean. Reinsert it all the way.
5. Remove the dipstick again and check the oil level. It should be within the range
*1. If the
oil level is below
*2, remove the oil filler cap and pour recommended oil through the
opening.
Do not overfill
*3.
6. Recheck oil level with the dipstick.
It is normal to add some oil between oil
maintenance intervals or during the break-
in period, depending on the severity of
operating conditions.
CAUTION
Oil level should be checked regularly.
Operating the engine with an insuffi-
cient amount of oil can damage the
engine, and such damage is not cov-
ered by the warranty.CHANGING ENGINE OIL AND FILTERChange the engine oil and filter according to the
maintenance log shown in the NISSAN Service
and Maintenance Guide.Vehicle set-up1. Park the vehicle on a level surface and apply the parking brake.
2. Start the engine and let it idle until it reaches operating temperature.
3. Turn the engine off and wait more than 10 minutes.
ENGINE OIL
8-8
Maintenance and do-it-yourself
Page 366 of 433

Black plate (368,1)
Model "Z51-D" EDITED: 2010/ 7/ 23
CAUTION
Be careful not to burn yourself, as the
engine oil is hot.. Waste oil must be disposed of
properly.
. Check your local regulations.
Perform steps 4 to 9 when the engine oil
filter change is needed.
4. Remove the plastic cover over the oil filter location by removing the small plastic clips
as illustrated.
5. Loosen the oil filter
*C
with an oil filter
wrench. Remove the oil filter by turning it by
hand.
6. Wipe the engine oil filter mounting surface with a clean rag.
CAUTION
Be sure to remove any old gasket
material remaining on the mounting
surface of the engine. Failure to do so
could lead to engine damage.
7. Coat the gasket on the new filter with clean engine oil. 8. Screw in the oil filter clockwise until a slight
resistance is felt, then tighten additionally
more than 2/3 turn.
Oil filter tightening torque:11 to 15 ft-lb (14.7 to 20.5 N·m)
9. Install the plastic cover.
10. Clean and re-install the drain plug with a new washer. Securely tighten the drain plug
with a wrench.
Drain plug tightening torque:22 to 29 ft-lb (29 to 39 N·m)
Do not use excessive force.
11. Refill engine with recommended oil through the oil filler opening, and install the oil filler
cap securely.
See “CAPACITIES AND RECOMMENDED
FUEL/LUBRICANTS” in the “9. Technical
and consumer information” section for drain
and refill capacity. The drain and refill
capacity depends on the oil temperature
and drain time. Use these specifications for
reference only. Always use the dipstick to
determine the proper amount of oil in the
engine.
12. Start the engine and check for leakage around the drain plug and the oil filter.
Correct as required.
13. Turn the engine off and wait more than 10 minutes. Check the oil level with the dipstick.
Add engine oil if necessary.
After the operation1. Lower the vehicle carefully to the ground.
2. Dispose of waste oil and filter properly.
WARNING
.
Prolonged and repeated contact
with used engine oil may cause skin
cancer.
. Try to avoid direct skin contact with
used oil. If skin contact is made,
wash thoroughly with soap or hand
cleaner as soon as possible.
. Keep used engine oil out of reach of
children.
8-10
Maintenance and do-it-yourself
Page 370 of 433

Black plate (372,1)
Model "Z51-D" EDITED: 2010/ 7/ 23
DI0137MA
Check the fluid level in each cell. (Remove the
battery cover if it is necessary.) It should be
between the UPPER LEVEL
*1
and LOWER
LEVEL
*2
lines.
If it is necessary to add fluid, add only distilled
water to bring the level to the indicator in each
filler opening. Do not overfill.
SDI1480C
1. Remove the cell plugs
*A
.
2. Add distilled water up to the UPPER LEVEL
*1
line.
If the side of the battery is not clear, check
the distilled water level by looking directly
above the cell; the condition
*1
indicates
OK and the conditions
*2
needs more to
be added.
3. Tighten cell plugs
*A
.
Vehicles operated in high temperatures or under
severe conditions require frequent checks of the
battery fluid level.
JUMP STARTINGIf jump starting is necessary, see “JUMP
STARTING” in the “6. In case of emergency”
section. If the engine does not start by jump
starting, the battery may have to be replaced.
Contact a NISSAN dealer.
8-14
Maintenance and do-it-yourself
Page 373 of 433
Black plate (375,1)
Model "Z51-D" EDITED: 2010/ 7/ 23
isn’t there, and the engine backfires,
you could be burned. Do not drive
with the air cleaner removed, and be
careful when working on the engine
with the air cleaner removed.
. Never pour fuel into the throttle
body or attempt to start the engine
with the air cleaner removed. Doing
so could result in serious injury.
CLEANINGIf your windshield is not clear after using the
windshield washer or if a wiper blade chatters
when running, wax or other material may be on
the blade or windshield.
Clean the outside of the windshield with a
washer solution or a mild detergent. Your
windshield is clean if beads do not form when
rinsing with clear water.
Clean each blade by wiping it with a cloth
soaked in a washer solution or a mild detergent.
Then rinse the blade with clear water. If your
windshield is still not clear after cleaning the
blades and using the wiper, replace the blades.
CAUTION
Worn windshield wiper blades can
damage the windshield and impair
driver vision.WINDSHIELD WIPER BLADES
Maintenance and do-it-yourself
8-17