2011 NISSAN MURANO tire type
[x] Cancel search: tire typePage 121 of 433
Black plate (119,1)
Model "Z51-D" EDITED: 2010/ 9/ 28
CARGO FLOOR BOX
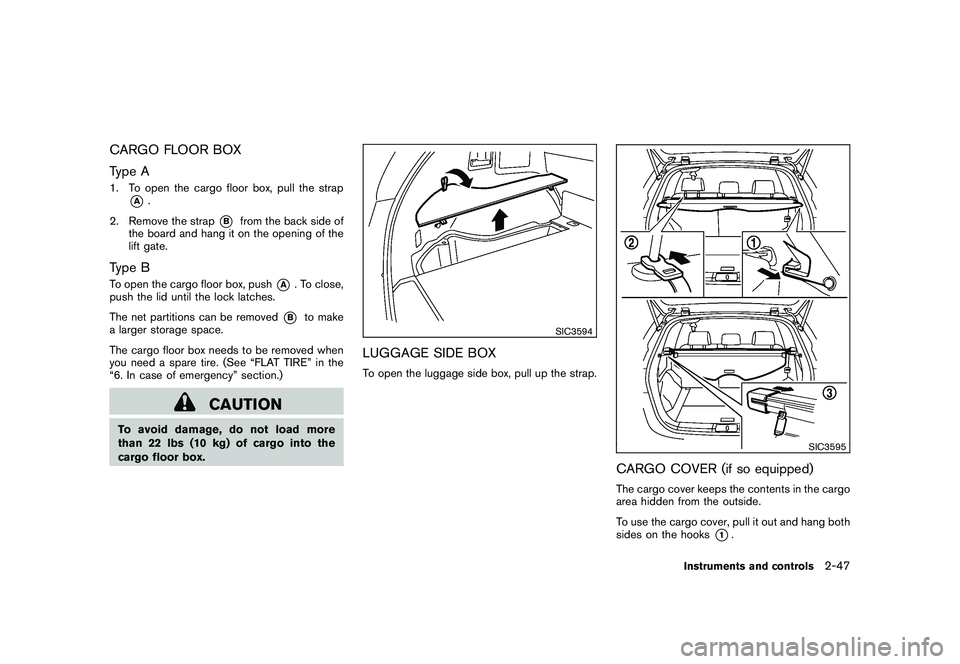
Type A1. To open the cargo floor box, pull the strap
*A
.
2. Remove the strap
*B
from the back side of
the board and hang it on the opening of the
lift gate.
Type BTo open the cargo floor box, push
*A
. To close,
push the lid until the lock latches.
The net partitions can be removed*B
to make
a larger storage space.
The cargo floor box needs to be removed when
you need a spare tire. (See “FLAT TIRE” in the
“6. In case of emergency” section.)
CAUTION
To avoid damage, do not load more
than 22 lbs (10 kg) of cargo into the
cargo floor box.
SIC3594
LUGGAGE SIDE BOXTo open the luggage side box, pull up the strap.
SIC3595
CARGO COVER (if so equipped)The cargo cover keeps the contents in the cargo
area hidden from the outside.
To use the cargo cover, pull it out and hang both
sides on the hooks
*1.
Instruments and controls
2-47
Page 191 of 433
Black plate (189,1)
Model "Z51-D" EDITED: 2010/ 7/ 23
.
(Stop)
Select the “
” key to stop the slideshow.
.
(Next)
Select the “
” key to display the next file.
.
(Previous)
Select the “
” key to display the previous
file.
Setting the Image Viewer:
The Image Viewer setting display will appear
when selecting the “Settings” key on the full
screen display. The following settings are
available for the full screen display.
. Slideshow Speed
Select the “Slideshow Speed” key. From the
following display, select the changing time
from 5, 10, 30, 60 seconds or “No Auto
Change”.
. Slideshow Order
Select the “Slideshow Order” key. From the
following display, select “Random” or “Order
List”. For “Order List”, the image order is the
order of the files as stored on the USB
memory. Operating tips:
.
Only files that meet the following conditions
will be displayed.
— Image type: JPEG
— File Extensions: *.jpg, *jpeg
— Maximum Resolution: 2048 61536
pixels
— Maximum Size: 2-MB
— Colors: 32768 (15-bit)
— Maximum File Name lengths: 253-Bytes
— Maximum Folders: 500
— Maximum Images per Folder: 1024
. If an electronic device (such as a digital
camera) is directly connected to the vehicle
using a USB cable, no image will be
displayed on the screen.
. If the file name is too long, some file names
may not be entirely displayed.
. When the total number of characters in the
file name exceeds 100 or if 1 file name in a
directory exceeds 100 characters, all files
will show a shortened 8-character version.
The image will still be displayed when
selected. When the selector lever is shifted into the R
(Reverse) position, the monitor display shows
the view to the rear of the vehicle.
The system is designed as an aid to the driver in
detecting large stationary objects to help avoid
damaging the vehicle. The system will not detect
small objects below the bumper and may not
detect objects close to the bumper or on the
ground.
WARNING
.
The rear view camera is a conve-
nience but it is not a substitute for
proper backing up. Always turn and
check that it is safe to do so before
backing up. Always back up slowly.
. Objects viewed in the RearView
Monitor differ from actual distance
because a wide-angle lens is used.
Objects in the RearView Monitor
will appear visually opposite than
when viewed in the rear view and
outside mirrors.
. Make sure that the lift gate is
securely closed when backing up.
. Underneath the bumper and the
corner areas of the bumper cannot
be viewed on the RearView MonitorREARVIEW MONITOR (if so
equipped)
Center display, heater, air conditioner, audio, phone and voice recognition systems
4-21
Page 308 of 433
Black plate (306,1)
Model "Z51-D" EDITED: 2010/ 7/ 23
ON-PAVEMENT AND OFF-ROAD
DRIVING PRECAUTIONSUtility vehicles have a significantly higher
rollover rate than other types of vehicles.
They have higher ground clearance than pas-
senger cars to make them capable of performing
in a variety of on-pavement and off-road
applications. This gives them a higher center of
gravity than ordinary cars. An advantage of
higher ground clearance is a better view of the
road, allowing you to anticipate problems.
However, they are not designed for cornering
at the same speeds as conventional passenger
cars any more than low-slung sports cars are
designed to perform satisfactorily under off-road
conditions. If at all possible, avoid sharp turns or
abrupt maneuvers, particularly at high speeds.
As with other vehicles of this type, failure to
operate this vehicle correctly may result in loss
of control or vehicle rollover. Seat belts help
reduce the risk of injury in collisions and
rollovers. In a rollover crash, an unbelted or
improperly belted person is significantly more
likely to be injured or killed than a person
properly wearing a seat belt.
Be sure to read “DRIVING SAFETY PRECAU-
TIONS” later in this section.
OFF-ROAD RECOVERYWhile driving, the right side or left side wheels
may unintentionally leave the road surface. If this
occurs, maintain control of the vehicle by
following the procedure below. Please note that
this procedure is only a general guide. The
vehicle must be driven as appropriate based on
the conditions of the vehicle, road and traffic.
1. Remain calm and do not overreact.
2. Do not apply the brakes.
3. Maintain a firm grip on the steering wheelwith both hands and try to hold a straight
course.
4. When appropriate, slowly release the accel- erator pedal to gradually slow the vehicle.
5. If there is nothing in the way, steer the vehicle to follow the road while the vehicle
speed is reduced. Do not attempt to drive
the vehicle back onto the road surface until
vehicle speed is reduced.
6. When it is safe to do so, gradually turn the steering wheel until both tires return to the
road surface. When all tires are on the road
surface, steer the vehicle to stay in the
appropriate driving lane.
.If you decide that it is not safe to return
the vehicle to the road surface based on
vehicle, road or traffic conditions, gra- dually slow the vehicle to a stop in a safe
place off the road.
RAPID AIR PRESSURE LOSSRapid air pressure loss or a “blow-out” can
occur if the tire is punctured or is damaged due
to hitting a curb or pothole. Rapid air pressure
loss can also be caused by driving on under-
inflated tires.
Rapid air pressure loss can affect the handling
and stability of the vehicle, especially at highway
speeds.
Help prevent rapid air pressure loss by main-
taining the correct air pressure and visually
inspect the tires for wear and damage. See
“WHEELS AND TIRES” in the “8. Maintenance
and do-it-yourself” section of this manual.
If a tire rapidly loses air pressure or “blows-out”
while driving maintain control of the vehicle by
following the procedure below. Please note that
this procedure is only a general guide. The
vehicle must be driven as appropriate based on
the conditions of the vehicle, road and traffic.
WARNING
The following actions can increase the
chance of losing control of the vehicle if
there is a sudden loss of tire air
pressure. Losing control of the vehicle
5-6
Starting and driving
Page 311 of 433
Black plate (309,1)
Model "Z51-D" EDITED: 2010/ 7/ 23
movement which could result in
serious vehicle damage or personal
injury. (AWD models)
. When a wheel is off the ground due
to an unlevel surface, do not spin
the wheel excessively.
. Accelerating quickly, sharp steering
maneuvers or sudden braking may
cause loss of control.
. If at all possible, avoid sharp turning
maneuvers, particularly at high
speeds. Your vehicle has a higher
center of gravity than a conventional
passenger car. The vehicle is not
designed for cornering at the same
speeds as conventional passenger
cars. Failure to operate this vehicle
correctly could result in loss of
control and/or a rollover accident.
. Always use tires of the same type,
size, brand, construction (bias, bias-
belted or radial) , and tread pattern
on all four wheels. Install tire chains
on the front wheels when driving on
slippery roads and drive carefully.
. Be sure to check the brakes imme-
diately after driving in mud or water.
See “BRAKE SYSTEM” later in this section for wet brakes.
. Avoid parking your vehicle on steep
hills. If you get out of the vehicle
and it rolls forward, backward or
sideways, you could be injured.
. Whenever you drive off-road
through sand, mud or water as deep
as the wheel hub, more frequent
maintenance may be required. See
the maintenance information in the
“NISSAN Service and Maintenance
Guide”.
. Spinning the front wheels on slip-
pery surfaces may cause the AWD
warning light to flash and the AWD
system to automatically switch from
the AWD mode to the 2WD mode.
This could reduce traction. Be espe-
cially careful when towing a trailer.
(AWD models)
WARNING
Do not operate the push-button ignition
switch while driving the vehicle except
in an emergency. (The engine will stop
when the ignition switch is pushed 3
consecutive times or the ignition switch
is pushed and held for more than 2
seconds.) If the engine stops while the
vehicle is being driven, this could lead
to a crash and serious injury.
Before operating the push-button ignition
switch, be sure to move the selector lever to
the P (Park) position.INTELLIGENT KEY SYSTEMThe Intelligent Key system can operate the
ignition switch without taking the Intelligent
Key out from your pocket or purse. The
operating environment and/or conditions may
affect the Intelligent Key system operation.
CAUTION
. Be sure to carry the Intelligent Key
with you when operating the vehi-
cle.
. Never leave the Intelligent Key in-
side the vehicle when you leave thePUSH-BUTTON IGNITION SWITCH
Starting and driving
5-9
Page 328 of 433
Black plate (326,1)
Model "Z51-D" EDITED: 2010/ 7/ 23
or accelerating could cause the
wheelstoskidandresultinan
accident.
. If the engine is not running or is
turned off while driving, the power
assist for the brakes will not work.
Braking will be harder.
Wet brakesWhen the vehicle is washed or driven through
water, the brakes may get wet. As a result, your
braking distance will be longer and the vehicle
may pull to one side during braking.
To dry brakes, drive the vehicle at a safe speed
while lightly tapping the brake pedal to heat-up
the brakes. Do this until the brakes return to
normal. Avoid driving the vehicle at high speeds
until the brakes function correctly.PARKING BRAKE BREAK-INBreak in the parking brake shoes whenever the
stopping effect of the parking brake is weakened
or whenever the parking brake shoes and/or
drums/rotors are replaced, in order to assure the
best braking performance.
This procedure is described in the vehicle
service manual and can be performed by a
NISSAN dealer.
ANTI-LOCK BRAKING SYSTEM (ABS)
WARNING
.The Anti-lock Braking System (ABS)
is a sophisticated device, but it
cannot prevent accidents resulting
from careless or dangerous driving
techniques. It can help maintain
vehicle control during braking on
slippery surfaces. Remember that
stopping distances on slippery sur-
faces will be longer than on normal
surfaces even with ABS. Stopping
distances may also be longer on
rough, gravel or snow covered
roads, or if you are using tire chains.
Alwaysmaintainasafedistance
from the vehicle in front of you.
Ultimately, the driver is responsible
for safety.
. Tire type and condition may also
affect braking effectiveness.
— When replacing tires, install the
specified size of tires on all four
wheels.
— When installing a spare tire, make sure that it is the proper
size and type as specified on the Tire and Loading Information
label. See “TIRE AND LOADING
INFORMATION LABEL” in the “9.
Technical and consumer infor-
mation” section of this manual.
— For detailed information, see “WHEELS AND TIRES” in the
“8. Maintenance and do-it-your-
self” section of this manual.
The Anti-lock Braking System (ABS) controls
the brakes so the wheels do not lock during hard
braking or when braking on slippery surfaces.
The system detects the rotation speed at each
wheel and varies the brake fluid pressure to
prevent each wheel from locking and sliding. By
preventing each wheel from locking, the system
helps the driver maintain steering control and
helps to minimize swerving and spinning on
slippery surfaces.
Using the systemDepress the brake pedal and hold it down.
Depress the brake pedal with firm steady
pressure, but do not pump the brakes. The
ABS will operate to prevent the wheels from
locking up. Steer the vehicle to avoid obstacles.
5-26
Starting and driving
Page 331 of 433

Black plate (329,1)
Model "Z51-D" EDITED: 2010/ 7/ 23
surface.
. If wheels or tires other than the
NISSAN recommended ones are
used, the VDC system may not
operate properly and the
in-
dicator may flash or bothand
indicator lights may illuminate.
. The VDC system is not a substitute
for winter tires or tire chains on a
snow covered road.
FREEING A FROZEN DOOR LOCKTo prevent a door lock from freezing, apply
deicer through the key hole. If the lock becomes
frozen, heat the key before inserting it into the
key hole or use the remote keyless entry keyfob.ANTI-FREEZEIn the winter when it is anticipated that the
outside temperature will drop below 32 8F(0 8C) ,
check the anti-freeze to assure proper winter
protection. For additional information, see “EN-
GINE COOLING SYSTEM” in the “8. Main-
tenance and do-it-yourself” section.BATTERYIf the battery is not fully charged during
extremely cold weather conditions, the battery
fluid may freeze and damage the battery. To
maintain maximum efficiency, the battery should
be checked regularly. For additional information,
see “BATTERY” in the “8. Maintenance and do-
it-yourself” section.DRAINING OF COOLANT WATERIf the vehicle is to be left outside without anti-
freeze, drain the cooling system, including the
engine block. Refill before operating the vehicle.
For details, see “ENGINE COOLING SYSTEM”
in the “8. Maintenance and do-it-yourself”
section.
TIRE EQUIPMENTSUMMER tires have a tread designed to provide
superior performance on dry pavement. How-
ever, the performance of these tires will be
substantially reduced in snowy and icy condi-
tions. If you operate your vehicle on snowy or icy
roads, NISSAN recommends the use of MUD &
SNOW or ALL SEASON tires on all four wheels.
Consult a NISSAN dealer for the tire type, size,
speed rating and availability information.
For additional traction on icy roads, studded
tires may be used. However, some U.S. states
and Canadian provinces prohibit their use.
Check local, state and provincial laws before
installing studded tires.
Skid and traction capabilities of studded
snow tires, on wet or dry surfaces, may be
poorer than that of non-studded snow
tires.
Tire chains may be used. For details, see “TIRE
CHAINS” in the “8. Maintenance and do-it-
yourself” section of this manual.All-Wheel Drive (AWD) modelIf you install snow tires, they must also be the
same size, brand, construction and tread pattern
on all four wheels.
COLD WEATHER DRIVING
Starting and driving
5-29
Page 338 of 433
Black plate (336,1)
Model "Z51-D" EDITED: 2010/ 7/ 23
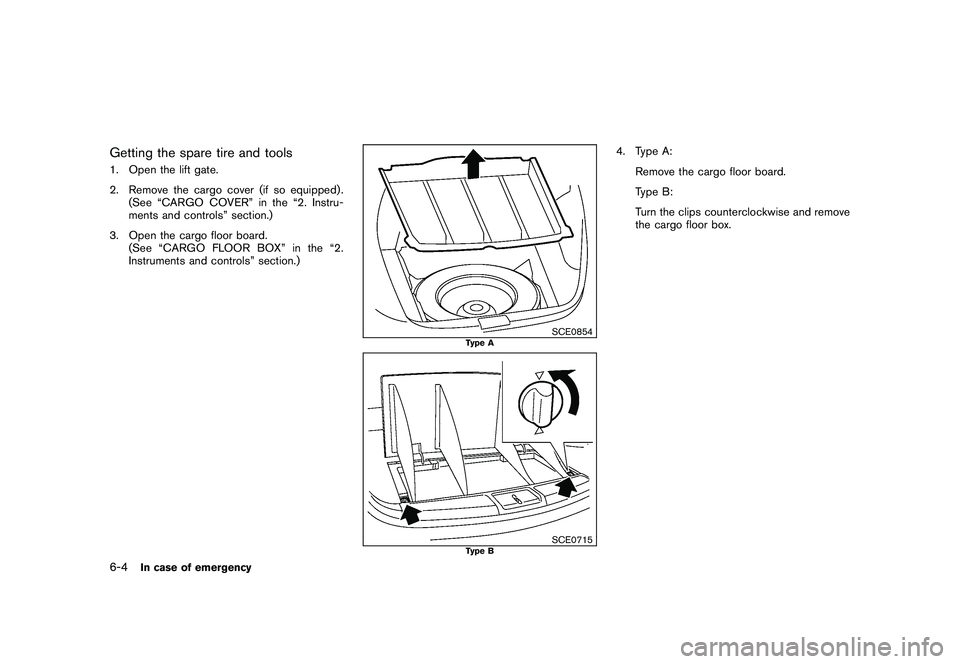
Getting the spare tire and tools1. Open the lift gate.
2. Remove the cargo cover (if so equipped) .(See “CARGO COVER” in the “2. Instru-
ments and controls” section.)
3. Open the cargo floor board. (See “CARGO FLOOR BOX” in the “2.
Instruments and controls” section.)
SCE0854
Type A
SCE0715
Type B
4. Type A:
Remove the cargo floor board.
Type B:
Turn the clips counterclockwise and remove
the cargo floor box.
6-4
In case of emergency
Page 339 of 433
Black plate (337,1)
Model "Z51-D" EDITED: 2010/ 7/ 23
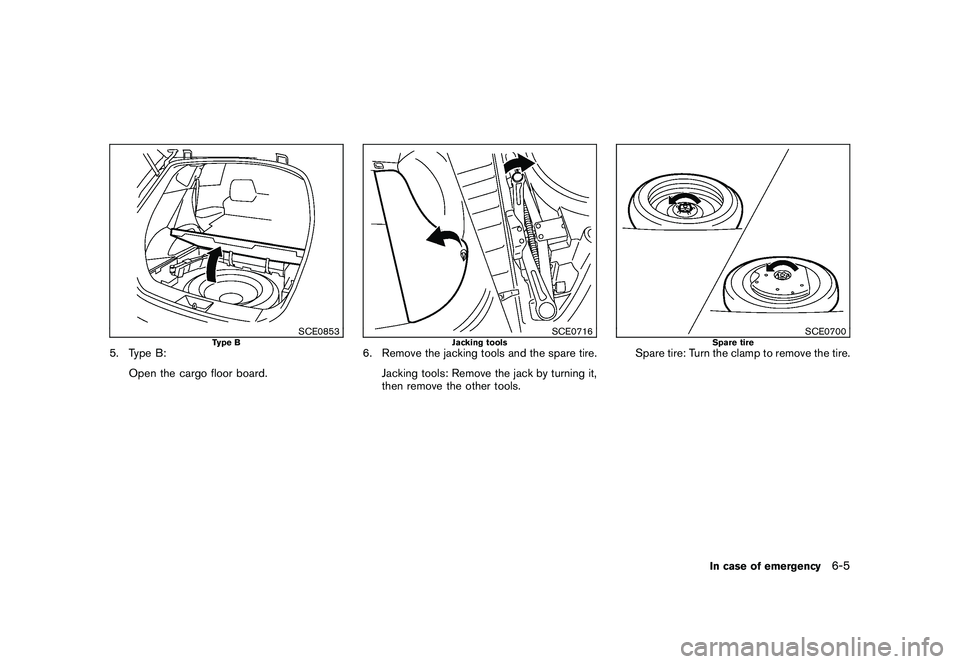
SCE0853
Type B
5. Type B:Open the cargo floor board.
SCE0716
Jacking tools
6. Remove the jacking tools and the spare tire.Jacking tools: Remove the jack by turning it,
then remove the other tools.
SCE0700
Spare tire
Spare tire: Turn the clamp to remove the tire.
In case of emergency
6-5