2011 NISSAN LATIO height
[x] Cancel search: heightPage 2626 of 3787
![NISSAN LATIO 2011 Service Repair Manual EM-236
< SERVICE INFORMATION >[MR18DE]
SERVICE DATA AND SPECIFICATIONS (SDS)
PISTON, PISTON RING AND PISTON PIN
Available Piston
Unit: mm (in)
*: Always check with the Parts Department for the latest NISSAN LATIO 2011 Service Repair Manual EM-236
< SERVICE INFORMATION >[MR18DE]
SERVICE DATA AND SPECIFICATIONS (SDS)
PISTON, PISTON RING AND PISTON PIN
Available Piston
Unit: mm (in)
*: Always check with the Parts Department for the latest](/manual-img/5/57357/w960_57357-2625.png)
EM-236
< SERVICE INFORMATION >[MR18DE]
SERVICE DATA AND SPECIFICATIONS (SDS)
PISTON, PISTON RING AND PISTON PIN
Available Piston
Unit: mm (in)
*: Always check with the Parts Department for the latest parts information
Piston Ring
Unit: mm (in)
Out-of-round [Difference between (X) and (Y)]
Limit 0.015 (0.0006)
Taper [Difference between (A) and (C)] 0.01 (0.0004)
Main bearing housing inner diameter grade Grade No. A
Grade No. B
Grade No. C
Grade No. D
Grade No. E
Grade No. F
Grade No. G
Grade No. H
Grade No. J
Grade No. K
Grade No. L
Grade No. M
Grade No. N
Grade No. P
Grade No. R
Grade No. S
Grade No. T
Grade No. U
Grade No. V
Grade No. W55.997 - 55.998 (2.2046 - 2.2046)
55.998 - 55.999 (2.2046 - 2.2047)
55.999 - 56.000 (2.2047 - 2.2047)
56.000 - 56.001 (2.2047 - 2.2048)
56.001 - 56.002 (2.2048 - 2.2048)
56.002 - 56.003 (2.2048 - 2.2048)
56.003 - 56.004 (2.2048 - 2.2049)
56.004 - 56.005 (2.2049 - 2.2049)
56.005 - 56.006 (2.2049 - 2.2050)
56.006 - 56.007 (2.2050 - 2.2050)
56.007 - 56.008 (2.2050 - 2.2050)
56.008 - 56.009 (2.2050 - 2.2051)
56.009 - 56.010 (2.2051 - 2.2051)
56.010 - 56.011 (2.2051 - 2.2052)
56.011 - 56.012 (2.2052 - 2.2052)
56.012 - 56.013 (2.2052 - 2.2052)
56.013 - 56.014 (2.2052 - 2.2053)
56.014 - 56.015 (2.2053 - 2.2053)
56.015 - 56.016 (2.2053 - 2.2053)
56.016 - 56.017 (2.2053 - 2.2054)
Grade* Dimension
Piston skirt diameter (A) Standard Grade No. 1
83.970 - 83.980 (3.3059 - 3.3063)
Grade No. 2 83.980 - 83.990 (3.3063 - 3.3067)
Piston height (H) dimension 39.9 (1.571)
Piston pin hole diameter 19.993 - 19.999 (0.7871 - 0.7874)
Piston to cylinder bore clearance Standard
0.020 - 0.040 (0.0008 - 0.0016)
Limit 0.08 (0.0031)
PBIC0188E
Items StandardLimit
Side clearance Top
0.04 - 0.08 (0.002 - 0.003) 0.11 (0.0043)
2nd 0.03 - 0.07 (0.001 - 0.003) 0.10 (0.0039)
Oil ring 0.015 - 0.185 (0.001 - 0.007) —
End gap Top
0.20 - 0.30 (0.008 - 0.012) 0.51 (0.020)
2nd 0.50 - 0.65 (0.020 - 0.026) 0.83 (0.033)
Oil (rail ring) 0.15 - 0.45 (0.006 - 0.018) 0.78 (0.031)
Revision: May 2010 2011 Versa
Page 2636 of 3787
![NISSAN LATIO 2011 Service Repair Manual EX-6
< ON-VEHICLE REPAIR >[HR16DE]
EXHAUST SYSTEM
INSTALLATION
Installation is in the reverse order of removal.
CAUTION:
• Always replace exhaust gaskets and seal bear
ings with new ones when instal NISSAN LATIO 2011 Service Repair Manual EX-6
< ON-VEHICLE REPAIR >[HR16DE]
EXHAUST SYSTEM
INSTALLATION
Installation is in the reverse order of removal.
CAUTION:
• Always replace exhaust gaskets and seal bear
ings with new ones when instal](/manual-img/5/57357/w960_57357-2635.png)
EX-6
< ON-VEHICLE REPAIR >[HR16DE]
EXHAUST SYSTEM
INSTALLATION
Installation is in the reverse order of removal.
CAUTION:
• Always replace exhaust gaskets and seal bear
ings with new ones when installing.
• Before installing a new heated oxygen sensor, clean and apply anti-seize lubricant to exhaust sys-
tem threads using suitable tool.
• Discard any heated oxygen sensor which has been dropped from a height of more than 0.5 m (19.7
in) onto a hard surface such as a co ncrete floor; install a new one.
• Do not over-tighten the heated oxygen sensor. Doing so may damage the heated oxygen sensor,
resulting in the MIL coming on.
• Remove deposits from the sealing surface of each connection. Connect them securely to avoid
exhaust leakage.
• Temporarily tighten nuts on the exhaust manifold side and bolts on the vehicle side. Check each part
for unusual interference, and then tighten them to the specified torque.
• When installing each mounting rubb er, avoid twisting or unusual extension in up/down and right/left
directions.
Exhaust Manifold to Exhaust Front Tube
1. Securely insert seal bearing (2) into exhaust manifold (1) side in
the direction shown.
• Exhaust front tube (5)
CAUTION:
Be careful not to damage seal bearing surface when install-
ing.
2. Install spring (3), tighten nut (4). • Be careful that the stud bolt nut does not interfere with the
flanged area ( ).
• Make sure the spring (3) sits properly on the flange surface by aligning it to the locator dimples.
Exhaust Front Tube to Center Muffler
1. Securely insert seal bearing (2) into exhaust front tube (1) side
in the direction shown.
• Center muffler (5)
CAUTION:
Be careful not to damage seal bearing surface when install-
ing.
2. Install spring (3), tighten bolt (4). • Be careful that the stud bolt does not interfere with the flanged
area ( ).
• Make sure the spring (3) sits properly on the flange surface by aligning it to the locator dimples.
INSPECTION AFTER INSTALLATION
• With the engine running, check exhaust tube joints for exhaust leakage and unusual noise.
• Check to ensure that brackets and mounting rubber s are installed properly and free from undue stress.
Improper installation could result in excessive noise and vibration. Oxygen sensor thread cleaner : — (J-43897-18)
Oxygen sensor thread cleaner : — (J-43897-12)
PBIC3797E
PBIC3798E
Revision: May 2010
2011 Versa
Page 2641 of 3787
![NISSAN LATIO 2011 Service Repair Manual EXHAUST SYSTEMEX-11
< SERVICE INFORMATION > [MR18DE]
C
D
E
F
G H
I
J
K L
M A
EX
NP
O
CAUTION:
• Use genuine NISSAN exhaust system parts or equi
valent, which are specially designed for heat
resistan NISSAN LATIO 2011 Service Repair Manual EXHAUST SYSTEMEX-11
< SERVICE INFORMATION > [MR18DE]
C
D
E
F
G H
I
J
K L
M A
EX
NP
O
CAUTION:
• Use genuine NISSAN exhaust system parts or equi
valent, which are specially designed for heat
resistan](/manual-img/5/57357/w960_57357-2640.png)
EXHAUST SYSTEMEX-11
< SERVICE INFORMATION > [MR18DE]
C
D
E
F
G H
I
J
K L
M A
EX
NP
O
CAUTION:
• Use genuine NISSAN exhaust system parts or equi
valent, which are specially designed for heat
resistance, corrosion resistance and shape.
REMOVAL
Remove exhaust system components using power tools.
• Remove heated oxygen sensor using Tool as needed.
CAUTION:
Be careful not to damage heated oxygen sensor.
INSTALLATION
Installation is in the reverse order of removal.
CAUTION:
• Always replace exhaust gaskets and seal bearings with new ones when installing.
• Before installing a new heated oxygen sensor, clean and apply an ti-seize lubricant to exhaust sys-
tem threads using suitable tool.
• Discard any heated oxygen sensor which has been dr opped from a height of more than 0.5 m (19.7
in) onto a hard surface such as a co ncrete floor; install a new one.
• Do not over-tighten the heated oxygen sensor. Doing so may damage the heated oxygen sensor, resulting in the MIL coming on.
• Remove deposits from the sealing surface of each connection. Connect them securely to avoid
exhaust leakage.
• Temporarily tighten nuts on the exhaust manifold side and bolts on the vehicle side. Check each part
for unusual interference, and then tighten them to the specified torque.
• When installing each mounting rubber, avoid twisting or unusual extension in up/down and right/left
directions.
Exhaust Manifold to Exhaust Front Tube
1. Securely insert seal bearing (2) into exhaust manifold (1) side in the direction shown.
• Exhaust front tube (5)
CAUTION:
Be careful not to damage seal bearing surface when install-
ing.
2. Install spring (3), tighten nut (4). • Be careful that the stud bolt nut does not interfere with the
flanged area ( ).
• Make sure the spring (3) sits properly on the flange surface by aligning it to the locator dimples.
Exhaust Front Tube to Center Muffler
1. Securely insert seal bearing (2) into exhaust front tube (1) side in the direction shown.
• Center muffler (5)
CAUTION:
Be careful not to damage seal bearing surface when install-
ing.
2. Install spring (3), tighten bolt (4). • Be careful that the stud bolt does not interfere with the flanged
area ( ).
• Make sure the spring (3) sits properly on the flange surface by
aligning it to the locator dimples.
INSPECTION AFTER INSTALLATION
• With the engine running, check exhaust tube joints for exhaust leakage and unusual noise.
Tool number : KV10114400 (J-38365)
Oxygen sensor thread cleaner : — (J-43897-18)
Oxygen sensor thread cleaner : — (J-43897-12)
PBIC3797E
PBIC3798E
Revision: May 2010
2011 Versa
Page 2686 of 3787

FSU-1
SUSPENSION
C
DF
G H
I
J
K L
M
SECTION FSU
A
B
FSU
N
O PCONTENTS
FRONT SUSPENSION
SERVICE INFORMATION .. ..........................2
PRECAUTIONS .............................................. .....2
Precaution for Supplemental Restraint System
(SRS) "AIR BAG" and "SEAT BELT PRE-TEN-
SIONER" ............................................................. ......
2
Precaution Necessary for Steering Wheel Rota-
tion After Battery Disconnect ............................... ......
2
Precaution for Procedure without Cowl Top Cover ......3
General Precautions .................................................3
PREPARATION ...................................................4
Special Service Tool ........................................... ......4
Commercial Service Tool ..........................................5
NOISE, VIBRATION AND HARSHNESS
(NVH) TROUBLESHOOTING .............................
6
NVH Troubleshooting Chart ................................ ......6
FRONT SUSPENSION ASSEMBLY ...................7
On-Vehicle Inspection and Service ..................... ......7
Wheel Alignment Inspection .....................................7
Component .......................................................... ....10
Removal and Installation .........................................11
COIL SPRING AND STRUT ..............................12
Removal and Installation .........................................12
Disposal ...................................................................12
Disassembly and Assembly .....................................13
TRANSVERSE LINK .........................................15
Removal and Installation .........................................15
STABILIZER BAR .............................................16
Removal and Installation .........................................16
SERVICE DATA AND SPECIFICATIONS
(SDS) .................................................................
17
Wheel Alignment (Unladen*) ...................................17
Ball Joint ..................................................................18
Wheelarch Height (Unladen*) ..................................19
Revision: May 2010 2011 Versa
Page 2692 of 3787

FRONT SUSPENSION ASSEMBLYFSU-7
< SERVICE INFORMATION >
C
DF
G H
I
J
K L
M A
B
FSU
N
O P
FRONT SUSPENSION ASSEMBLY
On-Vehicle Inspection and ServiceINFOID:0000000005930898
Make sure the mounting conditions (looseness, back lash) of each component and component conditions
(wear, damage) are normal.
INSPECTION OF LOWER BALL JOINT END PLAY
1. Set front wheels in a straight-ahead position. Do not depress brake pedal.
2. Place an iron bar or similar tool between transverse link and steering knuckle.
3. Measure axial end play by prying it up and down.
CAUTION:
Be careful not to damage ball joint boot. Do not damage the installation position by applying
excessive force.
STRUT INSPECTION
Check for oil leakage, damage and replace as necessary.
Wheel Alignment InspectionINFOID:0000000005930899
PRELIMINARY INSPECTION
WARNING:
Always adjust the alignment with the vehicle on a flat surface.
NOTE:
If alignment is out of specification, inspect and replace any damaged or worn rear suspension parts before
making any adjustments.
1. Check and adjust the wheel alignment with the vehicle under unladen conditions. “Unladen conditions”
means that the fuel, coolant, and lubricant are full; and that the spare tire, jack, hand tools and mats are in
their designated positions.
2. Check the tires for incorrect air pressure and excessive wear.
3. Check the wheels for run out and damage. Refer to WT-6, "
Inspection".
4. Check the wheel bearing axial end play. Refer to FAX-6, "
On-Vehicle Inspection and Service".
5. Check the shock absorbers for leaks or damage.
6. Check each mounting point of the suspension components for any excessive looseness or damage.
7. Check each link, arm, and the suspension member for any damage.
8. Check the vehicle height. Refer to FSU-19, "
Wheelarch Height (Unladen*)".
GENERAL INFORMATION AND RECOMMENDATIONS
1. A Four-Wheel Thrust Alignment should be performed.
• This type of alignment is re commended for any NISSAN vehicle.
• The four-wheel “thrust” process helps ensure that the vehicle is properly aligned and the steering wheel
is centered.
• The alignment machine itself should be ca pable of accepting any NISSAN vehicle.
• The alignment machine should be checked to ensure that it is level.
2. Make sure the alignment machine is properly calibrated. • Your alignment machine should be regularly calibrated in order to give correct information.
• Check with the manufacturer of your specific a lignment machine for their recommended Service/Cali-
bration Schedule.
THE ALIGNMENT PROCESS
IMPORTANT: Use only the alignment specifications listed in this Service Manual. Refer to FSU-17, "Wheel
Alignment (Unladen*)".
1. When displaying the alignment settings, many alignm ent machines use “indicators”: (Green/red, plus or
minus, Go/No Go). Do NOT use these indicators.
• The alignment specifications programmed into your alignment machine that operate these indicators may not be correct.Axial end play : 0 mm (0 in)
Revision: May 2010
2011 Versa
Page 2693 of 3787

FSU-8
< SERVICE INFORMATION >
FRONT SUSPENSION ASSEMBLY
• This may result in an ERROR.
2. Some newer alignment machines are equipped with an optional “Rolling Compensation” method to “com- pensate” the sensors (alignment targets or head units). Do NOT use this “Rolling Compensation”
method.
• Use the “Jacking Compensation” method. After inst alling the alignment targets or head units, raise the
vehicle and rotate the wheels 1/2 turn both ways.
• See Instructions in the alignment machine you are using for more information.
CAMBER, CASTER AND KINGPIN INCLINATION ANGLES INSPECTION
• Camber, caster, kingpin inclination angles cannot be adjusted.
• Before inspection, mount front wheels onto turning radius gauge. Mount rear wheels onto a stand that has
same height so vehicle will remain horizontal.
Using a CCK Gauge
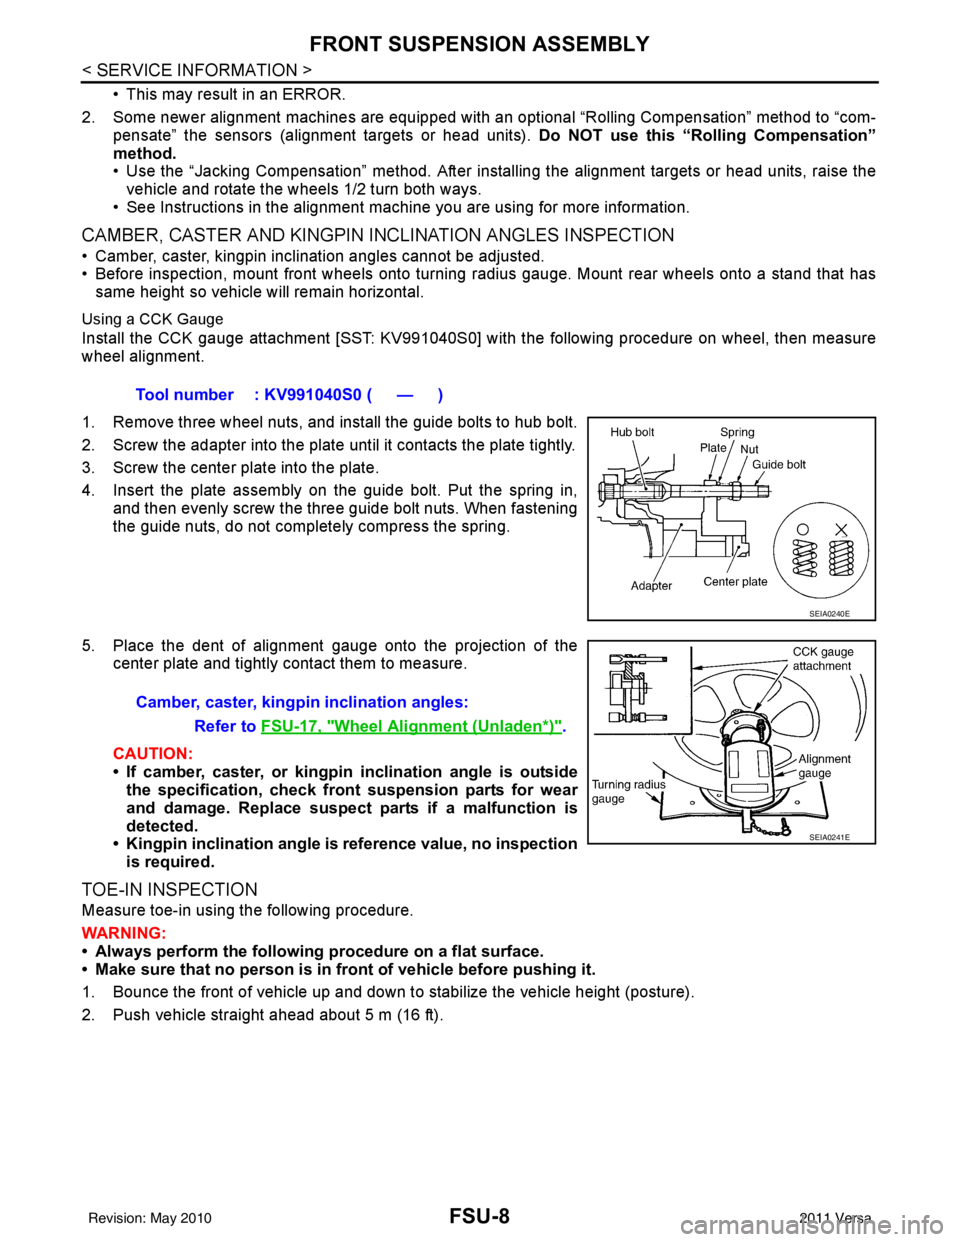
Install the CCK gauge attachment [SST: KV991040S0] with the following procedure on wheel, then measure
wheel alignment.
1. Remove three wheel nuts, and install the guide bolts to hub bolt.
2. Screw the adapter into the plate unt il it contacts the plate tightly.
3. Screw the center plate into the plate.
4. Insert the plate assembly on the guide bolt. Put the spring in, and then evenly screw the three guide bolt nuts. When fastening
the guide nuts, do not completely compress the spring.
5. Place the dent of alignment gauge onto the projection of the center plate and tightly contact them to measure.
CAUTION:
• If camber, caster, or kingpin inclination angle is outside
the specification, check front suspension parts for wear
and damage. Replace suspect parts if a malfunction is
detected.
• Kingpin inclination angle is reference value, no inspection
is required.
TOE-IN INSPECTION
Measure toe-in using the following procedure.
WARNING:
• Always perform the following procedure on a flat surface.
• Make sure that no person is in fr ont of vehicle before pushing it.
1. Bounce the front of vehicle up and down to stabilize the vehicle height (posture).
2. Push vehicle straight ahead about 5 m (16 ft). Tool number : KV991040S0 ( — )
SEIA0240E
Camber, caster, kingpi
n inclination angles:
Refer to FSU-17, "
Wheel Alignment (Unladen*)".
SEIA0241E
Revision: May 2010 2011 Versa
Page 2694 of 3787

FRONT SUSPENSION ASSEMBLYFSU-9
< SERVICE INFORMATION >
C
DF
G H
I
J
K L
M A
B
FSU
N
O P
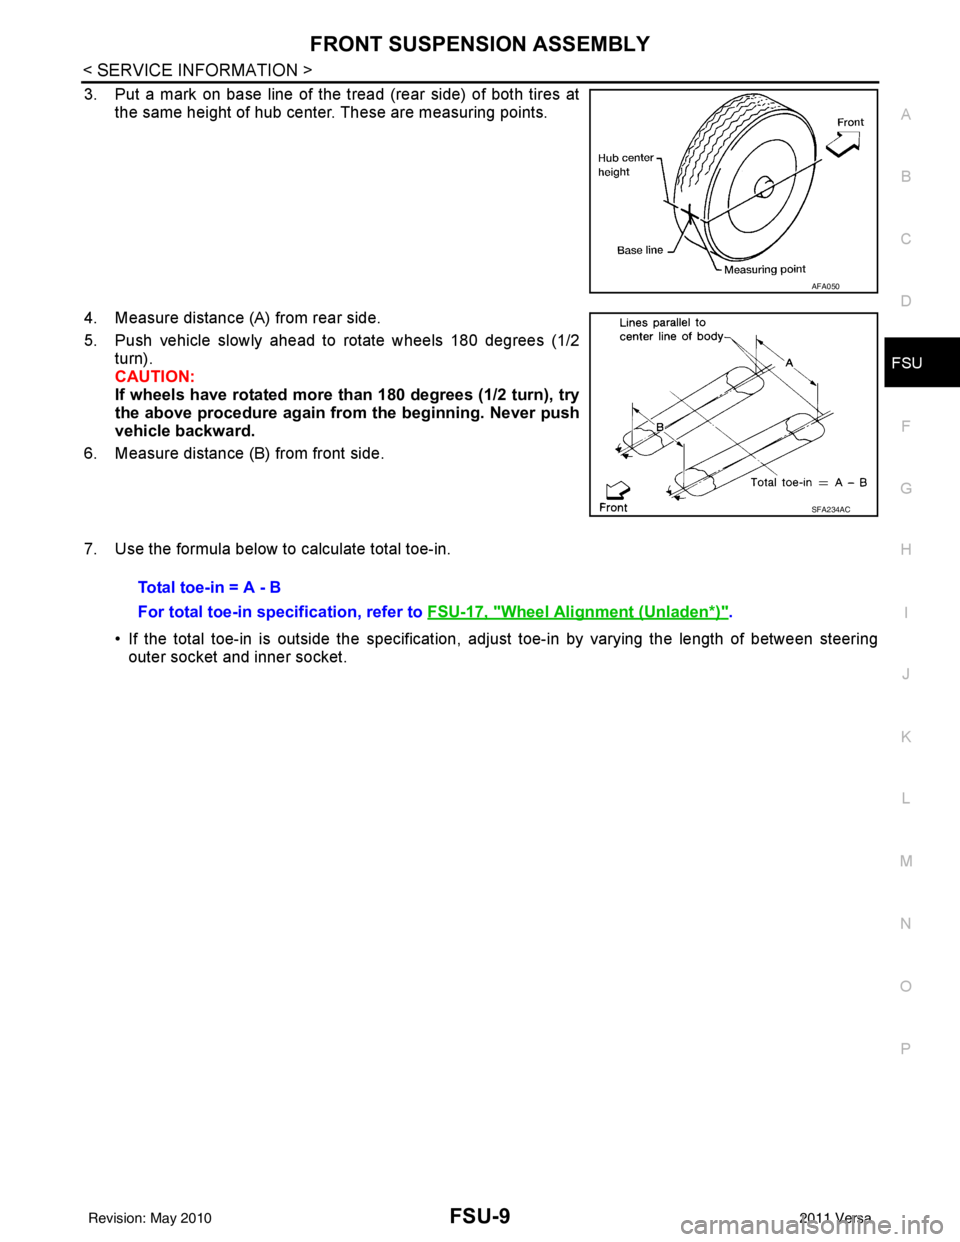
3. Put a mark on base line of the tread (rear side) of both tires at the same height of hub center. These are measuring points.
4. Measure distance (A) from rear side.
5. Push vehicle slowly ahead to rotate wheels 180 degrees (1/2 turn).
CAUTION:
If wheels have rotated more than 180 degrees (1/2 turn), try
the above procedure again from the beginning. Never push
vehicle backward.
6. Measure distance (B) from front side.
7. Use the formula below to calculate total toe-in.
• If the total toe-in is outside the specification, adjust toe-in by varying the length of between steeringouter socket and inner socket.
AFA050
SFA234AC
Total toe-in = A - B
For total toe-in specification, refer to FSU-17, "
Wheel Alignment (Unladen*)".
Revision: May 2010 2011 Versa
Page 2704 of 3787

SERVICE DATA AND SPECIFICATIONS (SDS)FSU-19
< SERVICE INFORMATION >
C
DF
G H
I
J
K L
M A
B
FSU
N
O P
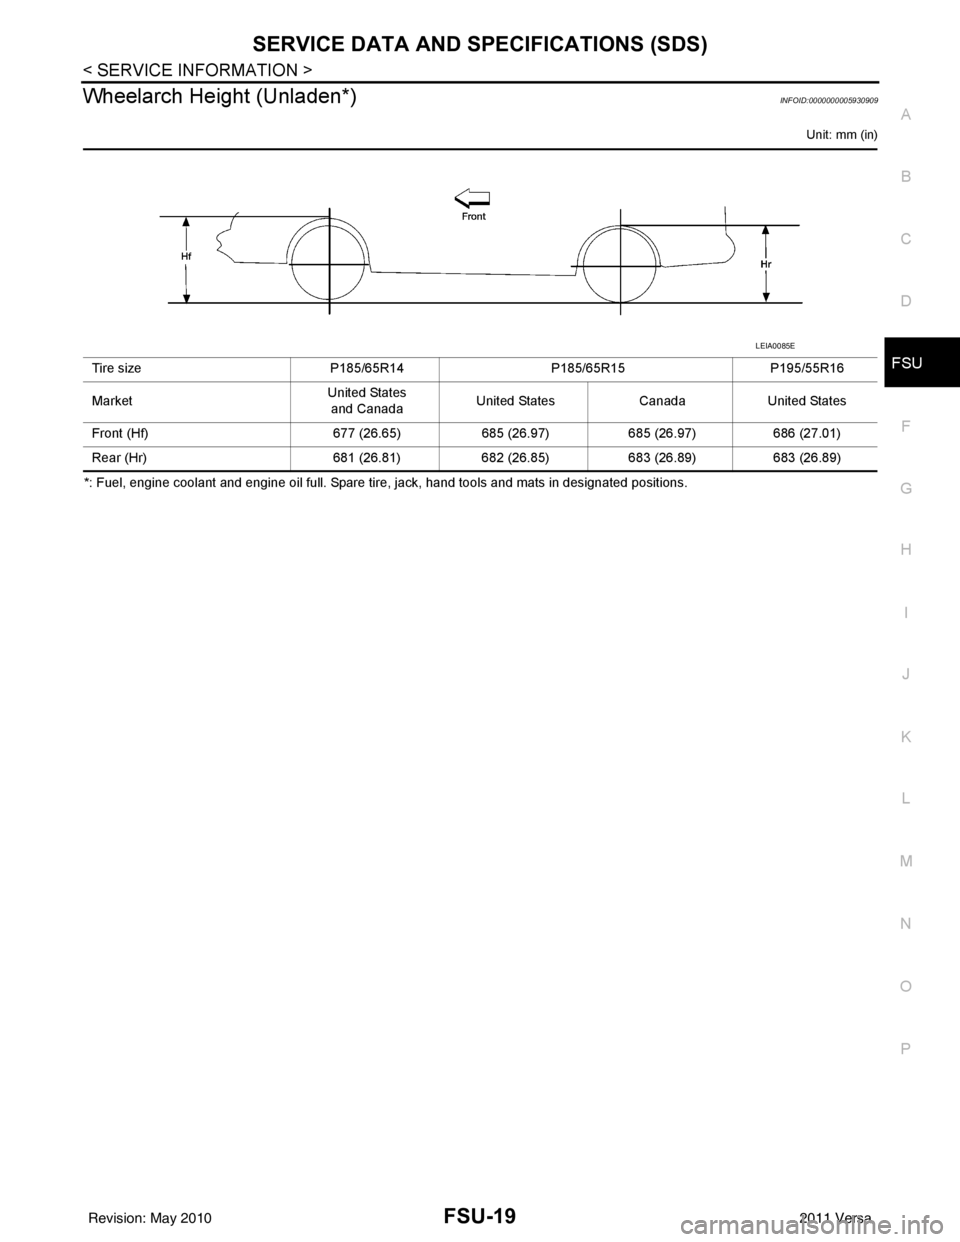
Wheelarch Height (Unladen*)INFOID:0000000005930909
Unit: mm (in)
*: Fuel, engine coolant and engine oil full. Spare tire, jack, hand tools and mats in designated positions. Tire size
P185/65R14P185/65R15P195/55R16
Market United States
and Canada United States
CanadaUnited States
Front (Hf) 677 (26.65)685 (26.97)685 (26.97)686 (27.01)
Rear (Hr) 681 (26.81)682 (26.85)683 (26.89)683 (26.89)
LEIA0085E
Revision: May 2010 2011 Versa